Copyright © 2023 Balmoral Software (http://www.balmoralsoftware.com). Portions copyright © 2013 Kheops Studio. All rights reserved. Republication, redistribution or conversion is expressly prohibited without the prior written consent of Balmoral Software.
A new feature in Chapter 3 of the game is the [PgUp] key for brightening the screen up to 4 times, useful in dark places for HOGs and other visual puzzles. The game's Play Mode is set to Adventure. Some of the directions in this walkthrough assume the 360° Free View setting is off. All mini-games and puzzles are played in Normal mode.
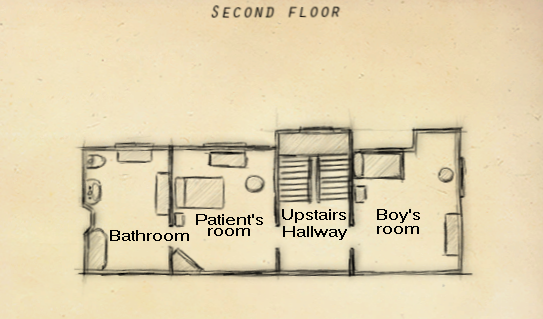
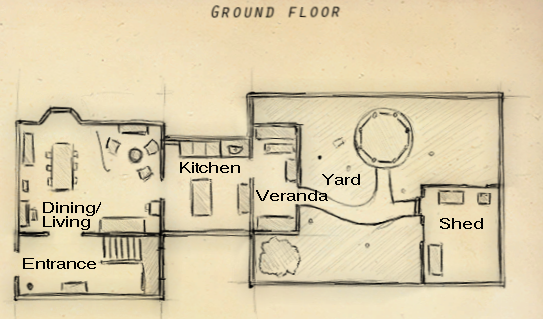
After the skippable game interface recap, you're starting in the Entrance of a Victorian-era house. Zoom in on the table to discover that the year is 1888. In a letter from a French woman named Elisabeth, she is seeking medical help from a doctor for her unconscious husband. Back out and pick up the Doctor's bag from the chair. Head upstairs and enter the open doorway at left into the Patient's room. Playing a doctor, pick up an Inkpot, Forms and a Quill from your bag:
A diagnostic checklist is displayed: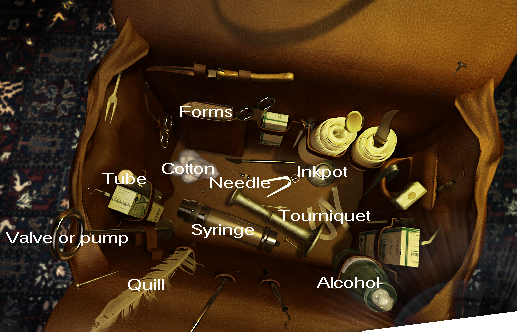
Enter the Bathroom at rear and solve the HOG for 25 bars of soap: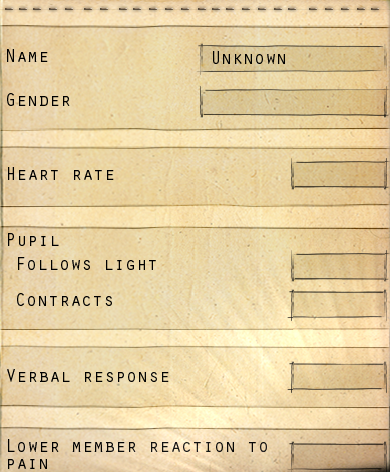
Move the Savon de Marseille soap from your inventory to the sink to wash up. Back out to return to the patient and specify his gender as Male. Open the drawer in the nightstand.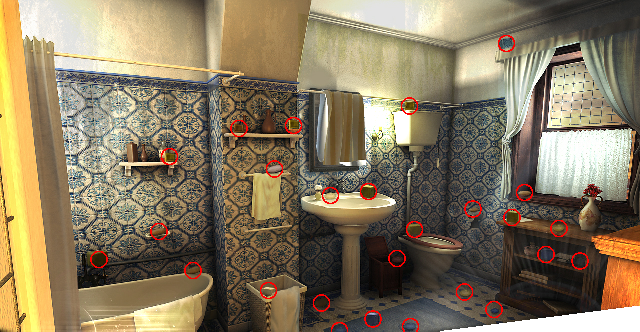
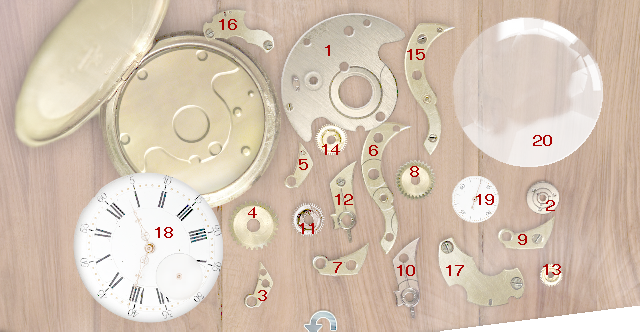
Click on the patient's arm and get ready to count some visual events. Click on his wrist on a slightly darker area:
Piece Destination in case 1 Centered 2 Center opening 3 Over two bumps at upper right 4 Over end of Piece 3 5 On top of Pieces 3 & 4 6 Centered vertically against top edge 7 Over hole and bump straight right from Piece 6 8 Over left hole in Piece 7 9 Over Pieces 7 & 8 10 Over hole midway between left edge and center of case, with its curved edge aligned with case 11 Over lower hole of Piece 10 12 Over Pieces 10 & 11 13 Over central hole in case 14 Over circular arcs on Piece 6 15 Over Pieces 6, 13 & 14 16 Over Pieces 15 & 5 17 Over two open holes and below central hole 18 Over whole case 19 Over lower portion of watch face 20 Over whole case
and count the number of beat sounds (usually 9) during the 15-second timer, then multiply by 4 to get 36 beats per minute.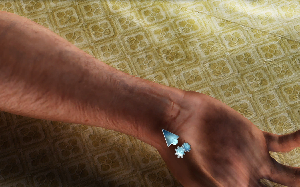
Zoom in on the patient and pick up the Empty candleholder from the nightstand. Solve the HOG for 20 candles:
Light the Burnt-out candle in the fireplace. Zoom in on the patient again and put the Lit candle onto his head. Drag the candle around until the pupil contracts. Exit the closeup and answer some questions: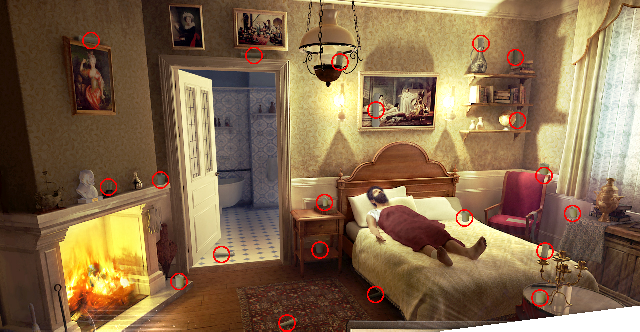
Does the eye follow the light? NoClick on the patient's head and talk to him:
Does the pupil contract in the light? Yes
Verbal response? NoSolve the HOG for 20 pointed objects:
Click on the patient's leg and use the Pointed object on the sole of his foot: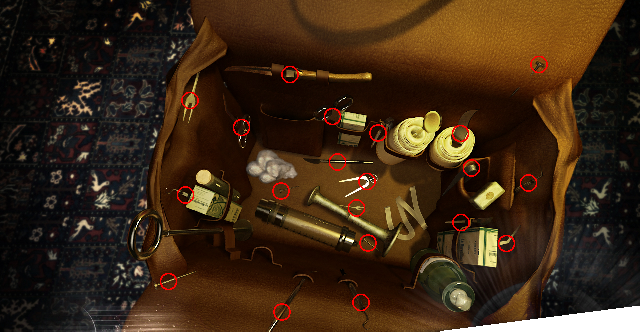
Reaction to pain? YesBack out from the Patient's room and return downstairs to the Entrance. Open the curtain at left to enter the Dining/Living room. Set 360° Free View to No in the game menu, if necessary. Solve the HOG for 15 pieces of wood:
Viewpoint Wood location Kitchen doorway Midway up left doorway frame Bookcase ** On shelf at left Lower right of stained-glass windows Piano ** Base of curtain at left Top of piano On chair in foreground On chair at left On top of blue/white jug in background Dining table * In back corner of room to left of windows Fireplace * On top of dining table at left Underneath chair at left In window at upper left In window at lower right On left leather chair Above fireplace *: Reach this viewpoint by rotating right once from the preceding viewpoint
**: Reach this viewpoint by rotating right twice from the preceding viewpoint
Return to the Patient's room and put the Pieces of wood into the fireplace. Pick up 7 items from the doctor's bag in the requested order:
Go back to the Dining/Living room and enter the Kitchen beyond. Solve the HOG for 20 deep containers:
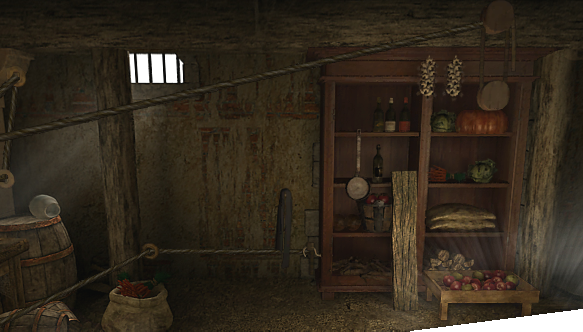
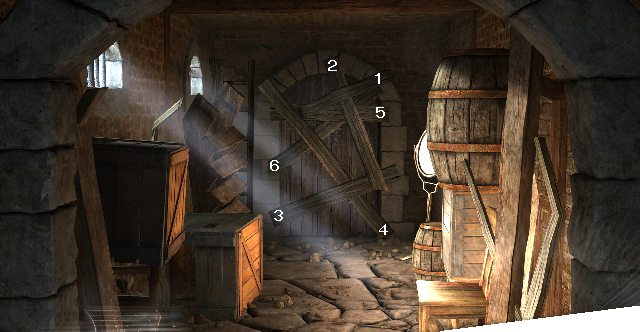
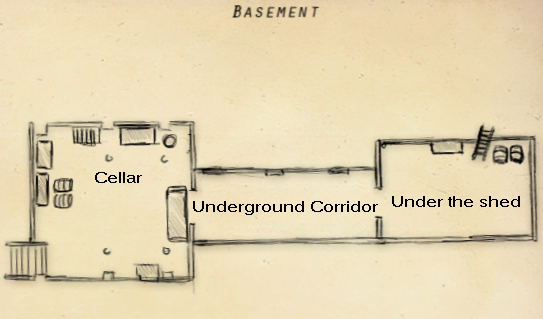
Put the Pot into the sink for a second, then put the Pot of water onto the stove. Click on the open cavity in the stove immediately below the pot. Return to the Entrance and open the downstairs door. Drag the door catch all the way to the left to enter the Cellar. Solve the HOG for 20 briquettes of charcoal. Each viewpoint is reached by rotating right once from the previous viewpoint: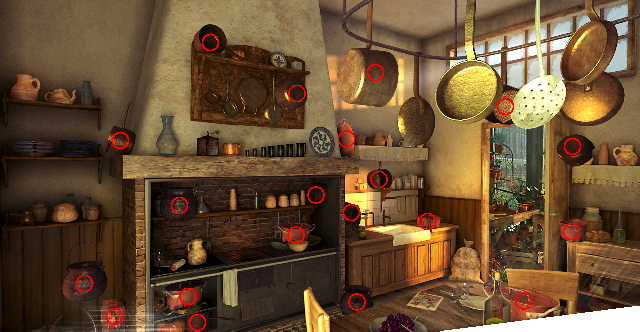
You're now locked in the cellar!
Viewpoint Briquette location Swinging pulleys at right Lower left of shelving unit Lower right of O-bolt on post Swinging pulleys left of center Next to 3 stacked bags at center Two windows On top of planks of wood against wall On top of barrel in foreground Stairway at center Base of stairs in sunlight Halfway up stairs On barrel to the lower right of stairs To lower left of a basket of apples, almost off the screen 3 stacked barrels Front of top barrel Lower right corner of shelves On top of biggest stack of bottles on shelves Front corner of wooden table On rusty container at far right Rack of pots at right Lower shelf of wooden table Next to basket in front of table On top of pot rack on wall Rack of pots at left Right side of woodpile Between pots at upper right corner of screen 5 eyebolts Lower left side of table
Rotate the viewpoint until the swinging pulleys are at right. Click on the moving towel on the wall, then on the shelving unit. Click on the pulleys at upper right. Rotate left once, then click the rope end on the eyebolts in the following order:
Rotate right once, then click the rope end on the hook attached to the shelving unit. Use the hoist/pulleys at upper right. Empty the shelves by moving its objects to elsewhere in the cellar. Select an item from the shelves, then rotate in the direction given below (while holding the object) and put the item with similar ones at the indicated location. After each transfer, return to a base position facing the shelves head-on and select the next item:
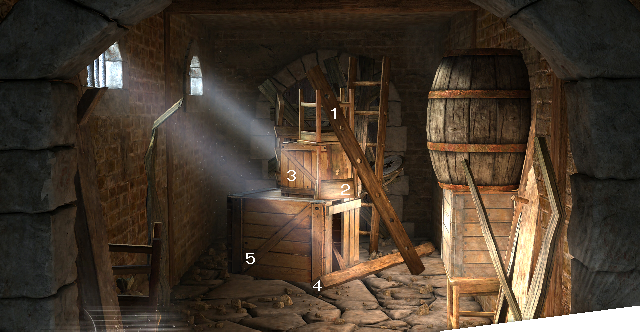
From the base position, use the hoist at upper right and enter the unexplored Underground corridor. Remove the obstacles in order:
Shelf Item Rotations Move to Top 2 strings of garlic Right 1 Top of post at upper right corner 3 wine bottles Left 4 Arched shelves Cauliflower Right 1 Basket straight below window Pumpkin Left 2 Pumpkins behind post 2nd from top Carrots (none) Bag at base of left post Frying pan Left 2 Pot rack on wall 3rd from top Cast iron balls Right 1 To lower left of basket of cauliflowers Basket of apples Right 3 Baskets of apples at bottom of monitor screen Wooden board Right 2 Planks against wall Cloth bags Right 1 Stacked bags at center Bottom Small piece of wood Left 3 Basket in front of table Firewood Left 2 Woodpile Crate of apples Right 2 Base of post
Open the door to the area Under the shed. Click on the trapdoor in the ceiling. Clicking on any one of the 8 deadbolts changes the open/closed state of itself and exactly 2 other deadbolts, so simply clicking once on each deadbolt (whether open or closed) will open all of them. Zoom in on the control panel at center. The shortest solution to extinguish the gas fire is:
12 obstacles: 5 obstacles: 5 obstacles: 6 obstacles:
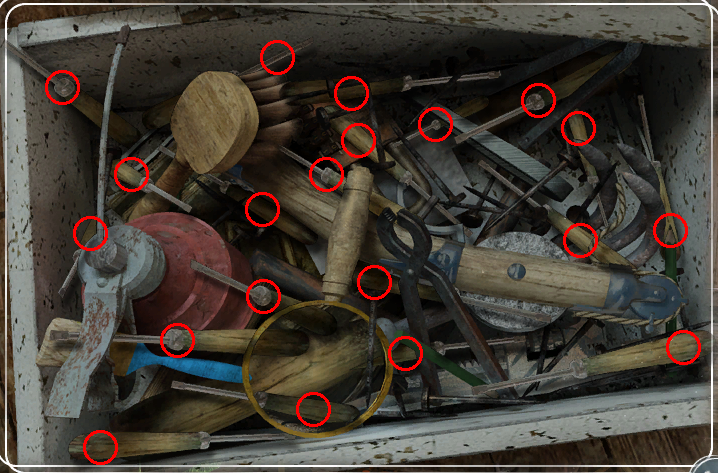
Rotate B onceExit through the trapdoor in the ceiling into the Shed. Click on the door at left, then click on the box of tools at lower left. Solve the HOG for 20 yellow-handled screwdrivers:
Rotate C three times
Rotate D once
Rotate E twice
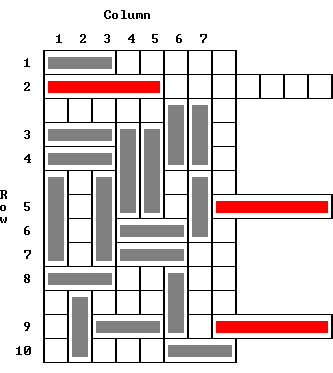
Exit the shed and proceed through the Yard and Veranda into the Kitchen. Put the Charcoal briquettes into the stove and the Blood test samples into the pot on the stove. Click on the magazine on the table to identify 10 differences between two pictures of the entrance to the temple in Chapter 1: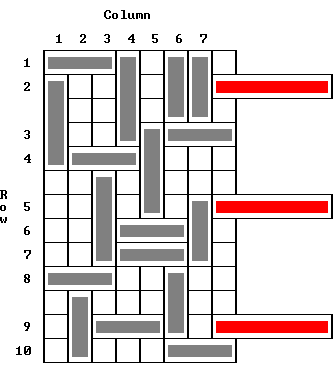
1. Column 7Bottom up
2. Row 6 right
3. Column 1 down
4. Row 4 left
5. Column 4 down
6. Column 5 down
7. Row 3 left
8. Column 4 up one square
9. Column 5 up one square
10. Row 6 left
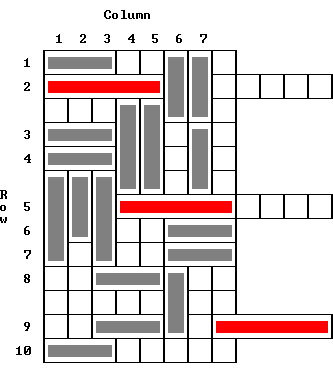
11. Column 7Bottom down one square
12. Column 6Top down two squares
13. Column 7Top down
14. Row 2 (top deadbolt) left
15. Column 4 up
16. Column 5 up
17. Column 6Top up
18. Column 7Top up
19. Column 7Bottom up
20. Row 5 (middle deadbolt) left
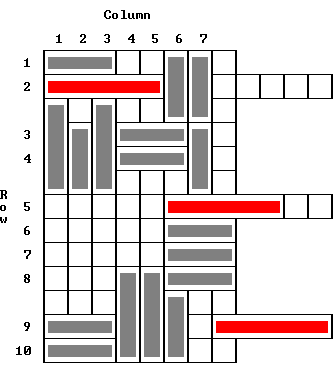
21. Row 8 right
22. Column 2 up
23. Row 10 left
24. Row 6 right
25. Row 7 right
26. Row 5 (middle deadbolt) right two squares
27. Column 6Bottom down
28. Row 8 right
29. Row 9Left left
30. Column 4 down
31. Column 5 down
32. Row 3 right
33. Row 4 right
34. Column 1 up
35. Column 2 up two squares
36. Column 3 up
37. Column 4 up
38. Column 5 up
39. Row 8 left
40. Column 4 down
41. Column 5 down
42. Row 6 left
43. Row 7 left
44. Column 4 up two squares
45. Column 5 up two squares
46. Column 6Bottom up two squares
47. Row 5 (middle deadbolt) left two squares
48. Row 9Right (bottom deadbolt) left
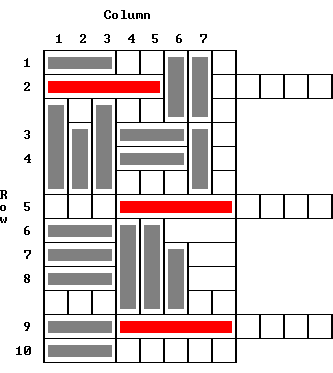
Shorter solutions may be possible.
Pick up the pot from the stove and put it into the sink to obtain the Sterile blood test supplies. Return to the patient's room and zoom in on his arm. Move the Tourniquet from the tray to the patient's upper arm. Put the Cotton on the green bottle and then on the inside of the patient's arm. Move the point of the Syringe to the clean spot on the lower arm. Click on the body of the syringe and drag it to the left. Click on the circular end of the syringe and drag it to the right. Click again on the syringe to obtain a Blood sample.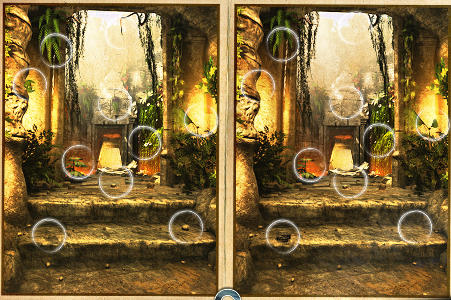
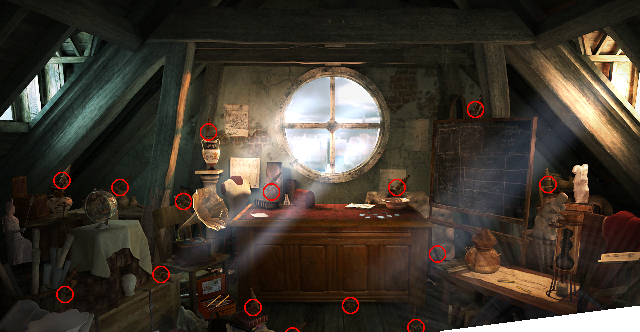
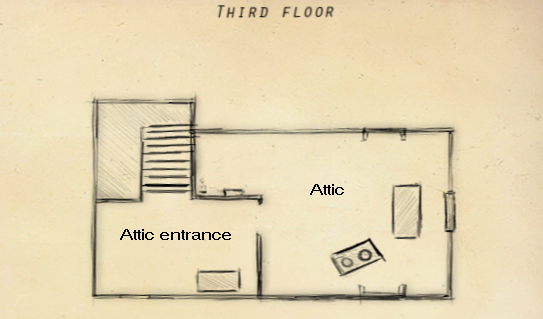
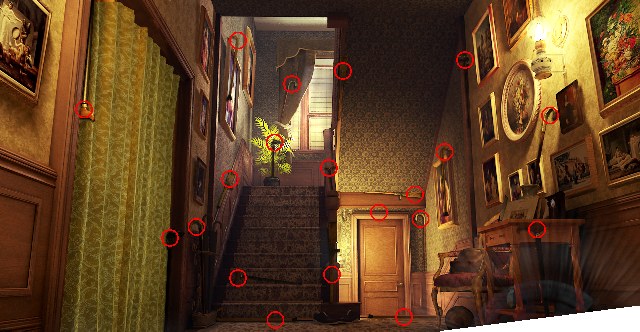
Back out of the room and go upstairs to the Attic entrance. Zoom in on the door to discover you'll need some keys to open it. Exit the closeup and return to the house Entrance. Solve the HOG for 20 keys:
Don't forget the key inside the drawer of the table.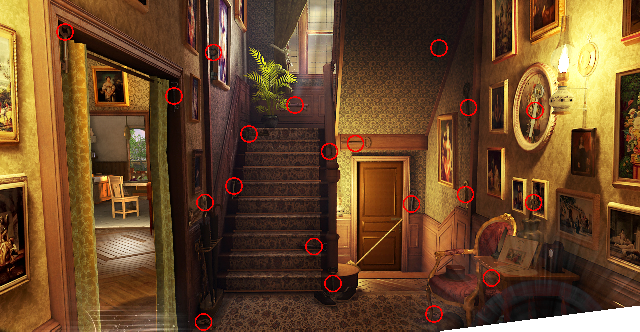
Return to the Attic entrance and zoom in on the door. Pick the key with the zodiac symbol matching the triplicity of the corresponding door lock:
The bottom key is not used. Solve the HOG for 15 microscopes:
Triplicity Key Lock Fire Aries Leo Air Aquarius Gemini Earth Taurus Capricorn
Move the Blood sample to the microscope. Move the viewpoint around and click on the red and white cells until 30 are found. Return to the Dining/Living room. Rotate right and open the stained-glass doors in the bookcase.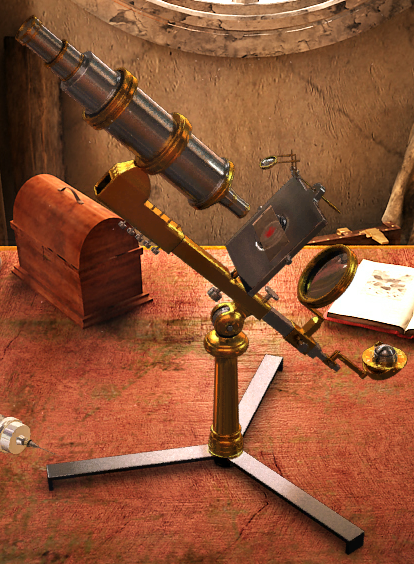
to produce the solution:
A-1 & F-2 F-2 & N N & K K & J J & T T & A-2 A-2 & X X & B B & C C & F-1 F-1 & O O & Y Y & P D & Z Z & M M & S S & U U & W E & V V & L L & R G & H I & Q
Read Volume C of the encyclopedia to identify ingredients for curing coma: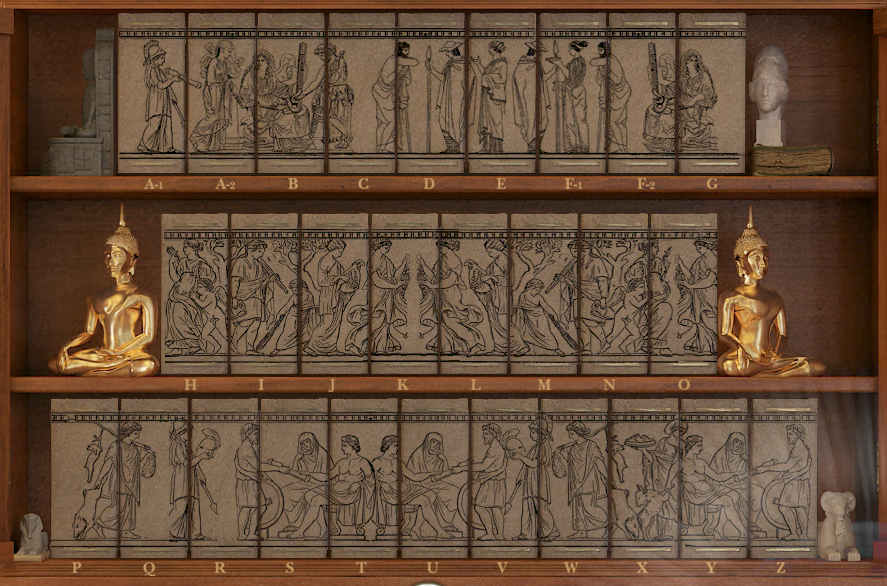
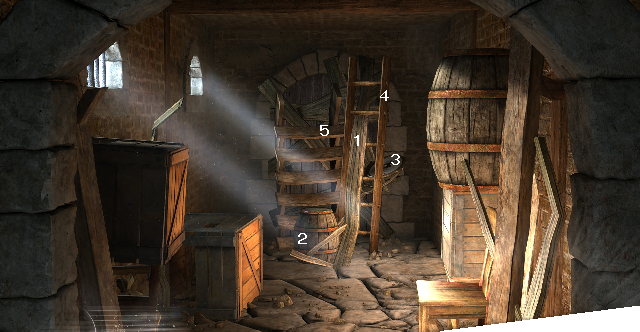
Return to the Entrance and remove the broom that's blocking the Cellar door. Again drag its deadbolt to the left to enter the Cellar. Solve the HOG for 15 saltpeter samples. Slowly scan the walls in this room, watching the glowing cursor for a shrinking diameter and green-colored sparkles. Each viewpoint is reached by rotating right once from the previous viewpoint: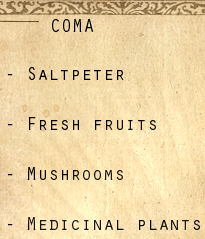
Return to the Yard and solve the HOG for 20 fruits:
Viewpoint Location of sample Empty shelves at center Just below window Apple create at right Lower left side of roof support pole Above left corner of apple crate 2 windows Directly above grayish plank against the wall Upper right corner of right-hand window Stairs at center Bottom of brick wall just past the bottom of the stairs Immediately above left basket of apples 3 stacked barrels Upper left corner of arched shelves Top of right edge of shelves Rack of pots at right Midway up stone support column at center Right of wooden table Just below third pot from the right Rack of pots at left Immediately above pumpkins Network of ropes Behind knocked-over vase on lower shelf Behind black flagon at right side of lower shelf
Viewpoint Location Entrance to Veranda at center Tomatoes to the left of path Entrance to Veranda at left * 6 lemons from tree Cherries at upper right corner Gazebo at center ** Cherries at top of left gazebo column Cherries directly above center chair in gazebo 3 oranges from tree at right Tomatoes from bush at right Corner of shed & brick wall ** 3 oranges from tree at right Left corner of Veranda at right ** 3 bunches of grapes on the wall vines *: Reach this viewpoint by rotating right once from the preceding viewpoint
**: Reach this viewpoint by rotating right twice from the preceding viewpoint
From the last viewpoint above, zoom in on the base of the twisted tree trunk. Remove 15 matching pairs of mushrooms:
Note: Exiting the game before backing out from the tree may not allow you to continue after restarting the game (backout arrow missing).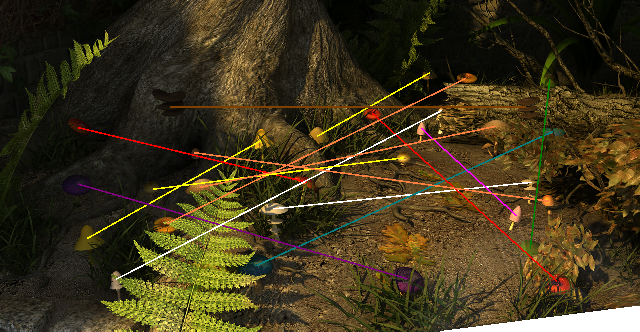
Back out and re-enter the Veranda at right. The shed door has magically closed. Enter the Shed and solve the HOG for 15 gardening tools:
Enter the Veranda and solve the HOG for each of 10 plant silhouettes: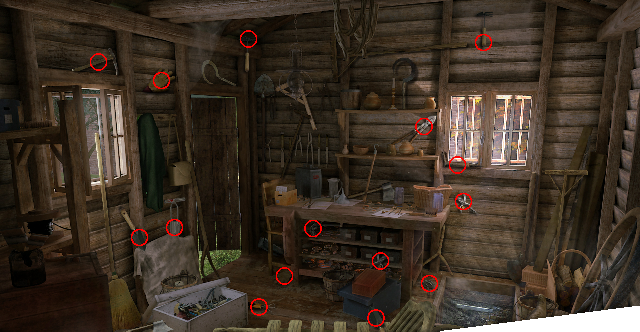
(The label for Plant #2 is shown in blue above.)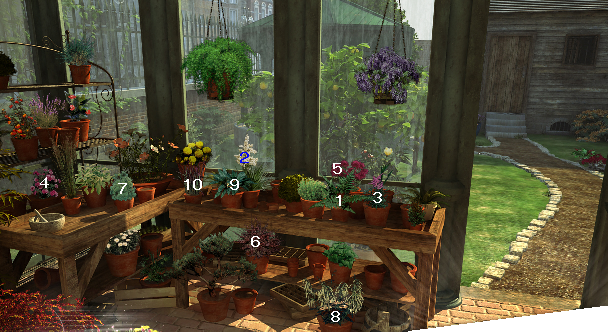
Put the Saltpeter, Fresh fruits, Mushrooms and Medicinal plants on the box of bottles at right. Click on 8 triplets of bottles according to the mixture list at right:
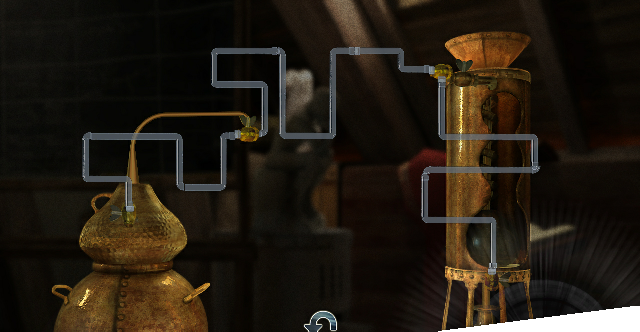
Pick up the Pestle and drag it over the mixture until done. Pick up the Mixture to be distilled and return to the Attic. Click on the table at right, then on the desk. Solve the still jigsaw: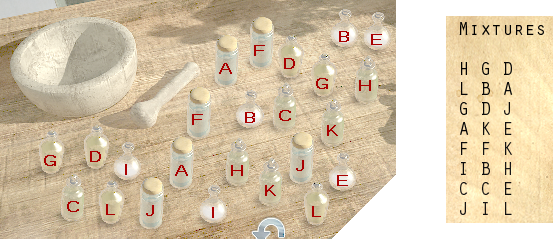
Put the Photographic plate onto the window, then exit from the photo. Click on the toy box near the left front corner of the desk.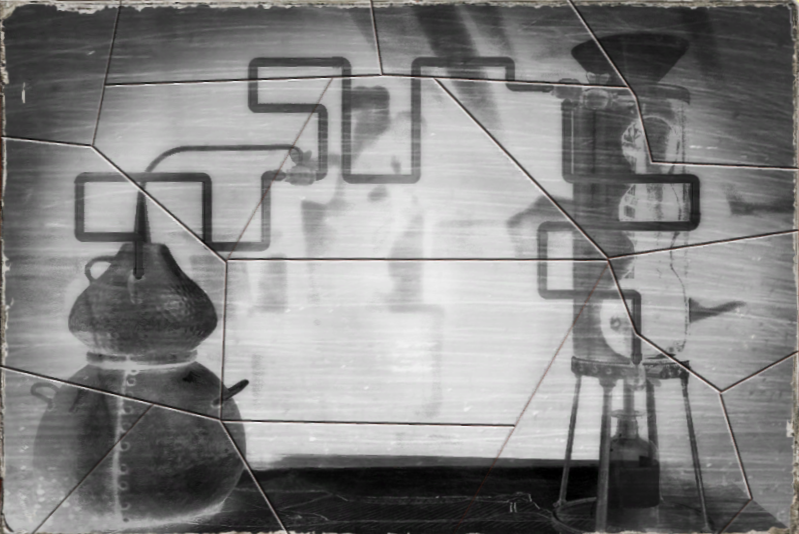
Enter the Boy's bedroom on the second floor and try to open the closet door. Put 16 toys away:
Open the closet door and solve the HOG for 20 tubes: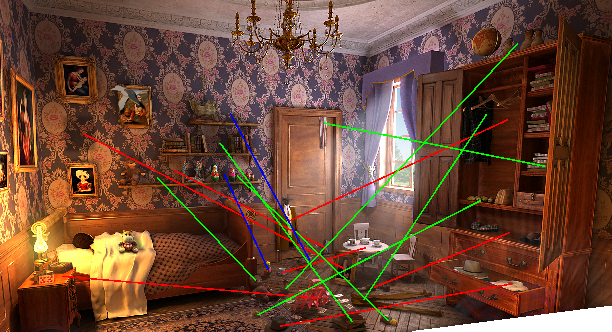
Return to the Attic. Move the Mixture and Tubes from inventory to the table at right. Solve the still assembly puzzle: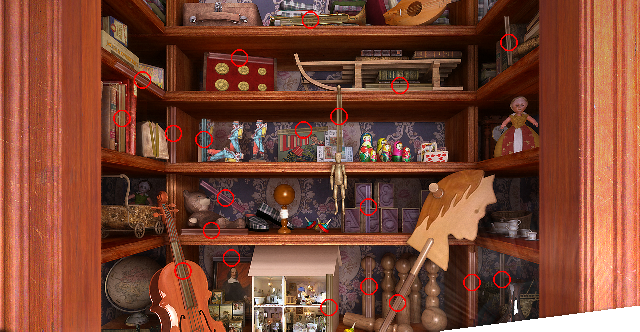
Return to the Kitchen and move the Still to the stove. Look at the magazine on the table to solve a puzzle for 10 differences: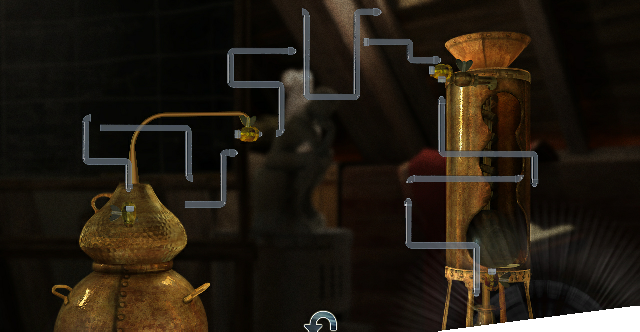
Pick up the X88 Remedy from the stove. Return to the Patient's room and put the Remedy on the patient's mouth. Enter the Bathroom and use the sink. Move the curtain over the sink and look in the mirror. Wipe back and forth to clean the mirror (small circular motions may work best):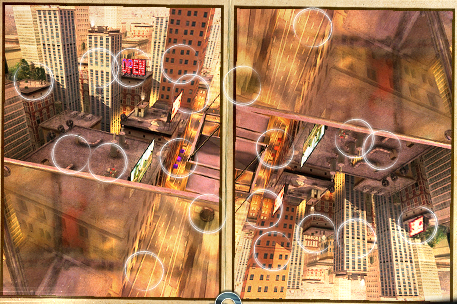
Watch the endgame sequence, tying together many of the recurring themes of the 3 chapters.
Copyright © 2023 Balmoral Software (http://www.balmoralsoftware.com). Portions copyright © 2013 Kheops Studio. All rights reserved. Republication, redistribution or conversion is expressly prohibited without the prior written consent of Balmoral Software.