Copyright © 2018 Balmoral Software (http://www.balmoralsoftware.com). Portions copyright © 2006 by Elecktro Games/Nobilis/Totem Studio/Kheops Studio/MZone Studio. All rights reserved. Republication, redistribution or conversion is expressly prohibited without the prior written consent of Balmoral Software.
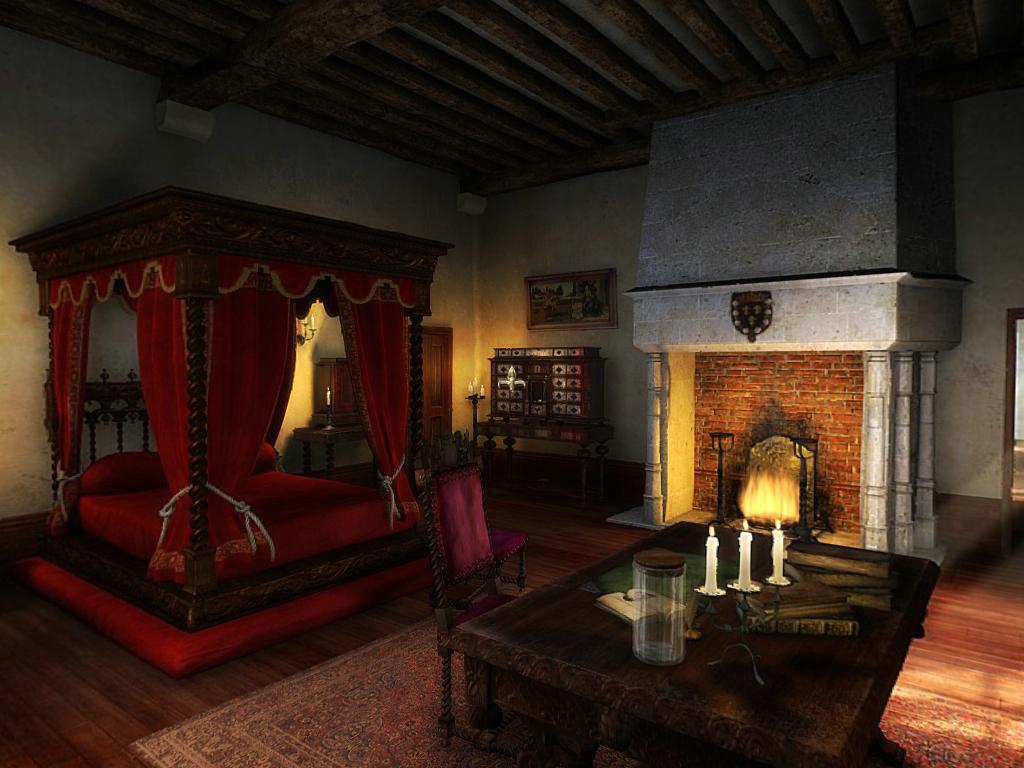
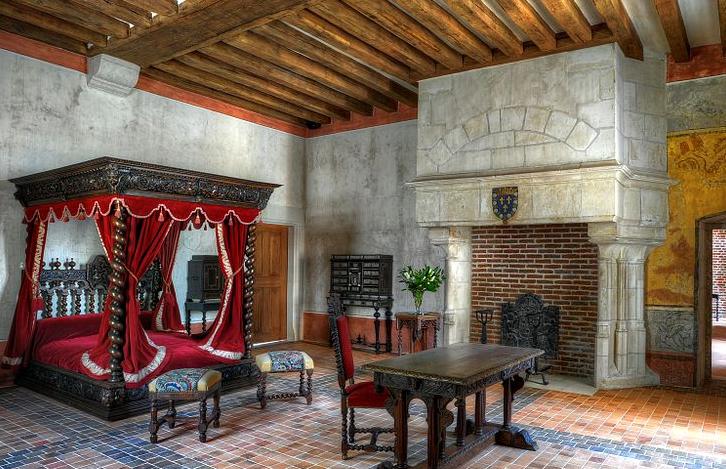
Graphics throughout the game are excellent, very detailed and realistic. A remarkably-accurate virtual creation of Chateau Cloux (pronounced "clue") has a variety of areas to explore. See the section below for a comparison of the simulated and present-day structure. Although there are only a few cyberpuppet characters in the game, they are well-executed and have excellent voice acting.
Gameplay covers a period of four days, and individual objectives throughout the game can be done in different orders, in different ways and at different times, in some cases extending over multiple days. For example, ingredients in a combination of inventory items may be substituted with other choices available in different areas or at different times in the game. There are a variety of side activities, but some are not essential to moving along the plot of the game. Although there is a great deal of non-linearity, there still are trigger events required to advance to the next chapter (day) in the story, and some of these can be obscure. A diary that contains lists of goals for each day may not be of much help since a frequent occurrence is that all current goals are completed but the game doesn't seem to progress. There is also a scoring feature with bonus points and a dashboard that's supposed to rate the good/evil characteristics of your character based on the choices he makes, but these devices didn't add much to the enjoyment of the game.
With this degree of non-linearity, there is no one "best" path through the game. The walkthrough below provides a short path through the essential parts of the game (possibly not the shortest), but excludes some of those optional side activities not essential to advance the gameplay. Gameplay possibilities are sensitive to the dialog choices made previously. There's no way to repeat dialog, so you must pay close attention or take screenshots if subtitles are turned on.
The inventory interface is accessed with a right-click of the mouse, and is relatively straightforward although the sheer number of items can be a bit cumbersome. There is generally no way to dump inventory items. Unfortunately, pickable inventory items cannot be identified with a mouseover prior to adding them to an already-cluttered inventory. In several cases, there are alternate locations of inventory items, and some inventory items can be replaced with a little effort by the player. Also, several inventory items can be replenished from their original locations, or multiple copies of an item taken at one time. A portfolio feature in the inventory interface allows examination of written materials gathered in the game, and many of its pages are interactive in some way. The portfolio allows the use of three specific tools after the corresponding item is added to the inventory.
The mouse cursor was very sluggish at the game Save/Load screens and main menu. You can hold down the up and down triangle icons to scroll through the list of saved games. If the keyboard arrow keys are used, saved-game screenshots are shown while moving through the list. We experienced system lock-ups if the game was left inactive at the Load Game screen.
But all in all, The Secrets of Da Vinci is a fun and immersive experience within a (mostly) historically-accurate environment with an intriguing gameplay and interesting characters.
New Game
{Cutscene}
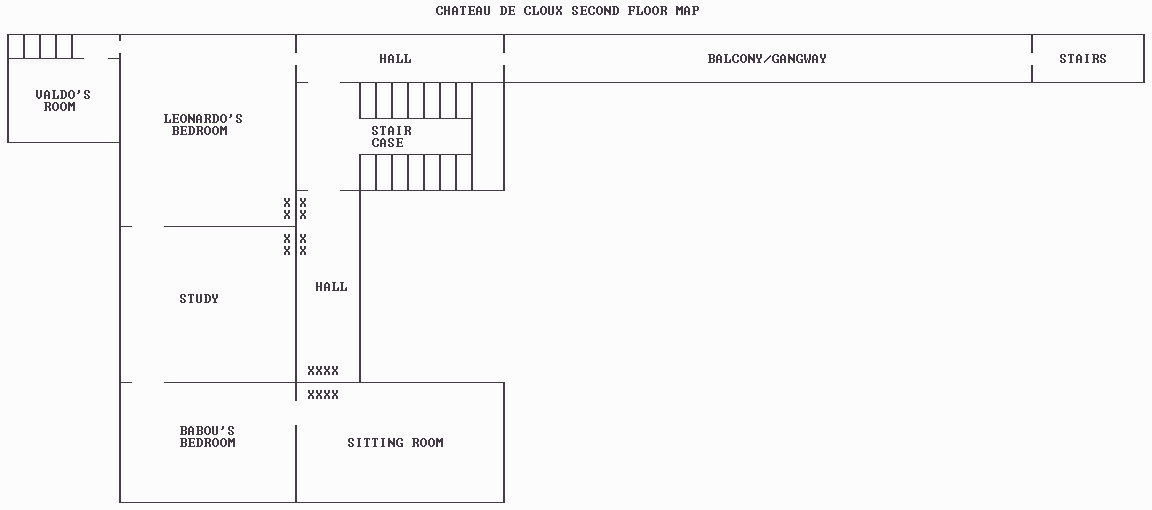
Valdo's Room
Open desk drawer
Take Knife & Charcoal crayon
Open lower drawer of chest
Take Brandy
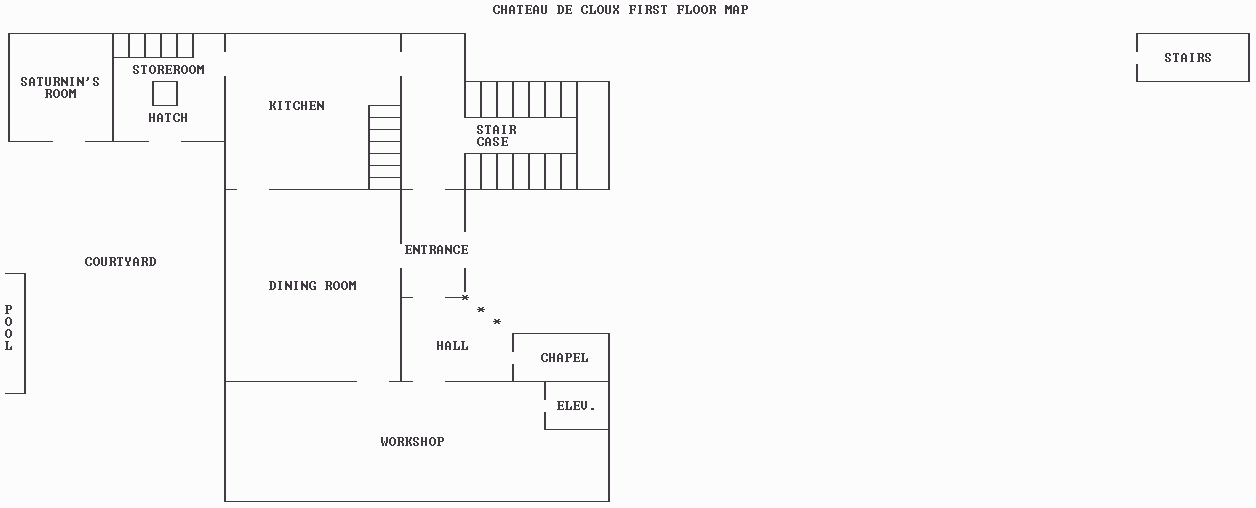
Kitchen
Take bottle of Oil next to lit candle
On the other side of the candle, take Egg
Dining Room
Take Bottle of water from the table
Workshop
Take stick
Put the stick onto the saw and operate the foot pedal to cut it in two
Take the two Small sticks from the saw
From the Workshop, make your way upstairs using the main staircase
At the top of the stairs, there's a dead-end hallway to the left, but nothing much happens there
Leonardo's Bedroom
Take Mirror from the decorative cabinet to the left of the fireplace
Take Sheet of paper with triangles on it from the nightstand and load it into the portfolio
In the portfolio, use the mirror to translate the writing under at least one of the triangle symbols
On the reverse side of that page, use the charcoal crayon to reveal two sections of embossed writing
Translate the result to identify the riddle "At the foot of the sacred fire of the house of dreams"
Go to the other side of the room and identify the Fire symbol at the top of the bed
Move carpet
Use Knife on floorboard
Take Sheet of paper & Key mould
When loaded into the portfolio and translated, the paper indicates that bronze is made from copper and tin
Examine the top of the John the Baptist painting to the right of the fireplace and get Key
Use Key to open door to Study
(An alternate way of entering the Study is through the door from Babou's Bedroom using a repaired ladder in the courtyard)
Study
Examine Leonardo's self-portrait by the left-hand window
Take the Sheet of paper and load it into the portfolio
Solve the gears puzzle by correctly placing large and small gears:
Operate the clock by clicking on the lower left gear
{Cutscene}
Take Ladder
Storeroom
Take 3 Charcoal
Take Split logs
Take Pliers
Go up ladder
Take Grains of wheat
Take Broom
Kitchen
Take Thyme
Take Lemon
Workshop
Saw Broom into Wooden shaft & Short broom
Take large Gear at the foot of the wooden printing press
From mantel, take Iron box, Lighter & large Drill bit
Use Pliers on paper above mantel to get Sheet of paper & Nail
Add Sheet of paper to portfolio
Solve the pump puzzle by correctly placing the movable parts:
Click on the complicated device in the box at center left, then click on the Archimedean screw at lower right to operate the fountain at the top(final positions shown)
{Cutscene}
Turn around and move toward the crooked door
Turn around and take the small star-shaped Gear on the floor
Make a note of the position (page, row, column) of any engraved plate(s) in your inventory since they are indistinguishable
Take the Engraved plate lying on top of the wooden box
This is the only engraved plate you must have in the game
Make a note of the position (page, row, column) of the workshop engraved plate just added to your inventory (the position of an inventory item generally doesn't change until the item is used)
Put the large Gear into the drill press
Attach the large Drill bit
Use the crank
Take the Perforated gear
Put the small Gear into the drill press
Use the crank
Take the Perforated gear
Take Crank
Attach the star-shaped small gear to the jack on top of the wooden box
Take Jack
Chapel
Click on the door to see that it is locked (required much later to advance in the game)
Bridge
Exit the house through the main entrance and make your way forward into the garden area, where you will encounter a large rotating bridge
Add Perforated gear to one of the windlasses
Take Iron bar
Use the other windlass
Cross bridge
Go past a beehive to a brick structure designed for housing birds
Dovecot
Take Copper object
Take Long rope
Go up ladder
Take Pewter dish
Return to the small footbridge just in front of the big rotating bridge
Place ladder across stream to mill
Cross over ladder -- oops!
Put Small stick on ladder
Put Small stick on ladder
Cross stream
Turn left
Cut weeds with Knife to get a Reed
Return outside the mill
Wear Reed (snorkel)
Dive into water near the waterwheel
Use Knife to free debris from waterwheel
Exit from underwater
Take Dead leaves
Mill
Take and wear Gloves
Put Copper object into crucible
Put Pewter dish into crucible
Put Dead leaves into fireplace
Put Split logs into fireplace
Ignite wood
Put crucible into fireplace
Cover and cook
Remove crucible from fireplace
Put Key mould on table
Pour crucible
Open mould and take Bronze key
(You could alternatively have purchased ready-made bronze from Saturnin, for a price)
Move lever at right to turn millstone above
Put Grains of wheat into funnel
Take Flour
Take Beekeeper's veil
Exit Mill and take Dead leaves
Beehive
Don Beekeeper's veil
Open lid of gray smoker at right
Insert Dead leaves
Ignite
Take Bee smoker
Use Bee smoker on beehive
Remove lid from beehive and set aside to the left
Take two Honeybee combs
Doff veil
Saturnin's Room
Take Fountain system
Click twice on bowl of (white) sugar on table
Give 2 gold coins to Saturnin
Take Sugar
Click on sheet of paper
Give 1 gold coin to Saturnin
Take Sheet of paper
Give 1 gold coin to Saturnin
Take Sheet of paper
Exit to courtyard
Put Fountain system into the pool
{Cutscene}
Study
Get an Engraved plate from Babou
Go to the work table in the corner
Take Empty phial of ink (dirty glass) & light-green Phial of sulphur from lower shelf
Take sheet of paper affixed to the wall behind the two phials you just took
Add sheet to portfolio and translate the text above the curved-hand sketch to identify the ingredients for black ink: Egg, Powdered charcoal & Water
Make Powdered charcoal in mortar and pestle
Add Charcoal powder, Egg & Bottle of water to yellow plate at right
Use Empty phial of ink on plate
Talk to Babou
Of course, I'm listening!Take Lyre
Identifying the strings from left to right as A B C D E, click on the strings
A B C, then D B B A{Cutscene}
Workshop
Slide out drawer underneath printing press
Open lid of drawer
Place the Engraved plate from the inventory position noted previously
Use Phial of ink on plate
Put Blank sheet of paper on inked plate
Close lid of drawer
Push drawer back under press
Click on press screw twice
Retrieve printed paper from drawer and load into portfolio
Translate to obtain fumagent (smoke bomb) recipe: heat Water, Sugar & Saltpetre
Many of the portfolio sheets are animated, and this one is no exception -- click on the 2 cannon at lower right of the left-hand page
Translate to obtain gunpowder ingredients: Saltpetre, Sulphur & Charcoal
Outside Storeroom
Talk to Saturnin
Madam de la Bourdaisiere has lost her voice, I wondered whether you knew of a good remedy?Obtain remedy ingredients: Honey, Thyme, Lemon & Water
Talk to Saturnin again
I found two frames in the beehive. Do you know how to extract the honey?Saturnin needs some time to prepare the honey, so visit the Dining Room or the front of the house and return to him to get Honey
Study
Take Monocle & Blood stone from drawer of desk in front of the fireplace
Take Empty bowl from the table near the sofa
Go to the workbench in the corner
Make remedy:
Open stove door
Insert Charcoal
Ignite
Close stove door
Remove Gooseneck
Add Honey, Thyme, Lemon & Water to copper pot
Use Empty bowl on copper pot
Give Bowl full of syrup to Babou
Get access to Babou's sitting room
Sitting Room
It's incongruous to have a telescope in this room since it wasn't invented until 1608, some 86 years later
Use telescope and learn about Salai
Open hatch in telescope
Use Knife on telescope, get Broken lens
Put Monocle into telescope
Zoom in on telescope eyepiece to see Saturnin hiding a boat
{Cutscene}
Kitchen
Move bags from trapdoor
Attach Long rope to pulley overhead
Attach Crank to wheel on wall
Use Crank to raise trapdoor
Take Crank
Ignite lamp on underside of trapdoor
Take lit lamp
Use Lamp
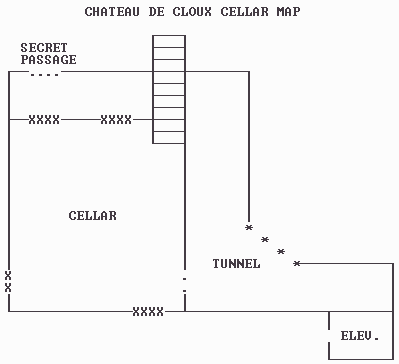
Descend steps into cellar
Cellar
Take Saltpetre from wall
Take Saltpetre from wall
Move forward, turn around and ignite candles overhead
Put Wooden shaft onto flying machine
At the other end of the cellar, look at dirty plate leaning against the table (not the barrels)
Put Flour onto dirty plate
A Blank sheet of paper in inventory is used
Leonardo's Bedroom
Solve Leonardo's cabinet puzzle:
Use Bronze key in keyhole of decorative cabinet
Note that each of 16 symbols is defined by the position of a white diamond in one of four positions. These diamonds are controlled by the buttons around the perimeter of the cabinet. The objective is to get all of the diamonds at the top, as shown by the 17th reference symbol below the keyhole:
To reset the puzzle, step away to another location in the room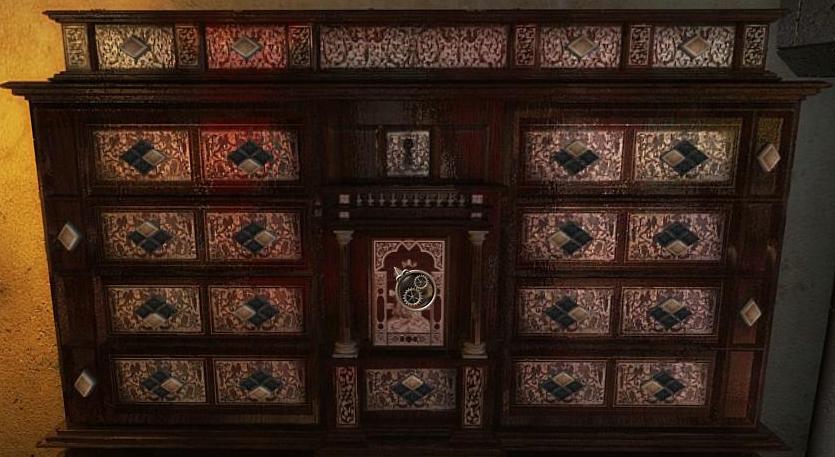
Using the following notation for the diamond-shaped buttons clockwise around the perimeter:
	  A B  C D
	.          E
	H          .
	.          F
	G          .
press the 10-move sequence
A A A B B D F F F Hin any order. This is the shortest solution to open the cabinet, and also the fewest different buttons to press (5).
Take the Roll of parchment. Nothing else is needed from the cabinet unless additional gold coins are required.
Take Bronze key
Load the Roll of parchment into the portfolio to disclose a map of the Chateau with four directional dials in the corners corresponding to the Sun, Star, Moon & Saturn symbols
Sitting Room
Put Oil on telescope
Rotate telescope using its arm
Look into telescope
Burn poster on the wall (click Lighter on woman's forehead)
Talk to Babou
You're right. Leonardo did use his telescope to look at the sky, but not necessarily the one we thought!Leonardo's Bedroom
Face the bookshelf in the corner
Spell out the name S A L A I by pressing:
S on Row 2, the 4th book from the leftIf this is done correctly, the books stay pushed back until the word is finished
A L on Row 3, the 5th and 3rd books from the right
A I on Row 1, the 7th and 4th books from the left
This opens a shortcut to the stairs outside Valdo's room
Outside Storeroom
Move forward to the pool
Use the Empty bottle of water on the pool to refill it
Turn around and approach Saturnin
Talk to Saturnin
Give Brandy to Saturnin
Your thoughts are running wild. I was just trying to be pleasant!Take 2 multicolored Lenses from closed cabinet in Saturnin's Room
Sitting Room
Put 2 Lenses onto telescope
Look through telescope 3 times after selecting unique pairs of unequal colors on the lenses
Study
Solve the globe puzzle:
Rotate blue globe to see lines of diamond shape under bands
Rotate band extending to lower left until 2 stars are precisely centered
Rotate band extending to lower right until 2 stars are precisely centered
Rotate horizontal band until globe opens up
Take Medallion
{Cutscene}
Outside Storeroom (via bookshelf)
Click on black cat
Sitting Room
Talk to Babou
Does Alkahest's name mean anything to you?Dovecot (via gangway)
Go up ladder
Put on Gloves if not already wearing them
Take Medallion from cat
Workshop
Use Jack at bottom of askew door
Attach Crank to jack
Use crank
Take Jack & Crank
Close door
Open metal cabinet
Solve the marble puzzle:
The goal of this puzzle is to alternately place 7 Red and 6 Yellow balls into the labeled receptacles at the bottom. It helps to make a note of each ball color that is deposited so that you can ensure they are alternating in color (the first ball is Red). The buttons in the centers of the circles control their rotation:
	Left circle:         Right circle:

	Clockwise            Counterclockwise
	Counterclockwise     Clockwise
The practical limit is 4 balls loaded onto the left circle at one time. The weight at upper right can be pulled to rotate the outer ring of balls and load them into the left circle if it has an opening. Step away to another location in the room to reset the puzzle to its starting configuration.
When the desired sequence R Y R Y R Y R Y R Y R Y R of 13 balls is correctly deposited into the receptacles at the bottom, a clicking sound is heard and the red and yellow bowls at the bottom rebalance. Pull the wooden lever at lower right to disclose an elevator.
Enter the elevator, turn around and use the lever to descend
{Cutscene}
Tunnel
Proceed forward through the tunnel until it ends and you can turn left
Use Short broom on floor patterns
Use incomplete Sheet of paper on floor patterns, then apply Charcoal crayon to it
Take Sheet of paper and add to portfolio
Proceed into the room
Turn right and use both Medallions on the corresponding places on the door plate
Use Lamp
Descend stone steps
Rotate slightly right to a dark oval with a jagged left edge, and move forward
Rotate left and pass through a framed opening in the metal bars
Rotate left and move into a dark tunnel that has no metal bars visible
Move forward towards a torch burning in the distance
An optional jewel can be found here
Turn left and enter the side chamber
Open the metal door hatch
It squeaks loudly after moving a little bit
Use Oil on the hatch
The Oil icon at upper left disappears to show it's been applied
Open the hatch the rest of the way
{Cutscene}
Retrace your steps through 3 intermediate nodes (now moving slightly right each time) until the stone steps are visible ahead
Click on the steps to hear Babou call to you
{Cutscene}
Get a signet ring & marked Sheet of paper from the King
Sitting Room
Babou tells you about the guards surrounding the chateau
Put the marked Sheet of paper into the portfolio:
Click on each symbol on the right page to turn it orange, then on the corresponding number at left
The first time this is done on each line, a white smudge will appear at right
When all symbols have been turned orange, click each white area with the Blood stone to record the complete number, using the triangular pointer of the gears icon, not the point of the crayon
When finished, the symbol/number associations top to bottom are:
	Sun        120
	Star       240
	Moon        60
	Saturn     310
Turn one page to the right in the portfolio to show the Chateau map, which now has gray rays extending from each of the four corner dials
Dial in the proper ray angles using the number of degrees above and the directional arrows surrounding each dial (10 degrees per mouse click, clockwise from 0 degrees at north)
This discloses a red X somewhere outside the main entrance to the Chateau
Kitchen (via bookshelf)
Saturnin talks to Valdo
Babou's Bedroom
Take key from mannequin
Sitting Room
Solve Babou's cabinet puzzle:
Use Key (with string attached) in keyhole of cabinet
Note that each of the 16 multi-colored symbols is defined by two pointers, one white and the other yellow. These pointers are independently controlled by separate groups of buttons around the perimeter of the cabinet, and so this puzzle is actually a combination of two puzzles, each of which is similar to that of Leonardo's cabinet. The yellow pointers are controlled by the tan-colored buttons on the left side and top of the cabinet, and the white pointers are controlled by the gray-colored buttons on the other two sides. The objective is to get all of the yellow pointers at the top and all of the white ones at the bottom, as shown by the reference symbol below the keyhole:
To reset the puzzle, step away to another location in the room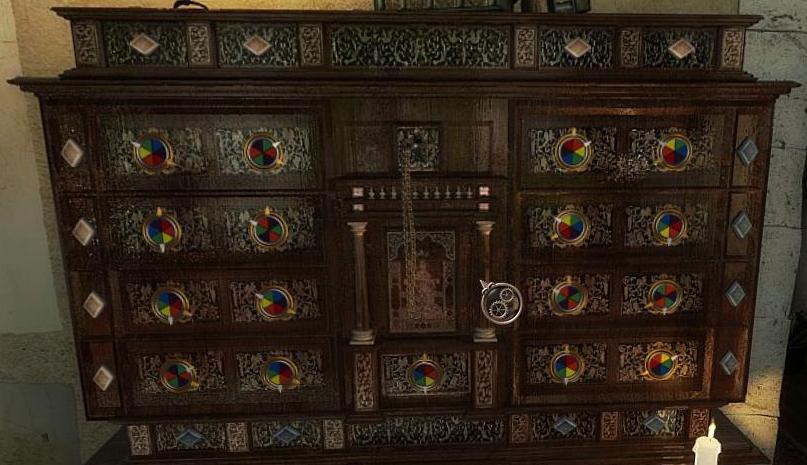
Using the following notation for the diamond-shaped buttons clockwise around the perimeter:
	  A B  C D
	P          E
	O          F
	N          G
	M          H
	  L K  J I
press the 13-move sequence
A A B B D E E H J J K K Oin any order. This is the shortest solution to open the cabinet, and also the fewest different buttons to press (8).
In the drawer, move the mask over the center of three sheets
{Cutscene}
Go to the far end of the gangway
Take Pebbles from the floor, if needed
Select Pebbles from inventory so that an icon is showing at upper left
When both guards are visible and facing away, throw Pebbles at the chapel, then quickly go downstairs and on to the bridge
Turn right and cross into the brush between the mill and the windlass
Pick up the brush and move it to the far right
Go onto boat
Navigate the boat towards the dovecot, picking up the Ladder along the way
When the dovecot is seen ahead, rotate left and throw a Pebble under the footbridge to distract the guard
Quickly dock the boat and enter the dovecot
There are more pebbles here if you're out
Take cloth Sheet & The Mona Lisa
Go up ladder
When you can see the guard through the window, throw a Pebble onto the board to attract him
After the guard appears below, use Iron bar or Short broom on the barrel
Go down ladder and take the Guard's uniform
Wear Guard's uniform
Return to the front of the house, and another guard will accost you
Leave me alone, I know what I've got to do!Kitchen
Talk to Saturnin
I can't hold on any longer Saturnin. I'll never succeed in solving Leonardo's puzzles in time! I'll end up in the hands of the guards outside.Saturnin describes corrections that must be made to the angle dials on the Chateau map:
	Sun                 no change
	Star                -10
	Moon                +10
	Saturn (planet)     -10
The new angles then are:
	Sun        120
	Star       230
	Moon        70
	Saturn     300
Enter these new angles on the Chateau map in the portfolio to show that the red-X position of Leonardo's codex is actually in the chapel
Talk to Saturnin
The door to the chapel is closed. Have you got the key?Storeroom
Take Charcoal
Study
Make smoke bomb (fumigant):
Put Saltpetre, Sugar & Water into the copper pot on the stove
Open stove door
Insert Charcoal
Ignite
Close stove door
Use Iron box on copper pot to get Fumigant
Make gunpowder:
Make Powdered charcoal in mortar and pestle
Put Charcoal powder, Saltpetre & Phial of sulphur onto yellow plate at right
Take (gun)Powder
Use Bronze key to open the locked cabinet with glass doors
Take Red paint, Blue paint, Yellow paint & Varnish (paint thinner)
Sitting Room
Babou talks to Valdo
Me either, I must admit. But I need your help.Get chapel Key
Chapel
Use Key to unlock chapel door and enter
There is no door at left corresponding to the big one seen outside!
Put the Ring into the altar hole
Take the Sceptre and put it on the ring
Get Manuscript
Take Sceptre & Ring
Dovecot
Go up ladder
Put Ring on black bird
Workshop
Put Red paint, Yellow paint, Blue paint & Varnish into the holes in the bottom of the right-hand easel
Open the metal panel behind the door leading to the chapel hallway
Pull the lever at lower right to raise the elevator
Take the elevator down and exit into the tunnel
{Cutscene}
The Manuscript is given to Hector
Take the elevator back to the Workshop
Kitchen
Talk to Saturnin and get a Wooden bow
{Cutscene}
Saturnin inexplicably refers to 300 years ago:
It was 1st May 1519.But Leonardo died only 3 years before the current year of the game (1522), which is also confirmed by the information in the opening scene of the game that Valdo was recently a pupil of Francesco Melzi (1491-1568)
Leonardo died the day after,
a little over three hundred years ago.
The Fumigant (smoke bomb) is given to Saturnin
Workshop
Put the Wooden bow into the drill press
Remove the large Drill bit and replace it with the thinner one in your inventory
Attach the Crank
Use the crank
Take the Crank
Take the Bow made of perforated wood
Cellar
Put the Bow made of perforated wood onto the flying machine
Saturnin's Room
Take Sewing spool from far left side of table (have to try twice)
Workshop
Copy the Mona Lisa:
Remove sheet from right-hand easel
Put the Mona Lisa onto the left-hand easel
Put the Nail onto the left-hand easel
Put the Sewing spool onto the left-hand easel
Use the black crayon at the bottom of the right-hand easel on the following squares:
(There are three other solutions due to rotational symmetries)
This completes a charcoal drawing of the Mona Lisa
Click once on each of the 25 colored squares to disclose a jumbled version of the painting:
A shortcut to solve the puzzle is to use Alt-Tab to return to the desktop, then Alt-Shift-Tab to return to the game. The puzzle is instantly solved!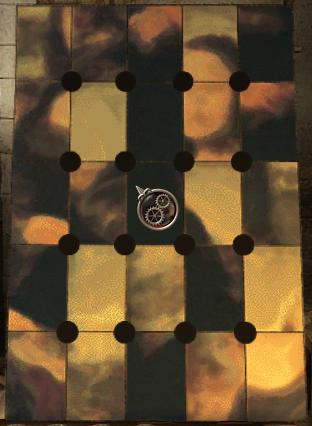
Pick up the brush from the right-hand easel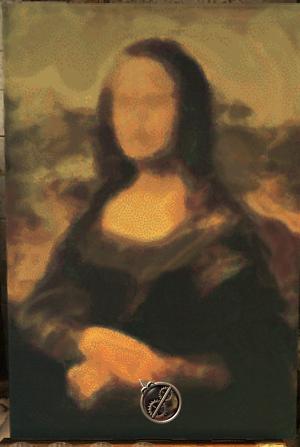
Dip the brush into the red paint
Thin out the color by dipping the paint-tipped brush into the jar of clear varnish
Click the brush on the painting several times until Valdo speaks
Wipe off the brush using the rag at lower right
Repeat the above 4 steps for the Yellow paint and Blue paint until the painting is finished
Take the copy from the right-hand easel
Take the original & Sewing spool from the left-hand easel
Cellar
At the bottom of the steps, take the Cannonball
At the far end of the cellar, use the Jack on the broken cannon
Apply the Crank to the jack
Use the crank
Open the small lid on the top of the cannon
Insert (gun)Powder
Insert the cannonball into the muzzle of the cannon
Ignite the far right end of the cannon
Enter the Tunnel corridor through the hole in the wall
Hector was knocked out by the blast, but if you'd already opened the cellar wall previously, you can knock him out with the Iron bar
Take Manuscript from Hector
{Cutscene}
Leave the original Mona Lisa in the corner
Sitting Room
Talk to Babou
Farewell{Cutscene}
Game crashes on exiting from the credits
In Workshop: Recipe for fumagent (smoke bomb) & gunpowder (required to advance gameplay)
In Cellar: Alberti's grid (optional)
There is enough Ink in one creation for all three Engraved Plates
Gunpowder: Saltpetre, Sulphur & Charcoal
Fumigant (smoke bomb): Heat Water, Sugar & Saltpetre
Brandy: Heat and distill Wine
Perfume: Heat and distill Flower & Water


Copyright © 2018 Balmoral Software (http://www.balmoralsoftware.com). Portions copyright © 2006 by Elecktro Games/Nobilis/Totem Studio/Kheops Studio/MZone Studio. All rights reserved. Republication, redistribution or conversion is expressly prohibited without the prior written consent of Balmoral Software.