Copyright © 2017 Balmoral Software (http://www.balmoralsoftware.com). Portions copyright © 2006 Nobilis Group. All rights reserved. Republication, redistribution or conversion is expressly prohibited without the prior written consent of Balmoral Software.
The Secrets of Atlantis is a 2006 game from Nobilis Group that provides a first-person adventure at several global destinations that you travel to in a vintage-1936 zeppelin. Movement is node-based, with spherical motion at each node. Background graphics and the cyberpuppet characters are not particularly detailed for a 2006 release. Along with discovery and inventory-manipulation tasks, a handful of reasonably-challenging standalone puzzles are provided in the game, but some are rather time-consuming to solve. You can press the spacebar twice to skip the game intro, and pressing the [Esc] key accesses the in-game menu. It's important to scan up, down and around at each node position to identify all available hotspots. If you have a walking companion, they will be shown by an icon at upper left, but there is no way to talk to them unless they "disengage" from you. You can left-click to move through dialog sections, but beware that left-clicking also completely skips intervening cutscenes. There is apparently no button to pause the gameplay, so you may miss some important dialog that is not repeatable without restoring a saved game. There are only 10 saved-game slots, so you may need to manipulate files in the \datas\Saves subfolder of the installation folder if you need more.
This walkthrough provides a minimum path through the game; other gameplay sequences and dialog choices can provide additional backstory elements.
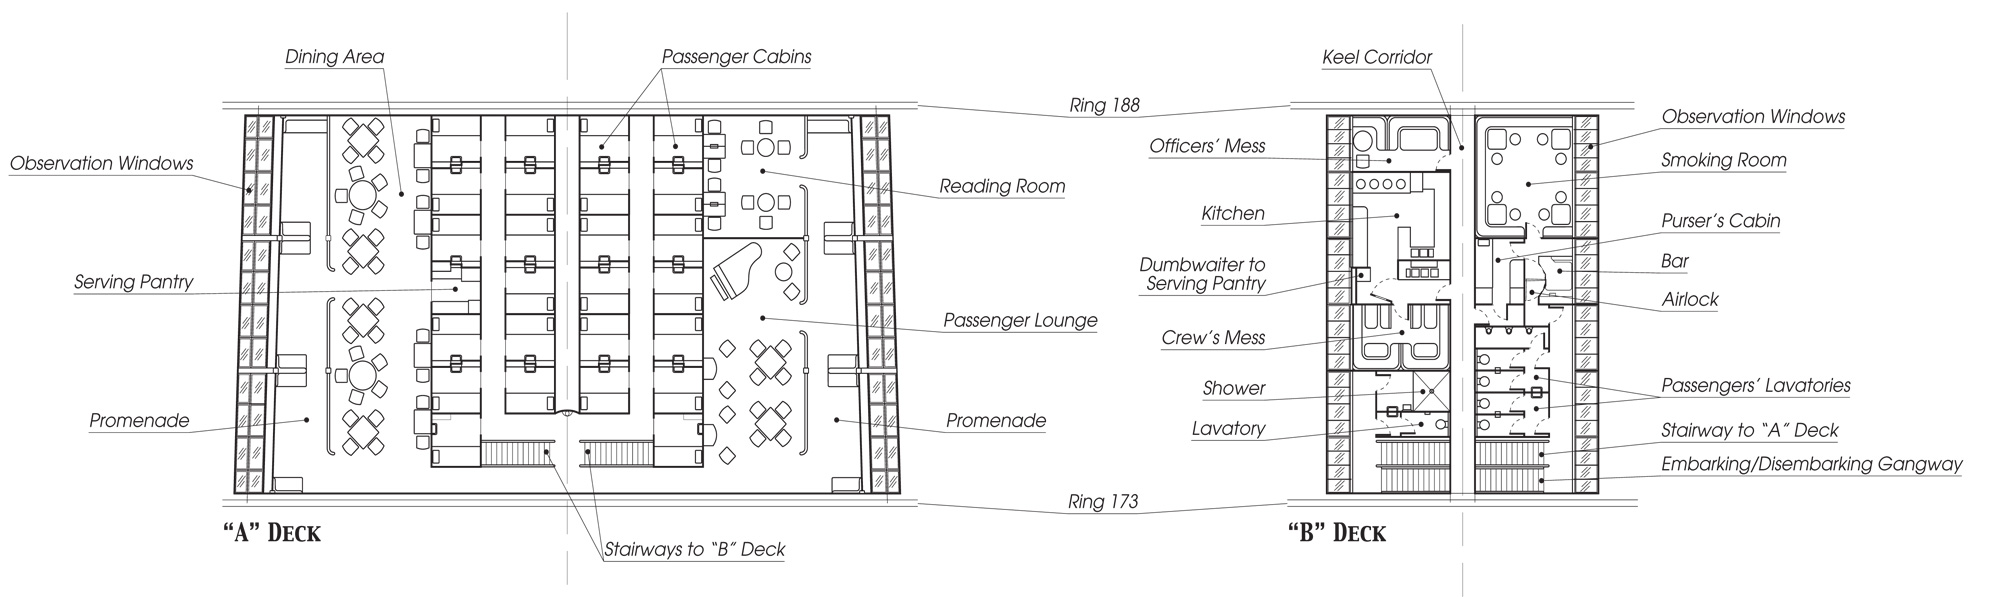
The initial cutscenes show that you're attacked on the zeppelin Hindenburg, after which the attackers escape in an incongruous 1918-era Fokker Triplane inexplicably attached to the airship. You start the game on "A" Deck in the promenade adjacent to the passenger lounge, facing forward on the starboard side of the airship, with the windows on your right.
Rotate left and enter the lounge
Below the position of India on the wall map, pick up a Crab pincer from the table
Turn around and pick up a Coin from the pile on another table
Move aft through the lounge and pick up an Ashtray at the junction with the cross corridor
Rotate right and move toward the windows
Rotate right and use the Ashtray to break the glass on the wall-mounted box containing a red tool
Take the red hammer-like Glass breaker from the broken box
Rotate right and follow the corridor to the central stairwell
At this point, you can discover that only the starboard portion of the Hindenburg has been modeled in the game, similar to what has been re-created in full scale in the Zeppelin Museum in Friedrichshafen, Germany
Take the unblocked stairway down to "B" Deck
Facing the windows, rotate left and move forward once
Here, the game deviates from the actual layout of the real airship, and an alternate map can be used
Rotate left and open the door to the radio room
Move inside, turn right and open the desk drawer
Take the Nuts and bolts
Exit the radio room, turn right and move past the stairs to the corner
Take the Ladder from the aft wall
Move amidships, then turn left, open the door and enter into the interior of the zeppelin
At the first node on the catwalk, turn right and talk to the man seated there
1. HimselfLearn that the man's name is Lou Garetti and that the Hindenburg has been sabotaged3. Zeppelin
Rotate slightly left and upward and you can see a pipe emitting steam at the top of a large tank -- this is the pipe requiring repair
Turn left and move starboard to a set of red valves
In the set of 3 valves grouped together at right, close the leftmost one so that it stops steaming
Use the Crab pincer to take the L-shaped pipe section at left
Be sure that the rightmost red valve is closed (not steaming) -- this is the one controlling steam sent to the broken pipe seen earlier
Return to the first catwalk node, rotate left and move once toward the aft of the airship
Rotate right and use the Ladder to reach the top of the tank; a diagonal slash in the pipe can be seen here
Use the Crab pincer to remove the nuts at the bottom of the pipe section
Use the Glass breaker tool to remove the bolts at the bottom of the pipe section
Push the damaged pipe section to remove it, then replace it with the Intact pipe from your inventory
Use the Nuts and bolts from inventory on the bottom of the pipe section
Be sure the red lever is pointing upward
Return down the ladder and back to the red-valve area you visited earlier
Open the rightmost valve so that it is steaming
Go and talk to Lou again (required in order to proceed in the game), and a fresh dialog choice is available:
3. ZeppelinRotate left and move forward 3 times toward the aft wall of the room
Rotate right and move forward once, then rotate left and upward to see another pressure gauge and red lever
Move the red lever upwards
Look down to see that a fan belt between the running motors has broken
Move the red lever to the left to turn off the motors
Go and talk to Lou about the fan belt, and he will give you a replacement
Return to the back of the room and use the belt in your inventory on the motors at the bottom of the pipes
Look up and move the red lever to its vertical position
Go and talk to Lou one more time about the zeppelin
He will give you instructions on sending a telex
Return to the promenade on this deck, and through the window you can see a turning propeller on one of the aft-facing engines
Enter the radio room
On the top of the telex machine (with a keyboard), remove both knobs connecting the power leads
On the large power unit in the corner (just to the right of the telex), remove both knobs connecting its power leads
Return upstairs to "A" Deck
From the stairwell facing the three clocks, rotate slightly left and proceed down the port passageway
Hotspots have now appeared on the telephone on the wall; use the Coin to unfasten the Phone cable, then take the cable
Return downstairs to the radio room
Use the Phone cable on the top of the telex machine
Use the keyboard of the telex machine to send Lou's message
Take the punched paper ribbon from the telex machine
Return to Lou's area and give him the Telex ribbon
You will learn that you have an appointment with Mr. Foster on the fourteenth floor of the Empire State Building
{Cutscene}
Floor 82
You are now on the 82nd floor of the Empire State Building with no inventory, apparently having come down from the airship embarkation on the 103rd floor
Maps of this floor and of the building may be helpful for navigation
Move forward to the red-uniformed bellhop
Talk to him about himself to learn that his name is Elmer
Rotate right and move to the rear of the bar area
Pick up an Empty waste basket
Exit the bar and move once through the corridor at right, toward a water cooler
At right is a small table next to a fire extinguisher
Open the drawer in the table and take a Lighter
Rotate right and move toward a large potted plant in the corner
Rotate right and move forward once toward some mailboxes at right
Rotate right and open the mailbox of Elmer Mitchel(l)
Take the Service note from the open mailbox
Rotate left and move forward once, just past the mailboxes at right
Rotate right and take some Paper from the wastebasket
Rotate left and move toward the water cooler in the corner
Turn right and move forward once, then turn right and move to the bellhop
Give the Service note to the bellhop
Turn left and move forward to the junction at the rainy window
Rotate right and move to the empty corner at the end of the corridor
Combine the Empty waste basket & Paper in your inventory to get a Full waste basket
There is a hotspot at this location where you can place the Full waste basket (but not an Empty one)
Use the Lighter on the wastebasket and you'll return to the junction outside the bar
Move forward three times to the bellhop and you'll be sent to the Ground Floor
The playable demo of the game ends here
Ground Floor
At your starting position, rotate left and talk to the reporter
1. ReporterRotate right, move forward and talk to the receptionist2. Celebrity
3. CelebrityRotate left and move to the corner3. Love
Rotate right and move toward the velvet rope
Move to the right and talk to the green-uniformed bellhop
2. Celebrity(If you ask the green-uniformed bellhop twice about himself, you'll get thrown out and have to restart at this floor)2. Red-uniformed bellhop
Return to the reporter and talk to him
3. Visitor badgeGet an Access badge
Go back to the bellhop and give the Access badge to him
Move into the (open) Elevator 5 and take it to the 18th Floor
Floor 18
Turn left and move toward a water cooler
Turn left, move forward once, then turn right and open the door to a red office
Talk to the woman inside
1. ElevatorYou will learn that elevator problems in the building may be the result of sabotage2. Foster
Exit the office and follow the corridor to the right past a group of bookcases
Take the Inventory ledger from the top of the second bookcase
Since this item has a (+) sign in your inventory, right-click on it to examine it and learn that Equipment Services is on Floor 5
Continue around the periphery of the floor (see map) until you come to a set of bookcases on the opposite side of the building
Take a Magnifying glass from one of the bookcases
Open the door opposite this bookcase and enter the purple office
Approach the desk and zoom in on the nameplate: Ellen O'connor (required)
Talk to Ellen:
1. ElevatorExit the office and follow the corridor to the right around the corner until you approach the water cooler3. Hatchet
Turn left and take the stairs to the 19th floor
Floor 19
Turn left and approach the Cineworld office at the end of the corridor
Rotate left and talk to the man behind the red rope
1. GarboHe would like to know the Ground Floor receptionist's first name2. Receptionist
Turn right and talk to the woman in the Cineworld office
2. HatchetTurn around and take the Cineworld Magazine from the counter
Return via the stairs to the purple office on the 18th floor
Floor 18
Give the Cineworld Magazine to Ellen and she will let her hair down
Pick up the Hairpin from the desk
Exit the office and return to the elevator bank in the center of the floor
Take Elevator 5 back down to the ground floor
Ground Floor
Follow the corridors back to the reception desk and talk to the receptionist to learn that her first name is Julia
3. LoveTake the elevator back to the 18th floor, then take the stairs to the 19th
Floor 19
Return to the Cineworld office and talk to the man behind the red rope
2. ReceptionistThe second dialog choice above appears because you have already learned about possible sabotage from Miss Hatchet. The man mentions someone called Lansky.2. Fist
Return to the elevator bank and take Elevator 3 on the left to the 12th floor.
Floor 12
This floor is distinctive because of its polished wood flooring
From the elevator, turn left and talk to the woman on the green sofa to learn that Lansky's office is on this floor opposite the bulletin board
3. FistThis conversation has triggered some activity up on the 18th floor, but we'll get to that later
Turn right from the sofa and follow the corridor around the corner to a bulletin board on the right wall
Examine the Planning board on the wall to learn that employee office hours start at 9:00 am
Turn around and use the Hairpin to unlock the door to Lansky's office
Enter the office, turn right and approach a large clock-like safe on the table
Save your game at this point to preserve the default starting arrangement of the safe puzzle
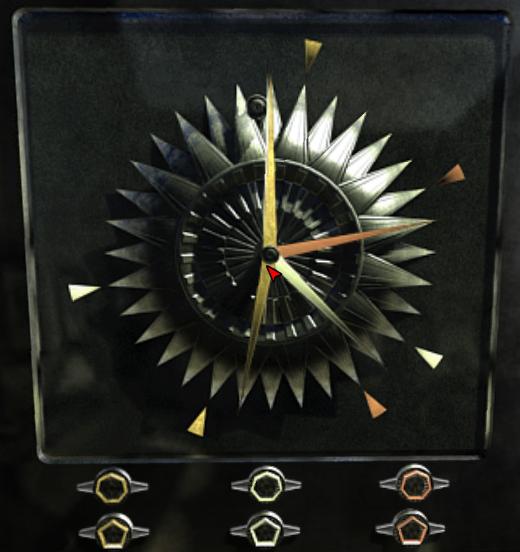
There are 32 radial positions for the three pale yellow, green and orange dials, each of which consists of a pair of pointers at a fixed offset from each other. Specifically, the yellow dial's pointers are offset by 17, the green by 12 and the orange by 7. The dial pointers can occlude each other, so it's sometimes a bit tricky to infer where they are. The polygonal buttons at the bottom of the safe rotate the correspondingly-colored dial either 7 positions in the case of the upper heptagon-shaped buttons, or 5 positions with the lower pentagon-shaped buttons. The direction of the rotation is clockwise using the right-hand button or counterclockwise with the left. There are limits on how many button pushes can be made for each color. Generally, the number of right button pushes is approximately equal to the number of left button pushes, but the order is also important. The object is to align each colored dial with the corresponding triangular marks around the periphery of the dial. Each colored dial can be solved independently of the other two colors. Using the notation
PL: Pentagon Left buttona solution in 16 moves is:PR: Pentagon Right button
HL: Heptagon Left button
HR: Heptagon Right button
Yellow: PRx2 HL PR HL (5 moves)Take the Heavy metal key from inside the safeGreen: HLx2 PLx2 HL (5 moves)
Orange: HLx2 PLx2 HL PL (6 moves)
Rotate left and approach the lit-up corner of the room
Move the picture at right to disclose a wall grate
Use the grate to hear a conversation in the next room about the sequence of elevators needed to reach the 14th floor
Exit Lansky's office and turn left
Move forward once, then turn left to see a photo of the Empire State Building
Use the Magnifying glass to examine the photo and learn that the building's inauguration date was May 1, 1931
Return to the elevator bank
Take the elevator back to the 19th floor, then take the stairs to the 18th
Floor 18
Return to the red office to see that it has been trashed and Miss Hatchet attacked
Go to the purple office and talk to Ellen
3. HatchetAfter the brief cutscene, return to the red office
Miss Hatchet has been removed, so pick up a Spiral-bound notepad she left behind
Rotate right to see a lockbox with 5 digits, each of which is between 1 and 9
Examine the Spiral-bound notepad in inventory to identify a list of items associated with numbers:
As can be seen in the elevator banks on most floors, the number of Elevator doors is 8Open the lockbox using these answers: 8 4 9 1 5. If you wanted to save an extra trip back to Ellen's office you could have just tried all the values for the second digit
You can return to the purple office and talk to Ellen to find out that the Maintenance floor is 4
From the Planning board previously seen on Floor 12, the Employee arrival time is 9 in the morning
From the photo seen earlier on Floor 12, the Day of the inauguration of the Empire State Building is 1 (May 1st, 1931)
From the Inventory register in your inventory, the Equipment Services floor is 5
Take the Security key from the lockbox
Exit the office and take the stairs to the 19th floor
Go to the elevator bank and take Elevator 4 on the right to the sub-basement floor -2.
Floor -2
Turn left and move forward once to the wall pipes
A cutscene plays, showing a suspicious man leaving through one of the doors
Move forward to the corner with the blinking Exit sign
Rotate left and take the fire Extinguisher
Turn around and approach a metal door ahead on the right, opposite a network of pipes and valves
Use the Heavy metal key to open the door
Enter a machinery room and turn right
Use the Extinguisher to break open a metal cabinet on the wall
Take the eight Jump leads from the cabinet
Turn around and approach a sparking control panel on the opposite wall
Put the Jump leads on the shelf above the lowest sparking wires
Put the Security key into the square plate above the jump leads and then turn it to activate the elevator panel
Examine the Scribbled note in inventory to disclose the elevator pattern needed:
-2 8 13 7 14In the leftmost Elevator 1 column, pick up a jump lead and use it in the sockets for floors -2 and 8; red lights sequence between the floors
When the jump leads are correctly positioned, a green light appears at the top of the Elevator 1 column
In the Elevator 2 column, use jumpers for floors 8 and 13
In the Elevator 3 column, use jumpers for floors 13 and 7
In the Elevator 4 column, use jumpers for floors 7 and 14
Exit the machinery room, return to the elevator bank and use the open elevator
Technically, this should require transfers at Floors 8, 13 and 7 before reaching the 14th floor, but these intermediate steps are skipped
Floor 14
Move forward twice and talk to the DTHO assistant
2. FosterTurn left and enter through the green doorway into Foster's "study"
Move around the fish pond to Foster sitting at a huge desk below a large angelic statue
Talk to Foster
1. FosterIn "The Jade Stones and the Scarab" puzzle, the Pawn can move only diagonally, while the Scarab can move only rectilinearly. In other words, starting from square X below, the Pawn can move only to one of the squares marked P, and the Scarab only to one of the squares marked S.
Here is a solution to the puzzle in 19 moves:
First jade (3 moves):
Second jade (8 moves):
Third jade (8 moves):
This game is winnable by the Pawn only because the Scarab repeatedly plays purely defensively and does not take advantage of foreknowledge of the available plays for the Pawn. For example, in the diagram below, the Pawn captures the first jade piece in position A at the top of the third turn. In the bottom of the third turn, the Scarab moves from position B to position C (ostensibly to protect the jade in corner J). But if the Scarab had moved to position D instead of C, it would have trapped the Pawn, who is forced to return to position E at the top of the fourth turn. The Scarab would capture the Pawn at the bottom of the fourth turn since it would be adjacent to it.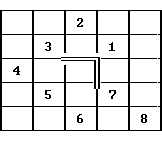
After winning the game, talk to Mr. Foster about your father's medallion, and he will return it to you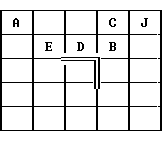
Talk to Foster
1. MedallionExit Foster's study and talk to Miss Pennington1. Atlantis
1. Foster
3. Atlantis
4. Brooks
5. Elliot
6. Miss Pennington
1. SilhouetteExit to the elevator2. Man
4. Zeppelin
{Cutscene}
Go onboard the junk, turn right and move into the bow
Turn around and descend the stairs into the casino
Note the bouncer dressed all in blue standing behind the post
Move left-forward and talk to the man in the white shirt standing next to the long rat-race game table
1. RatGet some cash for the Gambler's bet1. Rat
Move on down past the rat race game to an alcove to the right of the stairs
Draw aside the curtain to disclose a 4 x 4 slider puzzle that you must solve in order to reach the cashier beyond. This is arguably the most difficult and tedious puzzle in the entire game because it randomizes for each arrival in Macao (so no fixed solution is possible), and especially because it is a timed sequence. Every 85 seconds while you're in the alcove, the bouncer will stare at you suspiciously, and you then have only about 9 seconds to interrupt what you're doing with the puzzle, turn around and leave the alcove, which resets the timer for the next 85-second sequence. The timer counts down even if the game is minimized or another running program is given focus, so the best strategy is to grab a screenshot of your particular puzzle, leave the alcove in order to disable the timer, then solve the puzzle at your leisure outside of the game. Using the in-game menu prevents the timer from advancing, but does not reset it to the beginning. Here's a recommended sequence of steps to solve the puzzle:
1. Move into the alcove and open the curtainFor example, one gameplay produced the randomized puzzle having the jumbled starting arrangement2. Press the [Print Screen] key or the equivalent to take a screenshot of your particular puzzle
3. Turn around and move toward the rat race game to disable the timer
4. Return to your operating system and paste the screenshot into a graphics application such as Microsoft Paint
5. It helps to visualize the finished puzzle so that you can identify how your pieces are jumbled
6. Print out a complete solution to your particular puzzle, using a method such as the Balmoral Software solver
An 80-move solution to this puzzle was determined and entered carefully, while periodically being interrupted by the bouncer
If you prefer skipping this tedium, you can just copy a saved game file into the appropriate folder on your computer and load that game from the last saved-game slot (Saved 9).
After solving the slider puzzle, the door will open and you can proceed inside
Turn left, move forward and take the Cashier's note from the table
Wake up the sleeping cashier
Give him the Gambler's bet, then talk to him
2. RatGet a Betting slip
Rotate left and examine the calendar on the wall to note the date: Saturday, April 10, 1937. Note also the phase of the moon below the date, which incorrectly shows that the moon is in its first quarter (right side lit), when it was actually a thin, waning crescent (left edge lit) on that date. You can confirm the phase of the moon on that date using this link.
Return to the casino and give the Betting slip to the gambler by the rat race game (if you dawdle in the alcove, the bouncer will get you)
Talk to the gambler
1. RatGet a Small sum of money from him
Talk to the gambler
2. SilhouetteCross the casino and talk to the voluptuous woman in a white hat3. Cards
1. SilhouetteTurn left, move toward the bar and talk to the bartender3. Rat
2. IshtarTalk to the woman sitting at the bar3. Casino
4. Woman with drink
3. BartenderGive the Small sum of money to the bartender3. Bartender
Wait a minute for the bottle to empty itself, then the bartender will fall asleep
Move to the rear of the bar, then open the hatch in the wall and enter the generator room
Pull the generator lever, then quickly move into the hiding place behind the curtain at right
After the bouncer turns the generator back on, return to the casino and talk to Ishtar
3. RatGet a Large sum of money1. Silhouette
2. Medallion
3. Bas-relief
3. Cards
Cross the casino and show the Large sum of money to the bouncer Li Tang
Examine the Cashier's note in inventory to determine today's passwords:
Spring (April): TigerSpeak with Li TangLast quarter: Pair
Saturday: Ace
2. CardsGet a Winch code1. Tiger
3. Pair of kings
3. Ace
Talk to Ishtar
2. CardsYou are now standing up on deck, facing three winches, each with a Chinese ideogram on it. Each winch has 11 settings (-5 to 5), so there are 11 x 11 x 11 = 1331 possible winch combinations, far too many to test by trial and error. Rotating your position to the right of the winches, you can see mountains and a city in the far distance, whereas by rotating to the left, you can see lights ashore that are much closer. This seems to indicate that the dock is on your left when you're facing the winches. Referring back to the observation you made of the boat when you first arrived in Macao, the dock is on the starboard side of the junk (right side when facing forward on the boat). This indicates that the starboard side of the boat is on your left when you're facing the winches (facing aft on the boat). However, these observations are false, and the game assumes that starboard is on your right and port on your left when you're facing the winches, against the visual evidence.
Examine the Winch code in inventory
There are three clues (top to bottom) corresponding to the three winch symbols (left to right):
Left winch: One turn less than the second halyard (to starboard)Here, we have separated the direction associated with each clue to show that it's not part of the halyard reference. The first, second and third halyard refer to their order left to right (on the boat), or top to bottom (on the Winch code), and not by starting the count from one side or the other of the set of winches. For example, the "first halyard to starboard" refers to the left-hand winch (ignoring the "starboard" reference for now), and not the right-hand winch when you start counting from the starboard (right) side of the group of winches.Middle winch: Two times more turns than the third halyard (to port)
Right winch: One turn less than the first halyard (to starboard)
Also, the number of ropes apparently attached to each of the three winches (1, 2 and 2 counting from the left winch) is not relevant to the solution of this puzzle
Using the notation x, y and z for the first, second and third winches (left to right), respectively, we can derive the following relationships for the number of winch turns from the clues on the Winch code:
x: Leftmost (first) winchWe can now apply some high-school algebra to solve these three equations in three unknowns. Substituting the expression for z in the third equation into the second, we havey: Middle (second) winch
z: Rightmost (third) winch
x = y - 1
y = 2z
z = x - 1
y = 2(x - 1) = 2x - 2Substituting this result for y into the first equation produces
x = (2x - 2) - 1 = 2x - 3Subtracting x from both sides, we have
0 = x - 3, orSubstituting the answer for x into the intermediate result above for y yieldsx = 3
y = 2(3) - 2 = 4Finally, substituting the answer for x into the third of the original three equations gives
z = 3 - 1 = 2We now have the following results:
	Winch		Turns	Direction

	Left		3	Starboard
	Middle		4	Port
	Right		2	Starboard
Each winch's setting has negative numbers at the left and positive numbers to the right, so it's natural to assume that port (left) refers to negative numbers and starboard to positive numbers. Applying this reasoning to the table above, we derive the answer to the puzzle:
	Winch		Setting

	Left		3
	Middle		-4
	Right		2
Enter this code by clicking on the appropriate sides of the winch cranks, and the sought-after door to the poker game will open up for you
Enter the poker room (note the windows, another indication that you were actually facing aft at the winches)
Talk to Kate Sullivan on your left
1. CardsYou can now sit down at the poker table
Talk to James Elliot at left
1. HimselfTalk to Master Yu in the middle
1. HimselfTalk to the gambler at right
1. HimselfHe explains the rules of the Texas hold 'em game to be played, which is standard except that straights and flushes are not used. Save your game at this point if you want to replay the poker game. You cannot save your game once the poker session starts. Talk to the gambler again2. Cards
3. HandThis dialog choice starts the poker game. The white numbers at the top of the screen indicate each player's remaining stake. The objective is to have Yu run out of money so that he'll bet his piece of the bas-relief, and then you'll need to win that hand. If Yu wins or you run out of money, you fail. All of the previous dialog choices after you sat down at the poker table will need to be repeated in the event of failure (or you can restore your saved game). Here are the actions you can take to win:
Hand	Yu	Hole cards	Actions			Result

1	190	Pair of 9s	Follow bet (10$)
				Follow bet (10$)	Three 9s
				Raise stakes (20$)
				Raise stakes (30$)	You win

2	170	No pair		Fold			Gambler wins

3	140	A - Q		Fold			Elliot wins

4	100	8 - 10		Follow bet (10$)	Pair
				Raise stakes (20$)
				Follow bet (20$)	2 pair
				Follow bet (30$)	You win

5	10	Pair of Ks	Follow bet (10$)	Three Ks, bas-relief
				Raise stakes (20$)	Full house
				Raise stakes (30$)	Four Ks
				Follow bet (30$)	You win
Back to game
{Cutscene}
After the cutscene, leave the poker room and descend the stairs
Cross the casino, go up the stairs and get off the boat
Move forward to the far end of the dock and talk to the man with the clenched fist
1. SullivanEnd dialog with Blackwood1. Himself
2. Medallion
3. Sullivan
{Cutscene}
Take some Fine paper and a Lead pencil from the desk at right
Return to the interior part of the airship on this deck where you met Lou Garetti earlier, and pick up a Zeppelin knife from the catwalk
Return to the stairs and descend a long aerial rope ladder to Satyavrata Palace
Note Elliot's airship in the distance
Move forward around the caged Sullivan and on down the covered walkway
Note a great hall of glass at left
At the end of the walkway, follow the steps leading downward to the hall of glass
Go up the curving stone stairs at right to the door at the top
Combine the Fine paper & Lead pencil in your inventory
Use the Paper and pencil on the wall inscription underneath the statue to the left of the door to get a "Scumble of inscription"
Return downstairs, through the entrance arch and back along the covered walkway to where Sullivan is caged
Show the Scumble of inscription to Sullivan and she will translate it for you (the translation shows up when you examine the Scumble in your inventory)
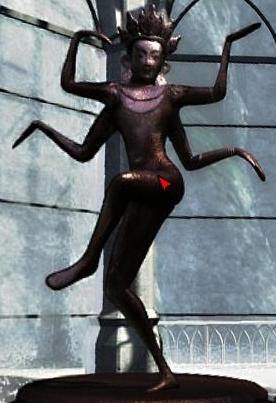
Return to the hall of glass and move toward the encircled sculpture of Kali at the far left side of the room
To solve the statue puzzle, press the following 6 pink crystals in the grid of 15 at the bottom of the statue:
Alternatively, you can use the mirror image of this pattern, or another pattern (or its symmetries) involving a group of four crystals in a square:
However, the first solution above does not involve pressing an unlit crystal in order to solve the puzzle
Take the Ruby from the opened statue
Note the arrangement of the Kali statue's arms and hands
Turn right and move toward the closest seating area by the windows
Turn right and move toward a greenish statue approximately in the center of the room
Turn right to see a green elephant statue close up
Use the Zeppelin knife to remove a Pearl from the elephant's trunk
Turn around and approach the seating area at right next to the open area at the bottom of the stone stairs you used earlier
Look down to see a table with a mechanical Kali figure on its top
From the arrangement seen previously in the Kali statue, manipulate the arms and hands using the following compass notation:
Upper right forearm NE (upward)Take the Emerald from inside the opened table
Upper right hand E
Lower right forearm NE
Lower right hand SE
Upper left forearm N
Upper left hand E (to the right)
Lower left forearm NW
Lower left hand SW
Facing back toward the entrance arch, approach the stone bookshelves at left
On the top shelf, pull out a purple book ("Seventh Book of Knowledge") and take a Sapphire from inside it
There is another book on these shelves, but it's not essential to advance the gameplay
Turn to the right and approach the bookshelves on the opposite side of the entrance arch
At this point, Blackwell disengages and you can interact with him
Rotate left and give the Pearl to Blackwell to get a Moonstone
On the top shelf, pull out a short book that shows pictures of elephants facing left and right
From top to bottom on each page, these read
L R R R L LThere is another book on these shelves, but it's not essential to advance the gameplay
Facing the windows, approach a pedestal at right that is illuminated by a bright sunbeam
Use the Zeppelin knife to clear away the ivy from the two-bulls pedestal
Place the Emerald on the pedestal
Follow the green beam to the next pedestal near the foot of the opposite stairs
Use the Zeppelin knife to clear away the ivy from the pedestal with two maned animals
Place the Sapphire on the pedestal
Follow the blue beam to the next pedestal in front of the central seating area
Turn around and use the Zeppelin knife to clear away the ivy from the two-headed pedestal
Place the Ruby on the pedestal
Return to the door upstairs and put the Moonstone on it
Go back downstairs to an illuminated stone column at the foot of the stairs near the two-bulls pedestal
Open the panel in the illuminated stone column and take the bas-relief half
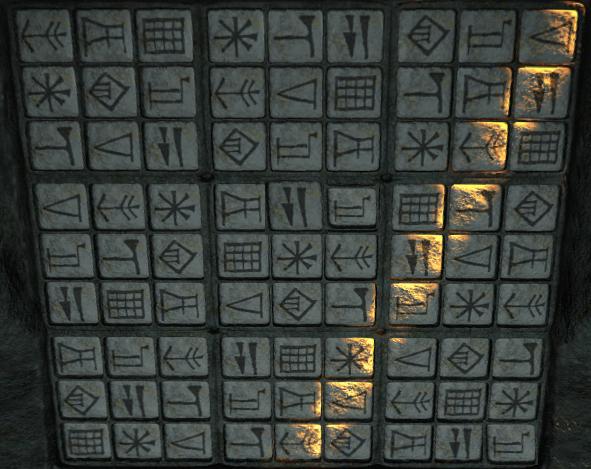
You're then betrayed by Blackwell, locked up in a stone sarcophagus, and will need to escape by solving a Sudoku-type game, using symbols instead of numbers
If you want assistance with the puzzle, you can use an online solver such as http://sudoku-solutions.com.
To solve the puzzle, press the blank areas of the stone tablet the following numbers of times to produce the solution (244 mouse clicks total):
If you lose track of how many mouse clicks you've made, keep clicking until you cycle back to a blank stone and you can restart the count
On release from the sarcophagus, you'll find yourself in the Hall of Truth
Turn right and take the Trident from the statue of the winged goddess Ishtar
Turn around and exit back into the hall of glass, then go downstairs and return to where Sullivan is caged
Facing Sullivan's back, use the Trident in the receptacle below to release her from the cage
Sullivan apparently won't budge until you talk to her (and you need her for the next step), so go around and exhaust the dialog choices with her:
1. BlackwellReturn to the Hall of Truth, accompanied by Sullivan2. Hall of Truth
Approach the circular bas-relief in front of the closed door
Click the question-mark icon on the joined bas-relief halves and an extra-shiny Sullivan will cooperate by standing on the flagstone behind you
Press the sides of the bas-relief in the order seen earlier in the book of elephant pictures:
L R R R L LGo through the opened Gate of Truth into the Grotto of Revelations
Move along the path and look at the fresco on the wall (required)
Exhaust all the dialog choices with Sullivan (required)
1. AtlantisExit up the steps at the far end of the grotto and you're abruptly dumped back at the end of the covered palace walkway2. Medallion
3. Hand
If you haven't completed the preceding required steps, Sullivan won't tell you that you're off to Mesopotamia and you'll have to go back to the grotto (or restore a saved game)
Follow the walkway, climb up the hanging ladder to the zeppelin and you'll be transported to your next global destination
{Cutscene}
Exhaust the dialog options with Sullivan so that she'll move out of the way
1. AtlantisMove up the path and talk to the herbalist at the switchback2. Elliot
3. Blackwood
1. HimselfGive the Pearl to the herbalist and get a Herb poultice in exchange1. Himself
2. Blackwood
4. Herbs
5. Omarim
Move up the path and on into the village, which consists of an arc of buildings surrounding a central open area with a well. Approach the building at the far left end of the arc.
At the doorway, rotate left and pick up a Hoe
Open the door and enter the hut
Turn left and talk to Blackwood to discover that he's nuts
Turn around and take the Shears and a Sieve
Exit the hut, turn left, and approach the next hut in the arc
Try opening its door to see that it's locked
Take a Grille hanging on the wall
Turn right and move toward a smoking outdoor oven in the distance
Talk to the baker there
1. HerselfTake a Box of matches from the ground to the left of the oven3. Omarin
4. Bread
Turn right and approach the next hut, right under the gondola of the Hindenburg
From the debris pile here, pick up an Iron bar and a Bucket
Move toward the last village hut, just to the right of the zeppelin's nose
Turn left and use the Iron bar on the wooden box to release a young girl
Take a Smoker device that you can now see under the hut window
Exit the village along the path at right leading up the mountain
At a switchback on the path, there is a beehive
Combine the Box of matches & the Smoker off in inventory
Use the Smoker on with the beehive, then put the smoker back into inventory and open the top of the beehive
To solve the three rounds of bee puzzles, use the Smoker to swap rows of yellow and orange bees from one side of the hive to the other. A row of bees can be moved into the open slot, or can jump over a row of bees of the other color. If you make a wrong move, the puzzle round resets.
Round 1 consists of 3 rows of bees of each color (Y: Yellow, O: Orange):
Y moveAfter the bees disappear, return the Smoker to inventory and click on the hive to begin Round 2, consisting of 4 rows of bees of each color:
O jump & move
Y jump 2 & move
O jump 3
Y move & jump 2
O move & jump
Y move
Y moveAfter the bees disappear, return the Smoker to inventory and click on the hive to begin Round 3, consisting of 5 rows of bees of each color:
O jump & move
Y jump 2 & move
O jump 3 & move
Y jump 4
O move & jump 3
Y move & jump 2
O move & jump
Y move
Y moveAfter the bees disappear, return the Smoker to inventory and take the center honeycomb Frame full of honey
O jump & move
Y jump 2 & move
O jump 3 & move
Y jump 4 & move
O jump 5
Y move & jump 4
O move & jump 3
Y move & jump 2
O move & jump
Y move
Follow the path up the mountain to the temple building decorated with blue stone
Move past the temple entrance and use the Hoe on the green plant
Return the Hoe to inventory and pick up some Red roots
Outside the temple entrance, pick up stones from the pile 4 times
Enter the temple and look at the colored fresco at right
Use the Grille on each of the four open spaces to determine the sizes of stones needed:
6 x 6Put the Grille back into inventory
5 x 4
3 x 2 (two)
Return to the village and give the Frame full of honey to the baker woman
After about 45 seconds, a cutscene plays and Omarin shows up
Give the Bronze medallion to Omarim
Talk to Omarim
1. HimselfA cutscene plays in which the girl has lost her doll in the village well2. Blackwood
Exit the village and return halfway down the path toward the herbalist's location
Use the Shears to remove Twisted metal wire from the barbed-wire fence
Continue downhill and talk to the herbalist at the switchback in the path
4. HerbsHe will tell you that aloe can be found near the beehives
Go to the well in the center of the village
Combine the Twisted metal wire & Bucket in inventory
Put the Bucket with handle on the hook of the well
Use the well crank at upper right to retrieve the doll
Take the doll and give it to the girl
Talk to the girl
1. HerselfShe will tell you how to get into the locked hut3. Lock
Go to the locked hut and look under a wooden pole to the left of the door
Take the Key and use it to open and enter the hut
Use the Box of matches to light the burner
Take the Stonecutter's tools from the window sill
Take the Pestle
Put the Red roots into the bowl (mortar) that held the pestle
Use the Pestle on the bowl to grind up the roots
Put the Sieve onto the stand to the right of the roots
Take the Crushed red roots from the bowl and transfer them to the sieve
Shake the sieve
Take the Bowl of red dye from underneath the sieve and put it on the empty receptacle on top of the burner
Obtain bowls of 4 different paint colors by setting the butterfly valves of the burner and using the wheel:
	   Butterfly valve		Result
	Left		Right

	Vertical	Vertical	Dark blue
	Vertical	Horizontal	Light blue
	Horizontal	Horizontal	Yellowy orange
	Horizontal	Vertical	Orange
You can "throw away" a bowl of paint in the sink at right, but since you'll need all four colors, this is useless. Also, you cannot create any other color combinations since the burner wheel doesn't work until the bowl of red dye is installed.
Exit the hut and turn left to the grid of lines on the platform
Place one of the Stones for cutting in inventory onto the grid
Click the Stonecutter's tools on the stone twice to cut it down to a 6 x 6 size
Store the Cut stone in inventory
Repeat the process for the other stone sizes needed:
5 x 4 (4 clicks)Return to the beehive area, then turn around and touch the plants at the curve in the path
3 x 2 (7 clicks)
3 x 2 (7 clicks)
{Cutscene}
Return to the oven area in the village and give the Aloe to Omarim
Talk to Omarim
3. RemedyGet Omarim's remedy (not to be confused with the bowls of paint you're carrying!)
Go back to Blackwood's hut and give him Omarim's remedy
Talk to Blackwood
1. HimselfBlackwood is now accompanying you along with Sullivan1. Temple
2. Elliot
3. Himself
3. Medallion
Return to the temple
As you enter the temple, Blackwood gives you instructions:
"To reveal the hidden door, place your medallion on the sign of the trident and turn it so the spikes are pointing downwards."Approach the circular wall design at left
Put the Bronze medallion on the sign of the trident at the top of the circle
Put the Bronze medallion on the sign of the trident at the right side of the circle
This discloses a puzzle on the back wall of the temple, but you will need something else first
Approach the colored fresco on the other wall of the temple
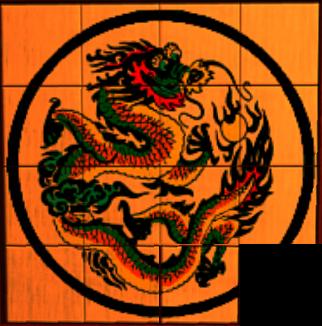
Place the appropriately-sized Cut stones into the recesses, then color them using the Bowls of paint from inventory:
		6x6 Dark blue

		5x4 Yellowish orange

			3x2 Light blue

	3x2 Orange
Put the Bronze medallion in the dragon's eye to get an Atlantean crystal
Take the Bronze medallion
Move to the puzzle on the back wall of the temple
Sullivan translates the cuneiform inscription as:
"Having crossed the seven oceans, the great ship came to rest on the mountain."To activate the warehouse puzzle, touch the receptacle on the left side with the Atlantean crystal. This step also can be used to reset the puzzle to its starting configuration:
A solution in 52 moves (believed to be optimal) is: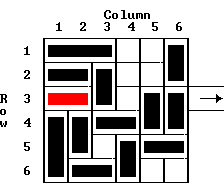
Column 5 up 2Note: The Column 6 piece in the upper-right corner is not moved
Row 1 right
Row 4 right
Column 3 down 2
Row 2 right 2
Row 3 (boat) right 2
Column 1 up 3
Column 2 up 2
Row 6 left
Column 3 down
Row 4 left 3
Column 3 up
Column 4 up
Row 6 right 4
Column 3 down
Column 4 down
Row 4 right 2
Column 1 down 3
Column 2 down 3
Row 1 left
Row 2 left
Row 3 (boat) left
Row 4 left
Column 4 up 4
Row 5 left
Row 6 left
Column 6 (lower piece) down 2
Row 3 (boat) right 4
Move forward into the tunnel behind the puzzle
{Cutscene}
Move forward and remove the melted medallion from the lowest position on the pedestal between the stone doors
Put the Bronze medallion into this spot
{Cutscene}
Elliot jumps out of a stone box and imprisons you, Sullivan and Blackwood
Examine the torch in the wall alcove
Talk to Sullivan
3. ScarfPut Kate's scarf on the wall torch
Use the Box of matches on the wall torch
If you haven't already done so, examine Elliot's bag at right and get a Torn-out page
Turn the circular handle under the torch three times
Turn around and observe that a post has risen up from the floor, and a dark button in front of it can be pressed
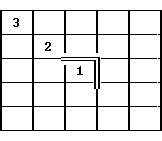
Each time you press a button in front of a raised post, other posts may raise, lower or remain unchanged. The objective of this Whack-a-Mole puzzle is to raise all nine of the posts, which will form stairs by which you can escape the trap you're in.
Number the buttons from 0 at far left to 9 at far right (in the darkness). If you can raise the top seven posts (3-9), Button 0 becomes active and pressing it completes the stairs. Some trial and error shows that pressing an even-numbered button reverses the state (up or down) of four of the posts, whereas pressing an odd-numbered button changes the state of three of the posts. Experimentation can identify which posts are affected by which button, with the other posts remaining unchanged (up or down). The following 5-move sequence is the shortest that will activate the stairs:
1. Button 3 (the only choice)Move up the stairs
2. Button 7
3. Button 4
4. Button 2
5. Button 0
Use the Iron bar on the horn of the bull's head above
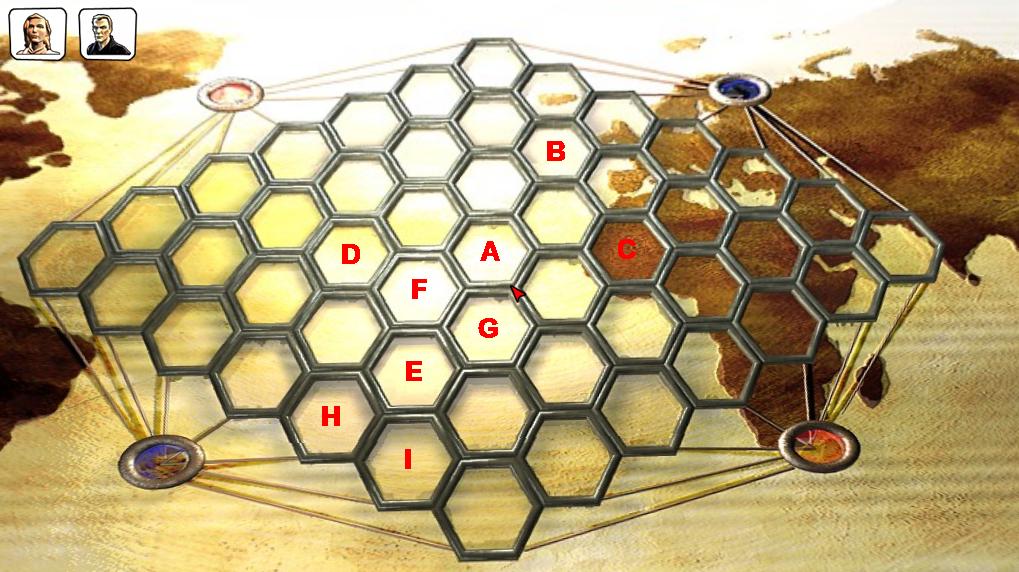
Move forward and board the Ark of the Atlanteans, then move forward and turn left to see a diamond-shaped grid of hexagons on which you'll play a mini-game against an AI opponent representing Elliot. Your opponent's strategy and play varies from game to game, so no fixed solution is possible.
Begin the game by placing the Atlantean crystal in the receptacle above the game grid
The objective of this mini-game is to create an unbroken chain of blue cells connecting the lower left edge of the diamond with the upper right edge, while preventing Elliot from doing the same with red cells connecting the other two edges. The four corner cells of the diamond can be used by either player.
Since you play first, you can almost always win the game using a simple strategy. Your first play should be the center cell A of the grid. Make a note of the cells that are one distance unit away from one of your blue cells along a radial edge emanating from your cell; for example, cells B, C, D or E with regard to the center cell A. If that type of cell is blue and both of the intervening pair of cells are blank, then you can always pick either cell of the blank pair to form an unbroken chain, regardless of how Red plays:
For example, if cells A and E are blue and cells F, G, H and I are open, then you can always create a chain connecting to the lower left edge of the grid, no matter how Red tries to block you.
Since Red plays somewhat randomly, you may luck out and have none of the cells E, F, G, H or I taken by Red after his first move. You can then grab cell E and leave the rest of the chain to be created later or whenever Red tries (vainly) to block you there. Just be sure to notice when Red does select one of the intervening pair of unclaimed cells (F-G or H-I), in which case you must select the other cell of the pair in your very next move.
If, on the other hand, Red plays close to your center cell, that will make it more difficult for you to find a path that always gives you two choices for intervening cells to complete the path. In those cases, an effective strategy is to never let Red have two adjacent cells that may block your access to one of your edges.
After you win the hexagons game, a cutscene describes what appears to be a tie-in to a possible game sequel in which the many unanswered questions in this game may be decided, and credits roll.
Copyright © 2017 Balmoral Software (http://www.balmoralsoftware.com). Portions copyright © 2006 Nobilis Group. All rights reserved. Republication, redistribution or conversion is expressly prohibited without the prior written consent of Balmoral Software.


