Copyright © 2020 Balmoral Software (http://www.balmoralsoftware.com). Portions copyright © 2005 Kheops Studio. All rights reserved. Republication, redistribution or conversion is expressly prohibited without the prior written consent of Balmoral Software.
This walkthrough provides a shortest path through the game; other gameplay sequences, exploration and dialog can provide additional backstory elements. Inventory item descriptions are shown in bold text. The walkthrough below also includes a playable demo of the game.
{Cutscene}
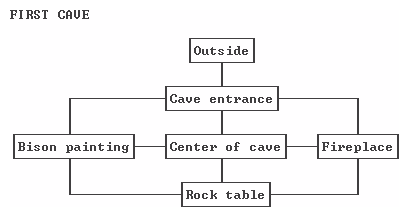
In the near-darkness, look down and pick up a Bundle of firewood. Turn around and pick up a Piece of hardwood. Look up to the cave exit and take a Piece of ice. Turn around and move toward the light spot inside the cave. Pick up some Dry grass, then turn around and pick up a Piece of soft wood. There is a fireplace here; put the Dry grass and the Bundle of firewood into it. Add the Piece of soft wood and the Piece of hardwood to make a roaring fire.
Approach a rock table behind the flames. Look to the lower right and pick up the Brown pigment. Follow the cave wall to a wall painting, then look down and pick up the Black pigment and some Branches. Turn around and enter a lower area below the fireplace ledge. Rotate right and pick up a Small strap. Climb up the ledge to the fire and click on the 3 x 3 grid on the wall.
{Cutscene}
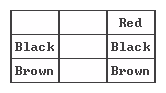
You'll get Klem's painted stone magically added to your inventory. Pick up the Red pigment to the right of the flat stone. Put the Brown pigment, Black pigment and Red pigment onto the painted stone. Turn around and melt the Piece of ice in the dish-shaped receptacle next to the fire. Transfer a drop of water from the dish to the red pigment on the flat rock. Repeat for the other two colors. Fingerpaint the following squares of the grid to match Klem's painted stone:
{Cutscene}
Turn around and ignite the Branches in the fire. While carrying the burning branches (icon in the upper-left corner), head for the cave exit at right. Throw the branches at the lioness to scare her away. You then have about 20 seconds to exit the cave before the fire burns down. Outside, pick up an Assagai (spear) and Deer antlers. Return inside the cave and follow the wall to the right. At the location of the wall painting, pick up some more Branches. In the wall painting, click on one of the two vertical spears and then click on the figure at left holding a spearthrower. Click on the black bison at right to complete the animation.
Spearthrower puzzle
Exit left to the rock table. Put the Deer antlers onto the table with three stone tools in order to manufacture a spearthrower. Pick up the middle tool (Knapped flint) and click it on the antler to remove the three upper branches extending from the lower horizontal portion. Up to four mistakes are tolerated during the process, as indicated by the spearthrower icons at upper right. Next, use the right-hand tool (Awl) to punch a hole in each end of the antler. Finally, use the left-hand tool (Scraper) on the middle of the antler. The resulting creation is shown below:
Add the Small strap to the right end and pick up a Spearthrower with an assagai. Move forward twice to the fireplace. Ignite the Branches and throw them at the lioness outside as before. You again have about 20 seconds to exit the cave.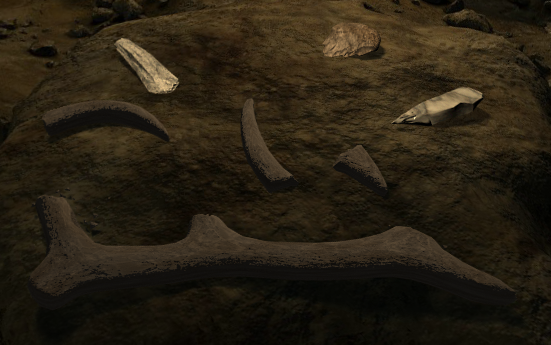
{Cutscene}
Re-enter the cave, then move right and pick up another load of Branches. Ignite them in the fire as before, then go outside while carrying them. Take the left (uphill) fork in the path and enter a second cave. The game demo ends at this point. Ignite the fireplace at lower right.
The sequence of grid squares indicated by the path arrows is 1 through 9 on the following diagram: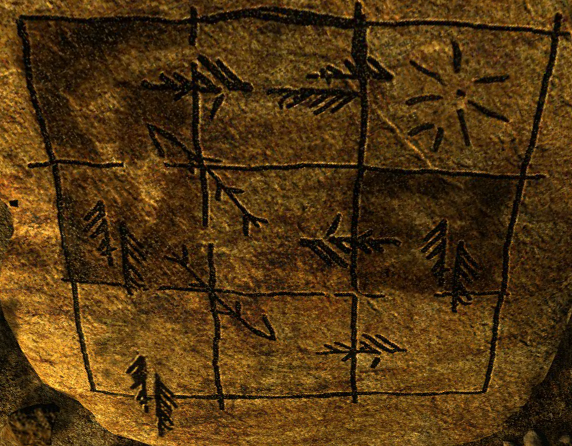
Note the dark squares corresponding to those on Klem's painted stone: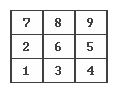
Correlating the sequence of grid squares with Klem's stone, the order of colors associated with the indicated path through the grid is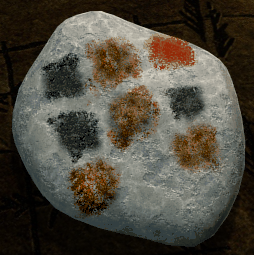
1. BrownTurn around from the stone and pick up two more Torches from the ground. Ignite a Torch in the fire. Start the passage through the labyrinth by selecting the cave exit labeled with a brown rectangle (second from the right when facing the fireplace). Depending on the lighting conditions, brown can be a bit tricky to distinguish from red or black, but brown generally has diagonal lines apparent in the rectangle. Each of the nodes in the path has an intermediate "pass-through" location, so be sure to click forward twice after the appropriately-colored exit is selected. Continue with Step 2 in the list above.
2. Black
3. Colorless (white outline)
*
4. Brown
5. Black
6. Brown
*
7. Black
8. Brown
9. Red
*: Ignite a torch
The torch's flame decreases only when you're moving through the labyrinth, but if it burns down completely, you'll be thrown back to the starting point in the cave, without any torches. For best results, ignite a fresh torch at every third node, as indicated in the list above.
Handprints puzzle
In the final room of the maze, move forward to a pattern of red and black handprints on the wall overhead. Save your game at this point so you have a reference for the default starting arrangement of this puzzle. Click on the grid to access the puzzle, or on the three-pronged symbol at lower right to leave it (instead of the usual red "X" symbol). The objective of this puzzle is to create a path through the grid of handprints to reach the top of the shaft. The handprints in an entire row or column are rotated clockwise when the corresponding row control at right or column control at the bottom is pressed. These controls are indicated by asterisks. A similar puzzle was seen in the electrical switchbox in Safecracker. The starting point of the puzzle is one of the five handprints in the bottom row, selected by clicking on the handprint itself, at which point a narrow red pointer is show underneath to indicate your choice:
Valid points along the path are lit up. After some experimentation with the puzzle, the following rules become apparent: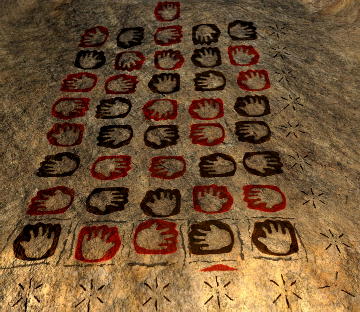
The two alternation rules (color and handedness) allow the puzzle to be analyzed before any moves are made. Classify each handprint as follows:
DR: Red right-handed print(The last letter of red is used to avoid confusion with handedness.) Using this notation, the puzzle grid can be represented as:
BL: Black left-handed printDL: Red left-handed print
BR: Black right-handed print
Since the final handprint above the grid is DR, all other handprints on a solution path must be either BL or DR, and therefore all DL and BR handprints can be ignored. A simplified grid can be produced, where + represents DR and - represents BL:
There is no way to include positions (R8,C4), (R6,C4), (R6,C5), (R5,C4), (R4,C1) or (R3,C1) in a continuous chain of alternating signs reaching the top, so these are also removed from consideration. The possible solution paths are shown below: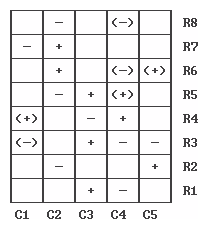
From position (R4,C3), there is only one possible path to the top. Therefore, the four shortest possible solution paths are: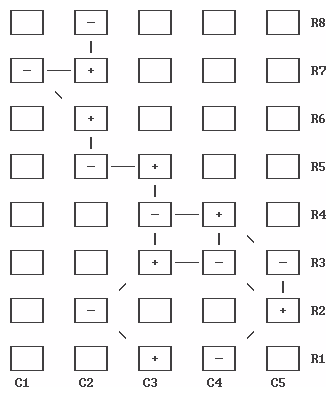
Path 1: (R1,C3) (R2,C2) (R3,C3)For each of these paths, finding a solution to the puzzle reduces to a problem of determining the numbers of row and column rotations that produce handprints all with fingers pointing upwards along the lit path.
(R4,C3) (R5,C3) (R5,C2) (R6,C2) (R7,C1) (R7,C2) (R8,C2)Path 2: (R1,C4) (R2,C5) (R3,C4) (R3,C3)
(R4,C3) (R5,C3) (R5,C2) (R6,C2) (R7,C1) (R7,C2) (R8,C2)Path 3: (R1,C4) (R2,C5) (R3,C4) (R4,C4)
(R4,C3) (R5,C3) (R5,C2) (R6,C2) (R7,C1) (R7,C2) (R8,C2)Path 4: (R1,C4) (R2,C5) (R3,C5) (R4,C4)
(R4,C3) (R5,C3) (R5,C2) (R6,C2) (R7,C1) (R7,C2) (R8,C2)
From the default puzzle starting state saved earlier and shown in the game screenshot above, the shortest solution is the following 13 moves based on Path 3, which can be played in any order:
Click on the (R1,C4) handprint to startThe resulting path to the top is:
Press C2 twice
Press C3 three times
Press C4 (one handprint lit)
Press R2 (five handprints lit)
Press R5 three times (ten handprints lit)
Press R6 (eleven handprints lit)
Press R8 (thirteen handprints lit)
Some of the solutions involving other paths result in inexplicable exceptions to the alternation rules, such as the shortest solution (R1,C4) C1 C2x3 R1 R2 R3 R4x3 R5x2 R7x3 for Path 2 (why isn't (R3,C3) lit?), and the shortest solution (R1,C4) C2x2 C3x3 C4 C5 R3x2 R5x3 R6 R8 for Path 4 (why isn't (R4,C4) lit?).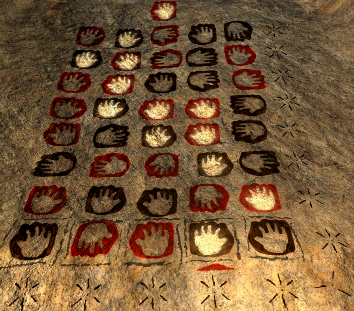
In the small cave overlooking an underground lake, pick up a Piece of leather from the ground. Pick up two bundles of straw from the corner and deposit each of them onto the lower lake level to cushion your fall. Pick up a Rope that was lying under the straw. Jump down to the water's edge. Since you've put both bundles of straw there, your landing is quiet enough not to wake the huge bear sleeping in the corner. Pick up a Piece of the wall from the sunlit portion of the rock. Climb back onto the ledge and put the Piece of the wall into the hourglass-shaped black hole in the wall to complete the painting.
Bear puzzle
Click on the wall to activate the puzzle. To vanquish the sleeping bear in the wall painting (and do the same to the real bear below), you'll have to throw four stones quickly and in a prescribed order. To throw a stone, follow these three steps:
1. A V-shaped crevice in the rock above the sleeping bearReturn to the lakeside and move toward the mess of bones. Look down and pick up Three stones and another Rope. Climb back to the ledge and approach the large flat stone. Place the Piece of leather there, then cut a couple of holes into the bottom of the leather with the hard-to-see awl at upper right. Add both Ropes to the project and pick up a Slingshot with three stones.
Result: The bear wakes up and looks to the left.2. Same target again
Result: The bear gets up and investigates the cave at left.3. The stalactite at top center
Result: The stalactite is no longer an obstacle to stone-throwing.4. The pile of large rocks at upper left
Result: Both the animated and real bears are neutralized.
Go back to the pile o' bones and look at the ceiling for some target practice. Use the Slingshot to shoot down the closest stalactite, creating a stepping stone you'll need to cross the water. Repeat for the next two closest stalactites. Replenish your ammo from the ground here, then shoot down the fourth and last stalactite.
Cross the water to a thin strip of rock in the middle of the lake. Move to the other end and pick up an Aurochs horn and a Long branch. Retrace your steps back across the lake and up to the ledge at the top of the shaft, then use the Aurochs horn to collect some embers from the fire there. Make a one-way trip back to where you found the horn and use it to light the fireplace on the rock in the water. This discloses a row of fourteen stag paintings on the cave wall.
Put the Long branch into the fire, then use it to ignite some of the fourteen clay pipes in front of the wall. Each time a pipe is ignited, the two or three pipes adjacent to it (but not at a diagonal) change state. One of two symmetric solutions is to light the following four pipes:
Stags puzzle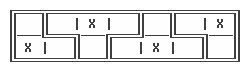
The object of this puzzle is to alter the sequence of cave paintings so that they are uniformly colored and form a continuous animation of a stag swimming across the lake and picking you up on the way to the other side. There are essentially two independent puzzles here: the first involving stag colors and the second involving the order of animation frames. Saving your game during the solution of either puzzle part does not retain the progress made. Number the stags from #1 at far left to #14 at far right. Playing around with the puzzle, you can discover the following rules:
It turns out that the smallest number of steps to configure the rider and all the stags with the same color is 14, regardless of which common color is chosen. Since gold is probably easier to distinguish on the wall than red or black, the solution below is based on that color. Perform the following steps (in any order):
Click on stag #2 twiceTo get the animation frames into the correct order, note that running the animation stops at stag #7, so that is the first incorrect frame starting from the right. The solution can be found by trial and error:
Click on stag #3 twice
Click on stag #4
Click on stag #5 twice
Click on stag #8
Click on stag #9 twice
Click on stag #10 twice
Click on stag #11
Click on stag #13
Press the arrow above stag #6 three timesOnce on the other side of the lake, exit the cave into the open air and a much warmer climate (or after an unseasonable snowstorm).
Press the arrow above stag #5 twice
Press the small arrow above the rider twice
Run the animation
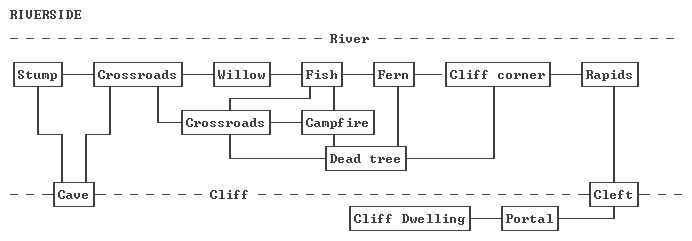
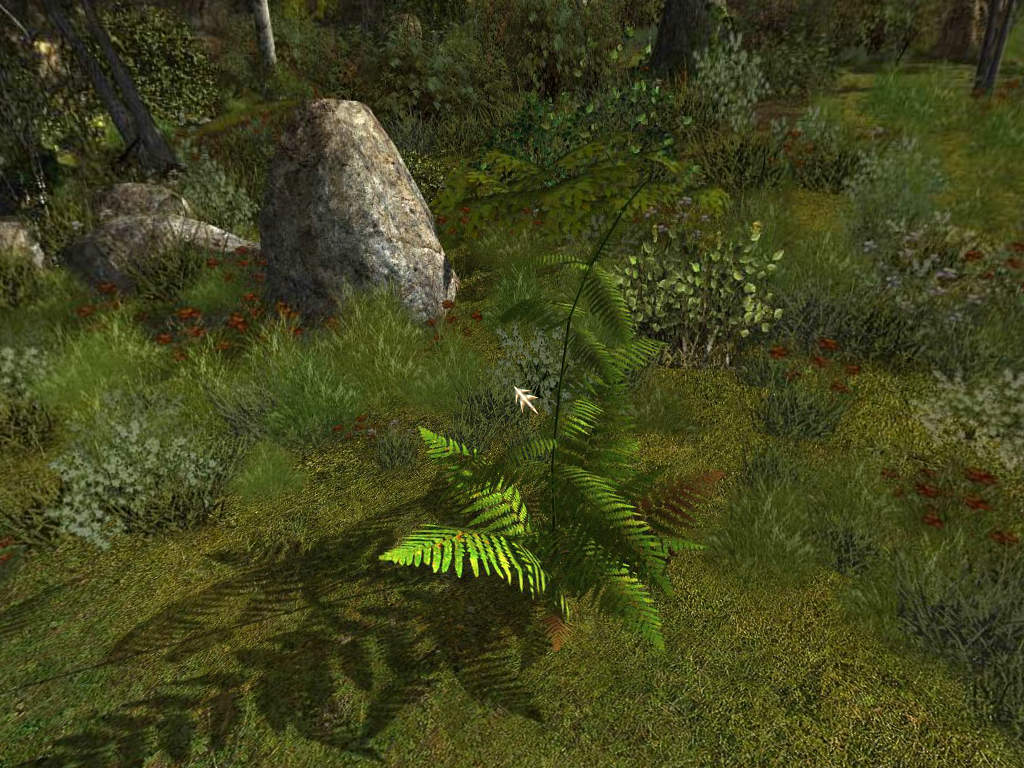
The cliffside forms a corner at this location. Pick up a small Knapped flint from the ground. Turn left and follow the upstream riverside path to a location with a large fern. Pick up a Shaft and the third Worked stone lying in the grass. Continue upstream to a rocky outcropping overlooking a narrow channel in the river, in which salmon can be seen. Pick up the Harpoon point from the rock. There are four path exits from this position; take the one leading uphill to a location with a dead campfire. Pick up a Strap and the fourth Worked stone from the ground near some red symbols painted on a rock.
Zoom in on the flat rock table next to the fireplace. To create a harpoon, place the Shaft and Harpoon point on the table, then add the Strap. Pick up the Harpoon and return to the salmon channel in the river. There is a row of four rocks here, which you can put into the river beside the ones already there to slow down the fish and allow one to be caught. Put the rocks into the river in the following order:
First Fourth Second ThirdWield the Harpoon and use it to spear a salmon when it pauses in the patch of clear water to the right of the rocks. Return uphill to the fireplace and talk to the carver Toar, who is the first real person you've met, and who conveniently appears once you've caught a tasty fish:
- I just caught a salmon.He gives you Marcasite and a Wooden recipient (bowl). Into the ashes of the fireplace, put the Tinder, Branches and Marcasite. Use the Knapped flint on the white Marcasite to create a roaring fire. Pick up the charred stick lying on the ground and use it to lever the large gray rock onto the fire.
- Right-click to end conversation
While the rock is heating, go back to the river and fill the Wooden recipient with water. Bring it back to the fireplace and put it in front of Toar. Use the charred stick to remove the heated rock from the fire (you may need to move the cursor around on the rock a bit to find the hotspot). Put the Salmon onto the steaming rock. Pick up the three small stones at lower right and put each into the fire. Pick up the Grilled salmon (turning it first if desired) and give it to Toar. Use the charred stick to knock the three steaming stones out of the fire. Try grasping one of the steaming stones, and Toar will give you a Wooden spatula. Use it to transfer each of the three hot stones into the bowl of water, then add the Camomile. Talk to Toar:
- They say you can recognize...Flint puzzle
Click on the stone table to start the flint-making. Up to four mistakes are tolerated, as indicated by the flint symbols at upper right. The three tools in the top row are an antler hammer, an awl and a stone hammer. The bottom row contains three candidate flints. Follow these steps to successfully create a flint knife blade:
Use the stone hammer on the middle flint three timesPick up the middle Core and give it to Toar. He returns it as a Knife. Talk to Toar:
Use the antler hammer on the middle flint twice
- I found some stones...and he gives you a fifth Musical stone and a hammer to play them. Take the exit to the right of the fire to return to the location of the dead tree. Click on the symbols on the cliff face to display the Musical stones. A sequence of four tones can be played on the stones using the bone hammer at lower right. As the sequence is played, the corresponding symbol on the rock turns red if the note occurs at the correct point in the solution, or black otherwise. The correct sequence can be determined simply by trying each of the Musical stones four times in a row. If the arc of stones is numbered 1 to 5 from left to right, the correct sequence is
- I'm going to try to reach...
- Right-click to end conversation
4 2 5 1The symbols disappear and are replaced by more abstract ones. Facing the cliff, use the path at left. The way forward around the cliff corner is now open. At the next position facing some river rapids, turn right and climb into the cleft between the rock cliffs. Continue upward and through a curtained portal.
Go back to Tika's room where there is a large shelf at left below a row of symbols. Pick up an Engraving of a fish and an Engraving of a stag. The eleven symbols here represent the segments of the gameplay so far, but they must be put into chronological order. Numbering the symbols from 1 to 11 left to right,
Click on symbol 2, then on symbol 1Place the following inventory items in order onto the shelf:
Click on symbol 5, then on symbol 2
Click on symbol 8, then on symbol 3
Click on symbol 11, then on symbol 4
Click on symbol 9, then on symbol 5
Click on symbol 8, then on symbol 6
Click on symbol 10, then on symbol 7
Click on symbol 11, then on symbol 8
1. Stag antlersTalk to Tika:
2. Bone engraved with a lion
3. Klem's painted stone
4. Spearthrower
5. Pebble decorated with a hand
6. Stick with a hole engraved with a bear
7. Engraving of a stag
8. Harpoon
9. Engraving of a fish
10. Knife
11. Figurine of a woman
- I'm sure you understood...Return to the room with the fish smoking, then continue to the end of the cliff dwelling. Turn left, move the Megaceros antlers to the sides and enter the cave. Approach a ledge in the back of the cave, behind to a large flat rock. Pick up some Resin, Powdered black pigment and a Piece of skin. Turn around and put some Animal fat at the near left and far right edges of the flat rock, then move the rock aside to disclose a jigsaw puzzle.
- Right-click to end conversation
Tablets puzzle
The following diagram identifies the tablet pieces to be placed in alphabetical order (the two pieces marked with an asterisk are stationary):
The different styles of painting on the tablets indicate that the solution is in two parts:
Exit the cave and pick up a Skin from the bone fence and a Bladder from the ground. Return to the fish smoker and put the Resin onto the pink receptacle in front of the fireplace. Pick up the Melted resin and turn around to face a flat rock. Put the Strap onto the large needle at the back of the rock. Put the Skin, Bladder and Vertebra on the rock, then sew it up using the Needle. Pick up the Waterskin and return to the tablets in the back of the cave.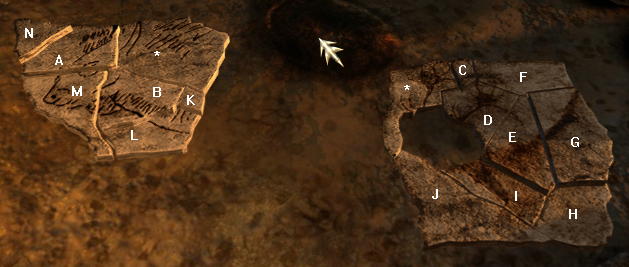
Apply the Melted resin to both tablets, then hold up the right-hand one
against the wall painting at right. Note the horizontal line of 8 red dots at
the bottom of the wall painting. Look down and move the cursor over the
left-hand tablet until it turns into the Reverse Cursor  .
Flip over the tablet to see that the reference image has an additional 5 red
dots on it.
Exit the cave and return to the cistern at the far end of the fish-smoking room.
Water is now magically flowing here, so moisten the Piece of skin with
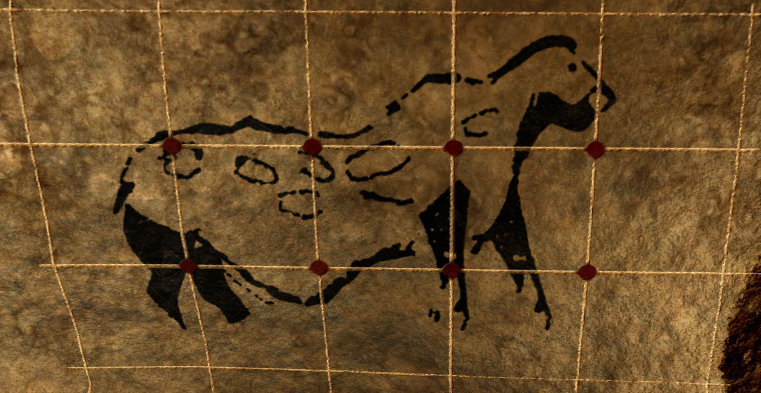
it. Go back to the wall painting in the cave and clean it three times with the
Moist piece of skin. Move to the other side of the cave and put the skin
you're carrying into the black pigment on the ledge. Return to the wall
painting and embellish it three times with the Wad of hide dipped in
paint to create:
.
Flip over the tablet to see that the reference image has an additional 5 red
dots on it.
Exit the cave and return to the cistern at the far end of the fish-smoking room.
Water is now magically flowing here, so moisten the Piece of skin with
it. Go back to the wall painting in the cave and clean it three times with the
Moist piece of skin. Move to the other side of the cave and put the skin
you're carrying into the black pigment on the ledge. Return to the wall
painting and embellish it three times with the Wad of hide dipped in
paint to create:
Go back to Tika's room and talk to her: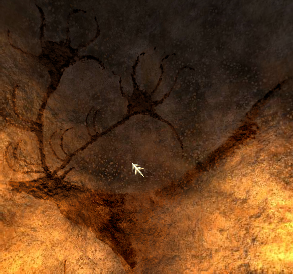
- I have a feeling...Exit the cliff dwelling and follow the river to the willow tree, near which you can obtain a Reed from the cattails there. Return to the cliff dwelling and give the Reed to Tika. If you haven't yet manufactured a Waterskin, Tike will insist that you do it now. Go back to the cave painting and wait a few seconds for Tika to show up and talk to you:
- Right-click to end conversation
-Right-click to end conversationShe's given you a blowgun, which is ready to use if you had some Powdered black pigment in your inventory. Use the Blowgun with pigment to add three dots to the left of the horizontal row and two to the right, as seen earlier on one of the tablets. Get your Knife from Tika and use it to complete the left and top edges of the rectangle in the lower left corner of the wall painting.
Return to the campfire and talk to Toar to get an Axe. Follow the river back upstream to where Tika is waiting by the stump. Use the Axe three times on the birch tree there to cut it down and cross the river.
{Cutscene}
Arok must have filled that waterskin along the way...
Tower of Hanoi puzzle
The object of this puzzle is to rebuild the pile of rocks at the base of the tree so Arok can reach its upper branches. The puzzle is equivalent to the standard one, with the smallest rock on the ground rather than on top of the tower at right. Warning: Under Windows, the Alt-Tab keystroke resets the puzzle to its initial state. A solution in 31 steps is to move the stones as follows:
Left to CenterAt this point, the top four stones are at left and the bottom stone is at right.
Right to Left
Center to Left
Right to Center
Left to Right
Left to Center
Right to Center
Right to Left
Center to Left
Center to Right
Left to Right
Center to Left
Right to Center
Right to Left
Center to Left
Right to CenterMove forward into the treetop and pick up the hanging Bull-roarer. There are also Pinecones and slingshot here, but you won't need them. Climb down from the tree and exit the campfire area. At the location of a rock shrine blocked by a barrier of sticks, pick up Juniper berries and a Juniper twig. Continue down the path toward two torches in the distance. At the location with a dead tree, pick up Spearmint. Continue along the path toward a group of several torches at the entrance to a cave. Pick up a Piece of bark on a rock at the base of the closest torch. Nearby, pick up a Little stick from the ground.
Left to Right
Left to Center
Right to Center
Left to Right
Center to Left
Center to Right
Left to Right
Left to Center
Right to Center
Right to Left
Center to Left
Right to Center
Left to Right
Left to Center
Right to Center
Enter the cave and immediately turn right. Pick up a pile of Powdered black pigment and directly below it, a Strap. Pick up a Block of ochre pigment near one of the lamps. Move deeper into the cave and Lharik will tell you to make a palette. On the ledge near him, pick up A tuft of hair. Exit the cave to the fireplace at the entrance. Put the Little stick, A tuft of hair and the Strap (in that order) onto the stone in front of the fire, then pick up the Brush.
Rotate right to a mortar and pestle. Place the Piece of bark onto the stone to the right of the bowl to serve as the base of the palette. Put the Block of ochre pigment into the mortar and grind it up with the pestle. Pick up the Powdered yellow pigment and put it onto the palette. Also put the Powdered black pigment, Brush, Piece of skin and Blowgun onto the palette. Return inside the cave and pick up another Block of ochre pigment, then go back and put it into the fire. Note that it is dropped at the closest edge of the coals and instantly turns from yellow to red:
Use the Wooden spatula to remove the red rock from the fire, then deposit it into the mortar. Use the pestle to turn it into Powdered red pigment, and add that to the palette. Finally, grab a drop of water from one of the tiny hotspots on the rivulet at right and moisten the red pigment on the palette. Repeat for the yellow and black pigments. At this point, the palette is complete and you can pick it up and give it to Lharik in the cave. He adds a black stone to the palette, but you won't need it. Go through the closed curtain and approach Klem on a raised platform at the back of the cave: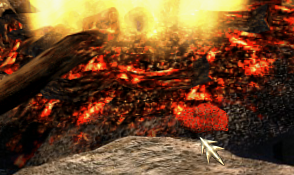
- Maybe your dream had another meaning.Exit through the curtain and talk to Lharik:
- Right-click to end conversation
- Klem asked me to help him paint...Give the Bull-roarer to Lharik and get a Figurine of a bull in return. Go back through the curtain and put the Figurine of a bull onto the rock with five lamps, which casts a shadow on the ceiling at right. You won't be able to reach the paintings there, so exit through the curtain and talk to Lharik again:
- Right-click to end conversation
- I have another problem...Exit the cave and give the Spearmint and the Juniper berries to Tika sitting by the fire. Return to the location of the dead tree and use the Axe on it three times to obtain A gnarly tree cut on a slant. Go back into the cave and listen to Klem. Climb onto the raised platform at the back of the cave and pick up two more Musical stones (for a total of seven). If desired, click on the stag painting on the wall for a brief animation. Climb down, move forward and put A gnarly tree cut on a slant next to the mess of poles in front of a low tunnel. Move toward the bull shadow on the wall.
- Right-click to end conversation
Bull painting
The objective is to paint the bull projected on the wall using materials on the palette you created earlier. Up to seven mistakes are tolerated, as indicated by the row of small palette symbols at the upper right. Warning: Under Windows, the Alt-Tab keystroke resets the puzzle to its initial state.
Pick up the purple Brush from the palette and note that its cursor hotspot is midway along its length. Click it on the black pigment, then on:
The other Musical stones have no effect on the bull. It seems reasonable to assume that the correct sequence of leg movements would simulate the walking gait of a prehistoric auroch, which if it's like that of modern ungulates would be:
Stone Motion 2 Bull's front left leg (FL) 3 Bull's front right leg (FR) 4 Bull's back left leg (BL) 6 Bull's back right leg (BR)
or some cyclic rearrangement of that since we can't be sure which leg moves first. As a result, there would be only four possibilities to test on the Musical stones:
BL FL BR FR
Sequence 1: 4 2 6 3Inexplicably, none of these sequences is the answer. Instead, we are faced with needing to check as many as 4! = 24 possible orderings of legs/stones until one is accepted as the solution. This would be a maximum of 96 stone clicks (24 orderings times 4 clicks each), but a much shorter 33-click sequence known as the superpermutation of 4, can be used instead. Mapping that shorter sequence to the Musical stones produces the test sequence
Sequence 2: 2 6 3 4
Sequence 3: 6 3 4 2
Sequence 4: 3 4 2 6
2 3 4 6 2 3 4 2 6 3 4 2 3 6 4 2 3 2 4 6 3 2 4 3 6 2 4 3 2 6 4 3 2The correct combination of stones is found near the end of this sequence, corresponding to the leg motions
or in other words, an auroch walking backwards.
FR BR FL BL
After the above sequence is entered, a short animation plays and a second bull painting is created on the wall (the solution sequence may need to be re-entered if the bull twitches its legs but does not move along the wall).
Click on the wall again, and the process is repeated for the second bull. This time, the following motions are produced by the Musical stones:
The correct sequence of Musical stones to strike corresponds to the same FR BR FL BL sequence used for the first bull:
Stone Motion 1 Bull's front left leg (FL) 2 Bull's back right leg (BR) 5 Bull's front right leg (FR) 7 Bull's back left leg (BL)
5 2 1 7Move toward the open curtain and zoom in on the wall next to Lharik.
Rotational slider
Save your game at this point. A 5 x 3 grid is displayed, consisting of a jumbled arrangement of squares corresponding to the cave painting of an animal. Note that clicking on most squares alternates between portions of an image in black and a somewhat-different one in red. A ghostly background of the black image can be seen on the squares. It can also be seen on the framework of stretched hide facing Klem. Start by setting all squares to the black image by pressing the following ten squares marked with an X:
The resulting jumbled arrangement is: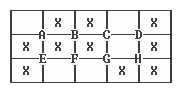
This is a "rotational slider" puzzle as seen in other contemporary games such as Safecracker. Any of the eight groups of 2 x 2 squares can be rotated clockwise by pressing the red button at the center of the group. Those buttons are indicated by the letters A - H in the diagram above. Warning: Under Windows, the Alt-Tab keystroke resets the puzzle to its initial state (as does moving to any other position in the cave). A 20-step solution is: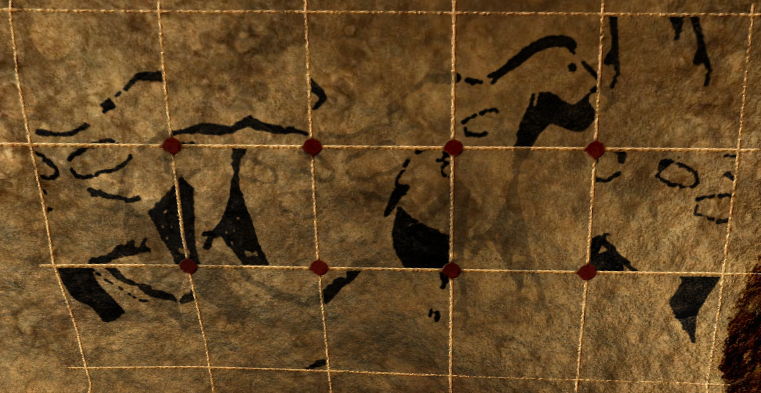
C D E2 A BOn completion of the puzzle, the animal grows horns and gets colored.
This completes the top row of the image
F2 G2 F E2 H G F E G2 H
This completes the black image:
Red animal (optional):
To solve the other version of the puzzle, restore your saved game and press the following four squares marked with an X:
The resulting jumbled arrangement is: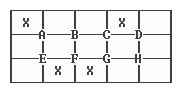
A 20-step solution is: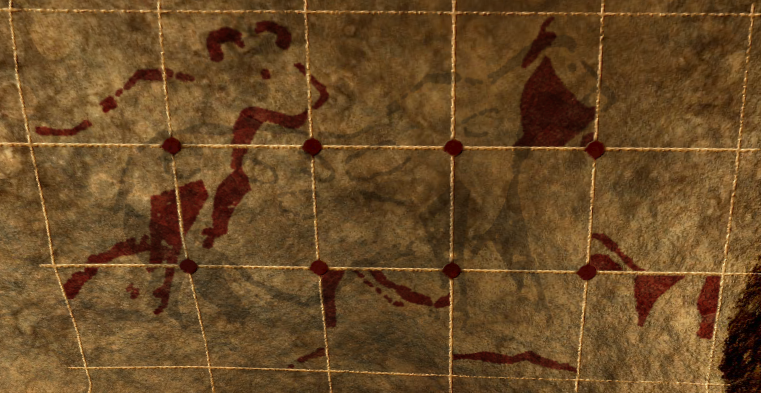
H2 C B C E2 B AThe image of what might be a predator is produced:
This completes the left column of the image
C3 H2 G D F2 C B
but no payoff animation is displayed, and the black version of the puzzle still needs to be solved to progress in the game.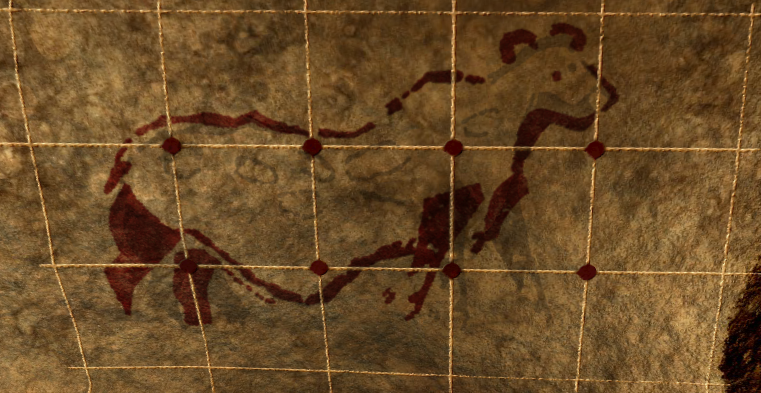
Pick up A gnarly tree cut on a slant and move it to the opposite side of the cave.
Painting the stags
Save your game at this point since any changes you are about to make are retained. There are three animals on the wall to paint here, using materials from the palette you created earlier:
Up to seven mistakes are tolerated, as indicated by the row of small palette symbols at the upper right. Clues are indicated by the strokes of color above each animal. Warning: Under Windows, the Alt-Tab keystroke resets the puzzle to its initial state.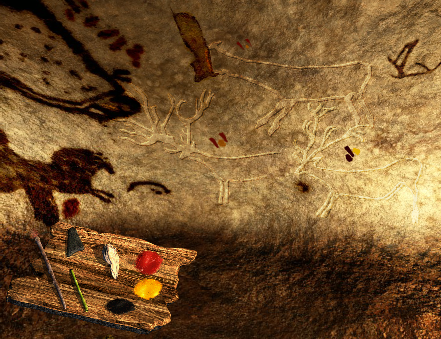
The shortest solution is:
- I think my work is finished...Exit the cave and return to the shrine with the barrier of sticks.
- Right-click to end conversation
Shrine puzzle
Save your game at this point since any changes you are about to make are retained. In this logic puzzle, there are nine horizontal sticks, denoted by A - I and colored black, white or red(dish). There are also twelve vertical poles, numbered V1 through V12 left to right:
With the exception of poles V5 and V6, each stick or pole can be rotated clockwise or counterclockwise using the corresponding red >>> or <<< symbols on the rock overhead. Sticks can be moved to the left or right using the red arrows there. The objective of this puzzle is to clear a path into the shrine between the immobile poles V5 and V6. Arok is assumed to be shorter than those poles.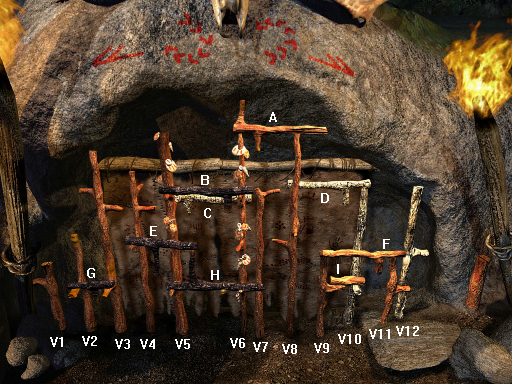
It will be shown later that pole V3 needs to be rotated from its initial position, so it cannot be used to support black H. Therefore, H must move to the right and red I must also move to the right to make room for it. To support the right side of the short I stick, pole V11 must be rotated. Since no pole can be rotated if it's supporting a stick, red F must be moved first:
Next, determine if white C can be moved to the right. To do that, we'll need to take a look at the back side of V8 to see if it has a spur at the height of C. Free up pole V8 with the following steps: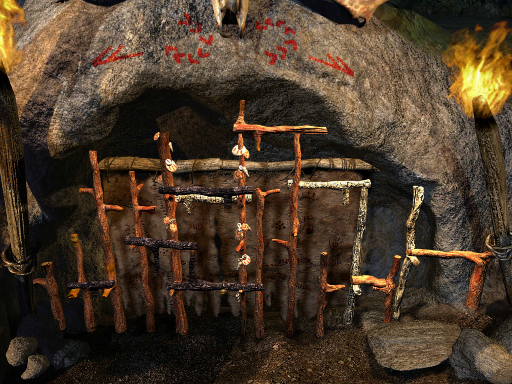
Poles V3 and V4 must be rotated to support white C. To allow this, first move black G and black E: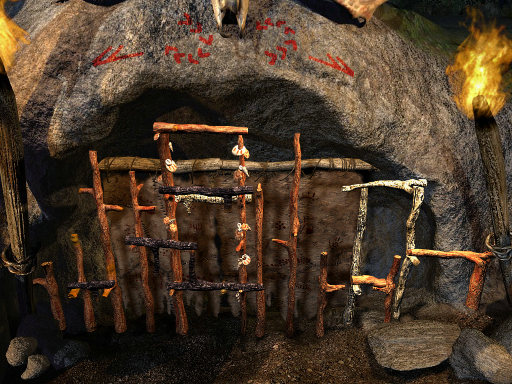
The arrangement now is:
Move the remaining sticks blocking the shrine entrance: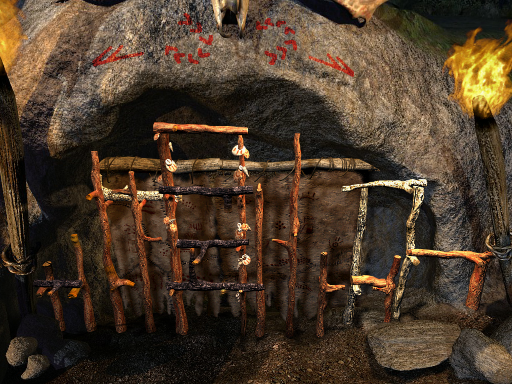
Pick up a Sorcerer's headdress and an Oil lamp.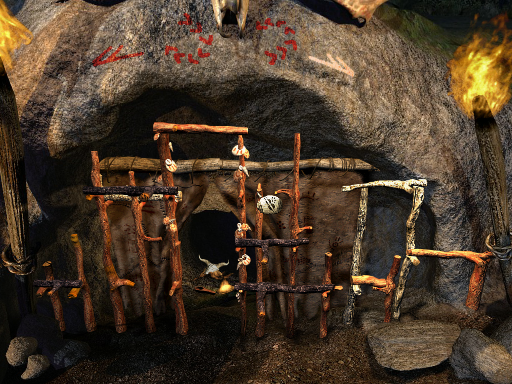
Ceremony puzzle
Return to Klem's location in the cave and put the Sorcerer's headdress and Oil lamp on the ground in front of him. Add the Animal fat and Juniper twig to the lamp. Turn around and pick up the thin stick lying on the stone with four lamps. Click the stick on one of the lamps to light it. Slowly and smoothly rotate left and use the stick to ignite the lamp (moving too fast here blows out the flame, apparently). Following Klem's instruction, drink from Tika's bowl at left. After some dialog, click on the rectangular animal skin to activate the puzzle:
In the first part of the puzzle, you must use the bone hammer at lower right to match the tones on the arc of Musical stones with the tones of the stones on the skin. As each tone is successfully matched, the corresponding symbol is copied to the matching Musical stone. The matching can be performed in any order. Let the seven stones on the animal skin be numbered from 1 to 7 left to right, and similarly for the arc of Musical stones. You have unlimited attempts to complete this task, and trial and error produces the following solution: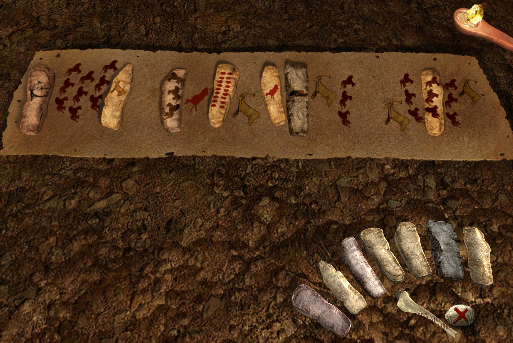
For example, one of the matches is produced by striking the bone hammer on the leftmost stone on the animal skin (#1), then striking it on the rightmost Musical stone (#7) at lower right (or vice-versa).
Stone on animal skin 1 2 3 4 5 6 7 7 4 1 2 3 5 6 Musical stone
For the second part of the puzzle, click on the animal skin again to activate it. Observe the symbols written on the skin between the stones and note that each corresponds to one of the Musical stones. Also note that each vertical grouping of three dark red horses on the skin corresponds to the image on the Musical stone second from the right:
Based on these correlations, the left-to-right sequence of 18 symbols on the skin (including its stones) can be entered by striking the Musical stones with the bone hammer in the following order:
7 6 6 6 4 1 3 2 4 3 5 4 6 4 6 6 6 4Be sure to let the echos die out so that multiple hits on stone #6 can be distinguished.
{Endgame cutscene}
Click to skip the credits and return to the main menu.
Copyright © 2020 Balmoral Software (http://www.balmoralsoftware.com). Portions copyright © 2005 Kheops Studio. All rights reserved. Republication, redistribution or conversion is expressly prohibited without the prior written consent of Balmoral Software.