Copyright © 2019 Balmoral Software (http://www.balmoralsoftware.com). Portions copyright © 2007 Nobilis Group. All rights reserved. Republication, redistribution or conversion is expressly prohibited without the prior written consent of Balmoral Software.
Press the Auto key to store collected items separately
Note that there are five (darkened) tabs at the top of the inventory screen that are used to access more items
To disassemble or empty an item, click it on the wrench icon
To combine more than two inventory items, click one on the other, then select the next one and click it on the question mark in the equation box
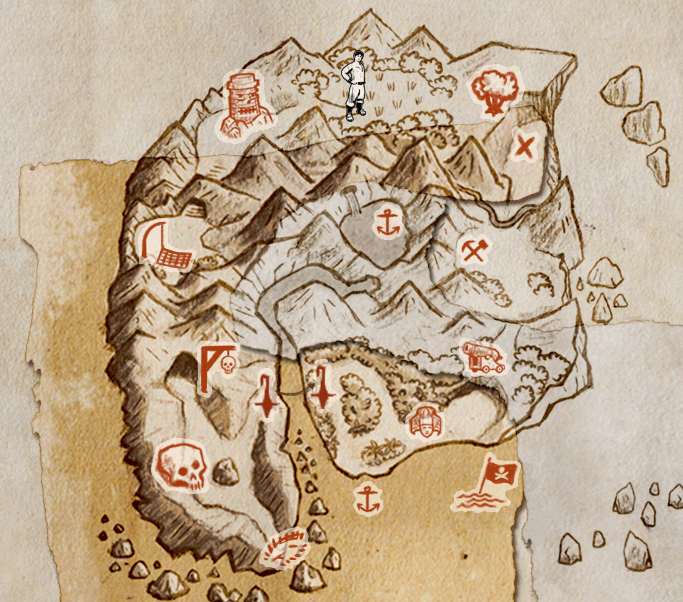
Use the Map button for quick navigation on the island
You can right-click to skip through cutscenes and dialog
This walkthrough provides a minimum path through the game; other gameplay sequences and dialog choices can provide additional backstory elements
Take the Black spot, Thick rope, Lighter, Rope & Sextant
Open the window
Take the Message from the parrot
The parrot makes a reference to the 7 seas
The Map and Enigma buttons in inventory are activated
To make the parrot leave the window, try exiting through the door, then move the mouse over the parrot
Combine Rope + Thick rope in inventory to make Knotted ropes
At the three decision points in the tying of the Sheet bend, select Lower, Upper, Lower
Use the Knotted ropes on the new hotspot that has appeared on the wooden bench arm
At the two decision points in the tying of the Mooring with half hitches, select Lower, Lower
Exit through the window
Turn around, move forward and then slightly left towards Skull Rock
Enter the cave
Take the Knifeblade, Empty helmet & String
Disassemble the Rusty knife
Combine Knifeblade + Knife Hilt + String to make a Knife
At the two decision points in the tying of the Constrictor knot, select Upper, Lower
Exit the cave and move forward twice, back to the location of the magnetized rock
Use the Knife on the wooden block attached to the spar lying on the beach
Take the Block
Turn around, move forward twice, then turn around to see a tree missing some bark
From the barkless tree, turn around and follow the path leading toward some dead trees
Use the overhead ropes
Take the Trolley Handle
Disassemble the Block
Combine the Trolley Handle + Wheel + Axle to make a Repaired trolley
Use the Repaired trolley on the overhead ropes
Move forward to cross the ocean inlet
Move forward to a location with a hammock
Take the Bottle of rum
Take the bunch of Bananas
Take the Right horn of a ram, which causes bird feathers to be dropped on the beach
Proceed down the path towards the beach
There is a firepit here, next to a stone snake
Take the Package wrapped in oilcloth
Turn left and move forward to see your dinghy
Turn around and move twice along the beach towards a sitting stone idol
The parrot intones "Nanasinrum"
Talk to the parrot
Are your songs as pleasing to the ear as your feathery finery is to the eye?The parrot responds with stanzas of the "Dead Man's Chest" song:
Fifteen men on the dead man's chest,Proceed down the beach to the right of the stone idol
Yo-ho-ho and a bottle of rum.Drink and the devil had done for the rest,
Yo-ho-ho, and a bottle of rum!The mate was fixed by the bosun's pike
The bosun brained with a marlinspike,And cookey's throat was marked belike
It has been gripped by fingers ten.There they lay, all good dead men
Like break o'day in a boozing ken
Yo-ho-ho and a bottle of rum
Yo-ho-ho and a bottle of rum[Suspend dialogue]
There is an animated crab here, but it will hide if you touch it with the cursor
Take the Red seashell, Blue feather & Yellow feather
Return to the stone idol
Translating the parrot's request "Nanasinrum" as "bananas in rum", you'll need to prepare a tasty dish for him
Combine the Knife + Bananas to make Banana slices
Remove the Cork from the Bottle of rum
Combine Banana slices + Empty helmet + Open bottle of rum to make a Helmet filled with bananas in rum
Talk to the parrot
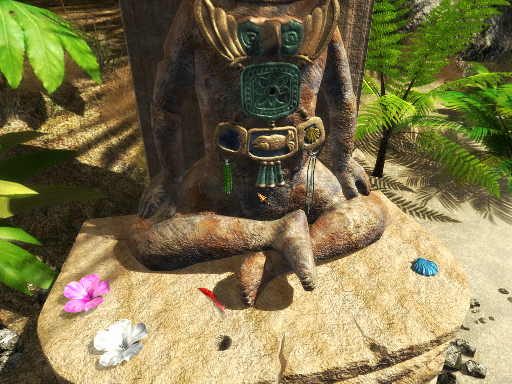
[Give helmet filled with bananas in rum]and a red feather is dropped at the base of the statue:
There is an open place for a seashell on the lowest part of the statue where a fish and a yellow seashell are located. There are two places for feathers at the upper left and upper right of the statue's chest. Using the Enigma's reference to sea colors reflected in the sky, place the yellow feather above the yellow seashell. There is no blue feather to correspond to the blue seashell at the foot of the statue, so place the red feather & red seashell on the left side of the statue. The Enigma refers to blended colors, so place the Orange (red + yellow) flower into the hole in the middle of the statue's chest.
Click on the hotspot below the yellow seashell to tie the Decorative knot (Upper, Upper at the two decision points)
Return to the location of the crab and use the Empty helmet in the pool of salt water to get a Helmet full of salted water
Use the Map button in inventory to move to the red icon at the far side of the
ocean inlet (Tyrolean Traverse)
Move forward to the barkless tree
Use the Knife on the tree
Take the Terracotta jar and use it on the tree
After a close call with some pushed boulders, return to the cave in Skull Rock
Disassemble the Package wrapped in oilcloth to get Oakum, Mallet & Caulking iron
Combine Oakum + Lighter with no wick to make a Lighter
Move the Fuel to the ashes and ignite it with the Lighter
Put the Helmet full of salted water into the fire to get a Helmet full of salt
Put the Cold resin into the fire to create Hot resin (lasts for about 60 sec.)
Take the Broken statuette
Combine the Broken statuette + Hot resin to make a Figurine
Put the Figurine onto the stone floor opposite the other one
Shadows are thrown on the wall
(If you leave it for a while, the fire will die down and the shadows will disappear, but you can restore the flames simply by moving the mouse cursor over them)
Wield the Mallet
Using the Enigma's reference to hook, pegleg, dagger and pistol, hit the following sequence of squares on the 6 x 4 grid where the shadows are cast:
This discloses an opening in the wall; take the Left horn of a ram
Take both Figurines
Exit the cave and return to the barkless tree location
Approach the gate in the distance
After the song is correctly completed, the parrot releases a hook from the gibbet
Take the Hook, Purse, Glass eye, Junk Watch & Scrap of cloth
Turn around and use the Hook on the wooden hatch
Put the Purse into the opening
Read the inscription on the metal plate on the hatch to see that the number of coins needed is the same as the (seven) seas. The Enigma indicates that 109 shillings are needed altogether. Mouse over the coins to get their values in shillings:
Doubloon: 48The only solution for the seven coins is:
Louis d'or: 28
Guinea: 23
Piaster: 5
Pistareen: 1
Move each coin to the opening, and the gate opens
Quantity Coin Shillings 2 Louis d'or @ 28 56 2 Guineas @ 23 46 1 Piaster @ 5 5 2 Pistareens @ 1 2 7 coins Totals 109
Take the Blackened bone
Combine Blackened bone + Cold resin
Put the Macabre Torch into the holder in the cave
Use the Lighter to ignite the torch
Enter the cave
The demo of the game ends here
Move forward twice through the trees to a gate
Turn left and click on the ram
Back at the exit from Gallows Cave, move the Shears to the ram
Look at the tattoo on the ram to see more of the island Map and Enigma. Note the reference in the Enigma to a verse about dogs and murderers that has a number.
Return to the gate and zoom in on its lock apparatus
Select the Black spot in inventory and see the number 22:15 associated with the verse in the Enigma
Drag up the four sabers until the numbers 2 2 1 5 are selected; the gate opens
Move forward
Bear forward to the right and get the fright of your life
Return through the gate to the stone bench
Take the Large disk & Small disk
Bear left along the cliff
Put the Large disk & Small disk into the corresponding receptacles
Noting the reference in the Enigma to
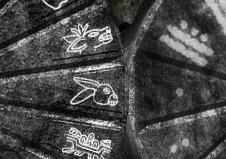
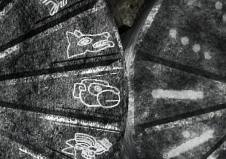
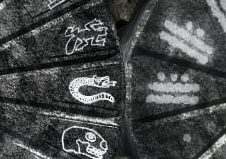
1 Rabbitdial each of these combinations by selecting the corresponding animal head on the left disk and the appropriate number on the right disk (each bar represents 5 and each dot 1):
5 Monkeys
13 Snakes
After each combination is correctly entered, a stone door gradually opens
1 Rabbit 5 Monkeys 13 Snakes
Go up the stone steps into the Hollow Head
Take another Package wrapped in oilcloth and disassemble it to get the Hull of a miniature boat, Masts & a Sailmakers' Kit
Combine the Sailmakers' Kit + Scrap of cloth to make Sails
Combine the Hull of a miniature boat + Masts + Sails to make a Model (boat)
Zoom in on the map on the table and pick up the Figurine with the thick sword
Referring to the clues in the Enigma:
Hook between two lakesplace the figurines on the appropriate black spots:
Saber near desert
Pegleg by isthmus
Scroll down in the Enigma subwindow if needed to disclose a clue about a three-master sailing for Cuba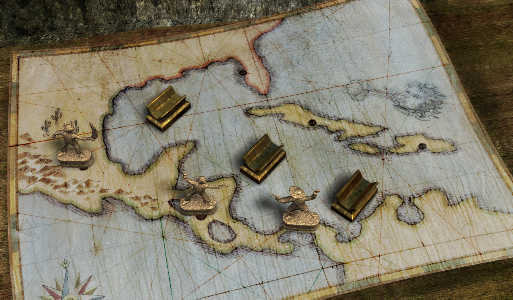
Place the ship Model near Cuba on the map and adjust its sails to solve the puzzle:
Take the Ram skull with its horns removed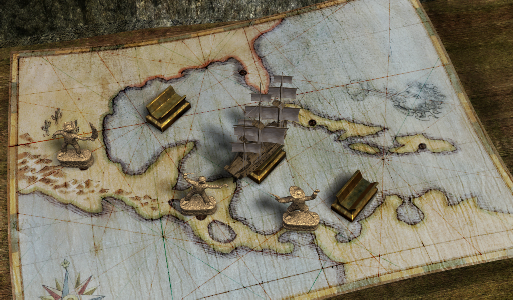
Combine the Ram skull with its horns removed + Left horn of a ram + Right horn of a ram to make a Skull of a Ram
Take the Model and exit the Hollow Head
Return to the stone bench and take the path on the right
Move forward twice to the edge of a swamp and take the Dried clay there
Move forward twice into the swamp and get stuck
Pick up the Hangman's Rope that Pepita has thrown to you (you'll get your revenge later)
Disassemble the Hangman's Rope
Combine Long rope + Hook to make a Grapnel
At the three decision points in the tying of the Capuchin knot, select Lower, Upper, Upper
Use the Grapnel on the tree
Use the Skull of a Ram on the two hooks in the three-trunked tree
Referring to the Enigma's clue about casting an eye, use the Glass eye on the skull
Disassemble the Grapnel back to its component parts, then use the Long rope on the tree root
At the four decision points in the tying of the Figure Eight knot, select Upper, Upper, Lower, Upper
Go down the cliff and feel a fever coming on
A big X is disclosed in the sand
Move forward, then turn right and move forward twice into some abandoned buildings
Scan upwards and take the Block
Rotate slightly left and take the Megaphone
Open the wooden crate and take the Long rope
Take Pick, Axle, Wheel & Short rope
Open the metal box and read the logbook inside. Several pages along, learn that forging molds need to be made from sand and clay. Further along, learn about a self-contained underwater breathing apparatus.
Combine the Block Cheek Plate + Wheel + Axle to make a Block
Combine Block + Block + Long rope to make a Tackle
Use the Tackle on the hook overhanging the pit Pepita is in
At the one decision point in the tying of the Clove hitch, select Lower
Use the Short rope with the Tackle on the framework
At the three decision points in the tying of the Bowline, select Upper, Lower, Lower
Disassemble the Pick to get a Handspike & Pick Head
Use the Handspike with the capstan
Push the Handspike to rescue Pepita
Take the Handspike & Tackle
Move out of the mine buildings to see a short rope ladder and a note attached to the wooden fence
Examine the note to learn that Cinchona bark tea will cure swamp fever
Go up the ladder and fill the Empty helmet with the water in the wooden box
Use the Knife on the tree twice to get a Piece of bark shaped like a heart
Return to the capstan, then turn left and enter the forge
Move the Fuel to the firegrate and ignite it with the Lighter
Put the Helmet full of fresh water into the fire
You now have about 20 sec. while the water is boiling to quickly combine the Helmet full of boiling water + Piece of bark shaped like a heart to cure your fever
Use the Map to return to the location with the X in the sand
Combine Pick Head + Handspike to restore the Pick
Use the Pick with the X
Zoom in on the pirate chest
Put the Glass eye into the skull
Take the Damaged Carriage at right
Disassemble the Sextant to get a Vernier, Lens & Small Mirror
Combine the Small Mirror + Damaged Carriage to make a Repaired Carriage
Put the Repaired Carriage into the curved groove of the chest
Disassemble the Junk Watch to get Gears & Watch case
Put the Gears into the holder at the front of the chest
Put the Lens into the holder at left
Use the lever above the gears to select the left-hand mirror
Use the white arrow buttons at the front of the chest to move the mirror two positions away from the right end of its curved groove
Use the lever above the gears to select the right-hand mirror
Use the white buttons to move that mirror to the far end of its curved groove
Click directly on the two mirrors to tilt them so that a ray of sunlight is directed to melt the chest lock at left:
Take the Bar & Treasure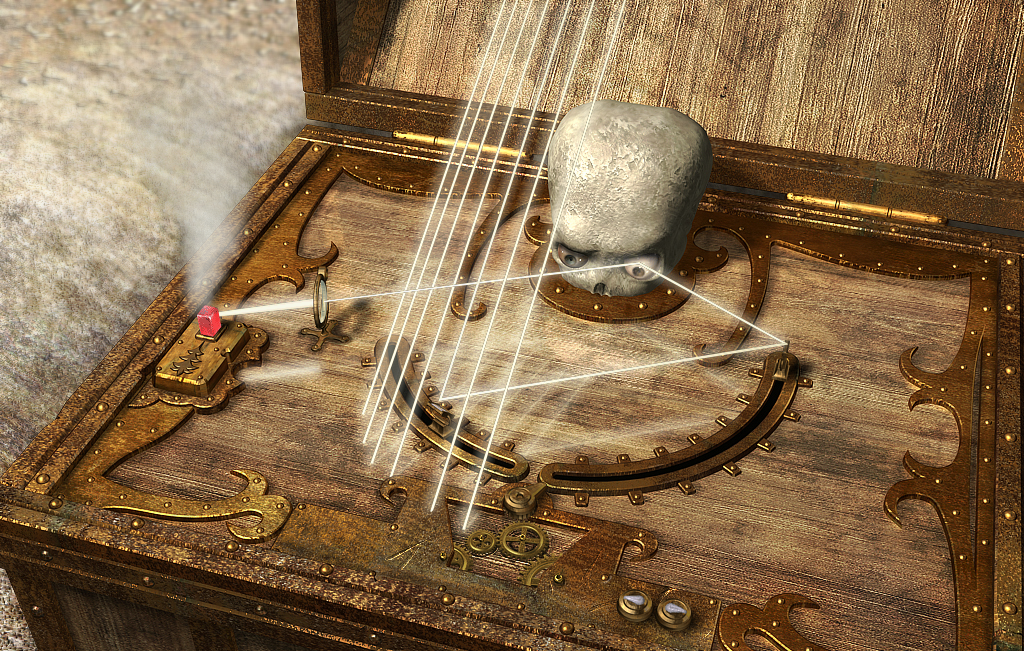
Learn of a second treasure to be found
Take the Sand to the left of the chest
Return to the capstan, turn right, and put the Bar into the triangular hole of the rusty water tank
Turn the tiller wheel to fill the sluice
Fill the Empty helmet with water from the sluice
Put the ship Model into the sluice
Follow the sluice downstream and take the Parchment from the model ship to get the final piece of the island map
Talk to Pepita
Explain the whole story to me, from the beginning.Return to the forge
Where is Long John hiding?
Use the Sailmakers' Kit to repair the bellows
Move the Extension Tube to the end of the bellows
Put the Treasure into the Empty crucible over the fire
Combine Sand + Dried clay + Helmet full of fresh water to make a Mixture of water, sand and clay
Turn around and put the Mixture into the wooden hopper at left
Move the Hemispherical Model to the center post on the table
Move the Empty Molding Box onto the Hemispherical Model
Move the Mixture into the mold
Take the Full Molding Box and place it into either of the stone receptacles at right
Move the Conical Model to the top of the Hemispherical Model
Move the Empty Molding Box onto the Hemispherical Model
Move the Mixture into the mold
Remove the Conical Model plug and set it aside
Take the Full Molding Box and place it on top of the other molding box
Pull the chain handle to operate the bellows
Use the Tongs to pick up the Crucible filled with molten metal and pour it into the prepared mold
Return the crucible to the firegrate
Open the mold and set it aside
Take the golden Cannonball
Return to the short rope ladder, then turn right and move to the cliff beyond
Climb the long rope ladder there up to the dead tree
Enter the one-room fort
Take the Tubes, Fish-hook, Perforated waterskin & Pole
Disassemble the Sailmakers' Kit to get Needle & Thread
Combine Pole + Fish-hook + Thread to make a Fishing pole
At the three decision points in the tying of the Uni Knot, select Lower, Upper, Lower
Exit the fort, turn around and climb on top of the roof of the fort
There's a hole in the roof here that may have been caused by a cannon misfire...
Use the Fishing pole to pick up the Powder horn
Disassemble the Snagged powder horn
Use the Fishing pole to pick up the Tobacco pouch
Disassemble the Snagged tobacco pouch
Combine the Tobacco pouch + Full powder horn to make a Booby-trapped tobacco pouch
Combine the Booby-trapped tobacco pouch + Fishing pole
Use the snagged booby-trapped tobacco pouch on the table between the pirates
Use the Short rope to tie up the pirates
At the two decision points in the tying of the Double loop bridle knot, select Lower, Lower
Take the Bullets, Netting needle & Unloaded pistol
Note the pirates' (your) ship offshore
There's a rope ladder down to the beach here
If you try to go to the Flowery Coast, the ship will fire on you. If you try to go to Hollow Head, you'll be blocked by the swamp. You can use some Branches there to cross the swamp, but will then be blocked by an armed pirate. Instead, return inside the fort.
Open the barrel
Fill the Empty powderhorn at the barrel to get a Full powderhorn
Combine Full powderhorn + Unloaded pistol + Bullets to get a Loaded Pistol
Move the Swab to the cannon to clean it
Return the Swab
Move the Empty gunpowder shovel to the barrel and then to the Cleaned cannon
Return the shovel and move the Rammer to the cannon
Return the tamper and add the golden Cannonball to the cannon
Disassemble the Pick again
Put the Handspike onto the left side of the cannon, then use it to tilt the cannon forward
Add the Tackle to the right side of the cannon
Pull the knot in the ropes to get the cannon into position
Use the Oakum on the Linstock leaning against the wall
Use the Lighter on the Unlighted linstock
Move the Linstock to ignite the cannon and sink the ship
Use the Map to return to the Forge and mine
Remove the Extension Tube from the bellows and set it aside at right
Combine the Perforated waterskin + Tubes to make a Strange Device
Put the Strange Device on the bellows
Pull the chain handle to operate the bellows
Take the Diving apparatus
Return to the sluice and refill the Empty helmet with water
Use the Map to return to Cape Fear
Use the Needle on the magnetized rock to make a Magnetic needle
Use the Map to return to Snare Valley
Turn left and use the Netting needle on the net hanging from the tree to reset the trap
Return to the Hollow Head and pick up the Large disk & Small disk
Go inside the Hollow Head and use the Megaphone on its mouth
Take the Key from the trapped pirate
Use the Map to return to the Idol on the beach
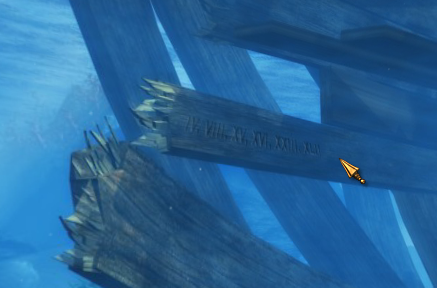
Turn around and Dive to the wreck
The Cannonball is here, but you don't need it
There are Roman numerals for the Lost Numbers 4, 8, 15, 16, 23, 42 here
Use the Handspike on the giant clam and take the Surgeon's Case
Disassemble the Surgeon's Case (you can do this underwater apparently) to get Forceps & Amputation Saw
You can leave the Handspike behind
Look up at the surface of the water, rotate and exit
Return to the dinghy on the beach
Rotate left and use the Forceps to remove the nails from the loose planks
Use the Amputation Saw on the planks
Use the Oakum on the boat
Turn around and return to the stone snake on the beach
Put the Fuel into the firepit and ignite it with the Lighter
Put the Cold resin into the fire
You now have about 60 sec. before the resin cools
Return to the dinghy and use the Hot resin on the boat
Enter the boat
At the three decision points in the tying of the Anchor hitch, select Lower, Lower, Upper
Go ashore and ring the bell twice
I've got another proposal for you: I'll trade Pepita for a treasure map!Combine the Open bottle of rum + Cork
[Suspend dialogue]
Put the Bottle of rum into the wooden box the pirates have lowered
Talk to the parrot and he flies away
Take the Twin Daggers
Go back aboard the boat
Put the Twin Daggers on the matching design on the rock
Use alternating daggers to trace out a path to the top:
Turn to the right and follow the stone steps up (twice)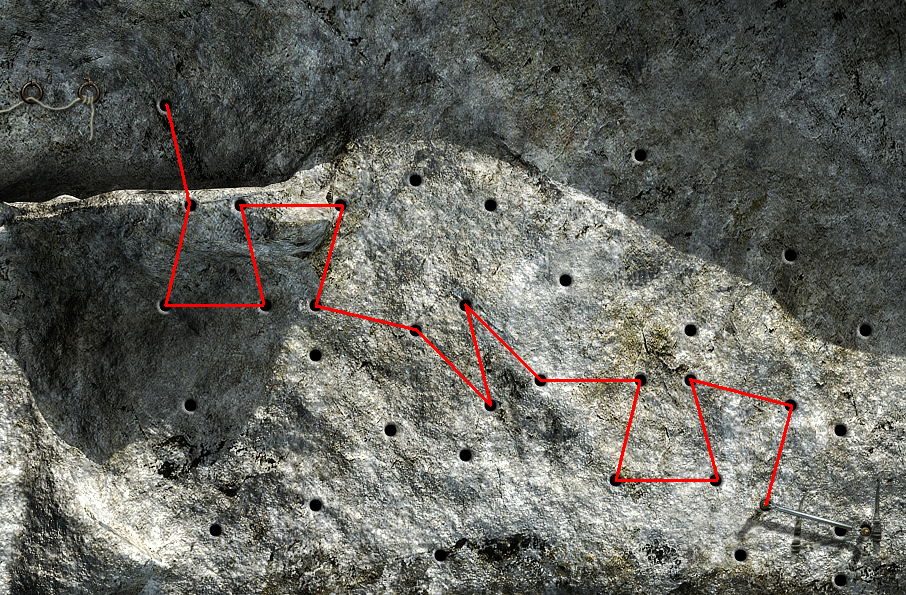
[Suspend dialogue]
Attempt to shoot the pirate with the Loaded Pistol
After the pirate shoots himself in the foot, turn left and pick up the Bottle of rum
Turn left and pick up the Mirror from the table
Turn around and use the Key on Pepita's manacles
Learn of a Mayan Inscription:
Let them answer all three beneath the serpents' gaze:Turn right and put the Large disk & Small disk into the receptacles
From south to white north, how many days?
From south to west, how many to count?
And from west to north, add what amount?
When 'twixt their arms the moon takes shape,
The dazzle of riches will leave all agape.
After Pepita explains the Mayan calendar, turn around and empty the Helmet full of fresh water into the green hole
Use the Damp sponge on the colored circle surrounding the water
You'll need to determine which direction is north, so disassemble the Bottle of rum to get a Cork
Combine the Cork + Magnetic needle to make a Compass
Put the Compass into the water and it will point to the left
Examine the white North symbol the needle is pointing at to identify it as 1 Flint, as shown in the upper-right corner of the screen. Mouse over to identify the other compass directions mentioned in the Mayan Inscription:
South = 1 RainTilt up and rotate the stone disk(s) until the 1 Rain (South) symbol is shown:
West = 7 Monkey
You can tilt down to confirm your selection with the symbols surrounding the water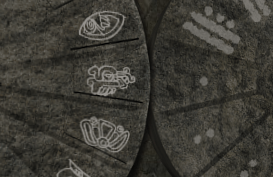
Count how many times (Mayan days) you press the white button below the stone disks in order to produce the 7 Monkey (West) symbol:
The answer is 32 days. From this result, the number of days to produce the 1 Fint (North) symbol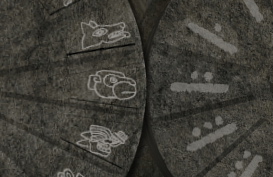
is 7 days. Finally, make a slight adjustment in the large disk to dial in the 1 Rain symbol and count 39 days from South to North. To summarize: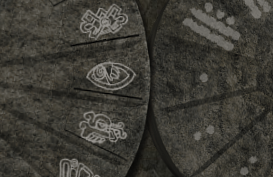
Turn and face the Mayan puzzle
Question Direction Number of days 1 South to North 39 2 South to West 32 3 West to North 7
The golden snake's head selects each of the three questions in the Mayan Inscription. For each question, one button of each color must be selected so that the three button values add up to the desired number of days. A little trial and error produces the following answers:
Don't forget to move the snake's head between the questions
Question Blue White Yellow Total 1 19 9 11 39 & one other solution 2 1 17 14 32 & five other solutions 3 3 2 2 7
Save your game at this point
For the second Mayan puzzle, the colored buttons must be pressed the correct number of times to duplicate the Moon design on the back wall. Each button cycles one of the three balls through the three colors blue, white, purple, and also rotates one of the three concentric circular arcs clockwise 1/3 of a turn. Identifying the six colored buttons from the first-person player's perspective, the following operations are possible:
From the default initial puzzle state, the following solution is the shortest:
Button Ball rotation Arc rotation Lower
leftCenter Upper
rightInner Middle Outer Left Blue X X Right Blue X X Left White X X Right White X X Left Yellow X X Right Yellow X X Rotations needed: 0 2 0 0 0 2
Press Left White button twicePut the Mirror on the table to get rid of the poisonous snake
Press Right White button twice
Press Right Yellow button once
The endgame sequence plays and the credits roll
Copyright © 2019 Balmoral Software (http://www.balmoralsoftware.com). Portions copyright © 2007 Nobilis Group. All rights reserved. Republication, redistribution or conversion is expressly prohibited without the prior written consent of Balmoral Software.