Copyright © 2026 Balmoral Software (http://www.balmoralsoftware.com). Portions copyright © 2019 by Attic Door Productions and Trilobyte. All rights reserved.
|
| ||
| ||
|
|
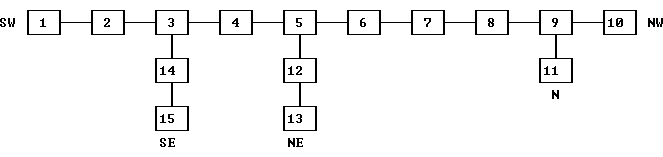
The navigation interface is standard for modern games -- the mouse is used to rotate the current viewpoint or as a puzzle interface, and the keyboard WASD or arrow keys are used for free motion throughout the environment. Unfortunately, there is no way to skip or pause cutscenes or dialog. The Stauf mansion's maps have the same layout as those in the earlier games The 7th Guest and The 11th Hour, but the ones in The 13th Doll have a new feature that allows free navigation to any of the open rooms in the mansion.
Games in progress can be saved into 10 slots, but their names are limited to only 11 characters. The saving mechanism is not the usual file-based method, but stores game status information and all 10 saved games in a registry key. It is necessary to export or import that key as individual .reg files in order to manage different groups of 10 saved games.
Note: The focus in this walkthrough is on the puzzles and main threads of the game. Bonus achievements such as pixel-hunting to find tiny gold coins or laboriously discovering all the kickstarter backer names are described elsewhere on the Internet. In the puzzle solutions below, we've tried to provide some background or explanation on how we found them, rather than just stating the answers.
Puzzles & hints. There are generally no more than a couple of puzzles that can be left unsolved at any one time, so the game is rather single-threaded. Accessing the hint system or main menu while you are working on a puzzle resets it to its starting state. This can be an important consideration during lengthy puzzle solutions such as in the Maze or the Laboratory. With a few exceptions, most of the hints are obvious, so they may not be of significant help. For each puzzle, there are up to three hints provided at 2-minute intervals. If you're still stuck, you can skip the puzzle, but no information will be provided about how it's solved. Puzzles are generally not randomized, but some are in the form of a mini-game or exchange with a virtual opponent that may have a moderately sophisticated response algorithm.
Old man Stauf built a house, and filled it with his toys.Afterwards, you'll be presented with a Choose Your Character screen in which you can play as Richmond or Tad. Either can be selected, but we'll start here with Richmond. Refer to a later section when playing as Tad. The backstory and events of the game are the same for each character you play, but their points of view, many details, and all of the puzzles are different. There are three locations in the game containing dual puzzles, one for each player.
Seven guests arrived one night, their screams the only noise.
Blood inside the library, blood right up the wall.
Scurrying round the haunted house, my, my, the guests took deadly falls.
But brave young Tad climbed the attic stairs, facing many a fright.
His sacrifice freed countless souls, released into the moonlit night.
And while Tad's life perished with them, there's one thing you should know.
Though he saved so many others, the house won't let him go.
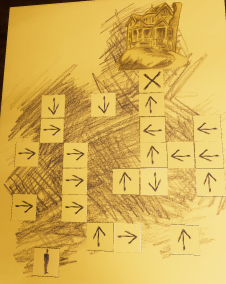
The objective here is to complete a path from the Guest figure at lower left to the Stauf mansion at upper right. Click on an arrow square to change direction, or click on the Guest to continue in the direction you were heading (up to four squares). This initial puzzle is simple enough to solve by trial and error, but it involves some backtracking. One solution is:
Click on Guest twiceIncidental animations in this room include:
Right
Up
Left
Click on Guest
Right
Click on Guest
Up
Sculpture on the desktopExit the office, follow the hallway to the right and enter the first door on the right (the only other one open).
Globe in the back corner
The objective is to complete a path from the lower right to top center by rotating and/or moving circles that all contain right angles for the path. Levers on the left side rotate clockwise and those on the right side rotate counterclockwise. To skip the derivation and jump to the solution, click here.
The choice of rotations for the first two circles in the bottom row are forced, and lead into a circle occupying the center of the 3 x 3 array. From that point, the path to the end takes one of two possibilities, looping either to the left or the right. Therefore, in each row there is one circle opposite the path whose orientation is of no concern. That region can be exploited to set up the correct final rotations in the sequence and then backing them into position by using appropriate slider moves. As in all puzzles in the game, you can reset it to its initial state by rotating away from the puzzle and zooming in on it again.
Numbering rows from top to bottom, here's a solution in 13 moves that follows the right-hand path:
Press the left lever in Row 2A cutscene plays in which a letter to you is read by Stauf:
Press the right lever in Row 3
Move the center circle downwards
Move the top center circle downwards
Press the left lever twice in Row 1
Move the upper left circle to the right
Press the left lever in Row 2
Move the left center circle upwards
Press the right lever in Row 2
Move the center circle to the left
Move the top center circle downwards
Move the upper left circle to the right
Congratulations, My Dear Player,An incidental animation in this room is:
For solving this First of My Special Puzzles.
Each One; each puzzle, will reveal to you a uniquely palpable piece...
...and, when you've successfully solved all my clever Puzzles,
These PIECES Themselves will come together...
unite, to Combine and form my greatest work;
the pinnacle creation of my career.
I'll have only you to thank!
So please, I implore you, do Continue with all my mischievous challenges.
Collecting, if you can, each critical component,
and then Personally participating in celebration of my finest achievement;
My Magnum Opus!
I'll hoping to meet you soon, dear friend
in the Flesh...
Yours,
Henry Stauf
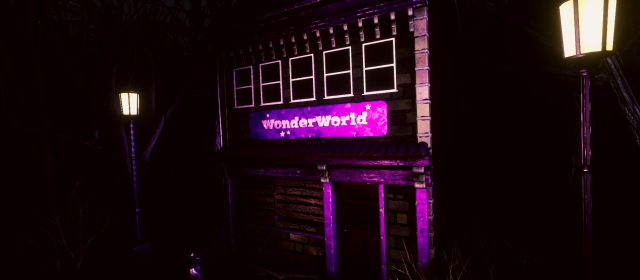
Radio on upper shelfExit the office and move to the right. A flock of black spots will run along the floor, reminiscent of the dust bunnies (susuwatari) from My Neighbor Totoro. Pick up Tad's doll head from the overturned wastebasket. That's the trigger for another cutscene with Nurse Vollmer that will play as you move back towards your own office. After a visit with Tad and a trip in the car, you'll arrive at Stauf's toy workshop "WonderWorld".
Move around the left side of the building and click on the ladder in the back. In keeping with the theme of boxes lying around, here is a standard warehouse puzzle, the object of which is to vacate the outlined square at lower right: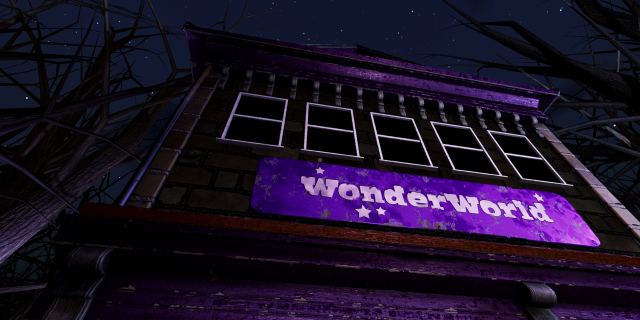
Pieces move until they are stopped by another piece. The basic strategy is to move pieces out of the way to allow the more interior ones to escape the square. In the diagram below, X refers to a piece that doesn't need to be moved. Here's a solution in 25 moves:
Solving the warehouse puzzle takes you through a one-way window into Stauf's upstairs office.
Many charming items in this room have incidental animations:
A female mannequinWhen you're done exploring, click the drama-mask cursor on the desktop and you'll be transported through the toy store area, which you will visit later when playing as Tad. Outside, Tad steals the car and you'll have to walk to the Stauf mansion.
An electrical power charger
A bottle of (deadly) Night Shade
A bottle of Black Leaves
A preserved octopus tentacle
A bottle of Witch something
A jar of eyeballs
A bottle of Bat Blood
A partial skull with X marks the spot
The skeleton of a toothy beast
Some preserved butterflies on display
The skeleton of a European hare (Lepus europaeus)
A spiral picture on the wall
A book "The Way of Evil Minds" on the chair
A newspaper on the table dated Tuesday, April 12, 1931 (but the twelfth was a Sunday!)
A dirty coffee cup
A Royal Sailing token in the left desk drawer
If you've completed a game playing as Tad, you now have access to a Bonus Puzzle in a cemetery outside the kitchen. Until the kitchen puzzle is solved, you'll be able to travel to or from the cemetery only through the map by clicking the brain cursor on the small doorway at the upper left of the kitchen.
Exploring the area to the right, the first table you come to has a strange portrait on top; this will be important later when you're playing as Tad.
Incidental animations in this room include:
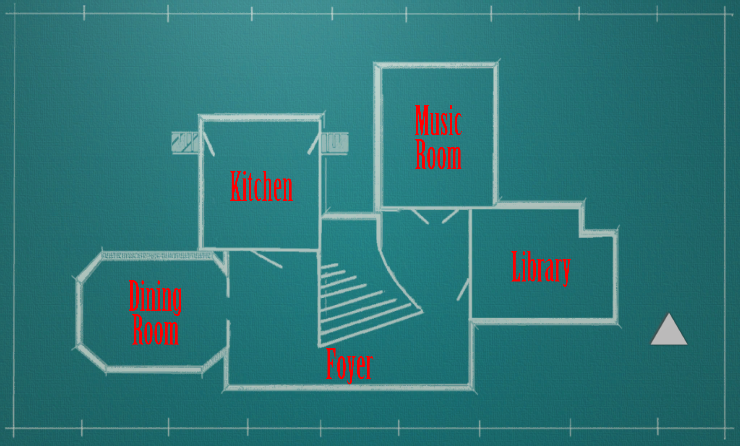
An origami bird on a coffee tableThe Kitchen and Music Room are the only open rooms at the moment. You can play these in either order; we'll visit the Kitchen first, whose entrance from the foyer is in the back to the left of the staircase.
Red roses on another coffee table
The objective is to add segments to complete connections between like colors without crossing the wires. This is a numberlink logic puzzle, for which one general strategy is to stay to the outside as much as possible. Noting the density of nodes in the lower portion of this puzzle, we might be able to snake the path of one of the colors in between the other two circuits. This is most easily done with the green path. There are two solutions to this puzzle, with only a minor variation between them; one is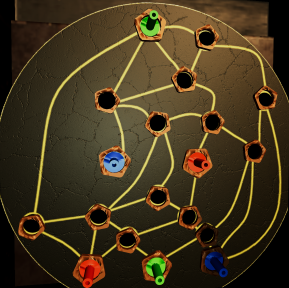
After a phone call with Stauf, you can explore further before heading to the Music Room. Incidental animations here include: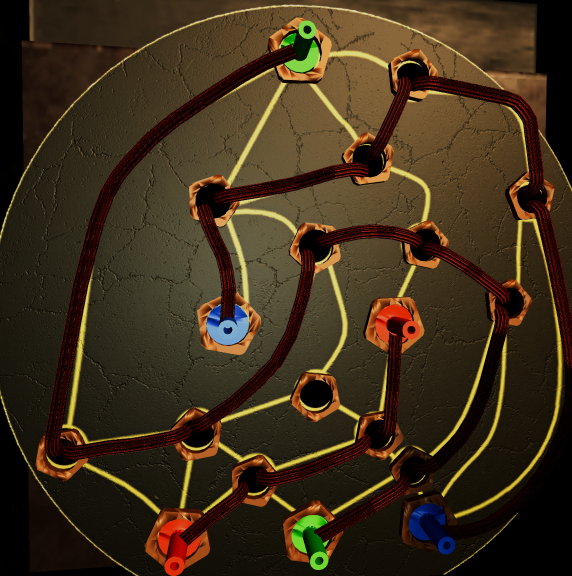
A can on the pantry shelf
Knives on the butcher table
A closed container next to the fridge
The scary denizen of a pot of tomato soup (maybe)
A Delft plate above the stove
A salt shaker near the entrance with a message seen in The 7th Guest
The game's background music is automatically silenced so it won't get in the way. The objective of the puzzle is to duplicate the 27-note tune played by the left button. Each of 13 horizontal bars corresponds to the time sequencing of notes at one pitch, but the bars are scrambled vertically. They can be swapped and/or rotated so that both sequencing and pitch match the target. To play the target sequence, press the left button. To test an arrangement of bars, press the right button. The rows here are numbered from bottom to top in pitch order as on a musical staff. To skip the derivation and jump to the solution, click here.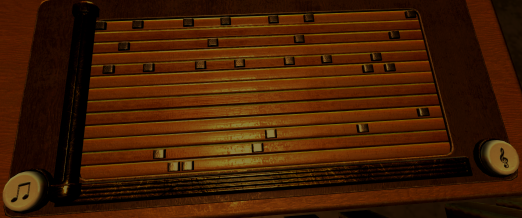
The puzzle is much easier to solve if you turn on the Hard of Hearing setting in the game's Options menu (the setting applies only to this puzzle). Otherwise, it requires a lot of aural pitch matching, which seems unnecessarily difficult for what is essentially a logic puzzle. With either button, the musical notes A through G# are then indicated in the order played. Also, you can press the same button again to terminate playback, which will be useful momentarily. First, notice that the number of bars has a correspondence with the 13 notes of a full octave on a typical diatonic scale. We can assume that the rows represent the usual C Major octave scale from C to C, but we really should confirm that. To do so, slowly press the left button twice to identify the first note of the target sequence as D. Reset the puzzle if necessary. The top bar has a note in the starting position, so swap it with one of the other bars. Slowly press the right button twice to play the first note of your attempted solution. If it matches the pitch of the target, you've found the row corresponding to the D note. It turns out that that row is third from the bottom, so the scale in the puzzle is indeed an octave starting and ending with C, with pitch increasing in the higher rows. The notation C1 is used for the C note in the top row.
We now have the following correspondences:
The target sequence is shown only one note at a time, but with some effort you can document the entire sequence:
Row Note 13 C1 12 B# 11 B 10 A# 9 A 8 G# 7 G 6 F 5 E 4 D# 3 D 2 C# 1 C
D F E D F A G# D F E D F A G# D F E D F C1 C1 G F G E D# DThis sequence consists of 8 different notes. Reset the puzzle if necessary. At this point we can see that the bar in the top row also has a note in the final position, but it won't need to be rotated since its D notes appear six times in the first portion of the sequence, which corresponds to the target. The double C1-C1 note about 2/3 of the way into the target sequence corresponds to the bottom bar, but that bar will need to be rotated as well as swapped with the top row so that it's in the (high) C1 position. Also, the only notes occurring one note apart are G near the end of the sequence, so they are currently in Row 8 in their final position. Therefore, our first two steps are:
1. Swap top Row 13 and Row 3 (puts D into the correct position)resulting in the arrangement
2. Rotate bottom Row 1 and swap with top Row 13 (puts C1 into the correct position)
Next, simply by counting the notes in the target sequence above and comparing them to the number of notes in the bars, we can identify additional bars: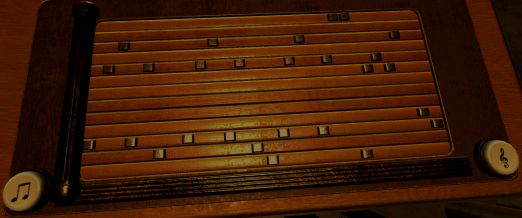
Our next two steps then are:
Note Quantity Current row Target row F 7 9 6 E 4 11 5 D# 1 4 4 Already in position
3. Swap Rows 11 and 5 (puts E into the correct position)resulting in the arrangement
4. Swap Rows 9 and 6 (puts F into the correct position)
At this point, all notes in the target sequence are known to be in position except for A and G# in Rows 1 and 2, which occur as the sixth and seventh notes, respectively. It follows that Row 2 is A, which goes to Row 10, and Row 1 is G#, which needs to be rotated and moved to Row 9.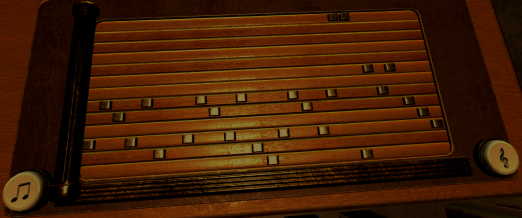
Summarizing, a 6-step solution is:
1. Swap top Row 13 and Row 3 (puts D into the correct position)Press the right button to complete the puzzle. The final arrangement is:
2. Rotate bottom Row 1 and swap with top Row 13 (puts C1 into the correct position)
3. Swap Rows 11 and 5 (puts E into the correct position)
4. Swap Rows 9 and 6 (puts F into the correct position)
5. Swap Rows 2 and 10 (puts A into the correct position)
6. Rotate bottom Row 1 and swap with Row 9 (puts G# into the correct position)
Go to the corner behind the piano and pick up the Gas Tank Valve from the chair.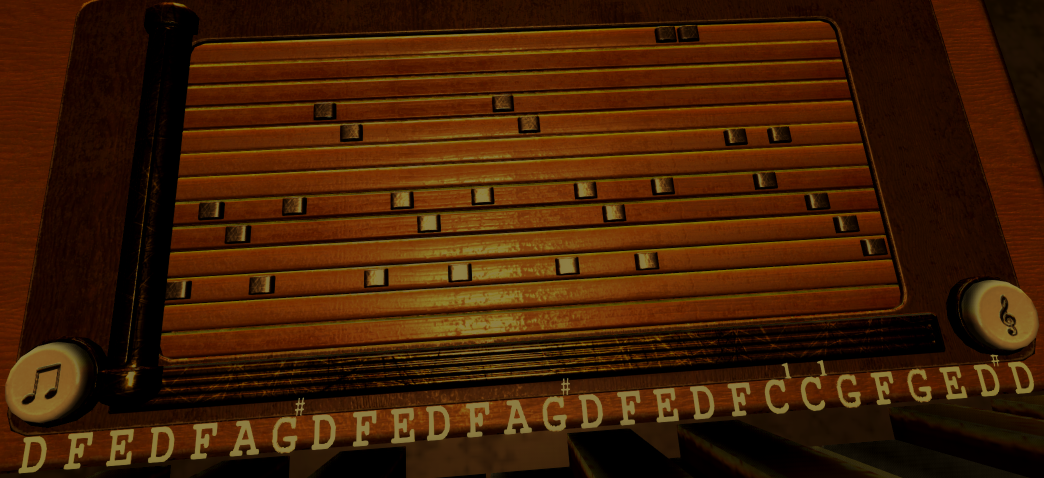
Incidental animations: Clicking on any of the musical instruments in this room causes the same 22-second audio clip to play:
HarpsichordThe next location to open up is the Dining Room.
Piano (from the side)
Trumpet on bookshelf
Harp
Violin on wall
The objective is to raise all 12 tombstones. Selecting any of them changes the up/down state of all those matching the pattern on the tombstone itself. To skip the derivation and jump to the solution, click here.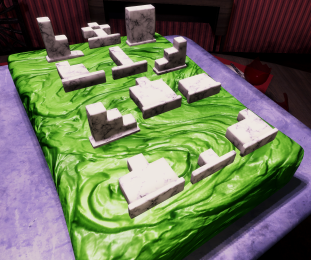
The tombstones that are initially up are indicated by arrows in the diagram below:
Note that Tombstone A will change the state of all of them except the top corners. Since those two are already up and most of the other ones are down, the result will be to raise up nearly all of the tombstones: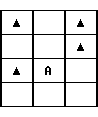
Now Tombstone B affects only itself and the two rows below it, so the result will be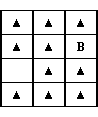
Fortunately, one of the tombstones (C) neatly covers the bottom two rows and the result is that all tombstones are up.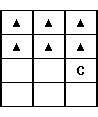
To summarize, press the following three tombstones in any order:
This is the only solution to the puzzle. After a cutscene with many of the mansion's ghosts, look at the dinner plate below the front of the cake and pick up a Gauge Handle shaped like a red arrow.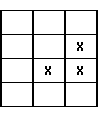
An incidental animation in this room is:
Rice Krispies treat on one of the platesThe next location to open up is the Library.
The objective is to remove 9 segments of the 4 x 4 grid so that no squares of any size exist. The 20 outer stubs of the fireplace grate are extraneous and are removed along with the associated grid segment. Once a segment is removed, it cannot be reinstated without restarting the puzzle. To skip the derivation and jump to the solution, click here.
The smallest an element of the grid can be is a 1 x 2 rectangle. Removing 6 of the segments creates a brick-like pattern that has no square larger than 1 x 1:
This arrangement has too many small squares left to remove, so the bottom two rows are swapped to provide more flexibility: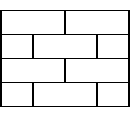
Focusing now on the middle two rows, a 7th segment can be removed to extend one of the 1 x 2 rectangles to 1 x 3 and break the central 2 x 2 square: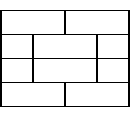
The 8th segment can be used to create a 2 x 1 rectangle at left: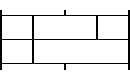
Finally, all that's left to do is to remove one segment from the remaining small square in order to break the outer 4 x 4 square: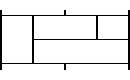
The result has no embedded squares: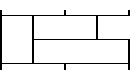
There are 28 other solutions to the puzzle. On completion, a cutscene pages through a book describing the Stauf family history:
On a lovely fall day, Henry Stauf met Lilith Antonia.Move to the red chair by the globe and pick up a Skull for your inventory.
They soon fell in love, and were married.
Lilith Antonia became Lilith Stauf.
But wedded bliss would not last long...
Henry Stauf was a brilliant inventor,
but his devices were ahead of their time.
The Stauf Family fell into financial hardship.
Lilith left Henry, abandoning him out in the cold.
But Henry never gave up on his dreams.
He turned his inventions into toys, dolls and games.
The toys were adored by children.
EVERYONE wanted a Stauf Toy!
Stauf created an empire and amassed great wealth.
He built the mansion on the hill, but grew quite lonely.
Lilith.. had become a drifter... Moving from town to town..
robbing a gas station here, a grocery store there.
She had nothing, no possessions. No life, No dreams.
Then one day Stauf sent for her, his long lost love.
Now, Lilith and Henry Stauf were together again,
and Henry had begun building a machine,
a machine that would be his greatest work!
But Lilith became envious and greedy.
She wanted Henry's fame and fortune for herself.
She plotted against him.
She fell ill with a virus,
a virus that spread throughout Stauf's Toy Store,
contaminating his dolls and toys.
And then, children started dying, clutching Stauf toys.
Stauf's reputation was ruined, and his empire crumbled.
Lilith had destroyed his greatest work.
It was her last act, before she succumbed to the virus and died.
Heartbroken and financially devastated, Henry Stauf fled his home,
vowing to return only when he could find a partner
to help him rebuild his great work,
and restore the reputation of the Stauf Empire.
Incidental animations in this room include:
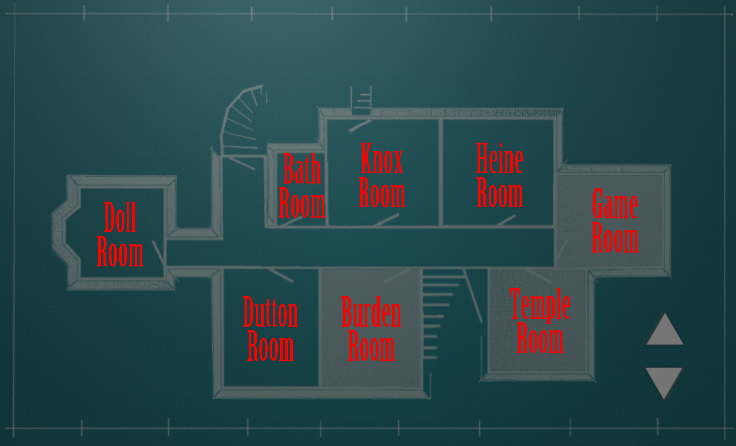
TelescopeThe next location to open up is the Heine Room upstairs.
Cemetery picture near the door
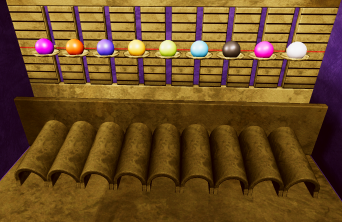
The objective of this puzzle is to place the 9 colored marbles on the 9 scales so that they all reach the equilibrium level along the red line. The colors of the marbles are denoted as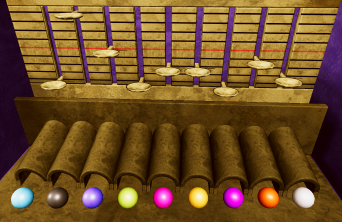
Cyan Black Blue Green Pink Yellow Purple OrangeTo skip the derivation and jump to the solution, click here.
Some experimentation with the marbles will show that there are three separate groups of scales that don't interact with each other. Group 1 consists of the two leftmost scales, Group 2 is the middle three, and Group 3 covers the remaining four scales at right. The scales indicate relative levels using vertical graduations from -4 to +4, but levels outside of this range are not identified. A starting point for the puzzle is to use the highest Group 1 scale to find the relative weights of each marble, measured as the distance below the top level. In order from lightest to heaviest, these are approximately:
Note that the blue and pink marbles weigh the same, which will be confirmed momentarily. It's clear that Group 1 will consist of a light marble at left and a heavy one at right. Some simple trial and error involving two marbles produces the following pairs in equilibrium:
Black 0.8 Purple 1.0 Yellow 1.6 White 2.6 Green 3.0 Cyan 3.8 Blue 4.8 Pink 4.8 Orange 5.0
The last two pairs confirm the equal weights of the blue and pink marbles. Based on the relative levels of the scales, Group 2 will consist of heavy, light and intermediate marbles. The heavy and light extremes are easiest to try from the list of weights above, and we will eventually find that blue and yellow marbles will even out the first two scales in Group 2, but at a level well below the red line. To bring them up, a few marbles are tried for the third scale until we determine the Group 2 sequence
Purple Orange Black Blue Black Pink
Blue Yellow GreenThere doesn't appear to be any other sequence of three marbles that will suffice for Group 2, so using the choices for Group 1, there are three sets of four marbles for Group 3. Based on the initial scale levels, the marbles will be ordered as:
Checking these three sets for Group 3 results in the single puzzle solution
2nd heaviest Lightest Heaviest 2nd lightest
Purple Orange Blue Yellow Green Cyan Black Pink WhiteAfter a cutscene plays, move to the table in the opposite corner and pick up a Metal Sphere for your inventory.
An incidental animation in this room is:
A vase of rosesThe next location to open up is the Foyer.
The objective of this puzzle is to separate the clock face into four equal pieces, the boundaries of which are leading from the center of the clock. To skip the derivation and jump to the solution, click here.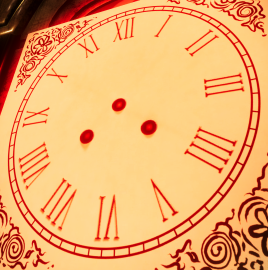
We have the following quantities of Roman numerals on the clock face:
The total of all values is a multiple of 4, so each piece of the clock must have a total value of 20 in Roman numerals. If each X was in its own piece, XI would be all that's contained in one of the pieces, which is insufficient. Therefore, at least one of the pieces must consist (only) of
Symbol Quantity Value Product X 4 10 40 V 4 5 20 I 20 1 20 Total 80
But in the first of these, the next piece clockwise would be either XI (11) or XI X (21), both of which are incorrect. Therefore, one of the piece boundaries is between IX and X and another splits XI:
Part of 9 added to 10: I | X X | 10 added to part of 11: | X X | I
Adding up the next piece clockwise, we have
I + XII + I + II + III = 19We need 1 more to make the goal, and to do that we split the first two Roman numerals in IIII. Then continuing clockwise, we have
III + V + VI = 14We need 6 more to make the goal, and to do that we split the last two Roman numerals in VII (this would not have worked if 4 was represented as IV instead of the medieval version).
You're then transported through the back of the clock into a bedroom, and a cutscene with Tad and a ghostly Woman in White plays. Based on what's open on the map, this must be the Knox Room. Other locations that have opened up are the Bathroom, Laboratory, Attic and Room at the Top.
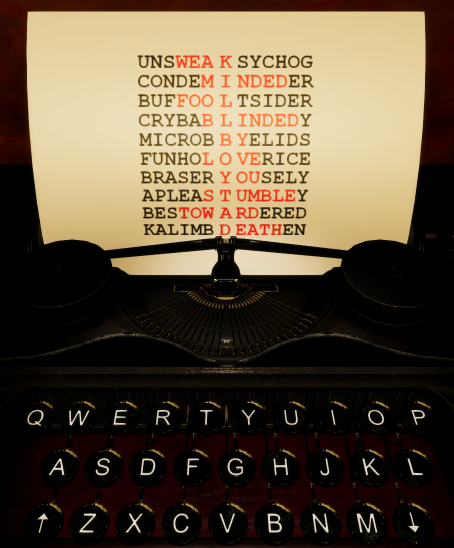
The objective is to use the typewriter on each of the ten lines on the paper to enter a single letter that creates a word when combined with the end of the 6 characters at left and/or the beginning of the 6 characters at right. The collection of 10 words for the 10 lines of text spells out a message, ostensibly from Stauf. An additional message is created from the vertical line of the 10 letters entered. When the correct letter is entered, the hidden word turns red. The up and down arrows on the typewriter can be used to skip the more difficult lines until the puzzle is partially solved. They can also be used to repeatedly test a letter on a specific line until the correct one is found by trial and error. Stauf and/or the resident ghosts can be abusive or insulting at times, so that may help to discern the message. To skip the derivation and jump to the solution, click here.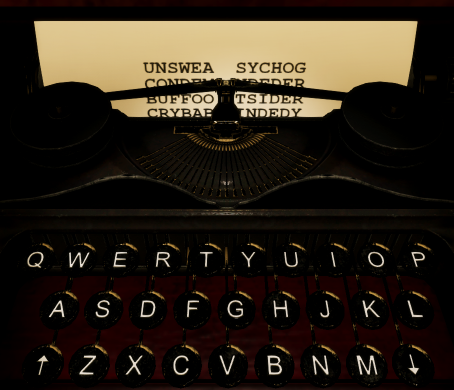
Here is one approach:
Line 1: SWEAT, WEAR or even PSYCHO didn't work, so this one was skipped for now.At this point, the message readsLine 2: DEMAND didn't work, so this one was initially skipped as well.
Line 3: OUTSIDER and BUFFOON didn't work, but FOOL seemed to be a taunt from Stauf.
Line 4: CRYBABY didn't work, but since the right side could be a past participle, BLINDED was eventually found.
Line 5: Neither of the obvious choices MICROBE and EYELIDS worked, but BY often follows "blinded".
Line 6: OVER seemed to be a good guess, but that got automatically changed to LOVE, which could be a reference to Stauf's romantic aspirations.
Line 7: It didn't take SERIOUS, but YOU could come after "blinded by love" and a comma.
Line 8: Since a verb seemed to be indicated, STUMBLE was eventually stumbled upon.
Line 9: ORDERED wasn't taken, but following "stumble", TOWARD seemed to be a good guess.
Line 10: HEATHEN didn't work, but then there was DEATH in keeping with the themes of the game.
___ ___ FOOL BLINDED BY LOVE YOU STUMBLE TOWARD DEATHand we're nearly there. Reading the central characters vertically, we have
L L B O Y T A Dso evidently the first two letters are K I in keeping with Stauf's animosity towards Tad.
This results in the complete message
Move to the other side of the bed and pick up a Small Coil for your inventory.
Incidental animations in this room include:
What appears to be a disembodied chess piece on a rugGo out the back door through a one-way passage into the laboratory.
A top hat on the hat stand
A partially-rendered cane shaped like a stalk of celery
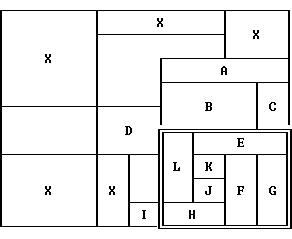
This time-consuming logic puzzle involves slowly filling out about half of the 225 cells in a 15 x 15 grid. Armed with the solution, it will take about 4 minutes to complete. Each row and column has one or more counts indicating the lengths of all of its consecutive runs of filled-in cells, each of which is separated by one or more open cells. To skip the derivation and jump to the solution, click here.
We can start by filling in the 29 cells in the leftmost column and bottom row since their counts are both 15. Since the bottom row of all the columns is filled in, the last counts for each column must end at the bottom edge of the grid, so we can next fill in the rest of the ends of the columns according to their final numbers. This ends up automatically doing the same for the bottom 6 rows. By similar reasoning, the first count for each row must begin in the first column, so we can fill out those as well. Finally, the count of 3 in the fifth column must extend into the fifth row, so that cell is also filled in. We can't be sure about any other cells without further analysis. The grid now has this beginning appearance:
Examining the grid counts, this completes the first three and last two rows, and the first three and last columns, so we can focus on the smaller 10 x 11 grid outlined below: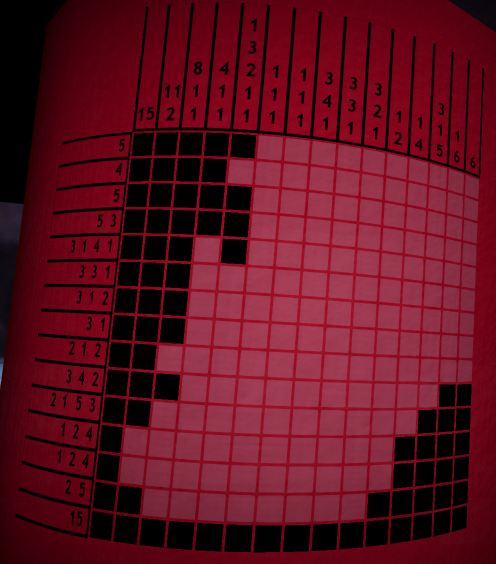
Here's a close-up of that region with the remaining undetermined counts. The black cells are known to be filled in and the zeroes indicate cells that are known to be blank.
The following diagram has the steps outlined in shorthand below it, with the corresponding symbols shown on the grid. Row and column numbers refer to this close-up rather than the entire 15 x 15 grid. Capital letters with horizontal stubs refer to filled-in cells, and lower-case letters refer to blank cells. If a string of filled-in cells is known to exist over a range of positions, the area that is common to all possibilities is referred to as the intersection and must be filled in.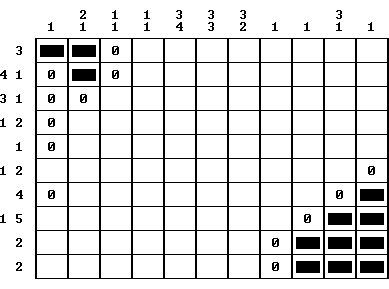
The revised grid is as follows, with black boxes indicating the residual boundary from the outer grid and --- indicating a filled-in cell: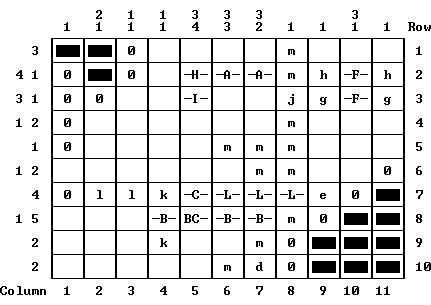
A: Intersection of possibilities for 4 in Row 2.
B: Intersection of possibilities for 5 in Row 8.
C: In Column 5, the farthest down for the 4 is Rows 7-10.
The minimum extent of 3 + blank is Rows 1-4,
so the farthest up for the 4 is Rows 5-8.
Therefore, the intersection (Rows 7-8) is occupied.
d: In Column 7, B must be in the second number (2), so Row 10 must be open.
e: In Row 7, C is part of the 4, so the farthest right
for the 4 is Columns Rows 7-10 and Column 9 must be open.
F: Intersection of possibilities in Column 10, since the 3 must start in Row 1 or 2.
g: In Row 3, the 1 must be at Column 10 (F).
H h: Similarly, in Row 2, the 1 must be at Column 10 (F).
That also limits the position of the 4 in that row.
I: Due to H, there is another cell that must be in the intersection for 3.
j: In Row 3, due to I, the indicated cell is open.
k: In Column 4, the occupied cell must be bracketed by open cells.
L: In Row 7, the position of the 4 is now fixed.
m: This in turn defines some empty cells in Columns 6 - 8.
The revised grid is as follows: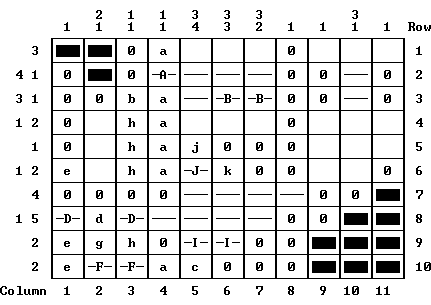
A a: In Row 2, the position of the 4 is now fixed.
This also fixes the positions in Column 4.
B: This in turn fixes the positions in Row 3.
c: The 2 in Row 10 cannot be in Column 5.
D d: The positions in Row 8 are now fixed.
e: So are the positions in Column 1.
F: And the positions in Row 10.
g: In Column 2, the boundary of the 1 is determined.
h: The positions in Column 3 are now fixed.
I: The positions in Row 9 are fixed.
J j: The position of the 4 in Column 5 is fixed.
k: The position of the second 3 in Column 6 is fixed.
The complete submatrix is: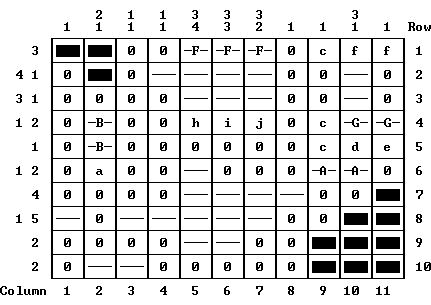
A a: The positions in Row 6 are now fixed.
B: The positions in Column 2 are now fixed.
c: The position in Column 9 is now fixed.
d: In Column 10, the boundary of the 1 is determined.
e: The position in Row 5 is now fixed.
F f: The position in Row 1 is now fixed.
G: In Row 4, the position of the 2 is determined.
h: The positions in Column 5 are now fixed.
i: The positions in Column 6 are now fixed.
j: The positions in Column 7 are now fixed.
The puzzle solution is: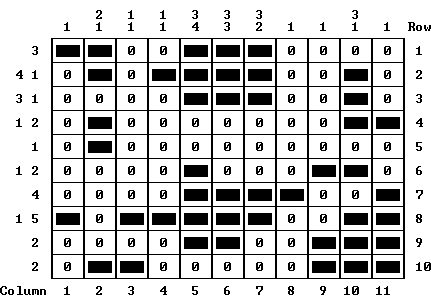
You can exit through the gate to the foyer (or use the map).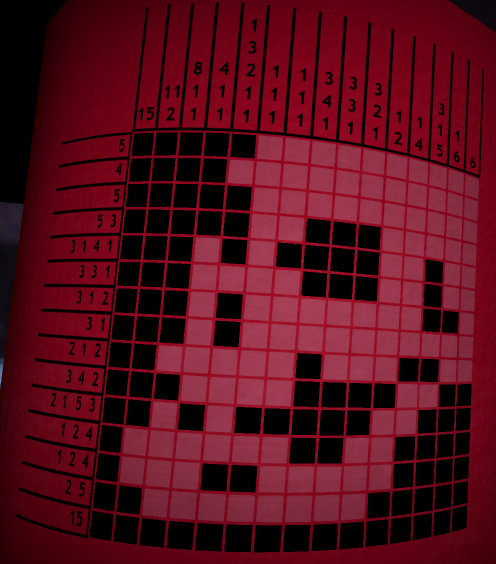
Visit the upstairs hallway for a bloody cutscene with a ghostly woman holding scissors, then check out the Bathroom.
The objective here is to place the 7 differently-colored eyeballs into the correct locations among the 15 nodes of a network connected by bones. Only one eyeball can occupy a node. To skip the derivation and jump to the solution, click here.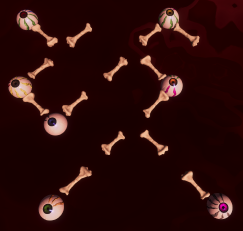
Since each node is separated from its neighbor(s) by a bone, we have the following equivalent network of numbered nodes, starting from the bottom left of the puzzle as Node 1 and indicating the endpoints by compass directions:
Click on an eyeball to see its colored veins, the quantity of which indicate the taxicab distance (up to 7) of that eyeball from the one that has the color of the vein. All distances are computed by following the network of bones. For example, the Purple eyeball that is initially in the lower right corner (Node 15) has 7 Gray veins, so the Purple eyeball should be 7 bones away from wherever the Gray eyeball is located. In other words, Gray would be at Node 8 if Purple is at Node 15. If you check out all 7 eyeballs, you'll find these results:
Gray is 7 bones away from both Purple and Yellow. The only locations in the network that provide two different destinations 7 bones away are Nodes 3 and 13, in both cases leading to Nodes 10 and 11 as the dual destinations. Therefore, Purple and Yellow together share Nodes 10 and 11, which completes the first two eyeballs.
Eyeball color Destination eyeball (vein color) Distance Red Blue 4 Green 4 Yellow Purple 2 Green 5 Gray Red 2 Yellow 7 Orange Green 3 Purple 2 Blue Gray 2 Green Yellow 3* Purple Gray 7
Both Red and Blue are 2 bones away from Gray. If Gray is at Node 13, then the only location that is 2 bones away is Node 5, which doesn't provide two different locations for Red and Blue. Therefore, Gray must be at Node 3, which completes three eyeballs.
Since Orange is 2 bones away from Purple, it must be at Node 8, which completes four eyeballs.
* Since Green is 3 bones away from Orange, it can only be at Node 5, which puts it at a distance of 5 bones from wherever Yellow is (Node 10 or 11). As a result, the number of yellow veins on the green eyeball is incorrect and must be ignored. This could be construed as a bug in the game. Five eyeballs are now complete.
The available nodes that are 2 bones away from Node 3 (Gray) are Nodes 1 and 15, so these are shared by Red and Blue, which completes the placement of all 7 eyeballs up to four choices for the ending branches (Nodes 10/11 for Purple/Yellow and Nodes 1/15 for Red/Blue):
Starting after a puzzle reset, a solution with the fewest steps is:
The resulting arrangement is:
Move orange eyeball from Node 4 to Node 8
Move green eyeball from Node 1 to Node 5
Move blue eyeball from Node 7 to Node 1
Move purple eyeball from Node 15 to Node 11
Move red eyeball from Node 10 to Node 15
Move yellow eyeball from Node 12 to Node 10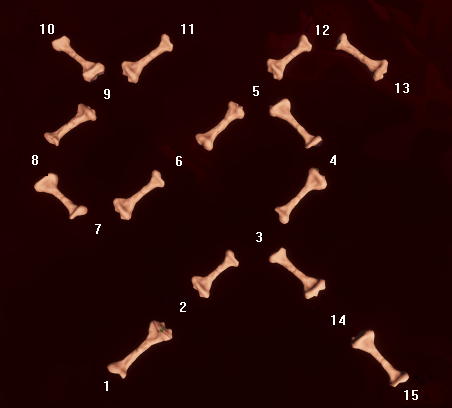
You then go down the drain (without spiders this time) and end up back at the foyer again.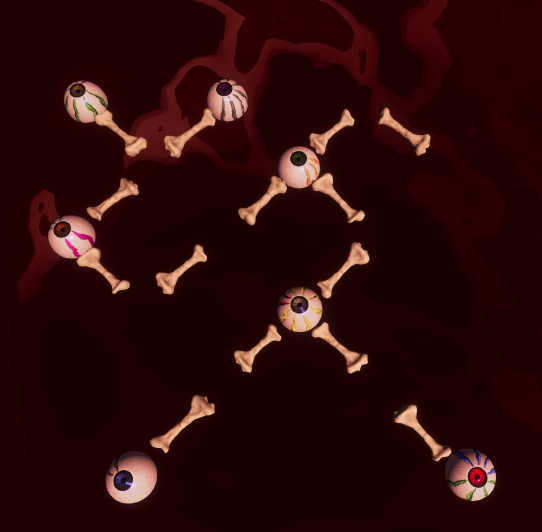
An incidental animation in the bathroom is:
ToiletAll available locations have now been explored except the top of the house.
SkullGo through the door ahead into the Room at the Top. If you didn't have all the inventory items needed, you have an opportunity to leave the attic and go get them, but once you have all of them there's nothing left to do for Richmond except to complete Stauf's machine. That's followed by a conversation with Stauf in which you learn that eyes are needed from Tad in the chapel. But that location isn't available on the map yet, so you'll have to visit the Dutton room first since it's the only location that has opened up.
Gas Tank Valve
Gauge Handle
Steam Cap
Small Coil
Metal Sphere
Transformer
Lever
The objective of this puzzle is to fill in three cells in a row before your opponent does. Since you play first, you can always force a win if you don't make a mistake. Select the center cell of the 7 x 7 grid, then carefully play diagonally opposite your opponent's next moves until you can complete three in a row vertically, horizontally or diagonally, which seems to always happen in your sixth move. Even if you miss seeing which cell your opponent fills in, you should be able to determine the unmatched cell by symmetry. Be sure to ignore the layer of partial cells at the bottom of the grid. After solving the puzzle, open the side door into the chapel.
An incidental animation in the Dutton Room is:
A sheet of paper on a desk with a message seen in The 7th Guest
An incidental animation in this room is:
A spooky denizen in the baptismal fontThe next location to open up is the Doll Room. The confessional door leads back into the laboratory and the door you entered leads back to the hallway from the Dutton Room. In the latter case, you'll be facing a strangely tall and narrow door leading up to the attic. Turn left, move forward and use an even narrower door to enter the Doll Room (or just use the map).
A jack-in-the-box in front of a corner cabinetThere are no less than four dolls in this room, but the one you need to click on is in front of the dollhouse in the corner opposite the door. A cutscene ensues with Richmond and the doll talking, after which they'll both end up in the attic. Richmond gets clobbered by a dressmaker's dummy before he's able to stab the doll, and Tad is seen taking the doll into the Room at the Top.
A music box on the center table
The pulsating occupant of a baby crib
The credits then roll, which can be skipped by pressing [Esc]. It takes 6 minutes to see all of them, including the names of over 1200 kickstarter backers who pledged an average of $50 each back in 2015.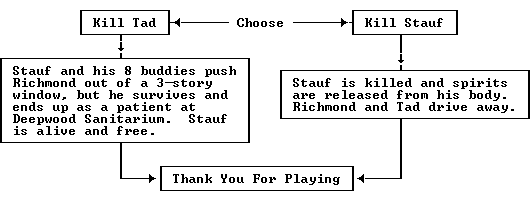
Given the clue that this puzzle is "as easy as 1-2-3", count the frequencies of the 13 different letters in the text: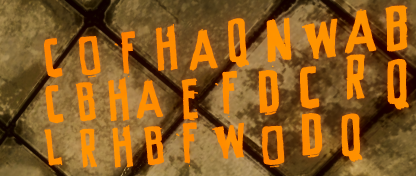
Click on all of the letters that have a frequency of 3 (A,B,C,F,H,Q) and the remaining 11 letters will magically rearrange themselves to form the message
Letter: A B C D E F H L N O Q R W Frequency: 3 3 3 2 1 3 3 1 1 2 3 2 2
A cutscene follows, in which Tad and Richmond go to Stauf's toy store, known as "WonderWorld":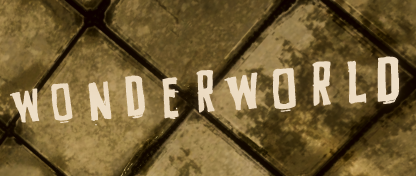
The objective of this puzzle is to vacate all of the doll "guests" from it. There are three separate locations for them: inside the house, in the doorway, or outside the house. In each location, a shield anywhere in that location protects the guest of the corresponding body color if they are somewhere in that location. Therefore, the defenseless white guest at the top of the house cannot be killed by any of the three guests wielding white swords as long as there's a white shield (on the pink or yellow guest) present inside the house. As soon as a guest changes location, the three locations are individually scanned to see if a killing can take place. The white guest is always the last to leave the house.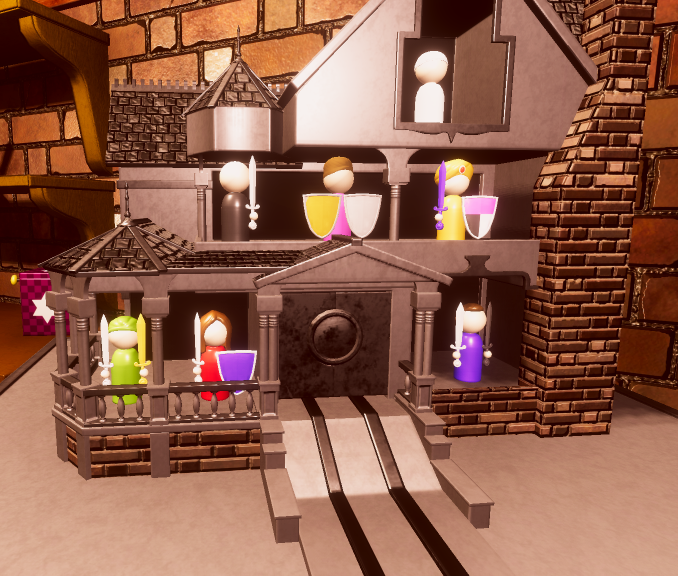
One of 10 solutions is:
Black Yellow Red Purple Green Pink WhiteIncidental animations in this room include:
Toy rocket shipGo through the white door into the next room. Incidental animations here include:
Toy top
Wooden train
Toy drum
Stuffed bear
Drummer babies on shelf
Stauf candy bar with golden ticketClick the drama-mask cursor on the blue box on the chest of drawers to watch a cutscene of Stauf attacking his wife. In order to escape the building, be sure to click again on the blue box to obtain Doll Eye 1 for your inventory. You can now return to the first room through the brown door. After a cutscene, you'll find yourself in the foyer of the Stauf Mansion.
Damaged toy mouse
Click on the hotspot at the base of the staircase for a puzzle:
The objective is to swap the black and white knights. Obviously, no knight can occupy the center position, so we can ignore that. Using the notation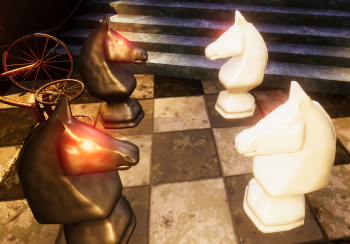
a solution in 16 moves is:
Black: 1 - 5For a derivation, see the section below. After the puzzle is solved, there is a brief cutscene with the Woman in White beckoning you from the second floor. Before leaving the Foyer, be sure to approach the table on the wall to the right and examine the strange portrait on top:
White: 3 - 7
White: 8 - 4
Black: 6 - 2Black: 5 - 6
White: 7 - 1
White: 4 - 3
Black: 2 - 8Black: 6 - 2
White: 1 - 5
White: 3 - 7
Black: 8 - 4Black: 2 - 8
White: 5 - 6
White: 7 - 1
Black: 4 - 3
This diagram will be crucial later in the game.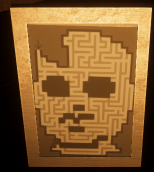
Incidental animations in this room include:
An origami bird on a coffee tableThe Doll Room and Gallery have opened up. You can play these in either order; we'll visit the Doll Room first.
Red roses on another coffee table
Derivation. Using the notation above, we can construct an adjacency diagram that shows the accessible locations for the knights:
With all moves made in the clockwise direction, a repeating pattern is: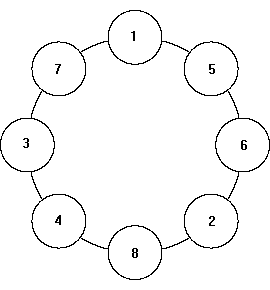
1. Black moves into the space between the black knightsThis pattern of four moves rotates the array of knights one move clockwise in the diagram above, so repeating the pattern three more times solves the puzzle.
2. White does the same
3. Black moves away from its black neighbor
4. White does the same
Incidental animations in this room include:
A jack-in-the-box in front of a corner cabinetThere's nothing else to do here until later, so we'll next visit the remaining new room, the Gallery. This is accessed via the map or the picture on the second floor at the top of the staircase.
A toy music box on the center table
The gruesome occupant of the cradle
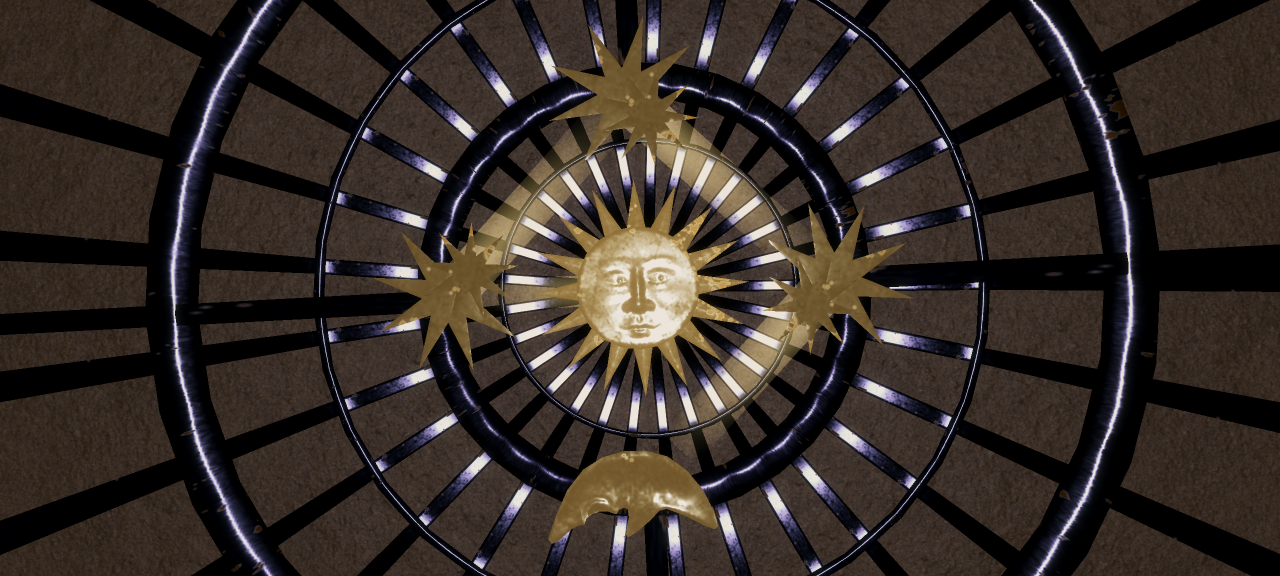
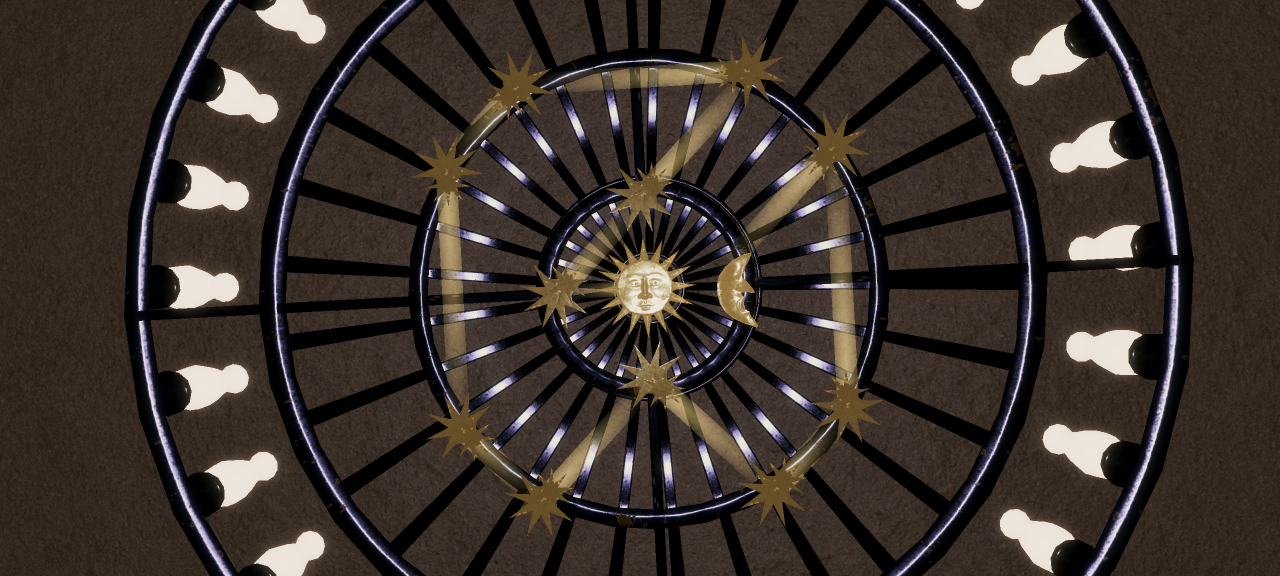
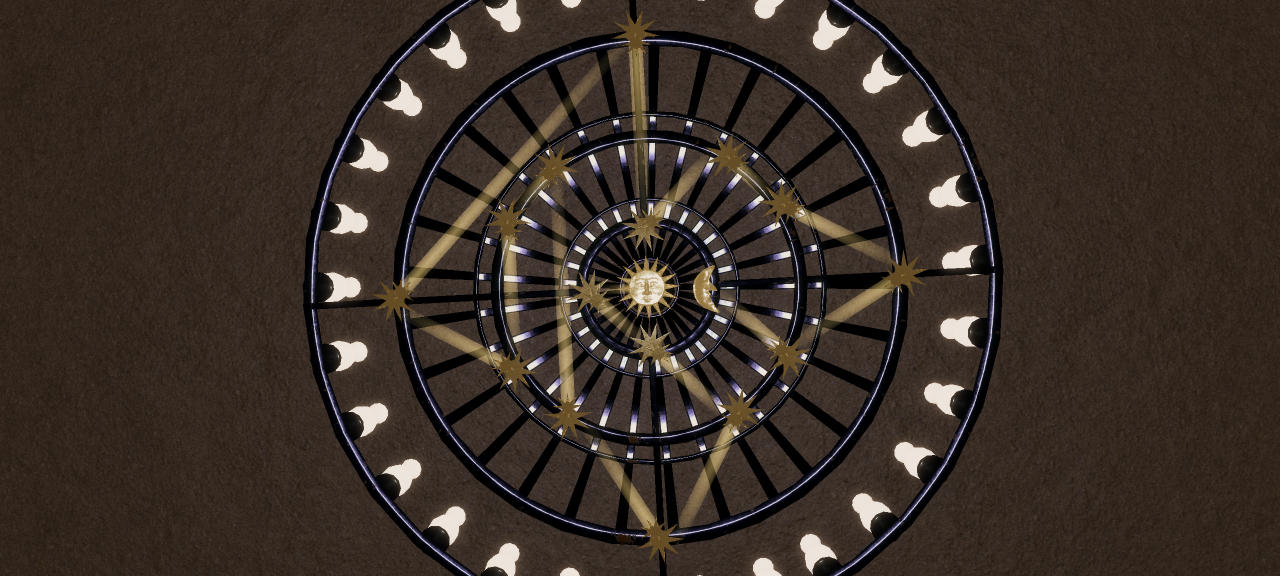
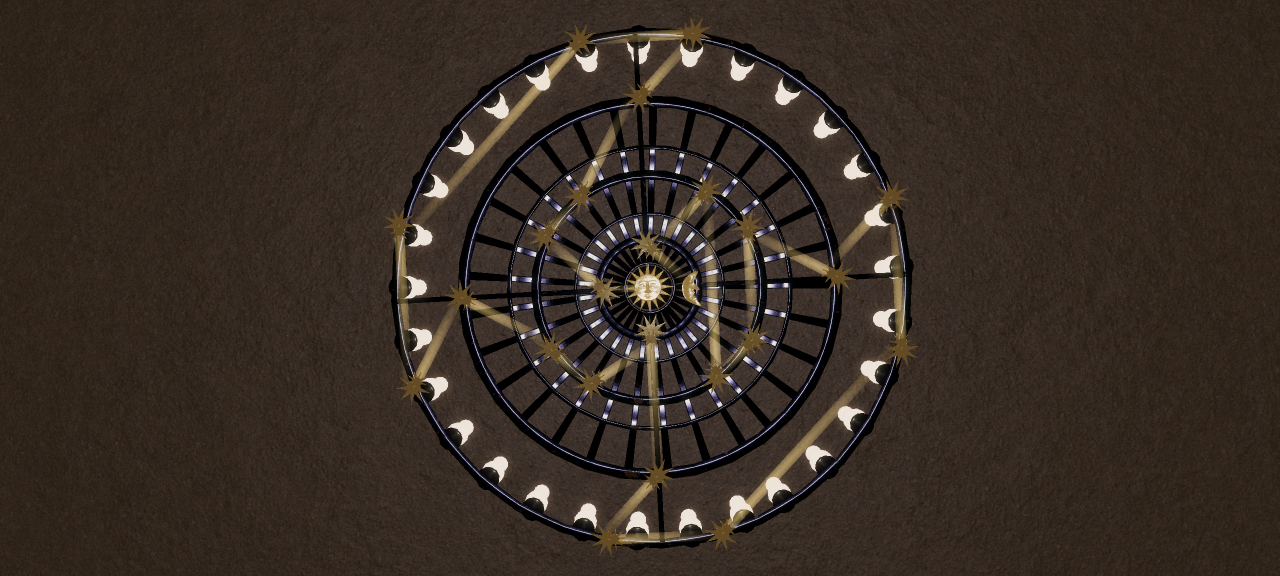
Facing the fireplace, look straight up to the ceiling and click the brain cursor on the chandelier:
The objective of each of the four rounds of this puzzle is to create a continuous light beam from the central sun symbol through all the stars and onto the moon. The outer ring of stars as well as individual stars can be rotated to change the light beam reflection angles, and both of these rotations occur in cycles of four. Therefore, there are a limited number of combinations in each round, and the puzzle can be solved by trial and error. The size of the star symbols shrink as the viewpoint is zoomed out in later rounds, so some care is needed to choose between the ring and star rotations. In the solution below, perform the ring rotation(s) first, then the star rotation(s). After they are completed, click on the sun symbol to confirm the light path and proceed to the next round: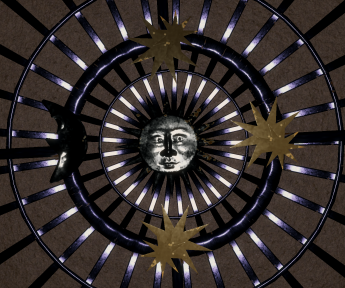
When the puzzle has been completed, you are moved over to a bright picture opposite one of the sofas and it opens up to reveal the doll's left arm for your inventory. After a cutscene involving the "MadMan", you can exit the room as described above or by using the map. You can select Doll in your inventory to see the progress of its assembly. If you've also completed the Doll Room as described above, the Kitchen becomes available.
Round Rotate ring Rotate star Result 1 Once Three times Image 2 Once Twice Image 3 Twice Three times Image 4 Once Once Image
A salt shaker near the entrance with a message from The 7th GuestOpen the refrigerator for a puzzle:
The scary denizen of a pot of tomato soup (maybe)
A Delft plate above the stove
A closed container next to the fridge
Knives on the butcher table
A can in the pantry
When the spider lands on a node numbered X, it can move to another node that is X steps away. Landing on an unnumbered node provides no way to proceed, and the puzzle is reset. You can't land on a node more than once since its number is erased when the spider lands on it. The spider cannot change direction during a move or cross any curved segment (even a small one). Backtracking and leapfrogging are key elements to solve the puzzle. The following 21-move solution A-U was found by trial and error:
The spider moves in 48 steps, including 10 spent backtracking. When the puzzle is complete, the key behind the spiderweb is magically used to unlock the door opposite into the basement. After a cutscene with Richmond, you're moved through the door into a maze.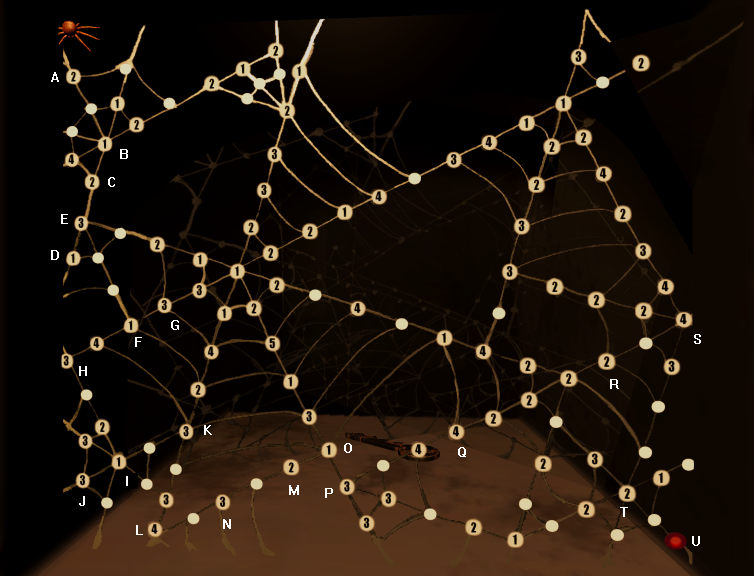
The following 60-node solution is the shortest path through this nasty. It traverses about 1/6 of the entire maze and will take a full five minutes of clicking through the repetitive scenes and monotonous transition videos (85 mouse clicks altogether). There's no way to save your game while in the maze. The following movement abbreviations are used: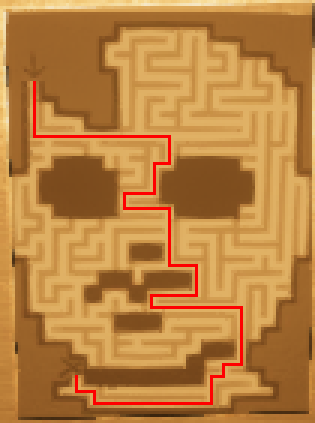
F: Move forward repeatedly until you are blockedLet the punishment begin:
Fn: Move forward exactly n times
RF: Turn right & move forward repeatedly until you are blocked
RFn: Turn right & move forward exactly n times
LF: Turn left & move forward repeatedly until you are blocked
LFn: Turn left & move forward exactly n times
F LF8 (noose at right)Note the faint light-colored object on the floor ahead. Move F and you can pick up the doll's right leg for your inventory. After an annoying cutscene with Jacob, you'll be transported to the crypt and can now access the game menu with the [Esc] key.
F1 RF RF LF RF LF LF (candles at left)
RF (red splotch ahead)
LF RF RF LF LF RF (noose at left)
RF1 LF (noose ahead)
RF LF (skull ahead)
RF RF LF1 RF1
If you decide to explore the maze further before picking up the doll leg, note that there are only two 4-way nodes; the other ones are all corners, T-intersections or redundant straight-ahead nodes. You'll encounter several types of decorations sprinkled among the otherwise identical nodes, some of which are listed in the solution above. Interestingly, each of these decorations almost always has an identical one on the other side of its rock wall at some other, possibly-distant point in the maze. This may be of limited help with navigation or mapping on an orthogonal square grid.
This challenging puzzle is a virtual version of the labyrinth game in which you use gravitational or magnetic controls on each side of the grid to cause the red and blue marbles to enter their respective holes simultaneously. We'll use compass notation to identify the puzzle controls. To skip the derivation and jump to the solution, click here.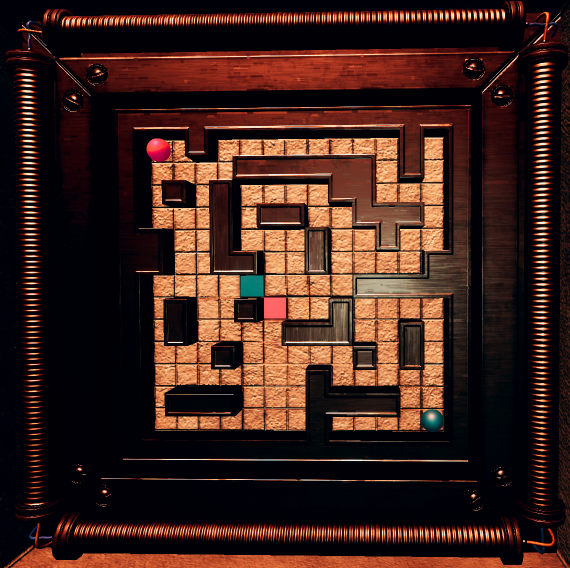
Most moves are made by one marble while the other one is stationary. For example, it's possible to immobilize the red marble in the cul-de-sac in the upper right corner while the blue marble makes several moves.
Since each marble must enter its respective hole in a single final move, and due to the obstacles around the holes, the final approaches for both marbles must be from the right. Numbering the grid's 13 rows from top to bottom and its 13 columns from left to right, it's easy to see that the penultimate (row,column) positions are
Red marble: (8,7)after which a final move to the West solves the puzzle. Searching for a complete solution is easier if feasible dual positions can be established for intermediate points in the sequence so that the puzzle can be analyzed in stages.
Blue marble: (7,9)
It's evident that the blue marble needs to escape the cluttered region at lower right by moving into the left region of the puzzle. From its starting position in the corner, it must eventually move up and counterclockwise. Note that the blue marble makes two moves South during this process, after which it can avoid all South moves until it's all the way into the upper right region of the puzzle. This allows us to exploit trapping the red marble most of the time in the upper right corner while the blue marble completes much of its travel.
Avoiding the holes, the blue marble must follow the red one by moving in a generally-clockwise direction around the central narrow maze. The red marble must pass through this maze to reach its final position, while the blue marble can avoid it.
Since all motion continues until one or both marbles hits an obstacle, and assuming redundant moves are excluded, it follows that moves alternate between vertical (North/South) and horizontal (East/West). Marbles cannot occupy the same location, in keeping with a physical puzzle.
Here's a solution in 37 steps using this approach:
After the puzzle is solved, there's another cutscene with Lilly, and the Knox Room has opened up. If you want to exit back to the foyer without using the map, approach the wall without arches that is at the far end of the crypt. It has a tall door that you can go through. Although it's full of dangerous spikes that seem to draw blood, you arrive undamaged in the foyer.
Stage Moves Result 1 2 3 4
The only incidental animations in this location are the kickstarter backer names on the various sarcophagi.
Other Exploration. In the puzzle solution above, the marbles come as close as one square apart, so there is no direct contact between them. However, juxtaposition of marbles is possible, but it behaves inconsistently. For example, if you complete the first two stages above and then move S E S, the two marbles will be vertically adjacent. Moving N or S keeps both marbles together as they would be in a physical puzzle. Continue from this point by moving
S W S Wand the two marbles will be horizontally adjacent (red on the left). Moving E or W keeps both marbles together. Finally, move W S N and the red marble moves up next to the blue one. However, the converse isn't true. To see this, let the red marble circumnavigate the central island of the maze:
N W S W
N W N W
S E S Eand the blue marble won't move all the way up next to the red one. No amount of coaxing will get it to move into the empty corner as the red marble did earlier.
N E N W
N W N W
S N
Open the first door on the right (or use the map). Approach the fireplace and pick up the doll's right arm for your inventory. On the small red table next to the fireplace, look at the red book for a puzzle:
It's a bit overexposed on the left side, but the puzzle is a 5 x 5 grid of square cells each containing a pipe segment connecting the midpoints of two sides of the cell. To skip the derivation and jump to the solution, click here.
Most segments are quarter circles, with a couple of straight ones thrown in. The overall path of pipe segments needs to connect the top center of the upper-left cell to the bottom center of the lower-right cell. There are various alternate paths and detours that theoretically can be formed, but the one with the fewest cells is shown in red below:
The shortest path consists of four pairs of matched quarter-circle segments plus one vertical segment, for a total of 9 pipe segments. The remaining 16 unused pipe segments can be removed, increasing the likelihood of finding a feasible solution.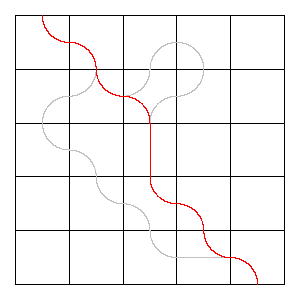
Numbering the 5 rows from top to bottom and the 5 columns from left to right, here's a solution in 38 moves:
Clear out unneeded symbols:
Move Column 2 up four timesThe resulting arrangement is:
Move Column 3 up four times
Move Column 4 up three times
Move Column 5 up once
Move Column 5 own three times
Move Row 2 left three times
Move Row 4 left once
Complete the upper portion of the path:
Move Row 1 right onceThe resulting arrangement is:
Move Column 1 up once
Move Row 2 right twice
Move Column 3 down twice
Move Column 4 down once
Move Row 2 left twice
Complete the solution:
Move Column 3 up onceBlood can now flow:
Move Row 4 right three times
Move Row 5 left once
Move Column 5 down three times
Move Row 4 left once
Move Row 5 right once
There may be solutions with fewer steps.
The Burden Room and Game Room have opened up. Move toward the hallway door next to the mirror and there will be another cutscene with Lilly. Incidental animations in this room include:
What appears to be a disembodied chess piece on a rug
A top hat on the hat stand
Half of a cane that looks like a stalk of celery
The objective is to double up all 20 coins into 10 stacks of two each. To skip the derivation and jump to the solution, click here.
In a column of four single (S) coins, a vertical jump from top to bottom makes the conversion
where D denotes a stack of two coins. This permits no further jumps in line with the first. However, in a row of five single coins, two lateral jumps in opposite directions are possible:
If this process is repeated identically for each of the four rows, the remaining single coins are in a column of 4, which per the reasoning above leaves two single coins that cannot be combined. However, if the row pattern is alternately reversed, a solution is possible.
S S S S S into _ S S D S into _ S D D _
In the diagram below, click on the coins in order:
The resulting arrangement is:
Next, the single coins at the top or bottom of a column are jumped vertically: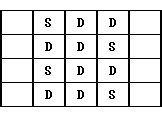
This produces a completed pattern of 10 double coin stacks: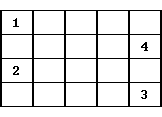
The coins then merge to form a single one that is inserted into the green gumball machine to produce Doll Eye 2 that you can pick up for your inventory.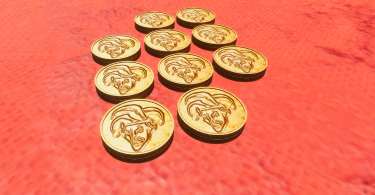
Incidental animations in this room include:
Wine bottle on floorProceed to the Game Room next.
Wine bottle on nightstand with crowdfunder name
Potted plant in the corner
Although the view of the chessboard is from the side, the relationships between the queens is not affected. After the 8 cells with queens and 28 others are removed, the remaining 7 x 7 board has 28 cells: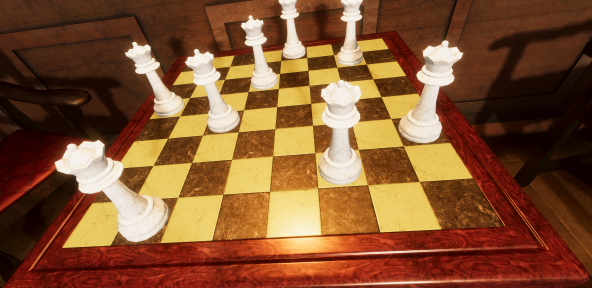
In this viewpoint, the rows are numbered from front to back to facilitate positioning the cursor. Note that each column has a unique number of cells (the same cannot be said of the rows). The objective is to complete 7 more rounds of the puzzle in a similar fashion by placing one queen in each column and row such that none are threatened. After each round, the cells occupied by queens are removed. To skip the derivation of the first round and jump to the full solution, click here.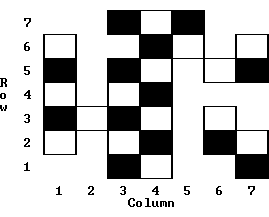
The first round can be analyzed in order of cell counts per column, starting with the forced move to the cell in Row 3 and Column 2:
This is the only solution to Round 1 of the puzzle. After it's played, the cells with queens are removed and Round 2 begins with 21 cells remaining:
Valid queen locations (row,column) Column: 2 5 6 7 1 3 4 (3,2) (7,5) (2,6) (6,7) (5,1) (1,3) N/A Fail (3,2) (7,5) (5,6) (1,7) (6,1) N/A Fail (3,2) (7,5) (5,6) (2,7) (6,1) (1,3) (4,4) Success
Rounds after the first one have multiple solutions, but the same logic applies. They are solved programmatically to make it easier to keep track of all the possibilities.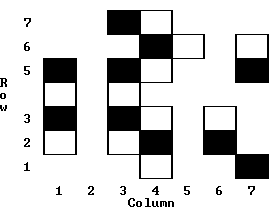
The following diagram (one of 90 solutions) shows where to place the queens for each round 1-7:
The following table presents the same solution in a manner that may be easier to enter. Read left to right for each round, selecting the indicated cell in each column. To facilitate making selections, locations in bold text have dark backgrounds on the chessboard and those in normal text have light backgrounds: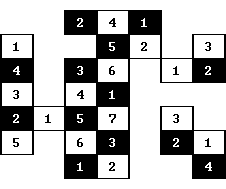
After the puzzle is solved, a brief murderous cutscene plays. Pick up the white Doll Dress from the picture on the wall before leaving the Game Room.
Column Round 1 2 3 4 5 6 7 1 Rear Sole Front Middle Rear Rear Next to front 2 Next to front Rear Front Sole Front Next to rear 3 Next to rear Rear Front Sole Rear 4 Rear Rear Rear Sole 5 Sole Rear Rear 6 Sole Rear 7 Sole
Incidental animations in this room include:
Dartboard over theThe Temple Room has now opened up.
Balloon drawings on a side table
Pool table
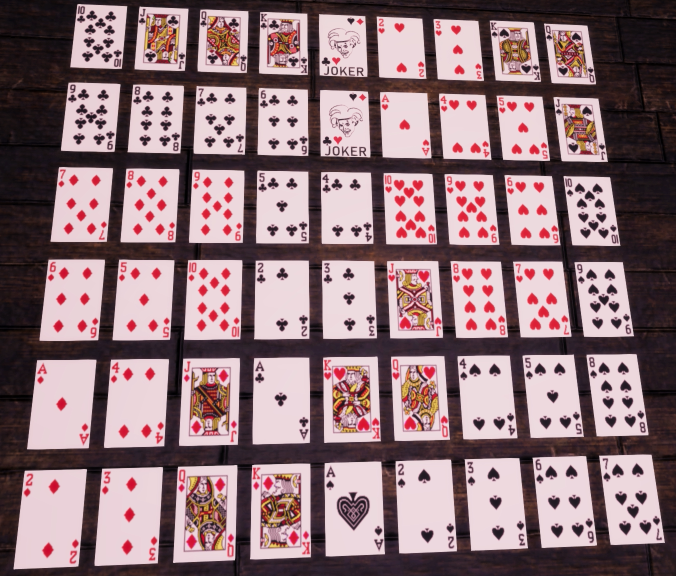
The objective is to continue placing the cards in rank sequence while following a continuous and uninterrupted path through the 6 x 9 grid, changing suits three times. Thirteen cards are initially placed to steer the path. To skip the derivation and jump to the solution, click here.
A cursory look at the initial layout provides approximate regions for the suits:
Diamonds at lower left to cover at least A-JSince the 6 x 9 grid has 54 locations, it seems likely that there are two Jokers somewhere so that every location will eventually contain a card.
Hearts at upper right to cover 2-J
Spades starting at lower right
Clubs in the remaining area mostly at upper left
Given the proximity of the King of Clubs and 2 of Hearts, one of the suit transitions is probably Clubs ➔ Hearts. The Jack of Diamonds and 3 of Clubs are also fairly close, so another transition is likely to be Diamonds ➔ Clubs. Finally, there's no possible connection between the spades and the Ace of Diamonds, so the overall suit sequence is probably
Diamonds ➔ Clubs ➔ Hearts ➔ Spadeswhich incidentally happens to be the same suit order used in the game Big Two. Following the diamonds in sequence starting with the ace, the first few moves are forced:
Looking at the transition between diamonds and clubs, we can see that to avoid isolating the Jack of Diamonds or creating a dead end, the 3 of Clubs is approached from the left:
Counting the next 9 cards and following the boundary of cards already played, the remaining clubs fill out the region at upper right:
At this point, placing the Ace of Hearts to the left of the 2 would create a dead end to the right of the 6 of Clubs, so there are probably a couple of cards in between, and these indeed turn out to be two Jokers. To avoid leaving a stub to the left of the 5 of Hearts, the next few cards are forced:
Looking now at spades, we can see that the 9-K constitute 5 remaining cards that don't have to end up adjacent to any ace since they are at the end of the overall sequence. Without fragmenting the available space for hearts, the higher-ranked spades must continue up the right side of the grid, ending above the 5 of Hearts. Saving that plan for later, we have a contiguous region in which to play the remaining hearts. Following a sinuous path from the 5 to the Jack of Hearts, we have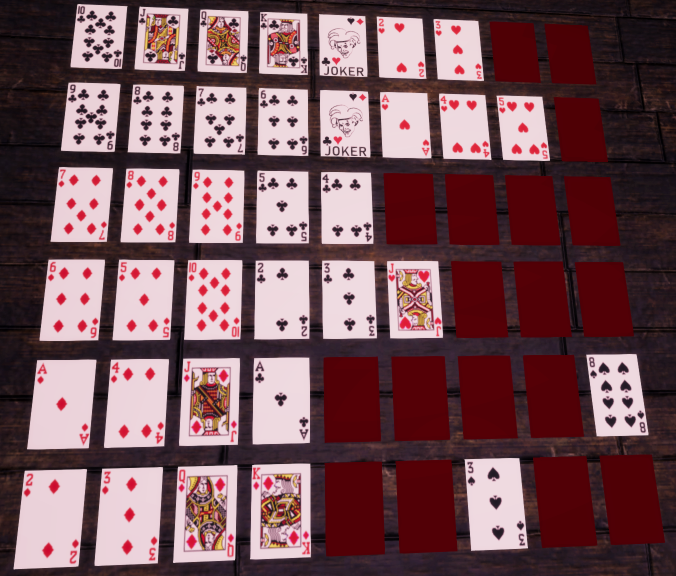
Allowing four spaces for the 4 through 7 of Spades, the transition from hearts to spades occurs in the left part of the open region: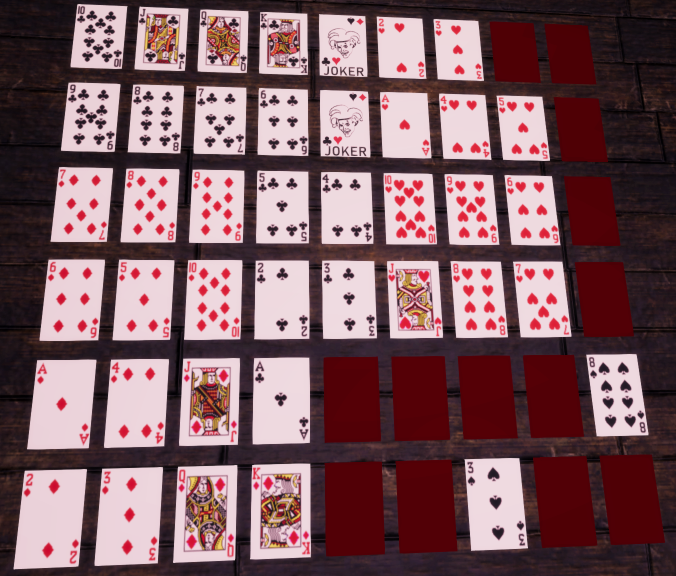
Based on the preceding comments, the rest of the path is as follows:
Be careful when placing cards as you can't undo your last move.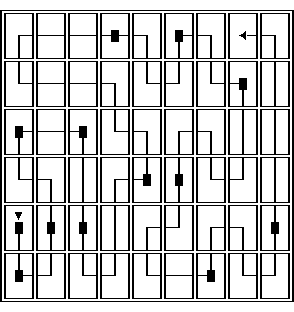
Incidental animations in this room include:
Guillotine in the cornerThe Dutton Room has opened up.
Top hat on a crate
The objective of this puzzle is to unscramble the angular pie pieces of an octagon representation of Ben Franklin's portrait on the pre-1995 $100 bill. Three of the wedges are doubles, which can be swapped with a pair of individual wedges by clicking first on the double and then on the dividing line between the pair. Begin by numbering the 16 wedges clockwise from the top, along with clock references that will come in handy: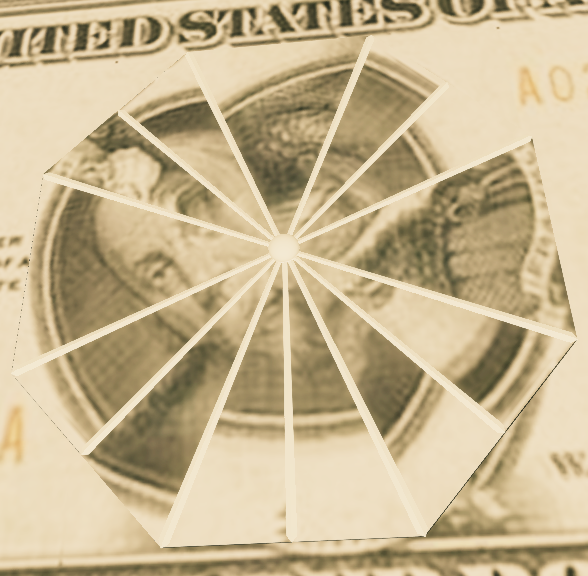
Note that performing a move twice gets you back to where you started. Stauf conveniently showed the scrambling operation in a preliminary animation sequence. If only there were some way to slow that down...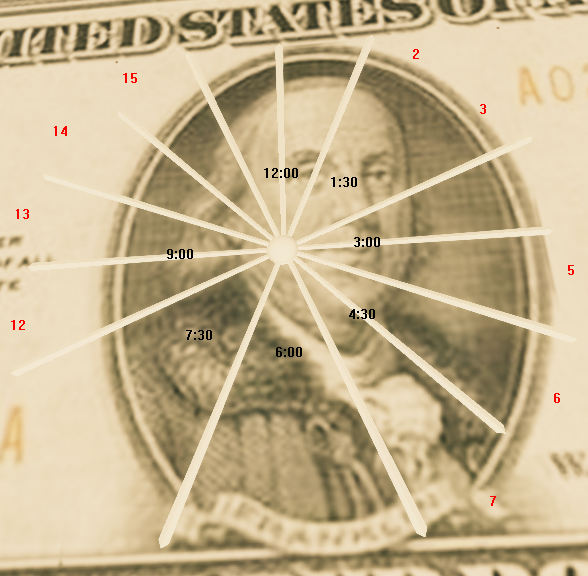
Here's a solution in 17 moves:
Swap 12:00 & 6:00 acrossAn incidental animation in the Dutton Room is:
Swap 1:30 & 3:00
Swap 12:00 & 1:30
Swap Wedges #7 & #15 across
Swap 6:00 & 4:30
Swap 3:00 & 4:30
Swap Wedges #2 & #3
Swap 9:00 & 7:30
Swap Wedges #7 & #15 across
Swap Wedges #14 & #15
Swap 9:00 & 3:00 across
Swap 1:30 & 7:30 across
Swap 9:00 & 7:30
Swap Wedges #7 & #15 across
Swap Wedges #5 & #6
Swap 12:00 & 6:00 across
Swap Wedges #12 & #13
A sheet of paper on a desk with a message seen in The 7th GuestExit through the one-way side door into the chapel (or use the map).
The objective is to depress all 15 organ keys. After every pair is pressed, the key corresponding to the sum of the two keys pressed is also pressed. The puzzle resets if the sum key has already been depressed or if the sum exceeds 15. To skip the mathematical derivation and jump to the solution, click here.
The puzzle boils down to finding 5 separate addition problems
a + b = cwhere a,b,c are all numbers in the interval [1,15], and in all five of the problems together there are no duplicate numbers. It can be analyzed and evaluated programmatically as follows. Since addition is commutative and the sum of two positive numbers is greater than either of them, the order of a,b,c isn't important and we can without loss of generality take a < b < c. There are
Here is one of the 21 distinct sets of answers, listed in increasing order:
Press keys 1 & 6; key 7 is also depressedThe pairs pressed by the player can be entered in any order since they are independent of each other. When the puzzle is complete, there's a violent cutscene with Richmond, and Tad escapes through the confessional door back to the foyer.
Press keys 2 & 9; key 11 is also depressed
Press keys 3 & 12; key 15 is also depressed
Press keys 4 & 10; key 14 is also depressed
Press keys 5 & 8; key 13 is also depressed
Checking the map, the only available destination is the Doll Room.
This puzzle is identical to the final puzzle in the 2006 game The Secrets of Atlantis, and the same strategy from that game applies here. However, Stauf seems to play more aggressively and is less likely to make a mistake, but on the other hand he is more predictable. Using the notation
make your blue moves in order and Stauf's responses in red should follow. On successful completion of the puzzle, you'll move into the dollhouse but won't have access to the game menu with [Esc]. Continue moving forward into the circle of dolls for a conversation, after which you're ejected from the dollhouse and can again use the menu.
The credits then roll, which can be skipped by pressing [Esc]. It takes 6 minutes to see all of them, including the names of over 1200 kickstarter backers who pledged an average of $50 each back in 2015.
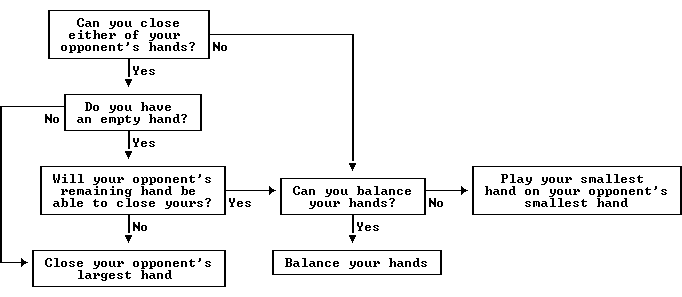
The objective of the puzzle is to beat an automated opponent by taking turns in a two-player game. Both you and your opponent follow the same rules, and a turn cannot be skipped or passed. Each of your turns involves either:
- Adding the number of fingers on one of your hands to those on one of your opponent's hands, leaving your hands unchanged.When a single hand reaches a total of 5 or more fingers, it is "closed" with no fingers showing. To win, you must close both of your opponent's hands, which means you must first close one of his hands. The same applies to your opponent playing against you. Your opponent plays randomly, unlike the other two adversarial puzzles in the game (the Bloody Grid puzzle in the Dutton Room when playing as the doctor and the Hexagon puzzle in the Doll Room when playing as Tad). As a result, you or your opponent generally must make a mistake before the game is decided. If both players continue to make optimal moves, the game will loop endlessly.- Balancing the number of fingers between your two hands, leaving your opponent's hands unchanged. This move is possible only if your {min,max} arrangement of fingers is one of the following:
{0,2} which changes to {1,1}
{0,3} which changes to {1,2}
{0,4} which changes to {2,2}
{1,3} which changes to {2,2}
{1,4} which changes to {2,3}
{2,4} which changes to {3,3}
The secret to this game seems to be the balancing of hands, which is almost always the best defensive strategy for either player if they have a closed hand and their opponent doesn't. So if your opponent makes a mistake by not balancing when he needs to, you can often exploit that to win the game.
If you have a closed hand on your side and can close your opponent by playing your nonzero hand on him, then make sure your opponent's remaining hand doesn't have enough fingers to come back and close you out.
There are 166 possible configurations in the game, and your responses must adapt to how your opponent plays. The following strategy is extremely effective at winning games. You may see one or more cases where the gameplay loops back to the original 1-1 vs. 1-1 configuration, but eventually your opponent will make a mistake or try something different, and it will automatically be exploited if you're following this strategy. The priorities are:
1. Close your opponent's largest hand if possible.A flowchart of steps is presented below:
Exception: If you have a closed hand and your opponent's other hand can close yours.2. Balance your hands if possible.
3. Play your smallest hand on your opponent's smallest hand.
48 15 16 23 42(without spaces) in the blind at the Main Menu, you'll be put into Open House mode. This gives you full access to any location in the Stauf mansion via the map or walking, in which you can replay the puzzles there without any cutscenes. However, it's only one play per puzzle as they will remain solved until you reload your Open House saved game or re-enter the code number above. Some of the color-based puzzles may be more difficult to see since you will be operating in a sepia-toned environment throughout.
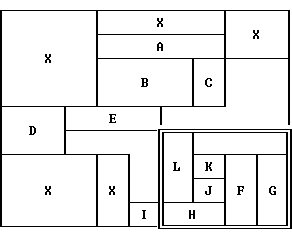
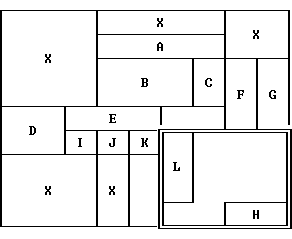
Background Meaning None Room has a solved puzzle Shaded Room is not yet accessible Thin-striped Room has an unsolved puzzle Thick-striped Room has an inventory item or necessary cutscene Bottom floor:
Second floor:
Top floor:

Copyright © 2026 Balmoral Software (http://www.balmoralsoftware.com). Portions copyright © 2019 by Attic Door Productions and Trilobyte. All rights reserved.