Copyright © 2019 Balmoral Software (http://www.balmoralsoftware.com). Portions copyright © 2013 Animation Arts Creative GmbH. All rights reserved. Republication, redistribution or conversion is expressly prohibited without the prior written consent of Balmoral Software.
Secret Files: Sam Peters is a little spin-off game in the Secret Files series from distributor Deep Silver using an excellent game interface from Animation Arts. In this interface, the spacebar can be used to highlight all hotspots in the current game panel, and the mouse icon shows in green which mouse buttons can be pressed. Left-clicking initiates active verbs, such as Use, Take, Open, Put, Move, Give, Talk to, Select, Enter, Exit and Combine (in the inventory bar). Right-clicking executes passive verbs such as Examine or Read, and can be used to skip game startup logos, video sequences and dialog.
We last saw archeologist Sam Peters as a secondary character in the game Secret Files 2 - Puritas Cordis. In this installment, Sam is the sole playable character (albeit rather conceited and gratuitously profane). We now get to find out what happened to her after she left her college chum Max Gruber trying to escape an Indonesian island with an erupting volcano.
Secret Files: Sam Peters provides excellent graphics, similar to those seen in the other Secret Files games. Most of the challenges are inventory-based. There are a few standalone puzzles and simple jigsaws in the game. The inventory bar can be accessed by moving the cursor to the bottom of the screen, and the saved-game list can be accessed by pressing the Escape key.
As a general rule, be sure not to miss any hotspots, especially along the edges of the screen, or in areas without a lot of contrast with the magnifying-glass icon. Also be sure to walk to the edges of each screen to scroll sideways in case the scene is wider than what's initially displayed. If you get stuck, try combining new inventory items with existing inventory items and using them on all hotspots. Also, right-click items in the inventory list to see if their descriptions have changed. Occasionally, you may need to move a character out of the way in order to interact with a hotspot in the scene.
This walkthrough provides a minimum path through the game; other gameplay sequences and dialog choices can provide additional backstory elements.
Press the right arrow to move through the bragging
Left-click on the Metal crate
Move Switch I to Recess M
Move the blank switch at X to the lower-left Recess
Move Switch III to Recess X
Move the blank switch at upper right to Recess A, then to the lower-right Recess
Move Switch II to the upper-right Recess, then to Recess A
You now have switches I, II and III spelling out M A X, and the box is opened
Pick up the Message in a bottle
Use the Message in a bottle with the Rock to break it open
Pick up the Broken bottle
In inventory, combine Rubber boots & Glass fragments to get a Piece of rubber
Take the Dead crab at the base of the Rock
Leave the beach
Walk to the right and the scene scrolls sideways
Left-click on the Animal skeleton to get a Bone
Combine the Crab claw & Bone, then combine the Piece of rubber & Crab claw on a stick
Exit twice towards the bottom of the screen
Use the Rubber in a crab claw on a stick with the Burning bush to soften the rubber
Return To the beach
Use the Socks on the Hole in the inflatable boat
Use the Sticky rubber in a crab claw on a stick with the Hole
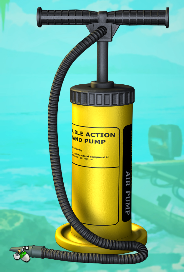
In inventory, right-click on the Air pump parts
Assemble them as follows:
Use the Air pump on the Inflatable boat
Click on the Inflatable boat
{Cutscene}
Take the Carpet
Examine the Letterbox
Move the Brown trash can to the Kerb stone at left
Use the Carpet with the Wall
In inventory, right-click on the Wallet to get some useful items
Open the Plastic toolbox on the bench to get some tools
Take the Rake by the No Entry sign
Use the Garden shears with the Garden hose
Take the Ladder
Combine the Garden shears with the Folding ladder, combine the Garden hose & Rake, then combine Rake with garden hose & Unfolded ladder
Use the Long ladder with the Window
Use the Window
Use the Two Euro coin with the Snack machine
Use the Window
Use the One cent coin with the Sign on the tree at left
Use the Window
Use the Sign on the Door at right
Open the Door
Use the Waste basket
In inventory, examine the Scraps of paper for a jigsaw puzzle
The button at the top can be used to rotate the pieces. It may be easier to first rotate all pieces correctly before assembling them into a letter:
Back out and use the Ring binders in the center bookshelf that's protruding from the rest
In inventory, examine the Ring binder
Press the right arrow to access all pages, then back out
{Cutscene}
Take the Batteries on top of a crate in the shade
Take the Bottle of lemonade
Examine the tent Pole
Take the Cap
Use the Pocket knife on the Hook to remove it
Back out and use the Voice recorder on the Cat
Combine the Voice recorder & Old batteries, then combine the Megaphone & Voice recorder
Exit Into the jungle
Click on the Camp at upper right
In the aerial view, you can see the rocky side of a meandering gorge
Use the Voice recorder with megaphone on the Warthog
Examine the Tree trunk
Take the Branch
Back out and exit forward Into the jungle past where the warthog was
Click on the Camp at upper right
Combine the Pocket knife & Cap, combine the Thread & Long branch, then combine the Coat hook & Branch with thread
Use the Long hook with the Bag below the bridge
In inventory, examine the Toolbag to empty it
Exit Into the jungle at left, then double-click on the Landing strip at lower left
Examine the Wire rope supporting the wind sock
Use the Wrench with the Rope connector
Return Into the jungle, then double-click on the Bridge
Examine the Rope
Use the Rope connector with the Snapped rope:
First, place the center part with the bolts protrudingBack out and exit across the bridge Into the jungle
Next, place the lower flat plate
Finally, place each of the two nuts
Double-click on the Camp at upper right
Pick up the sensor below the firepit
Examine Beneath the hut
Use the Wrench on the Floorboards
Take the Metal pipe and back out
Combine the Wrench and the Metal pipe
Use the Extended wrench on the Winch at the base of the tree
Open the Crate
Examine Beneath the hut
Use the Small key on the Locker
Take the Laptop, Sensor, First aid box and Letter, then back out
In inventory, examine the First aid box to get Painkillers, Pure alcohol and Gauze bandage
In inventory, examine the Solar modules
Assemble the modules as follows:
Combine the Laptop & Solar battery set, then examine the Letter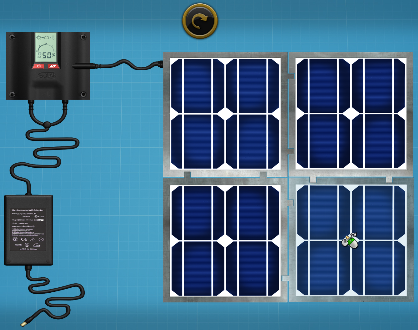
The information in the letter identifies the Professor's wedding date as 2 April 1986
Back out and put the Laptop with solar battery set onto the sunny Rock in the foreground
Examine the laptop
Use the Pocket knife on the Adhesive tape at lower left to show two wedding rings, which is a clue to the laptop's PIN
Using the numbered keys in the second row of the laptop keyboard, note that only the first six digits entered are echoed on the screen
Enter the wedding date in numeric European ddmmyy form as 020486, then press the Enter key on the laptop
Click on DOCUMENTS and scan through all four pages of the diary
Click on DESKTOP, then on MAPS to show the desired sensor coverage:
Click on NEXT to show where the Professor was headed
Click on DESKTOP and LOG OUT
Examine the Sensor on a stand directly behind the firepit; this one is 90 degrees, which is consistent with the map above
Examine the Sensors in inventory to identify the one that is 120 degrees, then put it on the stand to the left of the firepit
Repeat the process for a 160-degree sensor directly below the hut, a 75-degree sensor to the right of the winch, and another 90-degree sensor in the background between the hut and the lake
When all five sensors are set up correctly, a tone plays and Sam says they are placed according to plan
Pick up the Firewood from under the hut
Put the Firewood into the Fireplace and ignite it with the Lighter
{Cutscene}
Use the Camera on the Trees
Next morning, exit Into the jungle
Double-click on the Mission at upper left
After some dialog, examine Father Samuel's diary in inventory
Leaf through the pages to the last ones that show a potion recipe:
Back out, and a loose page from the diary is added to inventory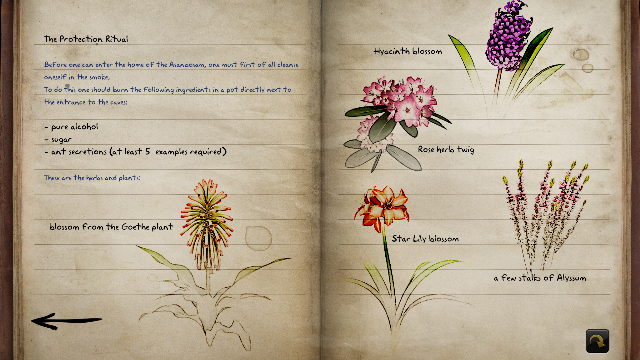
Enter the Graveyard at left
Examine the large Tombstone at left
Use the Paper on the Tombstone
In inventory, combine Pocket knife & Paper with symbols, then examine the Scraps of paper with ornaments
Solve another jigsaw puzzle:
Take the Clay bowl at the base of the large tombstone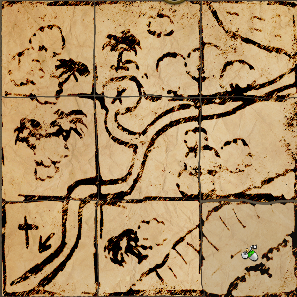
Exit the graveyard and examine a Grassy area to the right of the pathway
Click on various flowers until the five shown in the diary are added to inventory
Back out, exit Into the jungle, then double-click on the Camp at upper right
Use the Lighter on the Fireplace to re-ignite the campfire
Combine the Lemonade & Clay bowl
Put the Clay bowl filled with lemonade into the fireplace
Combine the Paint brush & Clay bowl filled with syrup
Exit Into the jungle, then double-click on the Swamp
Examine the Tree trunk
Use the Sticky brush to capture all 5 ants. Since each ant repeats its own path, this is fairly easy to do by placing the cursor "in wait", then rapidly left-clicking the mouse as the ant nears it.
Back out, exit Into the jungle, then double-click on the Caves at top center
Following the recipe in the diary, put the Clay bowl filled with syrup into the Pot at left
Add the Five ants, Pure alcohol and all five Blossoms to the Pot
Use the Lighter on the Pot to ignite the mixture
After some whining, enter the Asanbosam cave
You can refer to a cave map to navigate, or use the following steps for a shortest-path solution with 26 moves. There are 49 other solutions with this minimal number of moves.
Take the right-hand exit twice
Take the Chunk of resin from the floor
Put the Resin into the Clay bowl
Use the Lighter on the Clay bowl
Note that the front view of a single figure with arms arching downwards is lit in Row 5 of the Wall painting
Take the exit nearest the Clay bowl
Take the leftmost exit twice
In the room with a Wall painting, take the center exit of three
Take the exit at left
Take the Chunk of resin from the floor
Take the only exit
Take the exit at right three times
Put the Resin into the Clay bowl
Use the Lighter on the Clay bowl
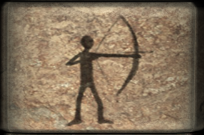
Note that a single figure holding a bow is lit in Row 3 of the Wall painting
Take the leftmost exit
Take the center exit of three
Take the Chunk of resin from the floor
Take the exit at right
Put the Resin into the Clay bowl
Use the Lighter on the Clay bowl
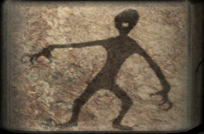
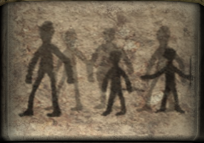
Note that the figures immediately to the right of a single figure pointing with one arm are lit in Row 1 of the Wall painting
Take the leftmost exit
Take the center exit of three
Take the leftmost exit twice
Take the Chunk of resin from the floor
Exit right
Put the Resin into the Clay bowl
Use the Lighter on the Clay bowl
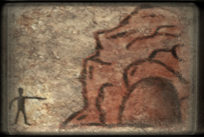
Note that a figure pointing to a red cave is lit in Row 2 of the Wall painting
Take the leftmost exit four times
Take the Chunk of resin from the floor
Exit right twice
Put the Resin into the Clay bowl
Use the Lighter on the Clay bowl
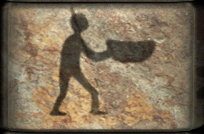
Note that a figure holding a bowl is lit in Row 4 of the Wall painting
Exit left
and examine the Panels to the right of the stone Door
Enter the five figures you saw illuminated on the wall paintings:
Press the stone button at left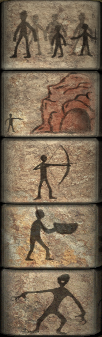
Move through the Door
Use the Camera on any of the Asanbosam to scare them all away
Give Painkillers to Professor Hartmann
Use the Gauze bandage on Professor Hartmann
Save your game at this point to replay both endings
Left-click on Professor Hartmann
After some dialog, make your moral selection and watch the corresponding endgame sequence
Copyright © 2019 Balmoral Software (http://www.balmoralsoftware.com). Portions copyright © 2013 Animation Arts Creative GmbH. All rights reserved. Republication, redistribution or conversion is expressly prohibited without the prior written consent of Balmoral Software.