
Copyright © 2017 Balmoral Software (http://www.balmoralsoftware.com). Portions copyright © 2008-2009 Animation Arts Creative GmbH & Fusionsphere Systems Ltd. All rights reserved. Republication, redistribution or conversion is expressly prohibited without the prior written consent of Balmoral Software.
Secret Files 2 - Puritas Cordis is the second in a series of three games from distributor Deep Silver using an excellent game interface from Animation Arts. In this interface, the spacebar can be used to highlight all hotspots in the current game panel, and the mouse icon shows in green which mouse buttons can be pressed. Left-clicking initiates active verbs, such as Use, Take, Open, Put, Move, Give, Talk to, Select, Enter, Exit and Combine (in the inventory bar). Right-clicking executes passive verbs such as Examine or Read, and can be used to skip video sequences and dialog. Secret Files 2 provides better graphics over its predecessor Secret Files - Tunguska, as well as an enhanced player interface with a larger mouse cursor and the ability accelerate character movement by double-clicking. The Pause button can now be used to pause and resume gameplay. Also improved is the display of pop-up heads indicating who is talking in multi-character dialog, which seems less confusing than the different-colored text used in the previous game. When an inventory item is added, consumed or changed, an icon appears briefly at upper left as a reminder. As in the previous game, most of the puzzles in the game are inventory-based. There are a few standalone puzzles, but these are easy and also have optional hints within the game.
As a general rule, be sure not to miss any hotspots, especially along the edges of the screen, or in areas without a lot of contrast with the "pulsing magnifying glass" icon. Also be sure to walk to the edges of each screen to scroll sideways in case the scene is wider than what's initially displayed. If you get stuck, try combining new inventory items with existing inventory items and using them on all hotspots. Also, right-click items in the inventory list to see if their descriptions have changed. Occasionally, you may need to move a character out of the way in order to interact with a hotspot in the scene.
This walkthrough provides a minimum path through the game; other gameplay sequences and dialog choices can provide additional backstory elements.
Examine Desk
Take Book
Combine Parchment & Book in inventory
Put Book with parchment on Bookshelf
{Cutscene}
Use Keyring on left-hand Door, enter Door
Examine Lecture schedule
Move Prof. Patterson's Magnetic plate down one slot
Move Dr. Forrester's Magnetic plate into Empty field at top
{Cutscene}
Exit into cabin corridor and encounter a passenger
End dialogGo upstairs to Reception
Take Bell
{Cutscene}
Return to Reception
Use Roller skate on UFO
Move UFO over window
Follow exit to ship's exterior and go to Sun deck
Take Ice bucket and Woolen blanket
Exit left to pool
Fill Ice bucket in pool
Return to cabin corridor and exit downwards to laundry room corridor
Take Oar and Flashlight
Enter laundry room at left
The faucet in the sink here is broken, so it could not have been used to fill the bucket
Use Ice bucket on Soap dispenser
Combine Woolen blanket & Ice bucket in inventory
Combine Oar & Cleaning utensils in inventory
Go to cabin corridor
Use Extended cleaning utensils on Window
Use Flashlight on Window
Exit to laundry room corridor
Examine Picture
Take Picture
Enter laundry room
Use Picture with Steam, get Photo
Examine Photo in inventory
Go to cabin corridor
Examine the middle door of the three at the end of the corridor (Sick Bay)
Use Photo on Window
{Cutscene}
Nina is back in her cabin after her handbag is stolen
Use Suitcase
BathrobeGo to Sun deckRed socks
Back
Take Lifebelt, Toothpicks, CD and Poster
Exit to pool
Talk to Passenger, get Tube of sunscreen
Go to Reception and exit left into the restaurant
{Cutscene}
Take Roses and Bottle opener
Go to laundry room corridor
Talk to Passenger
LaundryEnter laundry roomEnd dialog
Use Tube of sunscreen on Soap dispenser
Use Nina's key card on Bell
Exit and talk to Passenger
LaundryRe-enter laundry room
Put Bathrobe and Red socks into Washing machine
Turn on Washing machine, get Wet bathrobe and Wet red socks
Take fabric
Go to the ship's exterior and head for the Upper deck
Use Wet bathrobe on Ventilation
Go to pool
Give Tube of sunscreen with soap to Passenger
Take Sunglasses
Combine Fabric, Lifebelt, Roses, Pink bathrobe & Sunglasses in inventory
Exit
Use Disguise on Nina
Talk to Barkeeper
Key cardGo to ReceptionEnd dialog
Put Bell on Bolt
Use Bottle opener on Bell to summon porter
End dialogGive Poster to Porter
Use CD on Counter to find out Ms. Jordan is in Cabin 2
Go to Sun deck
Use Disguise on Nina
Talk to Barkeeper
Key card (02)Go to cabin corridor
Use Key card 02 with cabin #2 Door behind the stairs
Take magazine
Take handbag to trigger:
{Cutscene}
Go to Sun deck
Talk to Ms. Jordan
Talk to Barkeeper
CocktailGive Cocktail to Ms. JordanEnd dialog
{Cutscene}
Go to restaurant
{Cutscene}
Back out from closeup of doctor and go to Reception
Use Bowl, get Marzipan potatoes
Enter restaurant
Use Magazine with Photo
Take aluminum foil
Talk to Passenger
Prize drawCombine Toothpicks & Aluminum foil in inventoryEnd dialog
Combine Marzipan potatoes & Aluminum foil in inventory
Combine Aluminum toothpicks & Aluminum potatoes in inventory
Give Atomium to Passenger, get Lottery ball
Go to Sun deck
Talk to Boy
Bongo drumsGive Lottery ball to Boy, get Bongo drumsEnd dialog
Take MP3 player
Go to Upper deck
Use door to talk to Captain
DoctorGo to ReceptionEnd dialog
Use MP3 player on Microphone
Talk to Passenger
Ship's voyageGet photo of disguised doctorCameras
Camera
Photo
Go to Upper deck
Use door to talk to Captain
Photo{Cutscene}
The playable demo ends here
From Fruit bowl, take 3 Oranges
Combine Wire, 3 Oranges, Bamboo tube & Signal rocket in inventory
Use Mobile rocket launch pad on ramp
{Cutscene}
Use Tree, get Papaya
Take Fence
Take Bamboo tube
Take Flag
Take Peacock feather
Take Documents
Take Hard hat
Open Backpack, get Wrapped donut, Balloon, Beer can and Glow sticks
Use Destroyed tent, get Tent poles
Take Teapot
Take Hibiscus
Use Teapot in River
Combine Teapot full of water & Blossoms in inventory
Put Teapot with floating blossoms in Campfire site
Combine Papaya & Teapot with red mush in inventory
Examine Wrapped donut in inventory, get Cling wrap
Combine Teapot with red mush & Cling wrap in inventory, get Red cling wrap
Combine Fence & Tent poles in inventory
Put Reinforced fence in River
Use Flag on Branch, get Fish
Scroll right and use Beer can on Garden
Give Red papaya to Monkey
Exit to the jungle
Take White berries
Exit to the back of the temple
Use Donut on Hole in temple wall
Take Honeycomb
Take Rafflesia
Clear away Spider web
Use Flag with Tendril
Exit to camp
Take Beer can
Scroll left and put Rafflesia on Flat stone, get Frog
Scroll right and exit to the jungle
Take Flag
Take Spider web
Go to the temple square
Use Rafflesia on guard
Use Tent poles on Rafflesia
Take Venus flytrap
Exit to the back of the temple
Examine Inscription on temple wall
An object must be placed in each of six Niches
Examine Translation in inventory:
Honor the goddess, enthroned above all.Examine List of planets in inventory: Venus, the goddess of love, is right at the top.
With her radiant being and ever-open eye, she looks down upon her subjects: the mute and the homeless.
Yet they have no one to blame for their miserable state but themselves. Were they not so self-centered, then they could see the riches at their feet; the Queen's gold.
This suggests that the Venus flytrap be placed in the top position (although it's unlikely that ancient island dwellers would use the modern colloquial term for that plant)
The Queen's gold at their feet could refer to a gold-colored product of a queen (bee): a honeycomb in the bottom position
Other references in the translation (some debatable):
Radiant being: FirefliesPlace objects in Niches as follows:
Ever-open eye: Peacock feather
The mute: Fish
The homeless: Slug
{Cutscene}
Examine Picture of a ship
Note date: 7 April 1975, written numerically, this could be 7 4 75
Back out and use Combination lock
Enter 7 4 7 5
Open lowest of three Drawers
Use Bust on upper Hatch
Use upper Hatch
Take Metal rod
Use Bongo drum on Jet of water
Use lower Hatch
Use Lever
Full speed aheadUse Chain on Steel girderCancel
Use Metal rod on Chain
Use Lever
Full speed backwardsTalk to Nina's rescuer
Use upper hatch
Take Documents
Use lower Hatch
Give Ticket with letter to Nina's rescuer
Use (empty) Bongo drum on pipe
Use Bongo drum with water on Pipe, get Bongo drum with oil
Use Bongo drum with oil on lower Hatch
Open lower Hatch
Use lower Hatch
{Cutscene}
Take Hat stand
Take Handbag
Take Briefcase
Examine Briefcase in inventory to get Documents and Candy bar
Take Wheel
Take Sheet of metal
Combine Rake & Sheet of metal in inventory
Take Speargun
Use Speargun on Power pole
Take Car battery
Take Firehose
Combine Wheel & Firehose in inventory
Use Car battery on Tool box
Take Life vest
Take Pebbles
Combine Handbag & Pebbles in inventory
Take Suitcase
Scroll left and use Handbag with pebbles on Medical Kit, get Medical Kit and two Buckets
Combine Hat stand & Bucket in inventory
Examine Medical Kit in inventory
Combine Bucket & Bandages in inventory
Use Bandaged bucket with Sea
Use Power pole to turn off the power
Use Documents on High voltage cable
Use Power pole to ignite the documents
Use Makeshift shovel with Small fire
Use Shovel with fire on Barrel
Combine Hat stand with bucket & Bucket with water in inventory
Use Hat stand with bucket of water on Big fire
Use Candy bar in Bucket of water
Scroll left and give Bucket with chocolate water to Nina's rescuer
{Cutscene}
Use Bucket on Landslide, get Fan blade
Use Hose wheel on Motorcycle
Use Motorcycle on Boat
Use Tool box on Motorcycle
Use Life vest on Boat
Use Fan blade on Boat
Use Tool box on Suitcase, get Camera and Suit
Use Tank bag, get Map
Give Suit to David Korell
Exit left
Scroll left and use Digital camera on signpost
Examine map in inventory
Scroll right and talk to David Korell
Gatineau{Cutscene}
Examine Wall painting to see a multi-colored picture
Combine Hard hat & Red cling wrap in inventory
This discloses the red portion of the picture
Examining the List of planets in inventory shows that the red symbol is Juno
Combine Hard hat & Balloon in inventory
The green symbol is Venus
Combine Hard hat & Flag in inventory
The blue symbol is Neptune
Click on the Hard hat icon on the main screen
Use Hard hat on Max (no screen Search icon) to restore the white light
Use the Ancient control panel
You know the three buttons to press, but not the order (there are 6 possibilities)
In the first row, press the Venus (green) symbol fourth from the right
In the second row, press the Juno (red) symbol second from the left
In row three, press the Neptune (blue) symbol second from the right
{Cutscene}
Play Max
Use Bamboo tube with Hole to transfer to Sam
Transfer White berries to Sam
Play Sam
Use Bamboo tube on Fruit bowl, get Raspberry
Combine White berries & Raspberry in inventory
Use Laced raspberry on Fruit bowl
Talk to guard
FruitPlay MaxRaspberry
Use Glow sticks with Ugly face
Put Frog in Ugly face
{Cutscene}
Take Paper cup
Take Aluminum foil
Combine Paper cup & Aluminum foil in inventory
Exit left to signpost area
Take Mirror
Use Table to get Pocket knife, Spirit level, Power cable and Cloth pouch
Combine Mirror & Power cable in inventory
Exit left to statue area, get Elise's letter
Examine Statue
Use Spirit level on Left arm
Back out and exit to signpost area
Use Signpost
Turn leftSignpost is now aligned with laser beamTurn left
Turn left
Back
Return to statue area and examine Statue
Take Spirit level
Back out and exit
Use Spirit level with Signpost
Exit right to information board area
Use Information board
Founding and riseUse Pocket knife on Flap to get batteriesDownfall
Rediscovery
Back
Exit right to ruins
Use Pocket knife on Rockslide sign
Go to signpost area
Use Pocket knife on Plastic boulder
Use Rockslide sign on parking Sign
Put Plastic boulder into Derelict car
Exit right to information board area
Use Bowl to get a Fortune cookie
Use the Fortune cookie on Nina to get a Message
Repeat the process until you have 3 Messages in inventory
If the orientation of the Message icon in inventory is angled, it is not the correct one
The fortune cookie Message of interest is the one whose icon is horizontal
Examine this Message in inventory to confirm that it says:
"If you ignore the warning and disregard your neighbor's misfortune, disaster will strike you also."Give the (horizontal) Message to Chinese man, get Fresh fortune cookie
Exit right to ruins
Give Fresh fortune cookie to Surveyor
Talk to Surveyor
CarReturn to information board areaCar
Talk to Chinese man
Snack stand (icon at right)Laser beam fades out
Exit left to signpost area
Use Batteries with Spirit level
Exit right to information board area
Use Tied-up mirror with Hook
Use Cloth pouch with Molehill
Use Filled cloth pouch with Mirror
Use Aluminum foil with Molehill
Exit right to ruins
Put Paper cup with aluminum foil into Rubble
Examine Rubble
Talk to Surveyor
Archeological finds{Cutscene}
Use Iron ring
Examine Stone discs
Press the lower rectangular Button to reset the puzzle to its original position
This puzzle consists of 3 colored Stone discs with 8 radial positions (one of which is a hole), controlled by the three circular Buttons. The modulo-8 math is easier if we use Position 0 for the hole, and Positions 1-7 for the ones marked II-VIII. Some experimentation with the Buttons shows how the discs are rotated, and the moves necessary to align all three of their holes:
The Blue disc is controlled solely by the Right button, so:
A ten-move solution (since the move order is immaterial) is:
Press Left button 4 timesTake Ring and back out
Press Middle button once
Press Right button 5 times
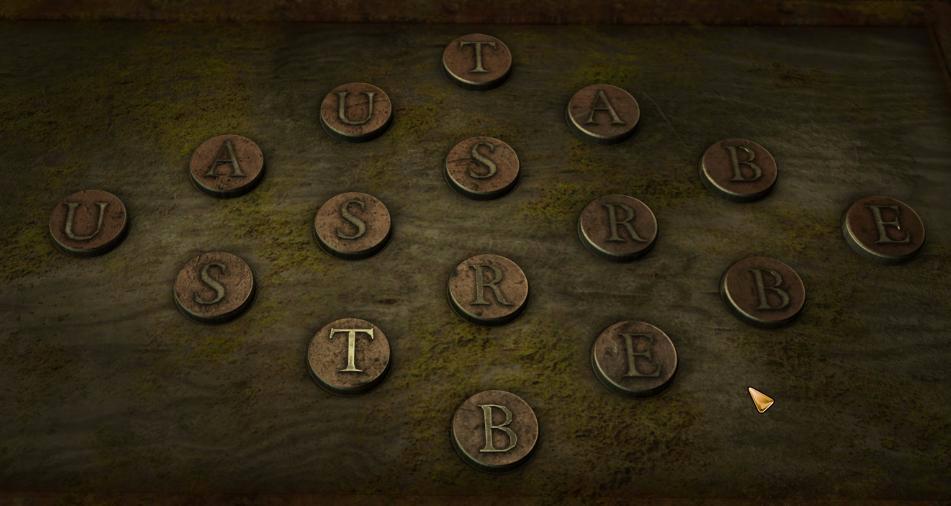
Examine Wooden board
Use Ring in Indentation
David Korell talks to you
End DialogExamine Wooden board
Referring to the letters shown on the Wooden board and the pattern in the Sketch in inventory, you can trace out a path to spell "AUSTREBERT". There is no solution without retracing your steps:
1. Start with A in left region{Cutscene}
2. Move to U at lower left
3. Move straight right to S
4. Move to T at upper right
5. Move to R at lower right
6. Move straight right to E
7. Move to B at upper left
8. Return to E at lower right
9. Return straight left to R
10. Return to T at upper left
Take Blue stone to enter crypt
Use Hole to get freed by homeless man
RuinsUse Compost heap, get Candle and StickEnd dialog
Based on the homeless man's responses, the Diary shows the following information about the curator:
Name was something like "Michel"Exit to the cemeteryServed the cardinal for 40 years
Died ten years after 1663 and in a squalid setting
Appeared heavily covered up in public
1670 (died in 1673)Note letter rotations on headstone:Poor (died in squalid basement)
Old (served Cardinal for 40 years)
Women (dressed secretly)
Top of "S" at lower right/upper leftBack out and enter ruinTop of "a" at right
Top of "f" at lower left
Use Hole to enter crypt
Examine Emblem
Rotate the top of all three S letters to lower right or upper left
Rotate the top of letter A to the right
Rotate the top of letter F to lower left
Gap at left opens up
Exit left
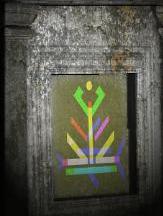
Examine Mosaic
Put White king into one of the empty fields
Back out and exit to the crypt
Use Hole
Exit ruin
Talk to Homeless man
MosaicGet map of Paris locations
Now at Bridge
Use Garbage heap, get Five cents and Pacifier
Talk to Street cleaner
BridgeExit to MetroEnd dialog
Talk to Passerby
End dialogEnter station
Take Teddy bear and Umbrella
Examine Window
Use Candle on Station clock
Back out and use Clockwork mechanism twice
{Cutscene}
Now in Park (new destination on map)
Scroll left and take Hula hoop and Tennis ball
To get the zoo to open, talk to Homeless man
ZooUse Map to go to ZooFountain
Alcohol
End dialog
Take Nail polish
Take Soda can
Exit left to monkey cage
Exit
Talk to Zookeeper
MonkeyReturn to monkey cageEnd dialog
Use Stick with Hole
Use Soda can with Stick
Use Hula hoop with Crack in the ground
Use Umbrella on Monkey
Use Hula hoop
Use Tennis ball on Soda can
Take Can of peanuts
Exit right twice to crocodile pool
Take Noisemaker
Put Teddy bear into Water in the enclosure
Scroll left and use Boat
Scroll right and use Can of peanuts on Bird's nest
Use Tree to get Black castle
Use Map to go to Bridge
Use Umbrella on Blue stone, get Black pawn
Use Noisemaker on Nina
Scroll right and exit to Metro
Take Candle
Use Nail polish on Car
Use Map to go to Park
Use Noisemaker on Nina
Scroll right and talk to Rossi
FountainUse Five cents with FountainEnd dialog
{Cutscene}
Use Map to go to Zoo
Go to crocodile pool
Use Noisemaker on Nina
Use Map to go to Zoo
Talk to Zookeeper
BaguetteUse Baguette with Milk cansEnd dialog
Use Map to go to Park
Use Fountain, get Five cents and Ten cents
Scroll left and give Soggy baguette to Homeless man
AlcoholUse Map to go to MetroEnd dialog
Enter station
Use Ten cents in Bubble gum machine, get Bubble gum
Use Map to go to Jail
Examine right-hand Cell
Use Bubble gum on left-hand Cell
Talk to Police officer
CellsUse Bottle of booze on NinaNo
End dialog
Talk to Police officer
Use Bottle of booze on Syringe
{Cutscene}
Take Broken ball
Take Spoon
Use Spoon on Blue stone
Talk to Wall
HarmonicaPuzzle: 3-digit number
"The first digit is a number between 1 and 5. Take a good look around your cell. It doesn't matter how long you search, you will never find the answer."Answer:1: Person, door, chair, etc."The second digit is simple. They have you trapped. It is an odd number larger than 1."
2: Bunks
3: Coat hooks
4: Chair legs
5: AnswerNumber of bars in Window: 9"The last digit, definitely even, and also to be found in your cell. They all stand, but not all of them can walk."Legs: 4 on chair (cannot walk) + 2 on Nina (can walk) = 6
RiddleUse Spoon on Blue stone, get Black king
5 9 6
Use door
Use Map to go to Park
Use Broken ball on Fountain
Use Map to go to Metro
Enter station
Use Ball with water on Fountain
Use Switch box
Use Pacifier on Fountain
Use Candle on Fountain
Use Switch box
Use Umbrella on Blue stone, get White knight
Use Map to go to cemetery
Go to the abyss
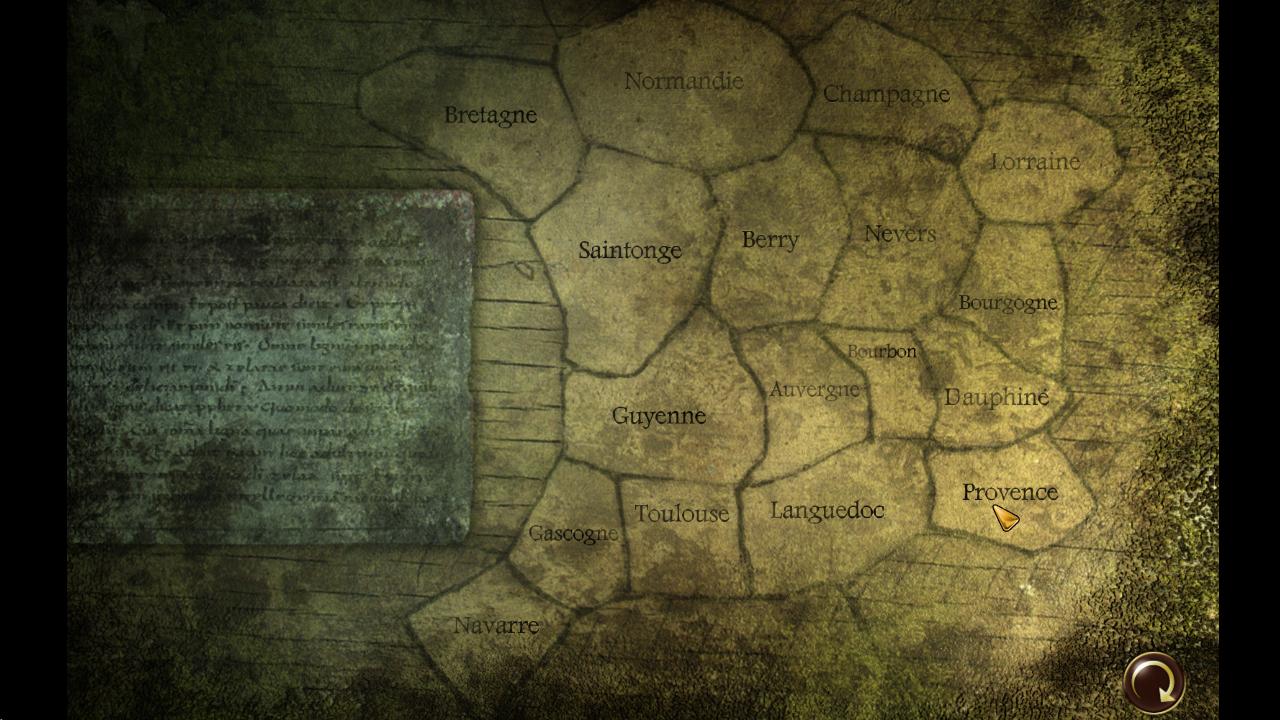
Examine Map on the wall for clues:
The king was in dire straits. He had withdrawn to Provence, and the options he had left did not bode well.Back out and examine Mosaic for the chess puzzleThe peasants were rising to the north, and the reinforcements from the kingdom of Navarre, who had just crossed the border, were forced to go up against a massive fortress to the east.
Meanwhile, his opponent sat back and eagerly watched the spectacle unfold from his country estate in Brittany.
Move white squares to make room for the solution as follows:
WK: White king in Provence
BP: Black pawn in Dauphine (peasants to the north of the king)
WKt: White knight in Gascogne (reinforcements across the border from Navarre)
BC: Black castle in Toulouse (fortress to the east of reinforcements)
BK: Black king in Brittany (Bretagne in French)
{Cutscene}
Use Apple on Trash picker
Use Trash picker on Stove door
{Cutscene}
Give any response to Shelton's question
Take Vase
Take Spade
Exit into the corridor at rear
Examine Window at left to discover Nina
Play Max
Back out and use Trash picker on Mousetrap to get Cheese
Use rear Window to enter storeroom
Take Ice spray
Examine Magazines and Books for clues:
Snow White and the 7 DwarfsTake Camera666 - The Devil's Number
11 Friends
Take Sacks
Take GameGirl
Take Coat hanger
Use Coat hanger on TV set
Pick up TV set
Put TV set with antenna onto Lectern
Switch on TV set
Exit through the window at left
Return to the gravesite and exit left to courtyard
Use Ice spray on Thermometer
Play Nina
Use Cell door to talk to the guard
ColdPlay MaxEnd dialog
Back out and return to the corridor
Examine Nina's cell Window
Use Trash picker on Cowl
Back out and use Cowl on Max
Go to gravesite
Use Spade on Doghouse
Use Sack on Debris
Exit left to courtyard
Take Wild garlic
If the guard is not there, either wait for him to show up, or revisit the gravesite to force it
Talk to guard
PatrolGuard now disappears
Use Camera with Bench, get Photo
Enter Prison door
Combine GameGirl & Photo in inventory
Give Illuminated photo to Nina
Clues: Snow White, soccer and devil
Correspondences from book in storeroom:
7 dwarfsUse Number pad to enter code 7 1 1 6 6 6 and open cell door to release Nina11 players on a team
666 Devil's number
Now in storeroom with Nina
Use Sack on Nina
Combine Coal sack & Nina in a sack in inventory
Exit right to courtyard
Use Nina in a coal sack on guard at right in front of the tower entrance
{Cutscene}
Now playing as Nina in the cellar (what happened to the coal sacks?)
Take Coals
Take Helmet
Take Wine bottle
Take Cloth handkerchiefs
Use Cloth handkerchiefs in Window to give to Max
Play Max
Return to storeroom
Use Cloth handkerchiefs with Sewing machine
Return to gravesite
Combine Vase, Cheese & Wild garlic in inventory
Use Sheet on Cellar window to give to Nina
Give Trash picker and Vase with ingredients to Nina
Play Nina
Combine Sheet & Trash picker in inventory
Combine Wine bottle & Vase with ingredients in inventory
Combine Potential cheese soup & Helmet in inventory
Use Trash picker with quilt on Bird cage
Take Gold medals
Use Coals in Stove
Use Potential cheese soup on Stove
Combine Vase & Helmet with cheese soup in inventory
Give Gold medals and Vase with cheese soup to Max
Play Max
Return to courtyard and give Vase with cheese soup to seated guard
Use Gold medals with Straw
Talk to Guard
StrawPress Alarm button
{Cutscene}
Throw Helmet with cheese soup at Pat Shelton (any other action causes a "Game Over" rewind)
Press Green button
0 Enter
Press Purple button
0 (any number other than 1 to deactivate alarm system) Enter
Press Red button
Enter seven-digit telephone code from "Zandona" book at right:
	Z A N D O N A
	9 1 5 2 5 5 1 Enter
Chip card is added to your inventory
{Cutscene}
Nina will now automatically move every 18 seconds between the bottom level (red door) and the middle level (world map) of the castle, or you can move her manually by jumping down or using the Shaft to move up
While at the bottom level, take Oil canister
While at the middle level, use Shaft to move up to the top level (desk and windows)
Use Oil canister on window
Use Oil canister with holes on Stairs
Push Statue
{Cutscene}
Endgame sequence in which, like in Secret Files 1, we get to find out what happened to all of the secondary characters in the game
Statistics for the gameplay are then shown.
{Endgame cutscene}
Copyright © 2017 Balmoral Software (http://www.balmoralsoftware.com). Portions copyright © 2008-2009 Animation Arts Creative GmbH & Fusionsphere Systems Ltd. All rights reserved. Republication, redistribution or conversion is expressly prohibited without the prior written consent of Balmoral Software.


