Copyright © 1997 & 2025 Balmoral Software (http://www.balmoralsoftware.com). Portions copyright © 1997 Activision, Inc. All rights reserved. Republication, redistribution or conversion is expressly prohibited without the prior written consent of Balmoral Software. Contents subject to change! For the latest information, see http://www.balmoralsoftware.com.
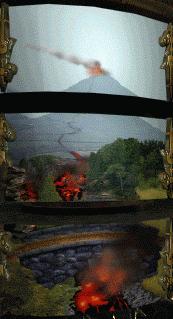
With its widespread humor, fairness to the player and faithfulness to its roots, Zork Grand Inquisitor is destined to be a classic in the adventure game genre. Throughout the game, the player is reminded of the meticulous care with which this game has been created, and the overall Zork theme is consistently maintained. Even the installation and game preferences menus show that an extra effort has been expended.
Gameplay is straightforward, using a extension of the engine first developed in 1996 for the preceding game in the series, Zork Nemesis (also well-received). Controls are immediately obvious and the use of cursor highlights avoids the monotonous pixel-searching found in other games. Full 360-degree lateral motion is possible from any of the main nodes in the game, with plenty of close-ups also provided. Use of spells gradually acquired throughout the game adds an interesting dimension to playability (and is reminiscent of older games such as Death Gate). The spell system, a crucial gameplay component, adds a degree of game control that would otherwise be much less fun to experience. Inventory and spells are managed through both a detail screen and two menus accessible at the top of the main gameplay screen. The tried-and-true "sidekick formula" is used in the form of a lantern containing the spirit of the former Dungeon Master. At many points throughout the game, he offers valuable advice, not to be missed. In later parts of the game, three time-tunnel quests are interesting, self-contained "mini-games" that preserve the overall theme of the game.
Music is very good, perhaps not quite as remarkable as in Return to Zork, but definitely of a superior quality (and occasionally reminiscent of themes in Rama). Generally, it is atmospheric rather than intrusive, and is effective in setting various moods throughout the game.
Lots of humor is interspersed throughout the game, often in the form of references to earlier Zork games. Voice characterizations are consistently of very high quality (Want some rye? Course you do!, Brog like rrrox!). Ambient sounds are excellent and frequently directional.
Given the fantasy setting, most of the FMV acting is satisfactory, with a nine-member cast headed by TV actors Dirk Benedict, the 50ish veteran of The A Team and Battlestar Galactica, and Rip Taylor (The Gong Show) as the Grand Inquisitor's sidekick, Undersecretary Wartle.
There's not much to complain about in ZGI. For those of us who follow the advice of the Grand Inquisitor to save often, a few more saved-game slots would have been nice. Also, an Undo-Last-Command function would probably require less pre-emptive saving in the game. Having to manipulate the map every time a teleporter was used seemed to be an unnecessary complexity - why not just have all the teleporters activate the first time the map was inserted, then offer the map itself as a display on the teleporter? At any rate, a single keystroke can be used to return a held item to inventory.
On the other hand, the detailing and care lavished on this game really make it stand out. Many details are in the form of subtly-humorous images such as the handmade patch on Lucy's purse. The game is not an exercise in ultra-hi-res pretty pictures, and fits neatly on two CD-ROM's in a standard-sized jewel case. Instead, the game designers have concentrated on story and tone, and have produced a superior product. With its light-hearted premise and whimsical characters, ZGI is a pleasure to experience.
Right-click the mouse to access the inventory window
Spacebar Skip video sequence F8 Return held item to inventory F7 Show current score and rank
Not everything is shown in this walkthrough. Some sequences can be played in a different order.
In the game introduction, you find that magic has been rubbed out in Zork and your job is to restore it before the Grand Inquisitor can carry out his plan to subdue the populace with Inquizivision. Checking your inventory, you'll find the only item you're carrying is a PermaSuck vacuum cleaner. Enter the town of Port Foozle and zoom in on the loudspeaker control in front of the fish market. Press the green button to increase the loudspeaker volume, which will drown out the alarm that sounds when you pick up the Acme mead can from the ice box to the left (be sure to pick up the can when the broadcast voice is speaking).
Walk to the dock and put the plastic six-pack rings on the fishing hook, then use the lever to lower the hook into the water and strangle the goatfish, scaring him off and retrieving a crate. Pick up the lantern from the crate and use it to knock on the door of the lantern repair shop at the entrance to town. Antharia Jack takes your lantern and steps away for a moment. While he's gone, zoom in and pick up a Frobozz Electric Auto-Lighting Cigar (or return to his shop for one later).
Wandering around town, you'll find all doors closed to you, even if you try to impersonate a PermaSuck salesperson. On the dark building next to the chain-link fence, note the posters suggesting you save often and one identifying Antharia Jack as the local fireman. At the vendor's stand in front of the fence, use your lighted cigar to ignite a highly-flammable Talk To Me Grand Inquisitor doll. Quickly move to the left and hide in the barrel in front of the fence, then watch Jack get arrested by the Inquisition.
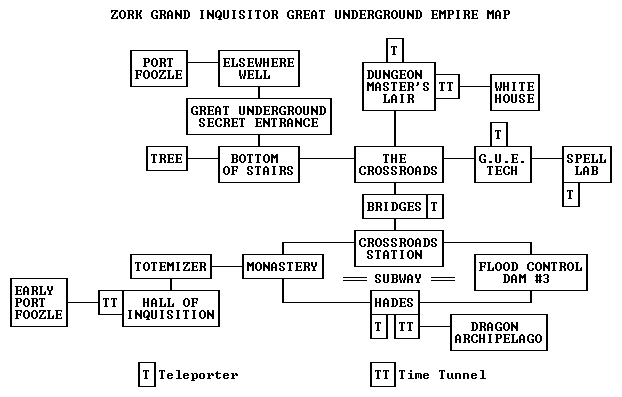
Return to Jack's now-abandoned shop and pick up the lantern. While there, you can see an unfinished adventure game playing on Jack's PC. Exit the shop and turn left to leave town. From the signpost, follow the unmarked path to the fenced-in Steppinthrax Monastery and pick up the rope from the Magic Inquisition totemization billboard. Return to the signpost and follow the path marked Elsewhere. Tie the rope to the crossbeam of the well and climb down.
After a CD change, you'll meet Dalboz, the Dungeon Master possessing your lantern. Although he gives you an an opportunity to introduce yourself, he'll prefer to refer to you as Ageless, Faceless, Gender-Neutral, Culturally-Ambiguous Adventure Person, or AFGNCAAP for short. You'll also meet the lovely Y'Gael, who will give you a spellbook containing VOXAM, REZROV and IGRAM spells. Look down and pick up a subway token from the bucket. You won't be able to open the G.U.E. Underground entrance door until you cast REZROV on it. Move forward and let the enchanted stair dragon carry you down to the Great Underground Empire.
At the base of the stairs, zoom in on the glass case and open it using the handle at right. Remove the hammer and close the case, then use the hammer to break the glass. Take the elven sword and G.U.E. map. Turn around and pick up the Griff totem lying on the path, then watch the video sequence showing his capture by the Inquisition. Continue down the path to the crossroads, then turn left and approach a small green door. Use your sword to cut away the foliage and enter the Dungeon Master's Lair. Open the gardening shack at right and pick up the shovel and THROCK spell. There's more to do here later, but for now return to the crossroads. Turn left and use REZROV to open the "In Magic We Trust" door. Move forward to the G.U.E. Tech entrance. Click on the pillar guarding the first of three bottomless pits and arrange its images in the following pattern:
Cross to the second pillar and arrange its images in the following pattern:
Finally, cross to the third pillar and arrange its images into the composite of three different windows:
Go through the materialized window and enter the G.U.E Tech lobby. Turn around and leave through the large double doors, ending up on what was previously the far side of the third bottomless pit. Turn around and climb the stairs to the fountain. Veer to the right and use your shovel to dig up the KENDALL spell from the pile of dirt between the columns.
On the other side of the fountain, put your map into the teleportation station and select the Crossroads as your destination. Zoom out from the screen and you'll be transported to a location near the G.U.E. entrance. Cross the bridge to the Great Underground Subway and insert your subway token into the slot in the turnstile. Zoom in on the subway map on the wall and decipher it using the KENDALL spell. Select Hades as your destination and move onto the metal loading platform behind you.
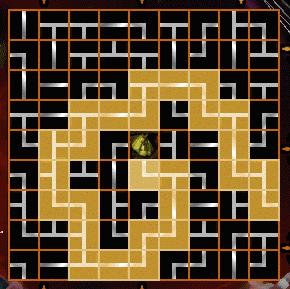
Zoom in on the skeleton at the far end of the platform and remove the lottery ticket from its hand. Go to your inventory and bring the ticket into the Frobozz Magic Viewer. Zoom out and save your game if desired. The ticket operates like a real-life lottery scratcher with 79 separate squares that can be individually uncovered. Your goal is to remove them in such a way as to create a continuous path from the first uncovered square at lower right to the prize at center. Only squares that can be reached from the path you've created so far are eligible for scratching (cursor highlighted). If you change your mind about the path, you can backtrack the active square. Make three mistakes and you'll lose your soul. This puzzle is pretty easy if you always choose branch points that move you closer to the center. Click here for a solution.
Zoom out from the skeleton and note the references to serpent nostrils in the book lying open on the seat next to the skeleton. Exit the subway platform to the Styx dock, then turn around and use the teleportation station to go to G.U.E. Tech. Go down the steps and enter the school lobby through the pillar window. On the bulletin board at left, note the references to an explosive combination of Zork Rocks and cola, and to a relationship between a candy vending machine and student lockers. In the vending machine alcove, use the change machine to convert your 500ZM bill into a bag of zorkmids (which should be more than enough for the rest of the game).
We have lots more to do at G.U.E. Tech, but for now exit through the window to the right of the double doors and return to the subway station via the Crossroads. Take the subway to Flood Control Dam #3. Along the way, you'll see a video sequence showing Jack on his way to being totemized.
On the subway platform, use a zorkmid in the souvenir machine to obtain a letter opener. Cast THROCK on the moss growing in a drainpipe to create a quantity large enough to pick up. Under the window at one end of the subway platform, open the ornate book and pick up the GOLGATEM spell. Read the book for clues on how you can destroy Flood Control Dam #3. Zoom in on the dam control panel. If desired, cast GOLGATEM on the mountains seen through the window. Each of the four colored buttons on the control panel changes the state of exactly two of the dam sluice gates. In order to close all of them, you'll have to cast REZROV on one of the closed gates, then use the appropriate control button(s). For example, if the gates are in this configuration
cast REZROV on gate 3, then press the blue and yellow buttons. You'll see a video sequence showing Jack saved from totemization by a power failure in Foozle caused by the dam's destruction. Take the subway back to Hades and exit the platform past the sitting skeleton. Turn around and zoom in on the teleportation station to return to G.U.E. Tech. Enter the lobby through the pillar window and head for the long hallway at right. Look up before entering the hallway and you'll notice the purple Infinite Corridor sign. Cast IGRAM on the word "Infinite" and quickly enter the now-finite hallway (you can first try casting IGRAM on the word "Corridor" for an alternative view, or later for yet another view). At the beginning of the hallway, click on the picture of Belboz to learn of three lost magic artifacts needed to return magic to Zork. At the far end of the hallway are three branching hallways in which you can see pictures of these artifacts:
Open Open Closed Open 1 2 3 4
Skull of Yorukand learn their histories. At the junction of the hallways, note the 3 x 4 array of student lockers.
Coconut of Quendor
Cube of Foundation
Revisit the vending machine alcove in the lobby. Insert a zorkmid into the freezer unit at left and quickly pick up the Obidil scroll from the Sandwitch dispenser. This scroll requires spell-checking before it can be added to your spellbook.
Zoom in on the glass-fronted candy machine opposite the freezer unit and you'll see an array of buttons in the same pattern as the student lockers at the end of the hallway. By inserting a zorkmid and pressing one of the buttons, you can open any single locker (except #6, for which the corresponding candy machine button is missing). Most lockers are empty or have inaccessible magic paraphernalia inside; the only ones of interest are #8 and #11. In #8, you can cast KENDALL on the book "How to Win at Double Fanucci". In #11, be sure to pick up a Prozork tablet and cast KENDALL on the book "Better Spell Manufacturing":
If you haven't already done so, press button 8 on the candy machine for some Zork Rocks candy. The package tilts forward but doesn't fall, so you'll have to "help" it by attaching your PermaSuck machine to the dispenser hole at bottom. Back out and turn the vacuum on to suck out the candy. The package can be retrieved by lifting the lid on the PermaSuck. Put the Zork Rocks in the soda machine and insert a zorkmid. Soaking the candy with Slam Classic creates a bomb that will explode within 45 seconds if not contained (like the Thaddium in Zork Nemesis). Pick up the explosive and quickly make your way back to the student lockers. Insert the Zork Rocks into the slot of the only permanently-sealed locker - #6 (second from the left in the middle row). Wait for the bomb to explode and blow off the locker door. Pick up Dalboz's student ID and use it in the card reader for the closed door near the lockers.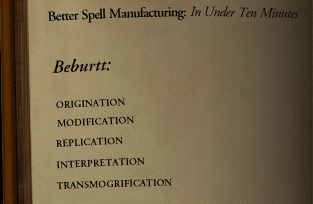
Enter through the doorway and destroy the invisible purple beast by striking the rope bridge with your sword. If you've previously destroyed Flood Control Dam #3, a stream of water will be flowing into the gorge ahead of you and you can cast GOLGATEM to create a bridge to the Spell Lab.
Cross the bridge and pick up a blank spell scroll at right. The only one of the six spell-processing machines that can be used is Origination; insert the blank scroll there and it will gain a border. The only sequence of remaining pressing tables that satisfies all the requirements in the book "Better Spell Manufacturing" from Mir Yannick's locker is:
Modificationfollowed by Spell Checking (the Elucidation machine is not used). Process the scroll to obtain the BEBURTT spell. While zoomed in on the Spell Checker, record the OBIDIL spell by inserting the soggy ice-cream sandwich wrapper from your inventory.
Replication
Interpretation
Transmogrification
Return across the bridge and teleport to the Crossroads. Head back to the foot of the stairs at the G.U.E. entrance. Cast IGRAM on the Umbrella Tree to disclose a spell scroll hidden inside one of the blossoms. Cast BEBURTT on the tree to release the scroll. Pick up the scroll containing the one-shot ZIMDOR spell. Unfortunately, you won't be able to explore the pathway beyond the tree...
Return along the path to the Dungeon Master's Lair. Move up the garden path and put the snapdragon plant to sleep with the Prozork tablet. Remove the snapdragon from its stalk with your sword. Continue toward the front door of the house, where entrance will be blocked by the Dungeon Master's home security system. Zoom in on the birdbath at right and pour out the can of mead you've been carrying. Triple its quantity by casting ZIMDOR on it. Zoom in on the ashtray at left and drop the lit cigar into it.
Enter the house and examine the book on the bookstand next to the entrance, learning about snapdragons and spring plants. Pick up a jar of hotbugs, a plug of glazed hungus lard and a piece of Flatheadia fudge from the shelves at left. Read a book from the top shelf to see images of the Blue-skinned Brog (Brogmoidus C. Graphicus) and Griff (Lesser Serpentus Canus) creatures. Check the vegetative answering machine next to the chair to obtain a cocoa recipe from "Gluttonous Recipes of the Fat and Unemployed":
Flatheadia fudgeLeave the house the way you came in and wander around to the backyard by following the path next to the birdbath. Along the base of the back wall of the house, cast THROCK on the mushroom-like plant, then place the snapdragon on it. Strike the plant with your hammer to obtain the torn half of a spell scroll.
Quelbee's nest contents
Hungus lard
Hotbugs
Moss
Return to the front of the house and insert the hungus lard into the quelbees' nest. After you've scared away the quelbees, remove the lard and quickly split the nest with your sword, extracting a quelbee honeycomb.
Re-enter the house and open the window blinds to see Hugh, the walking castle. To call him to you, cast OBIDIL on him. Enter Hugh's ribcage, look up and pick up the NARWILE spell. Return to the house and explore the bedroom off to the left. Pick up another torn half of a spell scroll from the window sill. Go through the mirror and then examine the torn scrolls in your inventory. Combine them together on your Frobozz Magic Viewer tool. Use the reversed cursor icons to return back through the mirror, then exit the bedroom. Pick a red mug from the vine near the entrance. Zoom in on the food-processor tree next to it and drop the mug, fudge, honeycomb, lard, hotbugs and moss on it, then learn the YASTARD spell.
Go back to the bedroom and open the cabinet doors, revealing a (collapsed) time tunnel. Cast NARWILE on the tunnel to activate it, then open your inventory window and cast YASTARD on the Griff totem you've been carrying. After you become Griff and arrive at the White House, move around to its backyard and pick up the Glorf scroll. Return to the front of the house and remove the unsealed envelope from the mailbox. Using the Frobozz Magic Viewer tool in your inventory window, insert the Glorf scroll into the envelope. To mail the scroll to Hades, put the sealed envelope back into the mailbox, close it and raise the red flag. Return to the Dungeon Master's Lair via the time tunnel in the backyard.
Exit the house and use the teleportation station in the backyard to go to the Spell Lab. Run the pieced-together Snavig scroll through the Spell Checker. Teleport to Hades and zoom in on the red telephone at the dock. After listening to all of the confusing instructions, press 8 for the list of questions, then answer each of four questions using the keypad responses 2, 8, 9 and 5 (alternatively, you can cast KENDALL on the telephone dial after you've lifted the receiver, then just press *). When Charon's shuttle appears, give him a zorkmid, then another one.
To get by the two-headed Hades monster, you'll have to make yourself look like an employee of the place. After Charon has taken you across the river Styx, cast SNAVIG on him and quickly move to the Hades monster. Open the gates of Hades by inserting Charon's card into the time clock. Pick up the Brog totem lying on the ground and watch the video sequence of his totemization in the Monastery. Exit back through the doorway, turn around and pick up your mail from the mailbox. Examine the envelope in your inventory window and open it with the letter opener to extract the GLORF spell.
Re-enter the gates of Hades and activate the time tunnel with the NARWILE spell. Open your inventory window and cast YASTARD on the Griff (left-hand) totem. After a CD change, you arrive at the Dragon Archipelago. Fly to the three-toed foot in the distance and tweak the right toe to expose the dragon's belly. Fly to it and pick up the inflatable red raft and blue Sea Captain from the wooden crate. Fly to the dragon's right hand and pick up an air pump from the kneeling skeleton. Fly back to the dragon's belly and then on to its smoking head. Insert the two inflatable items into the dragon's nostrils, then inflate them with the pump to get the dragon to raise its head out of the water (it'll still be asleep, though).
Enter the dragon's mouth and pick up the Coconut of Quendor from its uvula. Zoom out and wait for the dragon's throat resident to throw you a rope. Take the rope, then turn around and remove a gold tooth from the dragon. Look up and put the coconut into the inflated raft. Exit the dragon's mouth past his teeth, then turn around and zoom in on his nostrils. Attach the rope to the inflated items and re-enter the dragon's mouth. Look up and puncture the inflated Sea Captain with the gold tooth. Quickly look back down and exit the dragon's mouth. Retrieve the Coconut of Quendor from the raft floating next to the dragon's belly. Put the coconut on the biggest red pillow inside the castle and return through the time tunnel to Hades.
After a CD change, exit the gates of Hades and cast SNAVIG on the two-headed monster. Quickly approach Charon and click on him to return to the Hades dock. After your two-headed vision wears off, teleport to the backyard of the Dungeon Master's Lair and enter the house.
Zoom in on the time tunnel in the bedroom and cast YASTARD on the Brog (right-hand) totem. Follow the path away from the White House toward the burning torch in the distance. Pick up the right-hand (flickering, not bickering) torch, then return to the White House and tear off the boards blocking the front door, picking up a loose board in the process. Wield the torch and wait for it to light, then enter the white house.
Go downstairs and pick up a Grue egg from the nest. If you're really hungry, turn right and munch on some rrrox! Go back upstairs and light the fire with the torch. Cook the Grue egg until it turns golden, then pick it up and return downstairs. At the foot of the stairs, turn left and throw the golden egg at the small opening behind the row of stalactites. Jump forward to the Grue chess puzzle. You can try to figure out the game, or... act like a true Brog and just bash the cage with the board to retrieve the Skull of Yoruk. Inside the castle, put the skull on its pillow (the only one Brog can reach) and return through the time tunnel to the Dungeon Master's Lair. Along the way, watch a video sequence showing the Grand Inquisitor threatening Antharia Jack with a hungus prod and Jack's flashback (flashforward?) about a game of Grue-Fire-Water.
Teleport to the Crossroads, then take the stairs up to the G.U.E. entrance. Look up and remove the rope using the GLORF spell. Go back downstairs and take the subway to the Monastery. Move to the rockfall at the end of the platform. Open your inventory window and attach the rope to the sword. Look up and use the sword-rope combination on the ceiling hatch. Climb the rope into the Monastery. Move forward and set the Totemizer destination selector to the Hall of Inquisition. Note that the PermaSeal unit on top of the Totemizer is glowing yellow. Move to the side of the machine and zoom in on the set of several control valves. Turn the rightmost wheel to extinguish its yellow light and turn off the PermaSeal unit (now glowing purple). If necessary, turn the central wheel to activate the Totemizer control board. Zoom out from the wheels, then zoom in on the control board at left. Pull the switch to pass through the Totemizer. Since you weren't PermaSealed, you spring back to normal shape after landing in the museum-like Hall of Inquisition.
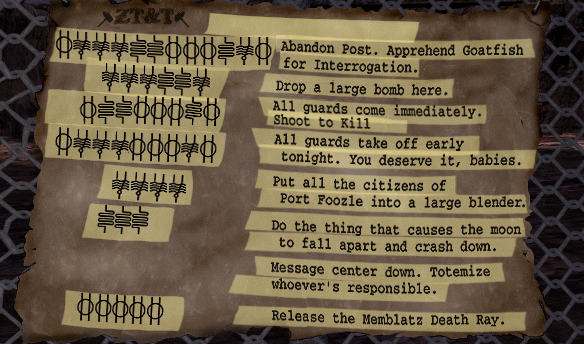
Turn around and pick up the Lucy Flathead totem from the bin, learning her story via a video sequence. Exit the museum through the doorway next to the "The Perils of Magic" sign. Turn left and press the red button to open the Inquisition signalling device (who's that speaking with a country accent?). Note the symbols shown above the three hammers. Examine the signaling device diagram attached to the chain-link fence and observe that removing the middle hammer will result in the "Apprehend Goatfish" message being sent instead as a message dismissing the guards. Go back to the signalling device and remove the center hammer. Take it back inside to the exhibit entitled "Closing The Time Tunnels". Pull the control lever all the way down (2 pulls) to operate the model at the highest speed. Press the red button to run the model until its hammer head falls off. Replace the hammer with the one you removed from the signalling device, then operate the model again to expose another time tunnel.
Activate the time tunnel with the NARWILE spell. Open your inventory window and cast YASTARD on the Lucy (rightmost) totem. After a CD change, you find yourself as Lucy in an earlier Port Foozle. The only place you can go is into the casino, where it's Ladies Night. Zoom in on the bartender, then turn around and pick up four playing cards from the Alpine's Quandry [sic] game. Your job is to insert the cards into the slots to make a valid arithmetic problem. However, no solution is possible with the four cards as given. Move to the dart game closer to the front of the casino and smash that annoying insect with the 4 card, turning it into a 5-spot. Return to the card game table and complete the arithmetic problem in one of two ways:
5 / 1 - 2 = 3or
5 / 1 - 3 = 2Changing the number of spots on any card other than the 4 will not work. You can play Grue-Fire-Water, the Zorkian equivalent of scissors-paper-stone, with Antharia Jack in the back room of the casino. The game seems rigged so that Jack always loses, even if you're trying to let him win or if you keep selecting the same button (see Timelapse for a much more difficult version of this game). How high can you make Lucy's pile of clothes? Once we saw 8 or 10 garments, with no end in sight! Eventually, Jack loses five times and gives up the Cube of Foundation in lieu of his heart-decorated underwear. Inside the castle, put the cube on the remaining pillow to activate the time tunnel back to the Monastery. Enter the tunnel and watch a video sequence showing you and Jack being thrown in jail.
In your prison cell, zoom in on the ventilation grille just below the ceiling and remove its lower right-hand screw using the letter opener. Rattle the open vent a few times until Jack gives you a scroll containing the one-shot LEXDOM spell. Grab the poster from the cell wall and slide it under the door. Cast LEXDOM on the door, then use the letter opener on the keyhole to eject the key. Pull the poster back in and retrieve the key. Put the key in the keyhole to open the door.
Exit the cell and turn hard left toward the guards' station. Zoom in on the TV monitor behind the counter and note the repeating sequence of camera numbers:
When you see Jack in his cell, waving at the camera, note the camera number: 31-05. Save your game at this point. You'll need to enter the number of Jack's cell into the control unit and then open his door by pressing the white button when his cell appears on the monitor. Enter 31AB to release Jack, then watch a video sequence showing your escape from prison and Jack's search for Lucy.
31-05 12-67 23-87 41-50 33-98 11-69
Y'Gael will give you the BOOZNIK spell (an obvious reference to an infamous Return to Zork character). Even though the Dungeon Master says you've got the three magic items, you'll still need to retrieve them from inside the yellow castle. Open your inventory window and use the BOOZNIK scroll on your spellbook. After all your spells have been reversed, cast VORZER on the purple tent to the right of the radio tower, trapping the guards inside. Cast MARGI on the electric sparks to disclose an invisible fence surrounding the tower. Back out from the fence and unplug its power cord at left. Tear open the fence with your sword and move forward to the tower.
Put the Skull of Yoruk in the nook at the base of the tower. Climb halfway up the tower and put the Cube of Foundation into the cube-shaped hole. Go farther up the tower, turn around and put the Coconut of Quendor into the cup-shaped receptacle. Counterbalance it with the lantern. Go up to the very top of the tower and cut the antenna with your sword. Quickly cast MAXOV on the tower and watch the endgame sequence.
Final Score: 1000 points
Rank: Dungeon Master
and their reversals:
Voxam Separate the energies of different magics Golgatem Create a bridge over a body of water Obidil Make caster more attractive to other creatures (Libido) Beburtt Create the illusion of inclement weather Rezrov Open locked or enchanted doors Kendall Simplify instructions Narwile Activate time tunnels Yastard Send spirit through time Igram Turn purple things invisible Throck Cause vegetation to grow Snavig Change shape to that of target creature Glorf Untie knots
One-shot spells:
Maxov Bind the energies of different magics Vorzer Seal open doors shut Margi Turn invisible things purple
Zimdor Triplicates quantity of intoxicating beverages Lexdom Create lock and key Booznik Reverse spells in spellbook
Point Level Rank 0 PermaSuck Salesman 50 PermaSuck Regional Sales Manager 100 Luckless Adventurer 150 Acolyte Spellcaster 200 Junior Enchanter 300 Enchanter 400 Assistant Sorcerer 500 Sorcerer 600 Executive Spell Manager 700 Vice Wizard 800 Wizard 900 Uber Wizard 1000 Dungeon Master
Copyright © 1997 & 2025 Balmoral Software (http://www.balmoralsoftware.com). Portions copyright © 1997 Activision, Inc. All rights reserved. Republication, redistribution or conversion is expressly prohibited without the prior written consent of Balmoral Software. Contents subject to change! For the latest information, see http://www.balmoralsoftware.com.