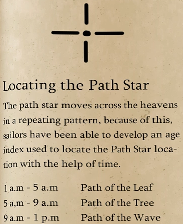
Copyright © 2021 Balmoral Software (http://www.balmoralsoftware.com). Portions copyright © 2012-2017 Skygoblin. All rights reserved. Republication, redistribution or conversion is expressly prohibited without the prior written consent of Balmoral Software.
The game interface is efficient and can be accelerated: double-click to speed up exits from scenes and left-click or press [Esc] to skip dialog sequences. Pressing [Esc] will skip cutscenes. The inventory area and the game menu are easily accessible at the bottom and top of the screen. There are only three saved-game slots for each chapter, so some manual file manipulation will be necessary if more are needed.
This walkthrough provides a shortest path through each chapter; other gameplay sequences, exploration and dialog can provide additional backstory elements. Inventory items are shown in bold text.
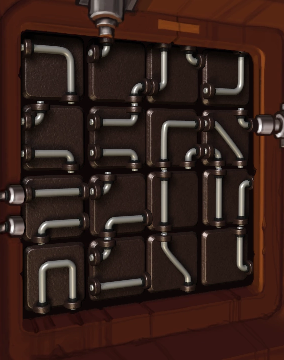
Click on the Power Box as instructed
Release the four Brackets on the Hatch
Click on the Hatch
Pull Switch
{Cutscene}
Examine Folders to get Bwana's phone number: 99-450
Open the Cupboard to put Breadsticks into inventory
Open the Fridge to get some Cheese
Drag the Breadsticks from inventory to the Ladder
Go up into the loft
Pick up a paint Brush from the fireplace
Open the Dresser to obtain a Shirt
Use the Bed to find the Journal of the Journey Down
Select either dialog choice
Rotate each of the three knobs so that its color on top matches the colored connector it's wired to (Red Orange Green) and the white light comes on
Enter the digits of Bwana's phone number: 450
Select either dialog choice
Learn that the airplane needs engines, a propeller and a steering wheel
Open the Hatch below the Dashboard and take the Wrench
Exit right and take the Net
Head back to the Power Box area
Use the Brush in the Paint bucket
Exit up to the Elevator area and click on the Garbage can to get a Hook
Exit to the boat M.S. Corollo and speak to the Dockmaster:
That's me man! The new deckhand!Go to the Diner and speak to the Sailors:
Gee, I'm afraid I've forgotten it.
What ship are you on?In the inventory bar, combine the Shirt & Brush
I'm the new deckhand on the ship! But I forgot the password.
Never mind man! Not gonna disturb your soup!
Drag the Shirt to the Sophisticated sailors to get the password: Feed the hungries
Talk to Matoke at right:
Talk to you later Matoke! I gotta run!Go to the Pump area on the other side of the airplane
Put the Cheese on the Float
Return to the Diner and click on Matoke
Combine Hook & Fishing Rod
Examine the Buoy
Use the Net on the Cage to get a Crab
Talk to the Dockmaster:
I finally remembered the password!Enter the ship
See you later man!
Click on any of the Switches 10 times until Bwana just kicks them to position the crane
Go up to the crane
{Cutscene}
In the boat's lobby area, exit right into the chef's kitchen
Select any of the dialog choices
Re-enter the kitchen and talk to Sabo
Return to the Diner and use the Crab on Rufus the dog
Enter Mama Makena's kitchen and take the Wheel
Talk to Mama Makena:
What's your trick Makena? Why's your stew so good?to get a Spice Container and Recipe
Later lady!
Clicking on the Recipe in inventory indicates what ingredients are needed: lemon, salt, chilis, ginger, oil and chervil
Exit the kitchen and talk to the Sophisticated sailors:
How's the stew tonight?to get a Chili
Never mind man! Not gonna disturb your soup!
Go to the Office next to the airplane
Examine the Medium sized blue cup to get some lemon
Use the Fishing Rod with the Fan to get a Propeller
Go up to the loft and check the Books above the Dresser to get some chervil
Return to the Pump area and use the Oil tap to get some oil
Use the Fishing Rod on the Water to get a Mudyuggler [sic]
Return to the ship entrance and exit right to a Forklift
Examine the Box to get some salt
Combine Chili & Mudyuggler
Use the Mudyuggler on the Pelican
{Cutscene}
Use the Wrench on the Lever of the Forklift
Examine the Nest to get a Metal Rod
Go aboard the ship and use the Gas canister
Timed sequence
Exit rightReturn to the chef's kitchen, then exit to the rear into a freezer
You then have about 20 seconds to use the Wrench on the Nut and then put the Propeller on the Nut
Take the pink Gum on the floor
Open the lower right of the four doors to get some Ginger
(Your inventory bar is now completely full)
Combine Spice Container & Chili
Combine Spice Container & Ginger to complete the spice mix
Turn the Knob below the fan to the right (hot)
Push the Right button down (on) and the Middle button up (off)
Use the Tasty gum on the Left button
Exit right and use the Spice Container on the Stew
Return to the freezer and open the upper left of the four doors to get some Frozen bread
Turn on the Middle button and turn off the Right button
Put the Frozen bread into the lower Radiator and pick up the Toast
Reverse the Middle and Right buttons so you can exit the freezer
Give the Toast to Sabo and pick up the Canapes
Return to the yacht's lobby and show the Canapes to the Concierge
Return to the chef's kitchen and pick up some more Canapes
Go back to the lobby and combine white Brush & Canapes
Go past the Concierge to the party
Exit right twice to reach the engine room
Save your game at this point
Click on the Switchboard for the only real puzzle in the game
The solution is easy to find when you notice that the correct tile rotation is found when a double (not single) click is heard after it's turned:
For a quick solution, click on the following tiles the indicated number of times (30 clicks total):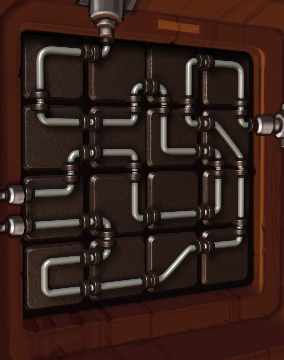
Press the Button to obtain engines for the airplane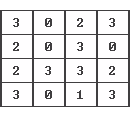
{Cutscene}
Go to the Cockpit and put the Metal Rod into the Hole by the left-hand seat
Put the Steering Wheel on the Metal rod
{Cutscene}
Go through the cockpit to the winch area
Click on the Winch to get a (bent) Winch Handle
Return to the Diner and move the Pipe at the counter to the right
Use the Wrench on the Pipe to turn it and dilute the sailor's coffee with some rainwater
Enter Mama's kitchen and pick up the Coffee pot
Return to the welder aboard the ship and give her the Coffee
Take the Access Card
Click on the Access Card in inventory to see a path indicated on a 3 x 3 grid:
Go to the elevator and use the Access Card in the Card terminal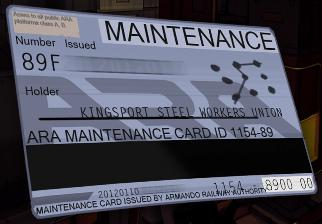
Enter the code corresponding to the pattern above: 7 5 2 3
Enter the elevator car and press the up button at left, then re-enter the elevator
Timed sequence
Use the up, stop and down buttons at left to stop the elevator car just when a panel floats by the windowClick on the large hexagonal nuts until their slots align with the pattern of lines on the panel
Using compass notation, the orientations are:
Click on the Plate to remove it
NW-SE NE-SW NE-SW NW-SE
Exit up and put the Winch Handle on the Track to straighten it
Return to the winch area of the airplane and put the Winch Handle into the Winch
Use the Winch
{Ending cutscene}
Press [Esc] to skip the credits and return to the main menu
A Behind the Scenes menu selection is now available
Onboard the M.S. Biko, Lina is apparently able to read her book in the dark
Descend at right to the airplane
Take the hanging Tape
Click on the Toolbox to get a Screwdriver
Drag the Screwdriver from inventory to the Compass to retrieve it
Return to the deck of the ship and use the Tape on the Wires
Enter the Cabin and press the Button
See you around!Take the Spring
Go to the upper deck and use the Screwdriver to remove the Porthole
Use the Spring to get the Key
Use the Key to open the Door
Open the Drawer to obtain a Navigation book
Click to the left of the book to close it
Go down to the main deck and give the Compass and Navigation book to Joe
{Cutscene}
Click on Kito three times to get him off his bunk
Pick up the Ball and chain and attach it to the Window
Use the Ball and chain three times to break open the wall
Exit the cell and examine the Lever
Return to the cell and pick up a Skeleton hand
Exit the cell and use the Skeleton hand on the Lever
Click twice on the Button by the ramp to rotate the cart junction to connect upper left and right
Press the rightmost button in the row of three to move the cart out of the way
Click once on the Button by the ramp to rotate the cart junction to connect lower left and right
Press the leftmost button in the row of three to move the lower cart into position
Access the Cart to get a Pickaxe
Return to the cell and use the Pickaxe on the Chain above Kito
Use the Pickaxe on the Grate to escape
{Cutscene}
Exit up to the street and select either answer to get a Matchbook
Use the Pickaxe on the Newspaper rack
Examine the Newspaper rack to get Newspapers
Proceed through Port Artue to the alley
Put the Newspapers and Matchbook into the Barrel
Pick up the Nachos
Talk to Moe:
About those clothes...Exit left three times to the lighthouse
Select either response to the lighthouse keeper Morten
Use the Can with the Teapot in the fireplace
Take the Boltcutters
Go back to the Club Temba area you passed through earlier
Use the Pickaxe on the Wire box and then the Boltcutters on the exposed Wires
Exit right and examine the Matchbook in inventory to learn that the club's phone number is 634 000
Enter the Phone booth and dial 634 000
This is management speaking.Exit up and give the Nachos to the Pigeon
Take the Plunger
Enter Arnie's bar
See you guys later!Take the Almanac from the wall
Give the Lobster soup to Gimbo and get the Navigation book in return
Return to Club Temba and try to enter it
I'm here to repair the lamp.Return to the lighthouse and go up into its tower
Put the Lamp on the Lantern
Go back down and give the Navigation book to Morten to restore the lighthouse
{Cutscene}
It's raining heavily now, so re-enter Arnie's
Take the Bottle from the floor
Use the Plunger and then the Bottle on the Drain
Click on the Drain to retrieve the Plunger
Go back to the dock area and click twice on the Rubber boat to pick it up
Exit right to the alley and listen to Moe talk about cigars:
I gotta go!Go to the lighthouse and fill the Bottle with the Teapot
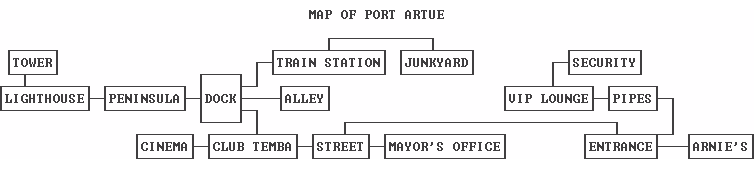
Go to the mayor's office and note the Port Artue map on the wall:
(The Enola, Hospital, Cemetery and Distillery locations are not visited in any Chapter of the game)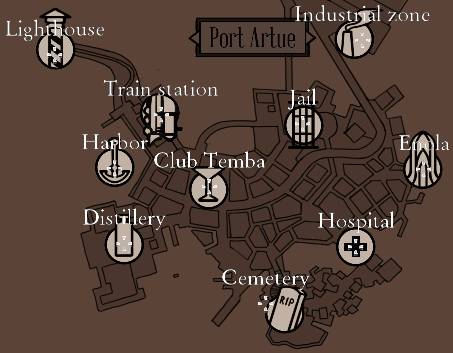
Click on the Box of cigars to pick up some
Give the Almanac to Andiswa
Use the Matchbook on the smoke Alarm at upper left
Use the Terminal to access the most difficult puzzle in the game
The objective is to enter a key search term that will allow the game to proceed by providing additional information you can act on
Out of the numerous person and place names you've encountered, a few produce data files but are not triggers to advance the gameplay: Kaonandodo, Barlow, Temba, Morobo, Sisulu, McFerrin, eel rinse, etc.
A search term that does work seems somewhat logical given the circumstances: police report, in which a former police chief named Leroy McIgbo is mentioned
Be sure to press [Enter] twice more to read the full file
On your way out of the mayor's office, pick up the Fire extinguisher that was released when you set off the smoke alarm
Back in the street, put the Rubber boat under the Car
Use the Fire extinguisher on the Rubberboat [sic] to inflate it
Click on the Car to obtain a Wheel
Enter the Phone booth and examine the Phonebook
Looking up the name McIgbo shows an entry for someone who may be related to Leroy at number 510 842
Call that number and speak to Leroy's widow, who will inform you that the Power Company has an office in Port Artue on Charnel Road
Exit left twice to the cinema
I'll see you around!Give the Wheel to the cab driver Reynolds
{Cutscene}
Open the Gate, move inside and click on the Power box
This puzzle involves four knobs with eight settings each that increase or decrease the power level shown on the gauge at right. Since each knob operates independently of the others and the total power is the sum of the individual knob settings, the maximum total power is achieved when each knob is at its own maximum level. By varying one knob at a time, these maximums can be easily identified. Using compass notation, the required knob positions are:
Press the Button at right to turn on the lights and activate the steel mill
S (4 clicks) W (6 clicks) E (2 clicks) NW (7 clicks)
Pick up some Keys from the Key box, then exit the mill and use them in the Truck to release the police car
Re-enter the mill and use the Control Panel, and then the Handwheel on the Smelter
Use the Control Panel again and go up the spiral stairs at right
{Cutscene}
Exhaust the three dialog options with Lina
Each of the 12 Drawers must be selected in order to proceed. Additional backstory information is provided when the 2nd, 5th, 8th and last drawer is selected. The drawers can be chosen in any order; Bwana's walking is minimized when they are selected in the following order:
After Lina exposes the wall, a Mastermind puzzle is shown with a 9-digit keypad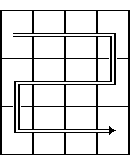
Colors are displayed for the usual scoring of a solution: green for a correct
digit in the correct position, yellow for a correct digit in an incorrect
position, and red otherwise. Since an unlimited number of guesses is
apparently allowed, the puzzle can be solved by trial and error by entering 4
identical digits for each move in order to identify the correct set of
digits, then trying different orderings of the set. The correct answer is
{Cutscene}
Go to the alley by the docks and give the Eel rinse and Cigars to Moe
Open the Crate to get some Corn
Go to the cinema, put the Corn into the Popcorn machine and pick up some Movie tickets in return
Revisit Arnie's bar and zoom in on the Radio
Scan the frequencies near the high end until the voice chatter of Power Company guards is heard at frequency 99.4 (this isn't audible until you return from the Power Company side trip)
Give the Movie tickets to the Sad sailor and he will give you a Videocasette [sic]
Return to the lighthouse tower and zoom in on the Radio
If a record is playing, press the lit button in the group of five
Enter the frequency 99.4, then select the middle record button to play an advert and confuse the guards in the train station
Go to the train station, exit out the back and take an Oil can from the Junkpile there
Return to the lighthouse and take the Model ship over the fireplace
Go upstairs and put the Model ship on the Pulley
Use the Oil can on the Reel
Use the Reel, then return downstairs
Timed sequence
Click on the Doohickey, then press the lever at upper right just as the dial pointer passes E (east)Return through the train station to the junkyard and click the down arrow at the end of the suspended walkway to see the airplane
Gotta go!Use the Elevator
Return to the entrance to Arnie's bar and go into the darkened doorway at right that Lina has opened
Up in the foyer of the Club Temba VIP lounge, click on the Door to disclose some wear marks on the digits 1 5 and 8 of a numeric keypad (much more obvious than the same puzzle in Safecracker):
Some experimentation shows that the combination to this lock has 3 digits, so each must be used once. The 6 possible combinations can be tried until the correct sequence is found: 8 5 1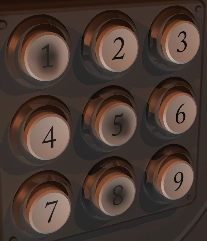
Go inside the security office and put the Video casette into the Video storage unit
Exit to the foyer, use the Plunger to open the Window and exit left
{Cutscene}
Click twice on each of five areas of the wall until an exit arrow appears and you can enter the vault
Pick up The Journey Down Book
{Cutscene}
Note the preponderance of swirls and spirals on the rocks in this area, and the vaguely human-shaped Figure on the stone wall
Enter the Tent to get a Machete
Zoom in on the Table and click on the Clock (pocket watch) to see that the local time is (permanently) 10:00 am
Examine the book to see the same human-shaped figure and a sequence of vertical patterns:
Exit up and use the Machete four times on the Jungle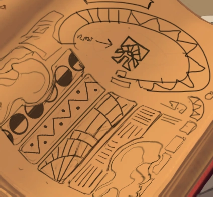
Note that swirls are also prevalent here
Go up the steps and open the door by clicking on the vertical columns to match the pattern above
Go through the door and move to the observatory at rear
Press the stone Button at left to incrementally rotate the stone device and the symbol selected by the pointer at its base, then click on the Observatory for a viewpoint through its sights
The only object of note is the moon displayed when the "Root" symbol
is selected
Click on the Navigation book in inventory and page forward to Section 7, in which the "Star" and "Wave" symbols
are associated with the current time of 10:00 am
Return to the Runes area in front of the observatory and note that the same six symbols listed in the Navigation book and on the base of the observatory are repeated on the doors:
Zoom in on the Runes below and observe how pressing any of the three buttons at center (Swirl, Moon and Star) causes a ring with the corresponding symbol to be rotated around the six symbols above
Tree Wave Leaf Seed Root Sun
Using the associations above, start by aligning the Moon pointer with the Root symbol and the Star pointer with the Wave symbol:
Although somewhat in shadow, the Moon pointer is at the 8:00 clock position and the Star pointer opposite at 2:00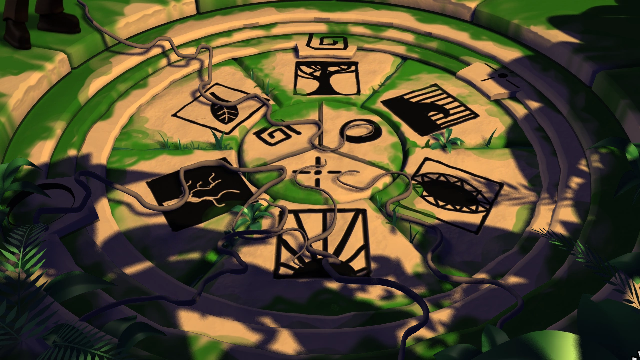
Next, note the position of the Swirl pointer, back out and press the stone Button at left
The corresponding symbol on the doors is depressed and darkened, as noticed by Bwana
Keeping the Moon and Star pointers where they are and being careful to press only the Swirl button, incrementally rotate the Swirl pointer and press the Stone button each time to depress the rest of the six symbols on the doors
When complete, an altar is raised in the middle of the Runes circle, from which you can pick up a human-shaped Idol
Return to the tent area and put the Idol in the Figure spot on the stone wall
{Ending cutscene}
A Behind the Scenes menu selection is now available
Exit from the monolith
Your inventory is empty
Look in the Backpack to find a Cactus
If desired, click on the Journal below the monolith for some of the backstory
Enter the Skull's mouth
Use the Cactus on the Fungi to get the Machete
Pick up the Deflated fungus
Open the Gate
{Cutscene}
Touch the Pedestal to release fire everywhere
{Cutscene}
Exit left and put the Fungus over a glowing Vent that has now appeared to the right of the Crate
Exit left and use the Machete on the Monolith
Exit from the monolith and pick up the Vines
Re-enter the Skull and open the Crate
Put the Vines on the Deflated fungus
Exit right and touch the Pedestal again
{Cutscene reminiscent of Avatar)
Use the Machete to open the Gate
Enter the gate and exit up to Lina's level
Drop the Petrified root onto the Roots below
Go back down and pick up the purple Root crystals
Re-enter the mining station and put the Root crystals into the Generator
At the display of the security lock, press the hexagons in the following order:
and Lina will give you Microfilm
Turn on the Switch next to the Bucket chain
{Cutscene}
Select either response, then
See you around, Waasi!Take the Air horn
Exit into the Tunnel at lower right
Open the Box and pick up a Jackhammer
Return to the hideout and go up the stairs to a highway overpass over a canal
Exit left to the subway
{Cutscene}
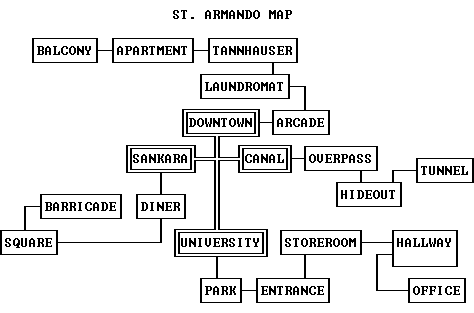
Click on the Sankara Square destination
At the diner, you run into Sabo and Makena from Chapter One:
Catch you later guys!Go downstairs to the square and get a Certificate from the Fruit at the Fruit stand
Exit to the rear to a huge barricade and public demonstration
Select any of the three responses to the TV reporter
Talk to Gabi:
You know a professor Moorhead?Note that Gabi says that the professor disappeared "two weeks back"
Use the Air horn on the Camera man
The exit is blocked by Gabi
Connect the Film camera to the Cable to Bwana's right
Put the Microfilm into the Film camera and get a ride from Gabi to Agibo University
Exit right and use the Fire escape in the window
Go up into a storeroom
Take a red Magnet from the Boxes
Exit right to a hallway
There's a Door here which you can never open in the game and was used by the kidnappers at the beginning of Chapter One
Click on the Mailbox to the right of the open doorway to learn that the break-in of the professor's office occurred exactly one week before March 22, or 3/15
Enter the professor's office
If desired, click on the Book to read some folk tales of the Underland
Pick up the Clock from the floor, which is stuck at 6:42
Return to the storeroom and examine the CCTV machine, which has a date readout of 05 July
Making the reasonable assumption that the readout indicates the current date, the professor must have been abducted some 16 weeks earlier, which is a lot different than the 2 weeks a well-informed reporter would be expected to know. But she must be wrong somehow...
Enter the date of 15 MAR and a time of 0642 (6:42 am) into the CCTV machine, even though the abduction seen at the beginning of Chapter One clearly happens at night
Press the lower Button to obtain a Polariod of the perps
Exit the University building and go to the subway station under the elevated highway
Return to the hideout at the Canal station and give the Polaroid to Waasi
Go back to the subway and proceed to the Downtown station that has been added to the map
Exit to the rear to a laundromat
Enter the Tannhauser Building past Rose, selecting either response to her question
Grab the empty Gas can in the foreground
Retrace your steps to the Downtown subway station and return to the Canal station
Attach the Gas can to the Wrecked car and push it over
Pick up the full Gas can
Combine Gas can & Jackhammer in inventory
Take the subway back Downtown and use the Jackhammer on the Arcade machine at left
Pick up the Quarters and exit back to the laundromat
Put Quarters into each of the four Laundry machines
Go back into the Tannhauser Building and enter the apartment to rescue the professor
{Cutscene}
Uprising
Back in the hideout, take the Firecrackers at upper left
Return to the apartment downtown
Pick up the Papers at left
Exit left to a balcony just like Rick Deckard's
Pick up a Lighter and use the Jackhammer to release the vibrating Air conditioner
Return to the arcade and use the Jackhammer on the License plate
Take the subway to Agibo University
Exit right
Twice select any of the three answers to Officer Beamis
Put the Firecrackers into the Squad car
Use the Lighter on the Squad car to get rid of the cop
Re-enter the University and make your way to the professor's office
Put the Stack of papers and the Certificate into the Copy machine
Click twice on the Copy machine to obtain some Certificates
Return to the laundromat downtown
Give the Certificates to Rose and pick up the Satellite phone
Take the subway to Sankara Square
Use the Magnet on Sabo's TV
Click on the Broken TV to get a Cleaver
Click three times on the Bunny on the counter
Combine Cleaver & Bunny to get a Battery
Go to the barricade behind Sankara Square (along the way, you can drop some Quarters into the Tip jar at the Fruit stand, if desired)
Give the Battery to Pablo
Talk to Pablo:
Right on! So how you gonna stop them?Pick up the sparking Battery
Alright, catch you later Pablo!
Return to the hideout at the Canal subway station
Give the License plate to Gabi
Give the Satellite phone to Bombshell
Walk down the stairs at right and click the Battery on the Truck
{Cutscene}
Click twice on either Barrel
Click on the Grub and on the Eel rinse
Timed sequence
When Wothar has the furnace grate open, throw the Eel rinse into the FurnaceUse the Grub in inventory to take the Keys next to the Levers
Use the Keys on the Lock to exit the cell
Go up the stairs and exit left
Take the Sword
Click on the Parachute to dispose of the Pirate
{Cutscene}
Open the Treasure chest to get a Necklace
Return to the Furnace pit and cut the Rope with the Sword to get a Grappling gun
Go upstairs and use the Grappling gun on the open Hatch above
In Madame Sisulu's throne room, pick up the Temple key from the floor
Use the Speaking tube and select any of the three responses
Exit right and enter the Aircraft below the open Hatch to get its ID number 426 68
Exit left and open the Treasure chest to determine that the name of the aircraft is The Flying Dagger
Go back to the throne room and use the Speaking tube again:
The Flying Dagger!Exit right
{Cutscene}
Awakening in a bedroom, you've lost your Sword and your only inventory is the Temple key and Necklace
Look out the Window
After meeting Kaonandodo, open the Cupboard to get some Candy
Look at the Photographs and pick up a Seashell
Back out and use the Grill to get a Tofu rat
Go up the ladder to the bedroom
Go through the pages of the Log book in the foreground and pick up a Recipe for mosquito repellant
Pull down the screen using the Tassel at left
Put the Recipe into the Projector at right, then exit down
Ring the Bell next to Webster the monkey
Take the Crackers from the top of the Cupboard and examine the Fruit box to get a Coconut
Use the Boat to travel to the Temple
Temple
Feed the Crackers to the Birds at right and pick up a red Feather
Toward the lower-right corner of the screen, examine the Flowers to get a Eucalyptus
Tell Kaonandodo to take you to the Waterfall
Waterfall
Give the Coconut to the Crabs
Click on the Crabs to retrieve a broken Coconut
Tell Kaonandodo to take you to the Swamp
Swamp
Try to exit left and you're blocked by a big snake
Give the Tofu rat to the Cobra
Pick up a Scale and exit left
Combine Candy & Coconut
Combine Eucalyptus & Coconut to complete the mosquito repellant
Enter the Plane to get the Grappling gun
Return to the boat and tell Kaonandodo to take you back to the Temple
Temple Revisited
Use the Temple key to open the Gate
Enter the Temple of Elders
At the collapsed bridge, use the Grappling gun on the far Arc
Continue up into the temple
Put the appropriate offering into the receptacle of each statue; from left to right:
Marushaka: SeashellTake the Horn
Awaquan: Feather
Nyakazho: Scale
Oganon: Necklace
{Cutscene}
Use the Recorder on the Terminal, which emits an old-fashioned modem-like sound to open the red Door
Exit right into the mainframe room
Open the Junction box and cut the wires inside with the Cleaver
Combine Cleaver & Recorder to separate its Microphone
Put the Microphone into the Junction box
Use the Recorder on the Junction box
{Cutscene}
To minimize walking, put the Bombs on the four Generators in the following order:
{Cutscene}
4 1 3 2
Use the Gas can on the Door
Use the Severed bunny (head) on the Gas can
Use the Lighter on the Firebomb
{Cutscene with a Star Wars feel}
Exit right and examine the Rubble
Open the Power box last seen at the beginning of Chapter One
Unlock four Brackets and open the Hatch
Pull the Switch twice
Use the Starter cables on the Connectors
Pick up the Starter cables
Pull the Switch in the Power box
Take the Detonator from Gabi and remove its Cassette
Combine Guitar & Detonator
Give the Guitardonator to Waasi
{Ending cutscene}
A Behind the Scenes menu selection is now available
Copyright © 2021 Balmoral Software (http://www.balmoralsoftware.com). Portions copyright © 2012-2017 Skygoblin. All rights reserved. Republication, redistribution or conversion is expressly prohibited without the prior written consent of Balmoral Software.


