Copyright © 2019 Balmoral Software (http://www.balmoralsoftware.com). Portions copyright © 2016 Ape Marina. All rights reserved. Republication, redistribution or conversion is expressly prohibited without the prior written consent of Balmoral Software.
Tales is a 2016 release from Ape Marina involving the adventures of a nerdy librarian interacting with the environments and characters of nine historically-famous stories. It uses low-res DOS-style graphics with a 1990's-era point-and-click interface from the Adventure Game Studio development tool. Character voice acting is pretty good, with no less than 33 different actors used. The acoustic background music seems appropriate for the historical periods in which it is played, and a soundtrack with 23 tracks containing about an hour of music can be found in the game installation folder. Sound effects are limited, with several reused for different purposes in the game.
Various controls can be used to speed up gameplay, such as left-clicking to skip dialog, double-clicking to quickly exit, and pressing the [Esc] key to skip blocks of dialog and action. Most game challenges involve inventory manipulation, with a few relatively-easy standalone puzzles thrown in. There are a few timed sequences, which can be fairly demanding to complete until you've discovered the exact sequence of steps to follow. The number of saved games is limited to only 20, which isn't mentioned in the game manual. If you need more, you'll have to manipulate files in the saved-game folder.
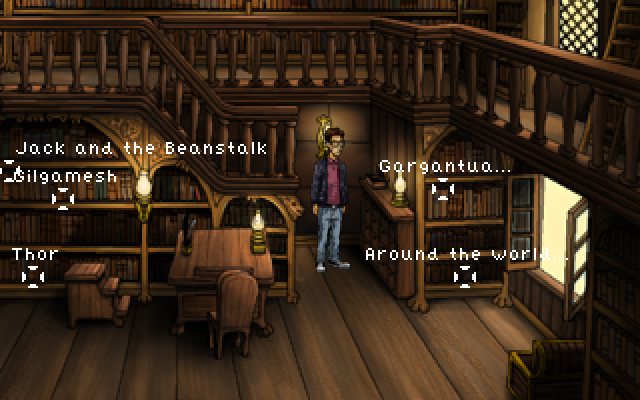
Game screens are static with the main character "Alfred Walsh" maneuvered in the third person. There are less than 40 different scenes in the game, about half of which are side-scrolling. Sprinkled amongst these are a handful of low-res cutscenes. Hotspots in the game scenes are displayed only when your cursor is over them, but few if any are easily missed. An exception is the pixel-searching needed to find books in the library (our maps may help). It would have been more convenient to have a better way to efficiently navigate between books, since that process adds nothing to the plot or gameplay.
An inventory bar is accessible at the top of the screen. Probably the biggest annoyance in the game is that separate inventories are maintained in each book, and you can transfer only one inventory item at a time between books, using a tedious multi-step process. This inventory transfer must be done more than 20 times before the game is completed, and quickly gets tiresome. Why wasn't a common inventory provided that moves with the player, like in most other games involving multiple locations? This restriction seems to have been deliberately chosen to extend gameplay and trial-and-error without adding any actual content. At a minimum, it would have been useful to have a way of at least viewing the inventory items in other books, and we found we had to manage a written checklist of where items were located in order to avoid unnecessary backtracking.
In summary, Tales is a fairly short game with interesting historical characters and a focus on story rather than graphics. This walkthrough provides a minimum path through the game; other gameplay sequences and dialog choices can provide additional backstory elements.
"Fairytales don't tell children that dragons exist.The only inventory item your character "Alfred Walsh" has is a Swiss Army knife
Children already know that dragons exist.
Fairytales tell children that dragons can be beaten."
- G. K. Chesterton
- Ask about the bas-reliefsTalk to Merchant
- Quit
- Ask about GilgameshTalk to Merchant
- Ask about Enkidu
- Ask him about the cheese he was sellingand get some Cheese
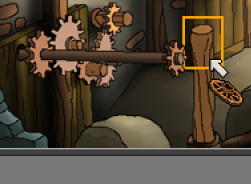
Bottom: Turn right three timesZoom in on Stone Wheels and enter the combination above
Top: Turn left once
Middle: Turn right once
Top: Turn right twice
- Ask about Ninsun
- Quit
We are four children from the same mother,Scroll right and knock on Door
But we can never meet each other,
Two sets of twins, each opposed,
One of one set hot whilst the other is cold,
The next fall down but spring up again,
Yet between them not a wound ever gain.
- Ask for a recipeMove Alfred if necessary, and take Cup
Use Bottle on TapUse Bottle on Tap
Give Wine to Panurge
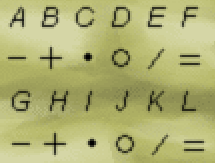
These symbol translations can be extended to the entire alphabet:
	-  +  .  o  /  =

	A  B  C  D  E  F
	G  H  I  J  K  L
	M  N  O  P  Q  R
	S  T  U  V  W  X
	Y  Z
Close the Note and click (twice) on Traveling case at far right to disclose an array of 6 controls in two rows. Use the translation above to enter the code for the 6-letter word TRINCH previously described by the Drunkard outside:
	+  =  .
	+  .  +
In the close-up, take Key
Open FloodgateTake River pebbles
Quickly enter Utility Room
Quickly enter Mill
Quickly use Ladder
Quickly use Wood slat on Weathervane
- Ask about hippocrasGo back upstairs and talk to Pantagruel
- Quit
- Ask for a recipeand Pantagruel provides Recipe #32:
Exit the tavern, then exit To the mill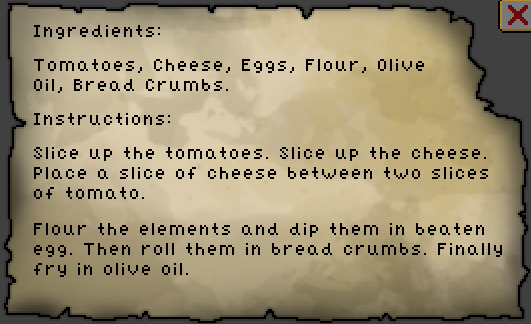
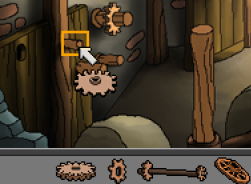
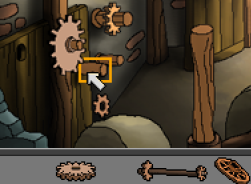
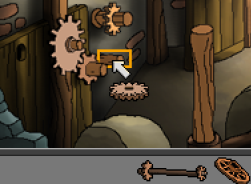
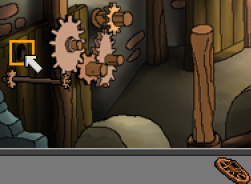
Exit the close-up and zoom in on Transmission system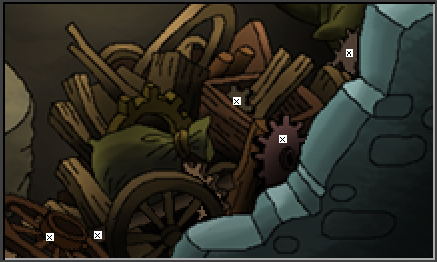
Press "Test the mechanism" button at lower right to get Flour
Leftmost gear: Middle gear: Gear second from left: Axle second from right: Wagon wheel at right:
In the dialog with Merlin:Take both Stone eyes from Sculpture- Ask about tomatoes
- Quit
- Quit
- Ask about tomatoesExit To the playing field
- Quit
- Ask about the pelota matchIn the pelota match, left-click or press [Esc] to clear the menu message, then select the following actions:
- Ask to watch the match
Move leftGive Wine to Papan
Butt with head
Kick with foot
Move right
Butt with head
Examine Bas-reliefSave your game at this point
Exit
Talk to Papan- Ask about the tomatoes room
- Ask about the bas-reliefs
- Ask about the creation myth
- Quit
into the desired configuration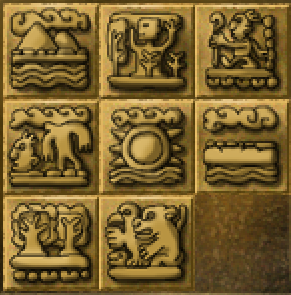
use the following 22-move sequence relative to the current position of the space (L: Left, R: Right, A: Above, B: Below):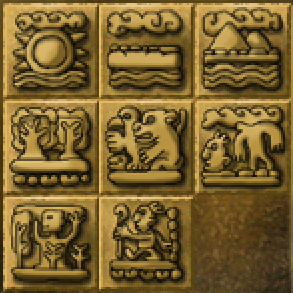
L L A R A L B R R A L B B L A R B R A L B Rfrom the solution provided by Balmoral Software's solver
- Ask what she's doingGive Dagger to Mayan woman
- Ask for the grater on loan
Place your first blue piece into the center box
Your opponent places his first red piece into the upper left corner
Place your second blue piece into the lower right corner
Your opponent will randomly place his second red piece into one of two
locations:
Opponent plays in upper right corner
You cannot win this game. Place your third blue piece into any box but the
middle top one, then click Try again and restart the steps above until your
opponent selects the following move for his second red piece:
Opponent (mistakenly) plays in middle right box
Create a fork by placing your third blue piece into the lower left corner
Your opponent plays his third red piece into the middle bottom box to block
Place your last blue piece into the upper right corner to win back your Magic
bell
Transfer Grater to Gilgamesh
Take Eggs and Bread
Zoom in on Bowls
Combine Bread & Grater to make Breadcrumbs
Click on Flour, then on Bowl at lower left
Click on Eggs, then on Bowl at upper right
Exit from the close-up
Transfer Grater back to Popol Vuh
Return to Vegetable market
Give Grater to Mayan woman and get back Dagger
Transfer Dagger to Gilgamesh
Transfer Rope to Popol Vuh
Transfer Tomatoes to Gilgamesh
Zoom in on Bowls
Combine Tomatoes & Dagger
Combine Cheese & Dagger
Click on Sliced cheese, then on Sliced tomatoes
Click on Tomato sandwiches, then on Flour
Click on Floury sandwiches, then on Beaten egg
Click on Battered sandwiches, then on Breadcrumbs
Use Cup with Jar to get Oil
Use Oil with Pot
Pick up Wood and use it on Embers at left
Take Pot with oil and put it on Stone hobs
Put Breadcrumbed tomatoes into Hot oil
In the dialog with Queen Ninsun:
- Answer telling the truthTake one of the Carrots
- Ask about the golden bridle
- Ask about his plan
- Ask about Phileas FoggKnock on Door underneath Inscription
- Ask about Phileas Fogg
- Ask about his trip around the world
- Ask about the hot-air balloon
- Ask what's for saleGive Tomatoes to Tradeswoman
which shows numbers in each quadrant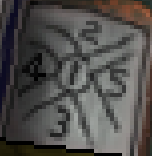
The code suggests the quadrants seen in the book
1 4 2 3 2 ? ?The settings alternate up and down, corresponding to a change in direction entered with the key. The possibilities for the last two settings are:
	3 followed by 2 or 1
	4 followed by 3, 2 or 1
	5 followed by 4, 3, 2 or 1
Each of these 9 possibilities can be tested by trial and error; the correct combination is the very last one on the list:
1 4 2 3 2 5 1or equivalently,
Turn right 3 timesAfter Jack pays up, transfer Beans to Sisyphus
Turn left twice
Turn right once
Turn left once
Turn right 3 times
Turn left 4 times
Examine and Read Inscription below the small golden statue to see the Greek letters for "owl":
Examine Inscription on the wall immediately to the right of the golden statues.
Use Grappling hook on Owl twice
Use the eyeball buttons to move the cursor left or right, and use the nose button to swap the two letters outlined by the cursor. The correct answer is
- Answer telling the truthTalk to Unknown man in dark cloak
- Ask again about ThorTake Stones and Wig
- Insist
- Give up
Combine Stones & WigPick up 4 Runic stones, two on each side of the candle you lit
Quickly pick up Torch at right and ignite it in Fire
Quickly use lit Torch on the (lower) candle at right
Alfred or Alberich stands on the upper left platformShow each Runic stone to Alberich to learn its meaning:
The other person stands on the lower right platform
Examine Inscription:
Fire Water Sun Ice Strength Thor's hammer
Given this diagram and the definitions above, the runes should be arranged on the Ice blocks so that opposite pairs of runes indicate one concept that is opposed to or extinguished by the other. From the perspective of the player's viewpoint facing the Inscription, these concepts are: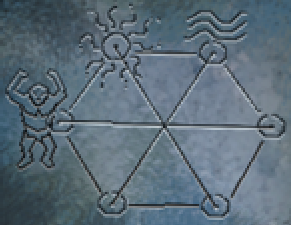
Place the runes accordingly:
(Inscription) Sun Water Strength Thor's hammer Fire Ice (Player)
Alberich gives you an invisibility cloak
(Inscription) (Player)
- Ask about GilgameshUse Invisibility cloak
- Quit
- Ask to be ferried to the islandNote the stacks of 1,3,1,3,2 stones arranged on the ground (not the ones higher up on the ledge)
Move 3 stones from the leftmost stack to the stack second from the rightGo into Entrance
Move 1 stone from the stack second from the left to the rightmost stack
Move 1 stone from the center stack to the rightmost stack
- Ask how to reach the underworldGo into Entrance and scroll right
- Because you are a sinner
- Bitterness
- Because you see human reason in him
- To find redemption
- Yes, but you are confident
- HunahpuTalk to Enkidu
- Ask for his helpUse Magic bag on Enkidu
- Quit
"An inconvenience is only an adventure
wrongly considered; an adventure is an
inconvenience rightly considered."
- G. K. Chesterton
Use Magic bell | Yes
Press [Esc] to skip the animation on exiting the book
Press [Esc] to skip the animation on arriving at the library
If necessary, use Staircase to move between library floors (note that some first-floor books are accessible at the very bottom of the second-floor screen)
Double-click on destination book title (see maps)
Press [Esc] to skip the animation on arriving at the destination book
Return to the King Arthur book on the library second floor
Select initial dialog choice(s) as needed- Ask for Merlin's adviceMerlin gives you permission to read the new book
- Quit
Press [Esc] to skip the animation on exit from the King Arthur book
Press [Esc] to skip the animation on arriving at the library
Use Staircase and Catalogue
Select the book title from the alphabetical list
Double-click on the red-outlined book (see maps)
To transfer an object from one book to another:
In the book where the inventory item is located, put it into the Magic bag
Return to the book that is the destination of the inventory item
Click on the Magic bag to release the inventory item
Second floor

First floor
Copyright © 2019 Balmoral Software (http://www.balmoralsoftware.com). Portions copyright © 2016 Ape Marina. All rights reserved. Republication, redistribution or conversion is expressly prohibited without the prior written consent of Balmoral Software.