Beneath a Steel Sky
11 December 1997
Copyright © 1997 Balmoral Software
(http://www.balmoralsoftware.com). All rights reserved.
Republication, redistribution or conversion is expressly prohibited without the
prior written consent of Balmoral Software. Contents subject to
change! For the latest information, see
http://www.balmoralsoftware.com.
Dialog can be skipped by clicking the left mouse button.
Pick up the rung at the left end of the elevated walkway and use it on the door
at right to access the fire escape. Open the door and re-enter the press room.
Go downstairs and exit through the doorway at right. Revive Joey by using the
circuit board in your inventory with the junk in the foreground shaped like
caterpillar tracks. Step on the striped elevator platform to attract a worker,
Mr. Hobbins, then immediately enter the workshop at right, open the cabinet at
left rear and grab a wrench.
Return to the elevator room and look at the transporter robot. Step on the
elevator platform again. After Hobbins reappears and shuts the elevator alarm
off, talk to him:
AM
OUT
DO
YOUR
TRANSPORT
inspection
Talk to your robot pal Joey:
TRANSPORT
Stand to the right of the elevator and wait for the transport robot to return
with a cylinder. As soon as the elevator platform descends, right-click on the
elevator hole to climb down to the furnace level. Wait for Joey to come down
after the next cycling of the elevator. Look at the lock next to the door,
then talk to Joey about opening the door. After Officer Reich appears and is
killed by the electric eye above, right-click on his corpse to get his ID card
and sunglasses.
Exit through the doorway to the upper-level walkway, then move one screen right
to the factory entrance behind and to the right of the LINC terminal.
Enter the factory and talk to the woman:
doing
Never mind
Wait for supervisor Gilbert Lamb to dismiss the woman Anita:
FUGUTIVE
Move one screen right and use the wrench in the cogs:
TECHNICIAN
ROBOT PAL
Remove the wrench jammed in the cogs and move one screen left. Use the wrench
on the large welding robot, then talk to Joey:
SHELL
Return one screen right and attempt to enter the storeroom behind the sensors.
Talk to Joey:
CHECK OUT
Wait for him to return, then talk to him again:
USEFUL
Talk to Joey:
FUSE BOX
Wait for Joey to return, then enter the storeroom. Lift the gangway and pick
up some putty underneath it. Exit the storeroom and give up Reich's sunglasses
to the technician:
CRIMINAL
(much later you'll get to see the sweater they're talking about). Leave the
factory by moving two screens left. Look at the red cable at right, then move
in front of the LINC terminal and talk to Joey:
WELDING
Move two screens left and enter the power station at far left.
Use the wrench on the left button of the steam unit, then use it on the right
button. Stand in front of the left button and talk to Joey:
button on the right
Simultaneously press the left button, then wait for the man to leave. Use the
switch at the upper right of the control panel to turn off its light bulb, then
pick up the bulb from the socket at left. Put the putty in the light socket
and operate the switch again to open the left panel. Use the left-hand switch,
then the right-hand one. Exit the room and move two screens right to the down
elevator outside the factory entrance. Put the ID card into the elevator slot
(a process you'll have to repeat whenever you want to use an elevator). Enter
the elevator and descend to the Belle Vue level. Grab the red cable, then move
one screen left. Enter the courtyard at upper right and use the ID card to
open the left-hand door to Reich's apartment. Enter the apartment and get a
magazine under the pillow. Exit the apartment and courtyard and move two
screens right to the Man and Machine sculpture. Enter Travelco and give the
magazine to the clerk:
DIFFERENCE
MYSTERY
RIP-OFF
ECONOMY
matter
Pick up the travel ticket from the clerk's desk, then exit Travelco and move
one screen left. Wait until Lamb appears, then give the ticket to him.
Return to the upper level via the elevator and enter the factory. Wait for Lamb
to appear, then talk to him:
TOUR
After Lamb describes the broken machine and leaves you alone, move one screen
right and talk to Anita:
doing
D-LINC
GROUND LEVEL
JAMMER
Give your ID card to Anita, then talk to her again:
D-LINC
LINC-SPACE
JAMMER
SCHRIEBMANN PORT
later
Exit the factory by moving three screens left. Use the ID card with the LINC
terminal outside the factory:
4 SECURITY SERVICES
2 SPECIAL OPERATIONS
1 FILE ADJUSTMENT
1 AUTHORIZE D-LINC
2 FREEZE ASSETS
EXIT
Wait for Lamb to appear and unsuccessfully try his card in the elevator scanner.
Talk to Lamb:
PROBLEM
ANOTHER
Use your ID card on the elevator slot and proceed to Lamb's apartment next to
Reich's. Use the ID card on the right-hand door slot and enter the apartment.
Pick up the video cassette from the bookshelf at left and insert it into the
VCR under the TV screen at right, displaying a cat movie. Operate the machine
to the right of the TV to feed the cat.
Exit the apartment and courtyard and move two screens left to the waiting room
of Burke's Bio-Surgery. Talk to the projector/receptionist:
SCHRIEBMANN
Talk to the projector:
ELSE
Talk to the projector:
LOOKING
Talk to Joey:
TALKING
CHARM
Exit left and talk to Burke. Talk to him again:
KIDNEY
Talk to Burke:
LUNG
Talk to Burke and get a Schriebmann port. Talk to him again:
GROUND LEVEL
PORT
Move six screens right to Anchor Insurance and talk to the agent:
NEVER
MORE
Talk to the agent again:
SPECIAL
Burke
When the agent leaves, talk to Joey:
STATUE
Pick up the anchor
and use it with the cable in your inventory to create a grappling hook. Move
two screens left and take the elevator to the upper level. Move two screens
left and enter the Recycling Center at right. Climb the stairs and exit to the
fire escape at upper right. Use the grappling hook on the sign. Exit the
locker room and insert the ID card into the chair (interface) slot. Quickly
use the interface.
Pick up the golden ball (COMPRESSED DATA) and exit right through the white
bar. Use OPEN (in your inventory) on the carpet bag and pick up the birthday
surprise (DECOMPRESS) and magnifying glass (DECRYPT). Use DECRYPT on each
DOCUMENT in your inventory (question marks disappear). Use DECOMPRESS on the
COMPRESSED DATA to obtain two PASSWORDs. Taking the exit north will cause an
immediate disconnect, so exit right instead. Using the notation
 Grid Notation
follow these steps:
Use one of the passwords at G
Use a password at H
Pick up the password at G
Use a password at D
Move to E, then pick up the password at H
Use a password at E
Pick up the password at D
Move through A, B, E and F, then use a password at I
Move to F and C and take the exit north
Pick up the bust (PHOENIX) and book (DOCUMENT). Use DECRYPT on the DOCUMENT to
remove its question mark. Exit left and follow these steps:
Move to F and pick up the password at I
Use a password at H
Move through I, F, E, B, A, D and G and exit left
Click on DISCONNECT in your inventory.
Use the ID card on the LINC terminal at far right:
4 SECURITY SERVICES
1 VIEW DOCUMENTS
1 BRIEFING.DOC
9 NEXT PAGE
0 VIEW DOCUMENTS
0 SECURITY SERVICES
2 SPECIAL OPERATIONS
2 SPECIAL STATUS REQUEST
EXIT
and learn your real name. Use the ID card on the elevator slot to go up one
level to the police station. Exit to the left, then move one screen right to
the down elevator. Go down to Belle Vue. Move one screen left and use the
down elevator to descend to ground level. Move one screen left and talk to the
doorman of the St. James Club:
JOIN
SPONSOR
later
Wander around the pond until you find a fat lady in pink (Mrs. Danielle
Piermont) walking her dog; talk to her:
OVERMANN
SPONSOR
Move one screen right and wait for the dog Spunky to show up. After Mrs.
Piermont goes up in the elevator, use the elevator lift button:
ME
WORKING
LINC
ESCAPE
SPONSOR
Use the video cassette in your inventory with the VCR. Look at the dog's bowl
and pick up some dog biscuits. Exit the apartment and move one screen left.
Put the dog biscuits on the plank holding the stack of bricks, then wait about
90 seconds for the dog to come and start barking at the biscuits. Use the rope
holding the plank, then enter the cathedral when the guard is preoccupied
saving the dog. Exit north and open the middle locker, where you'll discover
Anita's lifeless body.
Return to Anita's area in the factory by moving two screens left, taking the
elevator up, moving one screen right, taking the other elevator up, entering
the factory and finally moving two screens right. Open the middle locker and
don the overalls inside (cool sweater!). Exit right and use the
control panel:
2 OPEN REACTOR DOOR
EXIT
Exit through the open reactor door and pick up the LINC card on the floor.
Return two screens left to the clothes lockers and put on your coat. Move four
screens left and enter the police station at right. Take the elevator up one
level and use Anita's LINC card in the interface slot.
Access the game control menu using the F5 key and minimize gameplay speed with
the Game Speed slider control. Press the Play button at lower left. Use the
interface.
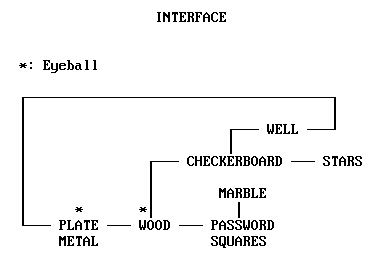
Use BLIND (in your inventory) on the eyeball, then exit right to the wood
zone. Use BLIND on the eyeball and immediately exit north to the checkerboard
zone. Exit north to the well zone. Exit right to the starting zone and
immediately pick up the tuning fork. Exit left back to the well zone and use
PLAYBACK on the well. Listen to the message from Anita, then click on
DISCONNECT in your inventory.
Restore the gameplay speed using the F5 key. Use the elevator and exit the
police station. Return to the ground-level courtyard by moving one screen
right, taking the elevator down, moving one screen left, taking the other
elevator down, moving one screen left and one screen to the lower right. Look
at the door of the shed to disclose its lock. Use the ID card with the lock and
enter the shed. Pick up the red secateurs (pruning shears) from the top of the
barrel, then exit left. Move one screen right (behind the shed) and exhaust
dialog with the boy, Vincent. Exhaust dialog with the gardener, Eduardo.
Exhaust dialog with Vincent again. Exhaust dialog with Eduardo three more times
and learn about a computer virus for LINC. Move three screens left into the
courtroom:
officer
defendant
ASSAULT
QUESTIONS
Talk to the St. James Club doorman:
Never mind
Enter the club and use the jukebox on the lower level:
search
Wait for the music to repeat and Colston to get up from the table at which he's
playing cards. While he's gone, pick up his glass. Return to Burke's
Bio-Surgery by moving one screen left, moving one screen right, taking the
elevator up, and moving three screens left. Give the glass to Burke and get a
new set of fingerprints. Return to the St. James Club by moving three screens
right, taking the elevator down, moving one screen left and descending the
stairs by the doorman. Use the metal plate at the right rear of the club.
Open the packing case using the metal bar in your inventory. Take the wooden
lid from the case and put it on the box next to the back wall. Climb the box
and use the metal bar to make a hole in the grill. Use the secateurs on the
grill to gain access to a narrow (one-way) passage to the subway.
Move one screen right and enter the branching tunnel in the back. Continue one
screen right (but not past the hole) and use the light bulb in the wall socket,
scaring away the monster that lives in the hole. Move one screen right and
save your game before taking the right-hand exit.
Slow down the game speed and exit through the (one-way) passage to the right.
Immediately click on the right-hand (one-way) tunnel exit. Restore normal game
speed and use the metal bar on the wall plaster, then on the exposed brickwork.
Pick up the fallen brick and use the metal bar on the swelling in the vein. Use
the brick on the crowbar stuck in the vein. Retrieve the crowbar, then
immediately exit through the (one-way) door at right while the repair robot is
fixing the damage to the vein. Exit north to the fire pit chamber.
Use the control unit:
2 REDUCE TEMPERATURE
While the fire cover is contracted, quickly pull the metal bar above the fire
to loosen the grill. Exit one screen left and use the grill to observe the
tank room. Click on the grill to zoom back out, then move two screens right
into the robot area. Carefully use the circuit board on the slot in the
red-and-white robot:
TANK
Wait for Joey to return, then talk to him:
REPORT
Talk to Joey again:
NUTRIENT TANK
TAP
Wait to hear a dripping sound, then enter the tank room through the doorway at
rear left. The android falls through the grill you prepared earlier in the pit
chamber (which somehow has sunk one floor down from this level). Exit to the
right past the large translucent tanks, then go through the open doorway at
right into the control room. Use the ID card with the terminal:
2 ACCESS TO RESTRICTED AREA
1 OPEN DOOR
EXIT
Exit the control room and encounter Gallagher. After he's killed, get a red
LINC card from his corpse. Retrieve Joey's circuit board from the damaged
robot and exit through the right rear doorway back into the control room.
Insert the red LINC card in the interface slot and quickly use the interface.
Exit right to the wood zone. Use BLIND on the eyeball, then immediately
exit north to the checkerboard zone. Use DIVINE WRATH on the crusader blocking
passage to the right. DISCONNECT.
Insert Anita's LINC card in the interface slot and quickly use the interface.
Exit right to the wood zone. Use BLIND on the eyeball, then immediately
exit north to the checkerboard zone. Exit right to the stars zone. Use
OSCILLATOR on the crystal and pick up the helix (VIRUS).
DISCONNECT.
Exit the control room, then go through the large circular hatch at right. Use
Anita's LINC card with the console to infect LINC with the virus. Pick up the
tongs from the right-hand wall and use them with the right-hand (rectangular)
tank. While the flesh they're holding is still red, quickly use the tongs with
the left-hand (circular) tank to freeze the tissue. Exit right and open the
cabinet of the center console. Insert the circuit board into the cabinet, then
use the console above it:
2 DOWNLOAD CHARACTER DATA
0 MAIN MENU
3 RUN STARTUP PROGRAM
Never mind
Retrieve the circuit board and exit right. Stand near the panel on the left
side of the door at right and wait for Joey to come over. Talk to Joey:
HAND
Immediately use the left hand panel. Exit right,
then continue right over the pipes. Tie your cable to the pipe support and use
the rungs at lower right. Use the tongs with the orifice to open a door at
left, then use the cable to swing over to it. As soon as your cursor reappears,
talk to Joey:
CHAIR
and watch the endgame sequence. Game credits can be skipped by pressing F5.
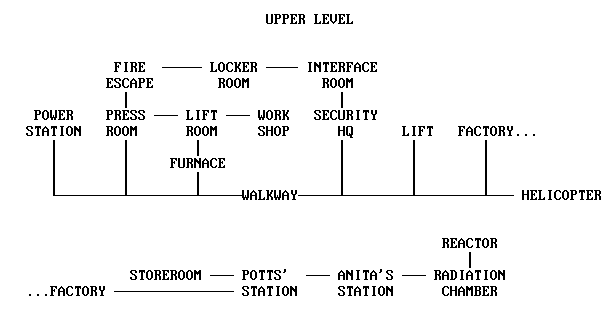 Upper Level Map
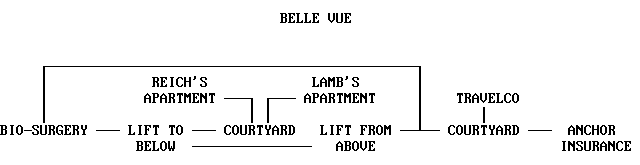 Belle Vue Map
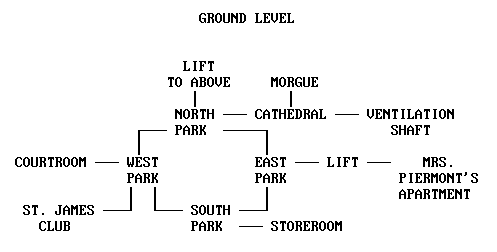 Ground Level Map
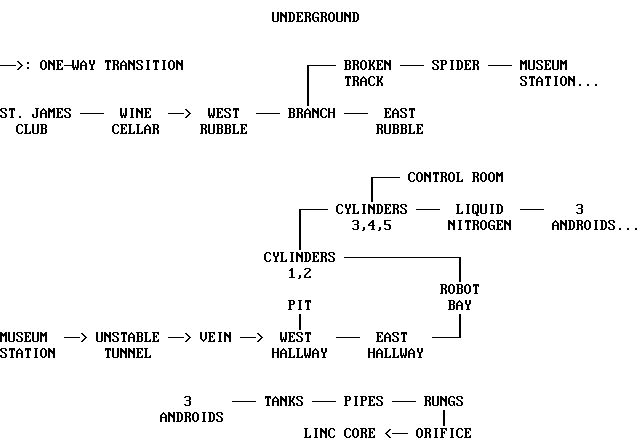 Underground Map
 Interface Map
Table of Contents
Home
Copyright © 1997 Balmoral Software
(http://www.balmoralsoftware.com). All rights reserved.
Republication, redistribution or conversion is expressly prohibited without the
prior written consent of Balmoral Software. Contents subject to
change! For the latest information, see
http://www.balmoralsoftware.com.