Return to Ringworld Walkthrough
Return to Ringworld Walkthrough
4 July 1994
Copyright © 1994 Balmoral Software
(http://www.balmoralsoftware.com). All rights reserved.
Republication, redistribution or conversion is expressly prohibited without the
prior written consent of Balmoral Software.
Press the [F1] key for the main menu. During gamplay, right-click the mouse
for the Action menu (Look, Walk, Take/Use, Talk, Switch persona, Main menu).
To identify an inventory item, select it from the scrollable inventory bar and
click on the [?] button. To release a selected inventory item, right-click and
then click on the hand icon.
L: Left
R: Right
U: Up
D: Down
B: Back (toward rear)
F: Forward (toward front)
Fn: n repetitions
Start in Quinn's bedroom on Deck 2
Take green rectangular stepping disk
Use center circular table, take stasis negator gun
Open cabin door to leave room, then open door opposite into Miranda's lab (door
marked 2 is elevator on this deck)
Get thin sensor probe on console in front of red square
Take hyper-conducting attractor unit from floor next to console
Take purple reader from third shelf next to Quinn
Use sensor probe on stepping disk to extract charged power capsule
Use sensor probe on stasis negator gun to extract spent power capsule
Use charged power capsule on stasis negator gun
Exit lab and take elevator to Deck 5
Move panel at right, take multi-purpose retention clamp
Take iso-linear optical fiber from open wall switch
Open opposite door into purple autodoc room
Open cabinet having a row of five buttons, take scanner
Put iso-linear optical fiber into network of green wires on side of autodoc
Put purple reader onto small shelf next to green wires
Press red button on autodoc and select the white button for Advanced Procedures
-- an "Invalid Access Code" message is displayed
Open Door
Take reader
Exit autodoc room and take elevator to Landing Bay 2
Use center door to enter airlock
Airlock:
Open left cabinet, get sonic stunner
Open right cabinet, get laser diffusion aerosol
Exit airlock room
Landing Bay:
Pick up cable harness from floor
Attach cable harness to handgrip on wall, next to airlock door
Use hyper-conducting attractor unit with cable harness
Walk right and use control panel
Operate Crane, set display for Tractor Field On
Use arrow keys to move crane to make cable harness vertical
Done and Done
Climb cable to balcony
Quantum Drive:
Enter quantum drive chamber through second door from the left
Use purple laser diffusion aerosol on laser eyeball
Use multi-purpose retention clamp on laser eyeball
Exit room, which causes the laser to break
Use scanner on [?] menu button at lower right of screen
Move sliding control to first tone position
Use toning scanner on laser
Walk to door, shoot laser with sonic stunner
Click on laser to get scanner
Use scanner on [?] menu button
Move sliding control to the left to turn off tone
Use stasis negator gun on wide gray panel of quantum drive
Exit Landing Bay and take elevator to bridge
Talk to Miranda twice to ask her for assistance with the autodoc
Give reader to Miranda
Return to autodoc (Deck 5)
Put reader on autodoc shelf
Press red button
Advanced Procedures
Open Door
Click yellow button, take infodisk
Return to bridge
Give infodisk to Seeker
Talk to Seeker
Now entering Ringworld space
Talk to Seeker
Use workstation
Scan Ops, Set Active Enabled, Deep Scan, Geographical
Click on up arrow until Fist of God mountain is shown
Done
Use stasis negator gun on ARM gunman
Use sonic stunner on ARM gunman
Talk to village chief
Back on the Lance of Truth bridge, use workstation to scan for ARM location
Scan Ops, Set Passive Enabled, Short Scan, Technological
Done
Back out through Fist-of-God mountain
Take elevator to Landing Bay 2
Enter airlock through center door
Use control panel, select a suit of the right size
Use air tank with suit
Use suit, then use airlock at left
Put scanner on [?] menu button, then press Scan to show component locations
L7 D3 to Joystick (need Seeker's help to get)
U6 L5 to Radar Set (interrupted by Lance of Truth capture)
R4 D15 L4 to Antenna
Use ladder
Move latch
Press red button
Right-click on background
Take battery from back of antenna dish
Use ladder
Right-click on background
U L5 to Guidance Control Module
D L7 to a wrecked spacecraft
Take white Airbag & functional Diagnostics Display from the dashboard
Click the walk crosshairs on a purple spot directly to the left of the
dashboard
Take Navigational Gyro
U R U9 to Fuel Cell
R6 D5 to intact spaceship
Use window to open
Remove broken diagnostic display
Attach functional diagnostics display
Put joystick in center receptacle
Open glove compartment, take Ignitor and Thruster Control Valve
Press green button to exit cockpit
Install in open hatches left to right:
Battery
Fuel Cell
Ignitor
Thruster Control Valve
Gyro
Radar Set
Guidance Control Module
Touch window
Use joystick
Move D3 to maglev transport car
Use scanner to determine direction of ARM base
Operate transport at far right:
Goal is to stop maglev at the location of a specific elevator
Large red button stops or exits maglev
Center white buttom controls direction of motion
Vertical rows of small red lights count up to elevator location
Adjust speed with right-hand slider control
Check scanner after exiting maglev
After elevator is found, walk left to it
Become Seeker, open doors
Become Quinn, reach under Seeker's right arm and pull tiny red lever
Enter upper elevator compartment
Caution: Don't skip through dialog here
Become Seeker, push robot
Become Quinn, put airbag on robot
After the dialog is finished, Quinn should have a red rebreather tank added to
his inventory
Use rebreather tank with robot
Press wall button to topple robot
Use console, click leftmost (depressed) button, then center button
Game automatically switches to Miranda
Select any of the dialog responses until Teal disappears
Take yellow wire from arm of chair
Take coat from post
Exhaust dialog with the mountain characters
Exit audience chamber
L4
Cross bridge
R2
Enter doorway
Use crank
Exit crank room
L2
Cross bridge
R2
Enter doorway
Pick up red rebreather tank from the floor and again from the hole
Exit room
R
Go down steps
L2
Cross bridge
R2
Go down steps
R2
Enter doorway
Fill rebreather tank from small helium spigot
Exit room
R
Use tank with balloon and get a purple flute
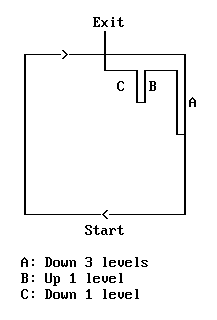
Left alone at maximum altitude, the balloon traverses a large square in a
clockwise direction. Whenever the balloon reaches the lower-right corner of
this square, it rises to maximum altitude (if necessary) and switches direction
(if necessary) to clockwise. Wait until the balloon passes through the
upper-right corner of the square at maximum altitude (A), then immediately
decrease altitude three times. The balloon will then reverse direction and
begin moving north. It will round the upper-right corner and move west for a
little while, then move south. As soon as it begins to move south (B), increase
altitude once to reverse its direction to northwards. When it begins moving
west again, decrease altitude once (C) and the balloon will exit northwards
through the river valley.

Use scanner to find forest
Enter forest
Play flute (use on Quinn)
Follow Nej to the right
Shoot guard with sonic stunner
Use guard tower
After Quinn arrives at the ARM base,
switch to Seeker
Exit audience chamber
L
Go down steps
L
Enter doorway
Take gunpowder from pole and lamp from top of short chest
Exit bedroom
L
Cross bridge
R
Enter doorway
Get lamp from top of chest
Exit bedroom
R
Go down steps
R2
Enter doorway
Take glass dome on floor
Exit helium room
R to balloon platform
Go up curving steps
R
Cross bridge
R
Enter doorway
Touch rope attached to wall
Click rope icon on Seeker
Use lamp on pool
Use glass dome on pool
Take key to the right of the glass dome
Climb up
Exit pictogram room
L
Cross bridge
L
Go down steps to balloon platform
L3
Go up steps
L2
Cross bridge
R2
Go up steps
L
Enter doorway
Get white facemask
Exit skins room
L2
Cross bridge
R2
Enter doorway
Take bottle of alcohol
Use alcohol on facemask in inventory
Exit crank room
R2
Open left elevator door, go down to bottom of shaft
Use gunpowder on ice
Use lamp on gunpowder
Go through doorway
Use key in door
Wear mask (use mask on Seeker)
Now for tasks even more tedious than negotiating the spaceport ledge: In the
maze of service tunnels ahead, you must pick up some important objects and
destroy no less than 18 vampires that inhabit the tunnels. Should you miss
finding any of the vampires, Seeker cannot leave the maze without the ominous
message "A hero would never leave any Vampires alive...". For map-based
navigation, you can use this map. Alternatively,
step-by-step instructions are given below:
Go through doorway to the right
R2 B L
Use photon stunner to kill vampire #1
R3
Kill vampire #2
R F L U L
Kill vampire #3
R D R B L3 F L U L B R
Kill vampire #4
R
Kill vampire #5
R U R D R B D L B R B U F U L
Kill vampire #6
L
Kill vampire #7
L D B D L
Kill vampire #8
L U2 R F D F R D L
Kill vampire #9
L
Kill vampire #10
L U B U R F L F2 R B R
Kill vampire #11
R F R
Kill vampire #12
L2
Kill vampire #13
L2 B2 R2
Kill vampire #14
R
Kill vampire #15
R D R B2 D L F L
Kill vampire #16
L
Kill vampire #17
R2 B U2 R
Kill vampire #18
The following message is displayed:
Cautiously, you sniff the air. The pheromones have dissipated. All
the Vampires must be dead.
L2
Get scrolls from shelves on wall
Use keypad on glowing device
Press each of 16 keys once each, then take gem
R D2 R U F2 L U L3 B L D F D R3 U L B U B L D2
R2 U F U R3 D B D F L F R U F L U L D L3 F R D L2
Exit through door in back and climb up elevator shaft
Click red button to open elevator door
L4
Cross bridge
R4
Enter doorway to audience chamber
Give scrolls and gem to Astor Pharisha (keep gem)
Switch to Miranda
Switch to Seeker
Switch to Miranda
Put pillow in toilet
Take light bulb from toilet light fixture
Put wire in toilet light fixture
Put metal food tray in toilet
Flush toilet using button on wall
Leave cell, go left
Open unbarred door to computer room
Get toolbox on floor
Open door and return to cell 8
Use laser hacksaw on ventilation duct grille
Disable anti-pest laser by touching panel with hand icon and pressing circular
buttons to set the red lines to:

R4 U3 to vent
Use eye icon on vent
U3 to junction
R
Configure red laser lines to:

R5 U2 R3
Configure red laser lines to:

R2
Put eye icon on vent (four times)
Use hand icon on vent
Enter ghoul-protector room at right, use computer console
Use slider to reduce speed to 10 and continue up as far as possible
Waiting for the spacecraft to finish moving each time, use the red keypad to
rotate L R L2 R L2
Rotate right, then at the fourth junction, rotate left and proceed as far as
possible to the right
Rotate L
Rotate right and then right again at the next junction
Rotate L
Rotate right and then left at the next junction
Rotate L R2 to exit the flup tube system
Open door on elevated walkway
Open door at end of corridor
Move R2 around the circular hallway to the double door
Open door and enter white-floor room
Click the hand icon on the light
Display of second Ringworld surrounding Dyson sphere with cutouts for light
squares
Table of Contents
Home
Copyright © 1994 Balmoral Software
(http://www.balmoralsoftware.com). All rights reserved.
Republication, redistribution or conversion is expressly prohibited without the
prior written consent of Balmoral Software.


