Electrical Circuits
Copyright © 1996 Balmoral Software (http://www.balmoralsoftware.com). Portions copyright © 1995 I-Motion, Inc. All rights reserved. Republication, redistribution or conversion is expressly prohibited without the prior written consent of Balmoral Software. Contents subject to change! For the latest information, see http://www.balmoralsoftware.com.
Use the [Esc] key three times to skip the introduction screens and proceed directly to the main game-restore menu. On exiting the game, press [Esc] to skip the credits.
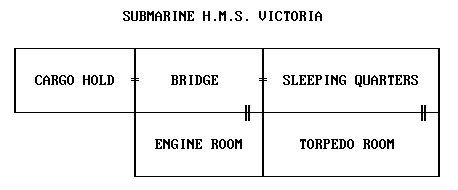
Talk to Captain Lloyd about the crates. The radar then picks up a vessel on the surface - watch through the periscope as a German destroyer drops depth charges, damaging the submarine. In the hold, a fire breaks out.
Immediately grab the fire extinguisher from the wall and use it to put out the fire (to access any inventory item, move your cursor to the upper screen border). Exit right, to the bridge. Open the drawer in the captain's desk at left and right-click on it to pick up a tape recorder, a code book and a key. Zoom out from the drawer and exit up the two steps at right into the submarine's sleeping quarters.
Immediately to the right of the entrance door, pick up a hatchet. Click on the "under the bunk" hotspot at bottom center and pick up crampons and a lifejacket. Zoom out and pick up a St. Christopher's medal at lower right. Talk to Wayne about Hamsun, then about Lloyd. Use the St. Christopher medal on Bjorn Hamsun to hypnotize him. Next, use the tape recorder on him to capture his chant
KAA NAAMA FTAH'N CTHULHU!Exit left to the bridge. After the Prisoner monster appears, use the tape recorder on Ryan to dispatch it. You won't be able to save Wayne, and the submarine suffers more damage, this time at the hands of a saboteur on board.
Use the hatchet on the electrical box on the right wall of the bridge. Activate blue, green and orange circuits connecting the top and bottom of the panel:
Talk to Driscoll about staying in contact, and get a walkie-talkie from him. Descend to the engine room from the bridge. Stanley is trapped under a fallen beam; you'll need the winch to free him. Use the walkie-talkie on Ryan in order to talk to Driscoll and get him to operate the winch from the bridge. Return the walkie-talkie to inventory and turn on the winch switch at right. Again use the walkie-talkie on Ryan to free Stanley. Talk to Stanley about the radio, then about Captain Lloyd. He'll give you the radio frequency you need. Before returning to the bridge, pick up an adjustable spanner (wrench) on the floor at center.
On the bridge, use the code book from your inventory on the radio and watch the animation of a rescue ship approaching. Exit left to the hold. Put the crampons on Ryan and cross the icy floor to the open cell door. Use the key from your inventory on the chest immediately to the left of the cell doorway. Click on the chest to pick up a flare gun.
Exit right to the bridge. Use the adjustable spanner to remove the metal wheel from the demolished door lying in front of the periscope. Exit right to the sleeping quarters, then descend to the torpedo room through the floor hatch at right. Pick up a distress flare lying on the nose of a torpedo at center. Use the draining wheel from your inventory on the hole in the wall at far right. Click on the installed metal wheel to drain the water out of the torpedo room.
Open a torpedo launching tube on the right wall, then open the hatch in torpedo C-26. Use the walkie-talkie on Ryan to talk to Driscoll and get launched to the surface (where you'll need that flare gun and distress flare you've been carrying). Watch the animation of the H.M.S. Victoria being towed into Edwards Base in the Falkland Islands.
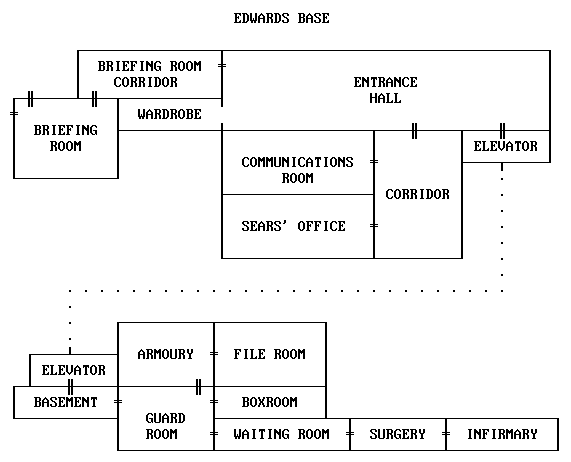
After Captain Sears talks to you and leaves the office, pick up your ID file and a packet of cigarettes from the desk at right center. Quartermaster Quincy will then enter the office and give you your duty roster, which you in turn give to the adjutant outside Sears' office. Left on your own again, pick up a reel of film from the adjutant's desk. Go through the middle door of three, into the communications room.
Use Ryan's card file on the steaming kettle to obtain the photo from it. Exit left back to the corridor, then go through the door at far right into the entrance hall. Exit through the door at far right into the briefing-room corridor. Go through the door at right (next to the sabres displayed on the wall), into the briefing room.
Talk to McLaglen about Quincy, then offer him the packet of cigarettes. Give McLaglen the film to show. Click on the white book below the red reading lamp on the bookshelf at left center, and note the left half of a code sequence:
4 9 6Return to the communications room and ask Shaw about your radio message. Proceed to Sears' office and open the left drawer of Quincy's desk. Right-click on the drawer to disclose the right half of a code sequence:
5 2 3Click on the portrait behind Sears' desk at left. Click on the safe and open it by entering the combined code sequence: 4 9 6 5 2 3. Right-click on the open safe and pick up a rubber stamp and Lloyd's submarine key. Right-click on the papers on Sears' desk. Affix Ryan's photo to the unfinished pass, then apply a signature with Sears' rubber stamp. Close the safe and painting, then exit right and proceed to the entrance hall. Click on the small red button to summon the elevator. Immediately enter the elevator and take it down to the basement. Go through the security door and give the guard your pass when he asks for it.
Go through the center wooden door of three, into the boxroom. Pick up a tin from the middle shelf and note the corpse in the trunk below the wall grate. Exit left back to the guard room and enter the door at right into the infirmary waiting room. Talk to Nurse Trend about an appointment to see the doctor. She'll check with the doctor and immediately return. When she does, exit right, into Dr. Trevor's surgery. Tell the doctor you've got stomach problems, then give him the smelly tin you picked up in the boxroom. When he leaves the room, quickly pick up the assembling manual from his desk at right center.
Exit left back to the guard room and click on the leftmost of the three wooden doors. When Finnlayson answers, give him the doctor's assembling manual. Enter the armoury and take the fire extinguisher from the wall to the left of the door. Take Finnlayson's lighted cigarette and drop it into the trash bin to the right of the table. Immediately hide in the dark corner at right (between the gun rack and the tall lockers). When Finnlayson leaves the room, douse the fire with the fire extinguisher - you should be getting pretty good at this by now!
Exit left to the file room. Open the drawer and right-click on it. Click on its contents to show Parker's card file. Zoom out from the drawer, return to the armoury and re-enter the guard room. Captain Sears will meet you and want to be told what happened onboard the Victoria - tell him about the monster and the incantation used to dispel it. He then sends you back to the submarine.
To the right of the deck gun, pick up the cable and use it on the vertical bar at the edge of the ice patch at right. Cross over the patch and open the floor chest at far right. Right-click on the chest for a close-up and pick up the two metal objects inside. Combine these objects together in your inventory to create a marine key. Move left to the submarine's conning tower, use the marine key on it and enter the bridge.
Enter the sleeping quarters to the right of the bridge and check out the locker at upper left. Pick up Hamsun's note-papers. Return to the bridge and quickly use Lloyd's red key on the button immediately to the right of the periscope shaft. Beat a hasty retreat up the ladder before the Prisoner attacks!
On your return to the base, accompany the doctor and obtain Hamsun's notebook. A Prisoner will get Quincy, but you'll restrain him inside a pentagram drawn on the floor. Return to Dr. Trevor's surgery and pick up a needle from his desk. Go up in the elevator and proceed to Sears' office. Use the needle on the wall map of Antarctica and click on the hiding place disclosed when the map swivels. Pick up the Mnar Stone and Sears' dossier. Return to the infirmary in the basement and use the Mnar Stone on the Prisoner to destroy it. Pick up Quincy's card files from the floor and learn from the doctor that Sears is a traitor.
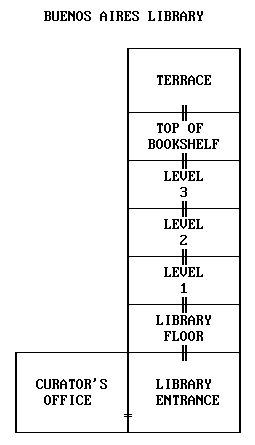
After (crash)landing at the Buenos Aires airport, you'll make your way to the city library. Talk to Hernandez about the book filed under reference OTR 2832, then talk to curator Jorge about the OTR 2832 password, an ancient book and Parker's efforts with a solar disc.
After the German agent Harland shoots Hernandez and is destroyed by your alter-ego from the future, get an OTR 2832 page from Jorge and hide from the police.
Exit the curator's office back to the library entrance, then go through the glazed doors at the top of the stairs. Pick up the pile of books and the blind man's stick to the right of the doorway. On the third shelf of the bottom bookcase, slightly to the left of the carved face above, click on the rightmost of six books that slant to the right (here the hotspot identification is "A book" rather than "Books"). Go into the secret passage thus revealed.
On level 1 of the library, repair the ladder with the blind man's stick. Go up the ladder to the next level. Right-click the "empty spaces" hotspot on the third shelf to the left of center. Place the three books from your inventory on the shelf, in chronological order left to right (Sophocles, Shakespeare, Goethe). When the stairs appear, climb them up to level 3. On this level, there is a switch amongst the books, but it has no apparent function. Try several times to walk past Diane to the right end of the ledge, until she lets you by and you find a staircase up to the next level. Move the rightmost statue to open a panel (hiding box) in the center statue. Click on the hiding box and pick up a key. Use the key to unlock the glass doors, and exit to the terrace.
Climb the statue of Venus, then jump over to the statue of Jupiter. Pick up the solar disc from the statue of the discobolus. Unfortunately, you now end up being captured by the Nazi leader Dietrich.
Eagle Castle? This must have been borrowed from the movie Where Eagles Dare. In your cell, pick up the items from the table and use the spoon on the left cell wall. Each time Professor Parker talks to you, immediately stand up or the German guard will see you and you'll be shot. Pick up the stool in your cell. After Hamsun, Diane and Professor Parker have been taken from their cells, Dietrich will give you some paper and a pen to write a message to Washington.
Quickly put the sheet of paper into the wash basin. When it floods and a soldier opens the door, hit him with the stool you are carrying. Immediately return the stool to inventory and click on the soldier's body to retrieve the key to your cell. Very quickly use the keyring on your cell door. Click on the table to move it into the center of your cell. Put the stool on it in order to climb up to the ventilation duct overhead. Open the ventilation grill with the spoon or pen. Proceed through the ventilation duct to the right and exit either way at the fork. Listen to the Irish brogue of the "German" full alert message.
On entering the lava pit, move the right-hand stalagmite to open the stone gate at left. Pick up the ruby and amethyst that were hidden behind the gate. Cross the bridge over the lava at right. Put the ruby into the left eye socket of the statue and the amethyst into the right. Go through the doorway now opened in the statue.
After being teleported to an area of frozen Prisoners, move right until you find a mine cart. Right-click on the cart and pick up a miner's bar from inside it. Move one screen left and use the miner's bar to loosen a stone on the ledge in front of the pile of molten rock. This action creates a pool of lava which unfortunately is close enough to melt one of the frozen Prisoners. Save your game at this point since the timing of the next sequence is particularly critical. Quickly dip the miner's bar into the lava pool and use it on the trapped wheel of the mine cart. Immediately push the cart in order to open a door to the right. As soon as the door starts to slide open, immediately move Ryan to the right (even though the pendulum-clock cursor is showing) and through the open doorway before the melted Prisoner attacks him. You may have to try this sequence a couple of times before you can successfully evade the monster.
The Prisoner won't follow you into the propeller room. Use the miner's bar to stop the large propeller. Proceed through its opening to another ventilation grill. After the Sun Gate sequence, yet another Prisoner is conjured up by Dietrich. Disable it by opening the grill and clicking the book page from inventory on Ryan.
Pick up the gun barrel and middle section to the left of the scanner console. Click on the steel plate half at the base of the Sun Gate for more insight into Ryan's origins. Move one screen right and pick up the gun butt lying on the floor at lower right. Pick up the battery from the scanner console and click on the scanner screen. Put the battery into the slit at lower right and press the red power button at lower left. Move the three gun pieces in your inventory onto the scanner screen; a completed "F.N.D." (Freeze 'n' Destroy) gun will then appear in your inventory.
Zoom out and click on the computer terminal for information about a complicated subplot involving Ryan's father, Howard Philips Parker (does that mean Diane is Ryan's aunt?). Move two screens left and pick up the nitrogen charges (gun ammo) lying on the floor at upper left. Use the F.N.D. gun on the lump of stone blocking access to the cupboard at left. Open the cupboard and right-click on it to obtain a stone and a copy of the solar disc.
Click the solar disc on Ryan to teleport him through the Sun Gate to 1937. Immediately click the book page on Ryan to disable the Prisoner. Talk to Parker, then get transported back to Buenos Aires, 1937. Immediately use the F.N.D. gun on the Nazi Harland.
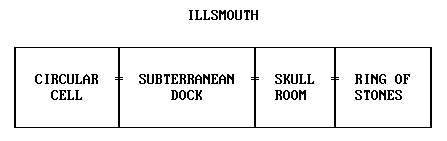
You are transported to Illsmouth, the Hall of the Sorcerer Narackamous. Click on the pull-ring on the cell wall, then on the stele that rises from the floor. Using the clues in the Sorcerer's Riddle I
from the Antarctica International Times newspaper that came with your game package, align the element symbols with their corresponding creatures in the proper order:
	Ice		Water		Air		Fire

	A Prisoner	Dagon		Cthulhu		Nyarlathotep
Zoom in on the Necronomicon book that subsequently appears, and put the stone from your inventory into the hollow on the book's cover. Now armed with a sword, attack the Boleskine and Narackamous apparitions behind Ryan. Click on the sparking Necronomicon book on the stone stele and exit right.
At the subterranean dock, click on the rowing boat. Before Sears has a chance to kill you, engage him in conversation using these responses:
Immediately click on the rope behind you to cause the chandelier to fall on Sears.
- Howard Parker
- John T. Parker
- Great Old Ones
Use your sword on the rightmost of the three skulls on the wall to smother the flames with sand. Click on the flagstone at bottom center. Cross the sand to the large skull at right and enter the passage inside it.
At the ring of stones, quickly click the sword on Ryan, then repeat twice more to fend off the incantations from Dietrich and Narackamous. After Dietrich drops to his knees, click the Necronomicon on the stone altar at center.
Click on your desired endgame sequence:
- The survivor of Time
- The one who never was
Amerikaner		American
Donnerwetter!		Gosh!
Herr Doktor		Doctor
Himmel			Heaven
Ja			Yes
Obersturmfuehrer	Storm Trooper Leader
Raus!			Get up!
Schloss Adler		Eagle Castle
Schnell!		Quickly!
Streng Geheim		Top Secret
Verdammt		Cursedly
Copyright © 1996 Balmoral Software (http://www.balmoralsoftware.com). Portions copyright © 1995 I-Motion, Inc. All rights reserved. Republication, redistribution or conversion is expressly prohibited without the prior written consent of Balmoral Software. Contents subject to change! For the latest information, see http://www.balmoralsoftware.com.