 Elevator Map
Copyright © 1997 Balmoral Software (http://www.balmoralsoftware.com). All rights reserved. Republication, redistribution or conversion is expressly prohibited without the prior written consent of Balmoral Software. Contents subject to change! For the latest information, see http://www.balmoralsoftware.com.
Played in the third person through an extremely linear path, Orion's plot revolves around your character's investigation of the death of his son at a research station in deep space. Other, more farfetched (or derivative) plot elements come into play later in the game.
Graphics are 256-color SVGA, with most backgrounds and characters painted rather than rendered. A few isolated animation sequences involved shaded polygons, but at a rather low resolution. Only one of these, involving a tram, could be skipped by pressing a key (Esc). Overall, the appearance of the game is typical of those that came out a couple of years earlier (Orion was released in 1995).
Much of the backstory is provided in a nifty little graphic novel packaged with the game, entitled "Devlin's Story". Other information, as well as comprehensive installation notes, are included in a well-presented game manual. Even with these aids, however, it was difficult to free up enough low DOS memory to run the game with sound card support. Orion does not identify how much free memory it requires, so there may be some trial and error in fine-tuning the game for best operation. To allow the game to run in less conventional memory, several command-line switches are suggested, which apparently display the screens at a slightly-lower resolution and offer automatic (but slow) scrolling at the screen edges.
The point-and-click user interface performs satisfactorily, with hotspots identified on the screen and possible object interactions displayed with the right mouse button. This "giveaway" of information on how you can act upon objects may make the game puzzles rather predictable and easy. On the other hand, you may find yourself spending the majority of gameplay merely moving your character from one station destination to another - often a very time-consuming process since no "zip" mode or shortcuts have been provided and access points seem arbitrarily restricted from each other. We'll suspend our disbelief about the amount of gravity on a 10-acre asteroid...
Although the voice actors in Orion are given quite a headline during the game introduction, nearly all of them come across as untalented (or undirected), with lines often read with poor inflection and many words mispronounced. In particular, the game is chock-full of completely-gratuitous profanity. If you're offended by that or simply don't see it as adding anything to the atmosphere of an adventure game, then you might want to avoid The Orion Conspiracy. There are also a few mildly-graphic scenes of animated violence, which together with the language have given the game a "Teen" rating.
Leave the guest quarters on Level 5 and move left (or right) through several passageways to a side corridor leading to elevator lobby B5. Use the elevator B control panel to select Level 2 (B2) as your destination. Explore the passageways on Level 2 until you see a red-headed woman, who will turn out to be Brooks, the shuttle pilot. Talk to her and ask her questions until she challenges you to a game of basketball.
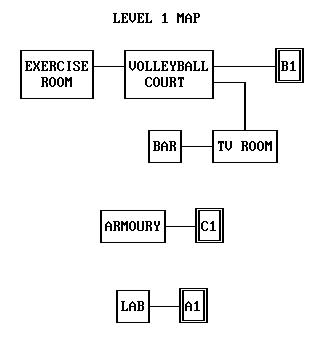
Return to elevator B2 and take it up to Level 1. Head for the exercise room on the far side of the volleyball court, past Brooks. Pick up a chest expander from the exercise bike. Open the middle locker and pick up a pass to elevator bank D. Pick up Brooks' jacket and search it to find a navcom identification card. Return Brooks' jacket to the locker and return to the volleyball court. Exit through the door at far right into the TV room. Enter the bar through the doorway at left and exhaust the dialog options with the bartender Chandra.
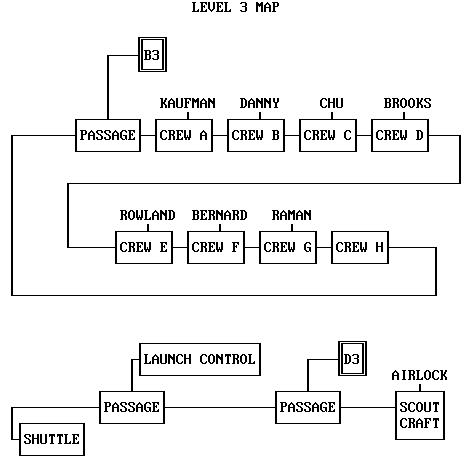
Head for the shuttle on Level 3 via elevators B1, B2, D2 and D3. Use the identification card on the navigation console, then use the console to clear its memory banks and buy yourself more time to investigate Danny's murder.
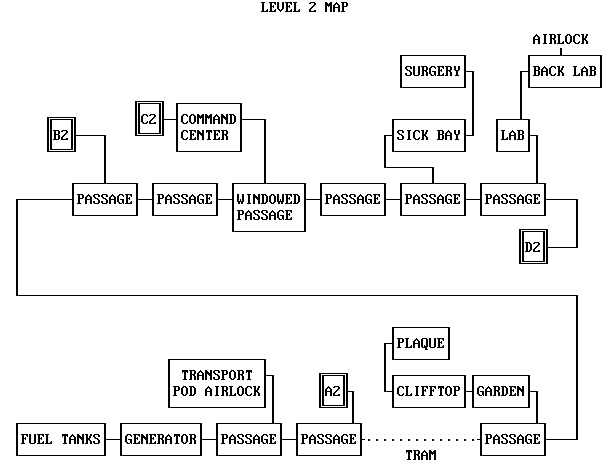
Go to the lab on Level 2 via elevators D3 and D2. Exhaust the dialog options with Bernard - she apparently has no qualms about deriding Rowland even though he's standing right behind you!
Head for the generator room on this level via the tram. Pick up the fire extinguisher at the foot of the stairs and exhaust the dialog options with Meyer. Ergo, return to the lab area on this level and exhaust the dialog options with Rowland.
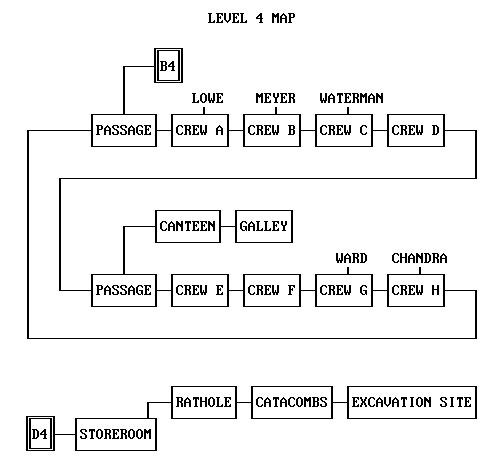
Go to the galley on Level 4 via elevators B2 and B4. Talk to Chandra about his "chicken korma", then go to the storeroom on Level 4 via elevators B4, B2, D2 and D4. Pick up the stocklist and laser welder from the storeroom alcove. Exit through the rear of the storeroom into the catacombs area. Move through the first area into another one and pick up a lamp lying on the ground. Move to the right into a catacombs area with an excavation site and pick up the hammer lying on the ground. Return left to the first catacombs area and put the lamp by the rathole while the scurrying rat is outside it. The rat will proceed to run in a circle; aim for it with your crosshairs cursor and freeze it with the fire extinguisher. Pick up the frozen rat.
Return to the canteen via elevators D4, D2, B2 and B4. Put the rat into the dish of korma on the canteen table, then enter the galley at right and talk to Chandra. Re-enter the galley and pick up the blueberry pie from the larder. Visit Rowland in his cabin (CREW E) on Level 3 via elevators B4 and B3 and give him the pie you're carrying. Head for the back lab on Level 2 via elevators B3 and B2. Exhaust the dialog options with Raman.
Go to the windowed passage on Level 2 and wait for LaPaz to show up. Ask her to give you the latest stock inventory. Terminate the conversation with her, then click on both stocklists in your inventory to compare them. Wait for LaPaz to reappear, then ask her about who has access to the armoury. End the conversation with LaPaz, then revisit Rowland in his cabin on Level 3 via elevators B2 and B3. Tell him he looks ill. Go to the surgery on Level 2 via elevators B3 and B2. After Dr. Chu tells you she has to visit Rowland, use the medical computer to access crew records.
Return to the windowed passage on this level and again wait for LaPaz to show up. Ask her to give you access to Danny's possessions. When she refuses, you'll be able to blackmail her with your knowledge of her pregnancy and obtain Danny's key. Terminate the conversation with her and go to Danny's quarters (CREW B) on Level 3 via elevators B2 and B3.
Use the key to unlock the cupboard under the bed. Open the cupboard and pick up the container inside. Search the container to find a packet of letters. Search the letters to obtain a paper clip, then search them again to obtain a photo. Look at the photo to find out that your son's lover was Steve Kaufmann.
After a brief interlude with LaPaz, you'll end up in Kaufmann's cabin, where he's been brutally murdered. You'll be incarcerated in the observation pod with a ration pack. Take the telescope, then dismantle it twice to produce a metal tube and a lens. Unscrew the ventilation grille using the lens, then dismantle the grille. Put the telescope tube ("bar") into the vent opening. Search the rations to find a moist biscuit. Use the biscuit ("food") to plug up the end of the tube in the vent, causing the elevator door to open.
Ride the elevator up, then head for the garden on Level 2 via elevators D5 and D2. Along the way, you'll learn that Gates is an undercover agent investigating the goings-on at Cerberus station. In the garden, open the door to the shed and search it for a pair of cutters. Continue via the tram to the transport pod airlock, then examine the alien cocoons in the corner. Dr. Chu will show up, turn into a big yellow lizard, and kill Gates. Finding yourself in the fuel tanks room, open the red door of the generator control panel and turn off power to the cables. Use the garden cutters to sever the cables to the left of the power generator. Turn power back on using the control panel, then exit back into the generator room. Pick up the wrench lying on the floor, then taunt the creature into entering the fuel tanks room.
After the creature is stunned by electrical shock, open the fuel tanks with the wrench to finish it off. Rowland willl abscond with the supply pod containing the "xenomorph" cocoons. From your location in the passageway outside the transport pod airlock on Level 2, head for the volleyball court on Level 1 via the tram and elevators B2 and B1. Use the garden cutters to detach both ends of the volleyball net and take it with you. Enter the bar and pick up the greenish crowbar at the end of the unattended bar.
Head for the C2 elevator lobby via elevators B1 and B2. Use the crowbar to pry open the elevator C2 control panel. Use the chest expander to force it to stay open, then magnify the circuits inside with your lens. Straighten out the paper clip in your inventory with the hammer, then use the open clip in the control panel to activate the elevator. Take the elevator up to Level 1 and enter the armoury.
Use the laser cannon console to destroy the escaping transport pod and Rowland and the cocoons with it. You'll then find out who's responsible for Danny's death. After Meyer kills Shannon, pry open the armoury storage locker with the crowbar and pick up two mines from it. Head for the shuttle on Level 3 via elevators C1, C2, D2 and D3. Open the locker above the floor hatch twice to get the zero-G ratchet.
Exit the shuttle and you'll be intercepted by LaPaz. Accompany her to the CREW E passageway on Level 3, where Ward has gone berserk. After the carnage and the touching love scene, use your welder to seal off both entrances to the CREW E passageway. Go to the scout craft bay on Level 3 via elevators B3, B2, D2 and D3.
After a pleasant greeting from Meyer and a close call during your EVA, you'll learn of more problems and will have to perform a second EVA to disable Mogami-Hudson's power lines with one of the mines you're carrying. After your return to the back lab on Level 2, head for the Mogami-Hudson lab on Level 1 via the tram and now-accessible elevators A2 and A1. Pick up the anti-alien fluid from the table in the lab.
Go to the CREW F passageway on Level 3 via elevators A1, A2, B2 and B3. Remove the circuit board from Brooks' corpse. Return to the shuttle on Level 3 via elevators B3, B2, D2 and D3. Give Brooks' circuit board to Meyer.
Collect LaPaz and Lowe from the command center on Level 2 via elevators D3 and D2. Go to the garden area on this level (Lowe will disappear enroute), then proceed through the passages to the plaque area, where you'll see the Waterman alien devouring some tasty dog intestines. Click on him to get his attention, then install the volleyball net on the left-hand exit portal on the garden clifftop. Talk LaPaz into being the bait for your trap, then pour the Mogami-Hudson fluid on Waterman struggling in the net.
Onboard the shuttle, you'll learn that you can distinguish real humans from shape-shifted imitations by how much profanity they use. Head for the command center via elevators D3 and D2 (ignore the incorrect last elevator setting). Set the self-destruct switch and return to the shuttle via elevators D2 and D3. Retrace your steps back to the command center via elevators D3 and D2 - you should be seeing a well-worn path on the floor by now!
Again set the self-destruct switch, then put your remaining mine into the switch. Watch your character actually run (for once), then view the short endgame sequence.
Copyright © 1997 Balmoral Software (http://www.balmoralsoftware.com). All rights reserved. Republication, redistribution or conversion is expressly prohibited without the prior written consent of Balmoral Software. Contents subject to change! For the latest information, see http://www.balmoralsoftware.com.