 Cubicles Map
Copyright © 1997 Balmoral Software (http://www.balmoralsoftware.com). Portions copyright © 1996 SegaSoft, Inc. All rights reserved. Republication, redistribution or conversion is expressly prohibited without the prior written consent of Balmoral Software. Contents subject to change! For the latest information, see http://www.balmoralsoftware.com.
Especially enjoyable is the Bureau sequence at the beginning of the game, containing some droll references to bureaucracies, robots and a certain best-selling computer game. Unfortunately, this level of tongue-in-cheek humor is not maintained throughout the rest of the game; instead we seem to encounter more and more puzzles loosely connected by a muddled plot about machines taking control away from humans and interpreting their dreams. There's a bit of interaction shown between a female character (whom you play) and a male counterpart, but the acting involved is not particularly uplifting.
There's no doubt that the look of Obsidian is its greatest asset in immersing the player in several surreal environments. It could arguably have been even more visually impressive if additional photo-based scenes like those in the initial forest sequence had been included, but that may ultimately be a matter of taste.
The music in Obsidian was disappointing, considering the calibre of people involved. Far too synth-heavy, it ended up sounding a lot like The 11th Hour, except for some interesting jazz clarinet in the art gallery. It would have been refreshing to have included acoustic formats such as those that were so enjoyable (and unique) in Return to Zork.
The puzzles themselves generally weren't too bad, but a couple of them were very tedious exercises in synchronizing time sequences. The puzzles were certainly original, but not as mentally satisfying as those seen in other games such as Jewels of the Oracle.
The game interface is adequate, with node-based movement controlled exclusively by the mouse. Screen hotspots are indicated by a change of shape or color in the mouse cursor, so there is very little pixel searching required. A game control menu is accessible (most of the time) by using the escape key. The game comes on 5 CD's, and can be started from any one of them.
Game Start: Press spacebar twice, wait for QuickTime logo, press Esc for game menu, select Continue (even though nothing has yet been played)
Game End: Press spacebar to skip credits, must then wait through MFactory mTropolis sequence
Although the minimum game requirements specify a Pentium 90, Obsidian is actually playable on a 486 DX2/66 if sufficient RAM and color depth are available.
You'll start out in an elevator, so look down and push the red button to ride the elevator down to the Bureau's "Atlas face". Move F to the Information desk. Looking around, you can see that you are inside a giant cube, the six faces of which form the floors of various Bureau regions. Click on the bell on the Information desk to hear a greeting from a vidbot and learn that the Bureau Chief has information about Max. Facing the Information desk, you can see that the word "INFORMATION" has been formed by rotating each translucent letter about a vertical axis. For a descriptive animation sequence showing this formation of letters, move R F3 through a red door and click on the large red book. Clicking on the guitarist will cause a letter to be created on each page (alas, the guitarist's instrument is merely approximated by a synthesizer).
Return to the Information desk and explore the booths behind it:
	Mediation					Operations

	Bridge Repair					Productivity

	Reception		Atlas Statue		Travel

	Bureau Hygiene					Sources

	Rebel Control		Information Desk	Hints
Many of these booths have hilarious video sequences involving vidbots in various Bureau departments; be sure not to miss the Myst reference in the Sources booth and the arguing vidbots in the Mediation booth. If you visit the Operations booth, you'll hear a dream reference by Obsidian in its mechanical-woman form - you'll see more of her near the end of the game. The Productivity booth has an interesting double-breakout game that's a challenge to win.
The vidbot in the Travel department will describe each of the six cube faces in the Bureau (which she refers to as the "Regional Information Facility"):
	Atlas Face		Departmental booths

	Records Face		Includes a sunken library

	Nexus Face		Used to access Bureau regions

	Security Face		Uses card-regulated passage between cubicles

	Time Face		Waiting room

	Executive Face		Bureau Chief's office
Opposite the Travel booth is a playback device describing the Atlas statue as a commemoration of the victory of bureaucracy over rebel spherical ideas.
Visit the Bridge Repair booth, click on the vidbot screen and get printed instructions:
Press [Enter] for the main menu and note the "Cloud Ring" reference. For now, enter 4 to play a game. At the games menu, select Word Games (3) and choose the WordMixer game (1). You can then type in one or more words (which may be broken between two lines of the screen) and the computer may eventually respond with the longest word made from the letters you've entered, if it can find your initial guesses in the "Bureau dictionary". Suffice to say that the longest word created from STANDARD DAMAGES is TRADESMAN, and the longest (single) word from CLOUD RING is GROUND. If desired, pick the Cloud Ring menu selection on the computer terminal and move F when the door opens. Drag the cloud and ring pieces to the six spaces at the bottom to spell out "ground", then watch a short animation sequence. Turn around and re-enter the records department. Make your way to the TRADESMAN entry in the card catalog, then pick up the Bridge Repair Request form filed there.
From the card catalog, move B R RF L F3 to the Nexus face control platform. Drag the control lever to the right to rotate the Bureau cube faces clockwise (as would be viewed from above) around you. This changes the face behind you from the Records face to the Security face. Move L2 F2 to the new face and listen to the cheerful vidbot. Pick up blue, yellow and red entry cards, two each.
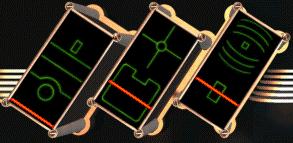
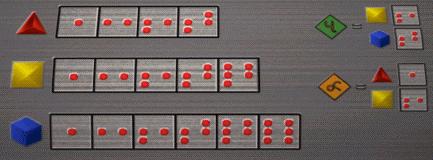
Each of the cubicles in the Security face requires card(s) for entry, and usually produces card(s) in exchange. The exact card outcome is shown by the colored stripes on the card entry devices next to each doorway between cubes or the outside access walkway, as well as by the floor design in each cube. Using the cubicle map:
the shortest path through the cubes (thanks to Bernd Eggink) is
8 9 6 3 6 9 8 5 4 7or, from the position of the receptionist vidbot outside cube 2, move R F3 LF L F2 L F2 R F4 L2 F4 L F2 L F2 R F2 R F2. If you visit Cube 2, check out the CD-ROM and bubble-gum vending machines. Note that entrances to Cubes 4 and 8 produce a black card, while Cube 7 (the Department of Pre-Approvals) requires three black cards for entry.
In Cube 7, move LF to the vidbot in the corner and click on it. After your bridge repair form is stamped with pre-approval, move B L F L F2 LF R F2 back to the Nexus. Drag the Nexus control lever to the right twice to make the Time face accessible. Move R2 F3 to the clock puzzle.
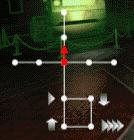
Give your document to the clock vidbot and learn that the clock is broken. Move R LF to the clock puzzle around the back. The object of this puzzle is to synchronize the sun, moon and planet rotations so that they do not collide with one another. The clock is started by the large lever at left. The three knobs at right adjust the starting positions of the rotations, and the white button at lower right can be used the reset the puzzle. While carefully watching the indicator pips on the control knobs, move them in this fashion:
Move L2 F3 back to the Nexus. Drag the control lever to the right twice to darken the Nexus and view a message from a Rebel leader. She refers you to a document filed under "orient militia". Move the control lever to the left to make the Records face accessible. Move R2 F2 RF R F and use the computer terminal's WordMixer game to translate "orient militia" into "limitation" (a guess which seemed to elicit the correct computer response was "materiel"). Find the card filed under "limitation", which refers to a dialing procedure for reaching the Bureau Chief's office. Move B R LF L F4 back to the Nexus and drag the control lever to the left twice to make the Executive face accessible behind you. Move R2 F2 to the access panel.
Set the left slider at the bottom, the center slider in the middle of the cubicle maze, and the right slider in the middle of the rectangle designating the Bureau Chief's office:
then click on the large red button. A thin horizontal rock is balanced on a triangular rock base. Drag the topmost point of the base straight down the screen until it appears to fold over and point toward you. Turn around and move F onto the executive face.
Move F L F L F R LF R U F RF F R F4. Meet with the Bureau Chief, apparently the only vidbot with a face (check out those eyeglasses!), and get transported to the next Obsidian domain.
                                     NORTH

                                Re-entry portal


                                  Spider Head     Fire
                                                  Port
WEST     Furnace       Air        S P I D E R               Giant     EAST
         Cable car     Port                       Metal     Bellows
                                  Oil             Port
                                  Port


                                  Smelting Vat

                                     SOUTH


                               SPIDER FACTORY MAP
Move F
LF R into the West end of the factory to face a realistic-looking furnace
spewing forth jets of steam. Move F R F L F and, if desired, press the red
button to flare up the furnace. Move L F L into a cable car and press the green
button to ride it to an upper-level control platform. Move L RF to the spider
control panel. On it can be seen individual controls for each of four
components that must be made as "offerings" to the giant mechanical
spider:
Fire Air Metal OilFurther explorations of the factory show that each cardinal direction contains machinery corresponding to one of these components. There are also ports in the body of the mechanical spider, reached by climbing through scaffolding, that correspond to the components. By passing through each port, you'll enter a zone for each component and will need to complete task(s) within the zone in order to progress in the game.
From the spider control panel, turn around and move RF R back into the cable car. Press the green button again to return to the factory floor. Move RF R LF R F L F LF U F2 into the Air Zone.
can be transformed into the desired arrangement
by the (minimal) 11-move sequence
G C G C G H K I L E KNote that the game has to be restored in order to get the initial arrangment of balls - if you merely zoom out and zoom back in, the puzzle "remembers" the way you left it. After you've obtained the desired arrangement of balls, move B2 U back to the sphere gun. In order to trap the tornado, which seems to be repulsed from the vertical rods, fire the sphere gun until the tornado moves off one of the edges of the screen. Aim the gun as far as possible toward that edge and make a note of the position of the center of the eight vertical rods. When the tornado returns to that spot, fire the gun to trap the tornado inside the vertical rods. After it's trapped, the landscape of spheres begins to "breathe" and you can turn around and move F into a planetarium. When the Air Zone "postcard" appears, move D and drag it into the lower slot second from the left. On completion of the air constellation and a few stars of the central spider constellation, turn around and move F2 back to the north end of the factory. Move F2 LF R F L F R LF LF L2 RF U F2 into the Oil Zone.
Here you'll see nine wave segments in the ocean; the objective is to synchronize the wave motion in all of them. The wave cycle in any single segment can be advanced incrementally by clicking on it with the mouse cursor. The combined action of all segments can be checked by moving the mouse cursor away from the nine segments. This puzzle requires a fairly high degree of accuracy, but musical cues are presented - there should be a more harmonious sound when the waves are in proper synchronicity. It may be easier to solve this puzzle by first equating all three segments in each row and then matching up rows from back to front. Pay particular attention to removing "seams" between the rows.
On completion, a cube of ocean and seabed under the wave segments will rise up into the sky. Note the strange pattern of markings on the side of the seabed portion as it moves up; you'll get a closer look at this later. Move R2 F LF L2 RF L over a suspension bridge into the sand castle. Here you can get a closer look at the markings on the floating section of ocean and seabed:
Move L LF L2 to a vaguely-similar pattern on the wall. In fact, this pattern is equivalent to the seabed pattern, but with rows and columns out of order. A single row can be moved laterally by dragging it sideways with the hand icon. Two rows can be exchanged by dragging one row to the position of the other. The entire puzzle can be reset to the starting position by rotating away from it. If rows are numbered 1-10 from top to bottom, the seabed pattern can be restored using the following steps:
Move B L LF R LF L2 F L2 RF down the stairs and back to the oil retrieval device. Set coordinates 133.5, with the horn of the device facing the floating ocean/seabed. Press the large red button to extract a second quantity of oil and restore the sand castle. Move L2 F into the planetarium. When the Oil Zone postcard appears, move D and drag it into the lower slot at far left. On completion of the oil constellation, turn around and move F2 back to the north end of the factory. Move F2 LF R F L F L RF R RF U F2 into the Fire Zone.
Finally, try to time the lightning bolts to correspond with the activation sequence you've set up. When a lightning bolt and a light rod activation coincide, a loud organ note is heard (a different note for each light rod). This will aid in fine-tuning the final correspondence between activations and lightning bolts. For some reason, the game music could not be turned off in order to facilitate hearing the timing of the organ notes. Note that accessing the game-control menu will reset the puzzle to its original state.
When the puzzle has been completed, the tree ignites and you can turn around and move F into the planetarium. When the Fire Zone postcard appears, move D and drag it into the lower slot at far right. On completion of the fire constellation, turn around and move F2 back to the north end of the factory, where the mechanical spider opens its mouth to show a fire raging inside. Move F2 LF R F L F L RF R LF U F2 into the Metal Zone.
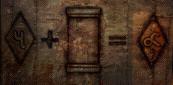
This indicates the purpose of the processing chamber is to transform element 4 (green rock) into element "alpha", which remains to be defined. Move R F L F through several doorways into a chemistry lab. Note the vials of red, yellow and blue fluids at left, and the single vial of green fluid at right, identified with the 4 element symbol. Move R, drag the left-hand video cartridge into the slot below the display screen and press the top triangle button to play it. Here, you learn that red-red and red-yellow combinations are possible, but not red-blue ones. Remove the first video cartridge and insert the other one to learn that when a red triangle with more dots is combined with a pair of red triangles with fewer dots, the triangles are exchanged so that the pair of triangles contains the ones with the larger number of dots.
Move B L U and observe the chemical element definitions:
Here you learn the chemical components of elements 4 and alpha. Move D to the chemical table. Two components can be combined by pouring each one into the clear glass receptacles and pressing the red mixing button in the center of the screen. A receptacle can be emptied by pressing the red button at the base of the brown device next to it. The chemical notation for the contents of the receptacles is shown on the two video screens. The strength (number of dots) of each chemical component increases from left to right in the vial stand at left; for example, the right-hand blue vial contains a 6-dot blue component and the left-hand red vial contains a 1-dot red component. The vials for the 3-dot yellow and 2-dot blue components are missing.
Test various solutions by mixing them with some of the element-4 green fluid. If the result consists of the desired orange alpha element (1-red plus 3-yellow), then you have found the correct solution for the green-rock processing chamber. The only possibilities are:
Turn around and move LF F into the planetarium. When the Metal Zone postcard appears, move D and note the shape of the central spider symbol. Drag the postcard into the lower slot second from the right. On completion of the metal constellation, you can connect the dots to produce the spider constellation:
Turn around and move F4 back into the factory. You'll then experience one of the more intense animation segments in Obsidian - being eaten by the giant mechanical spider you have now activated. After a short animation segment, you'll find yourself in the final Obsidian domain.
To check intermediate results, move F and watch the animation. When the zoetrope has been properly arranged, move B R2 F LF D into the (human) pilot's seat. Turn on the ignition key at left and wait for the preflight check to commence. At the verbal prompts, press buttons D-1, B-2 and A-3 (be sure to click on the yellow spherical buttons, not on the black and white switch covers). Use the Destination Selector screen to choose your next destination (the Hand represents the ornithopter base, your current position):
	                    Church of the Machine        Frame in the Sky

	Piazza

	             Hand                                     Statue


	                       JUNKYARD DOMAIN MAP
All destinations except the Frame in the Sky are "regulation destinations" and may be visited (to reach the Frame in the Sky, you'll need a crossover chip from the Church of the Machine). On arrival at your chosen destination, move B F out of the ornithopter.
To find success, you must first trap inspirationand you'll see a mechanical man move amongst the squares of the piazza courtyard. Move F4 R F L F L F onto the piazza balcony. Here there is a miniature of the piazza courtyard and you can practice putting the Lilah piece on any occupied square, thus disclosing the location of the mechanical man piece. After playing the miniature game, you'll see that the both pieces must move to an adjacent non-diagonal square every move, and the musical cadence that plays at the end of the move indicates the proximity of the two pieces - the fewer the notes, the closer they are together. The object of the puzzle is to trap the mechanical man into occupying an open square and becoming visible. This puzzle is easier to solve in the full-scale version, so move B L F back onto the piazza courtyard. Click on each of the courtyard pieces until you find the location of the mechanical man. Note that the piece you click on disappears; you'll need to use this feature to your advantage when trapping the mechanical man. The mechanical man can be trapped only in a corner of the courtyard. Note that your game cannot be saved, restored or even quit while you're inside the piazza. Starting from a position just outside the piazza, and using the following courtyard map
a move sequence that traps the mechanical man most of the time is
Move F2 (onto the position of the red fire hydrant)From position 8, facing position 4, move L F3 L F6 R2 LF D back into the ornithopter. Turn on the ignition key and wait for the preflight check to commence. At the verbal prompts, press buttons D-1, B-2 and A-3. Use the Destination Selector screen to choose your next destination.
Move F R
Click position 3 or 8 to disclose the mechanical man
Click position 7 to remove the head
The mechanical man is now forced to move to either position 2, 4 or 12
Move F onto position 10
Click position 4 to disclose the mechanical man
Click position 8 to remove the fountain
Move F L onto position 11
The mechanical man is now forced to move to position 3
Click position 2 to remove the chesspiece
Move F onto position 7
The mechanical man is now forced to move back to position 4
Click position 3 to remove the jug
Move R F onto position 8 and trap the mechanical man:Once you've found your inspiration, follow it at any cost, even if that means playing by your own rules
First, note that ten spider movement instructions are represented by ten green tabs under the viewscreen, initially all upward-pointing arrows. The instruction currently selected for possible editing is highlighted in light green, and the yellow triangle on the bottom indicates which instruction has last been executed by the spider. The small black left-pointing arrow at lower right indicates that, under certain circumstances, the instruction set of the spider will be repeated from the beginning once the set of ten is exhausted. The spider's program is executed by moving the brown lever at lower right. A square of four controls at upper right can be used to edit the spider movement instructions:
Triangle: Advance editing point to the next spider instructionThese controls are also repeated on the church map visible in the viewscreen; when the spider visits this lower area of the church, the corresponding control command will be applied to the currently-executing spider program:Down arrow: Cycle downwards through the set of possible instructions
Up arrow: Cycle upwards through the set of possible instructions
Four triangles: Advance editing point four positions to the right
As a result, it's possible to modify the spider's program during its execution, which in turn will allow the spider to avoid movements that are completely repetitive. The far-left instruction with a chip icon on it cannot be edited, and must be executed when the spider is at the central crossroads of the map, facing north (its starting position). Also, executing the "chip instruction" resets the current editing point to the extreme left.
The set of possible movement instructions are:
Up arrow: Move forward one nodeThere are 4^10, or 1,048,576, possible ways in which the spider can be programmed, nearly all of which will end in failure with the spider either running into a wall or unable to properly treat the crossover chip it is carrying. Avoid programs with too many U-turns - there are 451 ways to put the spider into an infinite loop! Note that it's not enough to visit each alcove for chip treatment; the spider must re-enter the church nave from the south after each treatment so that the partially-treated chip can be exposed to the central beam of white light. In order to accomplish this feat, the spider must visit the lower alcove in order to have its program adjusted.Right arrow: Turn right, then move forward one node
U-turn symbol: Turn around, then move forward one node
Left arrow: Turn left, then move forward one node
The only two solutions to this puzzle are, left to right:
	Solution 1		Solution 2

	Right arrow		Left arrow
	Up arrow		Up arrow
	U-turn			U-turn
	Up arrow		Up arrow
	Left arrow		Right arrow
	Left arrow		Up arrow
	Right arrow		Left arrow
	Right arrow		Left arrow
	Right arrow		Left arrow
	Up arrow		Right arrow
On completion of the puzzle, move F L2 D and pick up the now-programmed crossover chip, then move U R2 F R LF R F R back into the ornithopter. Place the crossover chip into the receptacle marked "INSERT", then move R LF D. Turn on the ignition key and wait for the preflight check to commence. At the verbal prompts, press buttons D-1, B-2 and A-3. Use the Destination Selector screen to choose your next destination.
The mechanical man seems pleased with the completely-blank canvas you've provided him; he then adds his painting to the art gallery. Click on the activation lever to the lower left of the frame, then move B and press the green button to hear Obsidian's chilling plan for a planet uncontaminated by people:
Explore the art gallery, then return through the exit door and down the ramps to the ornithopter.
A sample solution sequence for a red light initially in position A-3 is:
Block red motion left by opening switch cover A-2The ornithopter will then transport you to the Frame in the Sky, which now contains the painting seen earlier in the Statue art gallery. After an impressive animation sequence in which the ornithopter de-rezzes and the mechanical man transforms into a machine woman, you'll find yourself in a surreal environment from which the machine woman is trying to "reboot the world" without people.
Press button C-2 to begin to converge on the red light
The red light is found at position B-3
Block red motion left by opening switch cover B-2
Herd the red light towards the corner by pressing button C-3
The red light is found at position B-4
Block red motion downward by opening switch cover C-4
Force the red light into the corner by pressing button B-3
Lock the red light in the corner by opening switch cover A-3 and pressing button B-4
Move R F2 to a disassembled bridge, beyond which is a strange prison in which Max is trapped.
Lilah, please, come quickly!Your task is to use the arrow buttons on the control panel at lower left to combine the bridge segments so that a continuous path is created between you and Max. The left and right arrows simultaneously slide all horizontal bridge segments (unless blocked by a vertical segment); likewise, the up and down arrows affect all vertical segments as a group, unless one or more is blocked by horizontal segment(s). The puzzle is reminiscent (in two dimensions) of those wooden sphere puzzles that are entirely constructed from notched straight pieces. Certain joinings of bridge segments may appear to be unsmooth, but at least one of them can be ignored since the "bad joint" seems to dissolve when the bridge arrangement is complete. The puzzle is reset to the same initial configuration if the game control menu is accessed or your position is changed.
Consider the starting arrangement of bridge pieces in an array with 8 rows and 12 columns:
Since the terminus of the bridge must be in column 5 (ostensibly at row 8), the only piece that can reach Max's prison is F. The only piece able to make contact with F is E, so that must be the next-to-last piece in the bridge sequence. The lowest square covered by F is row 6, column 5 and the rightmost portion of piece E could range from column 5 to column 7. The only piece within reach of E is D, and to make a connection E must be shifted as far to the right as possible, covering columns 5-7.
By similar reasoning, the only remaining piece within reach of D is C; piece D must be positioned to cover rows 4 and 5. Likewise piece C covers columns 8 and 9, in order to reach piece B, which in turn covers rows 2 and 3 and abuts piece A covering columns 8-10.
The final bridge arrangement thus is
The shortest solutions for establishing this arrangement are the following five 16-move sequences:
U D L2 U3 L U R3 D4When the bridge is complete, move F D, pick up the glass receptacle of orange fluid and drop it into the abyss below. Max is freed from the energy field, but apparently has no time for thanks. Instead, he orders you to set the "eight buttons" and runs off. Left behind, you can move L2 F2 back to the crossroads in this crazy world. If you haven't had enough of Max's abuse, move L F R2 F L. Repeat the sequence for even more fun (are Lilah and Max supposed to be an item??).
U D L2 U3 L U R2 D R D3
U D L2 U3 L U R2 D2 R D2
U D L2 U3 L U R2 D3 R D
U D L2 U3 L U R2 D4 R
From the crossroads, move F2 to a distortion of the ornithopter preflight console. The original ornithopter puzzle has metamorphosed into what is arguably the most difficult challenge in Obsidian (except perhaps for the lightning tree in the Fire Zone). Here, the object is to click on the correct eight buttons from an array of sixteen, but every time an error is made, the puzzle resets! Partial results are not retained if the game control menu is activated, if the viewpoint is zoomed out, or if a previously-saved game is restored. In short, the puzzle resets no matter what you do, short of getting all eight buttons correct without a mistake. When the puzzle resets, half of the buttons (but a different set of eight each time) are obscured by sliding patterns emanating from the rest. Your job is to identify which of the eight buttons were not slid over.
To accomplish this feat, you've got to keep very close watch on all sixteen buttons. We found it useful to have two or more people watch separate rows of the array, but be prepared to clean fingermarks off your monitor afterwards!
Copyright © 1997 Balmoral Software (http://www.balmoralsoftware.com). Portions copyright © 1996 SegaSoft, Inc. All rights reserved. Republication, redistribution or conversion is expressly prohibited without the prior written consent of Balmoral Software. Contents subject to change! For the latest information, see http://www.balmoralsoftware.com.