 Piano Keyboard
Copyright © 1996 Balmoral Software (http://www.balmoralsoftware.com). Portions copyright © 1996 Activision, Inc. All rights reserved. Republication, redistribution or conversion is expressly prohibited without the prior written consent of Balmoral Software. Contents subject to change! For the latest information, see http://www.balmoralsoftware.com.
From the beginning position in the courtyard, move forward to the green stone mausoleum. Move around to the right side of the mausoleum. Enter the mausoleum and click on the burning candle and stone sarcophagus for animations. The significance of the violin will become apparent later in the game. If you look inside the sarcophagus, there's a friendly note from Nemesis.
Exit the mausoleum and turn left to proceed to the back side of the mausoleum. Head across the way to the main temple entrance. Look up to see the door inscription:
	WHEN THE SUN  |  AND MOON ARE
	  JOINED THE  |  ENTRANCE TO
	    ETERNITY  |  IS OPENED
Note the wooden demon figurines -- they will be seen again in the save game screen.
Zoom in on the left door and notice the moon-shaped knocker and sun-shaped plate (the right door's knocker is missing). Drag the moon piece up to the sun symbol to enter the temple.
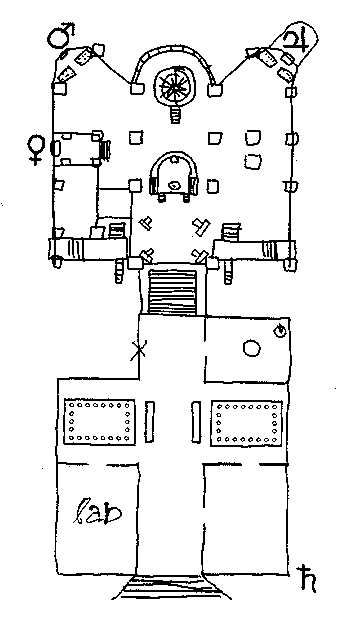
At this point, it is handy to refer to the temple map at the back of the Z booklet that came with the game. Move forward, then right to enter the library. Read the several books on the long table:
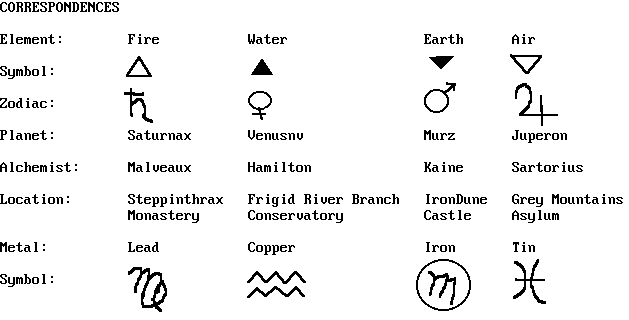
Exit the library into the fountain courtyard and proceed all the way left to the lab entrance. Read another of Nemesis' diaries (on the right, behind the door). Note the references to elements hidden in the temple, the colorlessness of air, and four metals corresponding to the four elements. In the center of the lab, look down to see four zodiac symbols, also seen on the temple map. Climb the creaky old ladder and check out the picture book to the right. Move into the back room of the lab and click on each of the six spinning mouth ornaments for more story background. On the drafting table, read the scroll for information on the correspondences of planets, metals and elements.
- Nemesis diary
- temple map
- references to four elements hidden in the temple
- references to alchemical metals
- reference to a blue star field
- Astronomy for a New Age
- correspondences between alchemists and planets
- use of the planetarium
- Interview with a Grue
- see Easter Eggs
- The Best of the New Zorker
- Alchemy of Pure Love
- reference to Quintessence (Philosopher's Stone)
- My Best Excesses
Exit the lab and proceed around the fountain courtyard to the hall on the far side. On entering the hall, note the painting on the left wall. Click on this painting to get clues to the puzzles in the temple.
Exit the hall through the doorway opposite the painting and enter an open courtyard. Examine the sundial on the far side and take its post.
Re-enter the hallway and turn right to proceed up the stairs into the nave. Click on each of the four trapped alchemists and the gold heads for more story background and correspondences. At this point, you are ready to attack the four element puzzles indicated by the corresponding zodiac symbols in the temple map.
Unlike the other three temple puzzles, this one is located away from the nave (see the temple map). Go to the temple library and face south.
Use this sequence to move the tapestries away from the doorway:
Click the left side of the front tapestryProceed through the doorway and down the passage (note those crackling flames!). On the zodiac pattern on the door at the end of the hallway, drag the man's head to the fire symbol (open triangle). This pattern may also be seen on a table in the lab. After the door opens, proceed inside.Click the right side of the second tapestry
Click the right side of the third tapestry
Click the lower-left corner of the last tapestry
Zoom in on the sundial and insert the sundial post you are carrying. Drag the post until the shadow line falls across the zodiac symbol (h with cross) corresponding to fire. A door opens on the far side; enter through it.
Immediately turn right and pick up the mirror. Enter the main part of the "candle room" and among the six hooks hanging from the ceiling, place the mirror on the far left one. This arrangement is the only one in which an unusual blue-flame candle can be seen in the mirror reflection. Noting the relative position of the blue-flame candle in the (reversed) mirror image, rotate to the right and click on the disguised blue-flame candle. It is the twelfth candle from the doorway in the third row from the top. Click on the blue flame to complete the fire puzzle.
Click on the flaming triangle in the altar, and then zoom in on the highlighted alchemist (second from the left). Watch the video sequence inside the coptic cross.
On the temple map, the Fire puzzle is located to the west of and a little behind the altar area. The entrance consists of stone steps flanking a square ventilation grid.
Proceed up the stairs. You will be thrown out of either of the two doorways unless the entrance puzzle is solved. To the south, click on the pan-pipes figurine and listen to the rising sequence of notes played (if you can discern them over the background music, that is). Turn around and set the water spigots to produce the same sequence of sounds:
	ON		OFF		ON		OFF

		OFF		ON		OFF
A mechanical sound is heard, indicating that the tower may now be accessed through the left-hand doorway (the right-hand doorway is a red herring). Note that the game cannot be saved from the time the doorway is entered until the final water puzzle is solved.
Enter the room at the top of the stairs. Looking around the room from left to right, note that the paintings portray consecutive time periods:
	  I. Ice Age
	 II. Bucolic Age
	III. Volcanic Age
	 IV. Temple Construction Age
	  V. Present Day
	 VI. The Future (opening scene from "Return to Zork")
Click on the blue hourglass in the center of the room. It will turn into a chair; sit on it. Turn around (rotating to the left) and look outside the window -- the view is unchanged. At this point, each rotation of the chair to the left will move you back in time one age, as seen in the view from the window (and a rotation to the right will move forward in time). Move back to the Temple Construction Age, zoom in, and pick up the saw. Continue moving back in time to the Ice Age. Use the saw on the icicle in the window to drop it into the blue bowl. Move forward in time to the Volcanic Age.
In the Volcanic Age, zoom in to the window (the icicle melts), and then immediately zoom in on the blue bowl before the water has a chance to boil away. Immediately click on the meltwater in the blue bowl before it disappears.
Click on the altar triangle below the blue bowl of water, and then zoom in on the highlighted alchemist (far right). Watch the video sequence inside the coptic cross.
On the temple map, the Earth puzzle is located in the left rear of the nave, well behind the altar area.
Proceed to the "skeleton hands" doorway. Open the door by clicking on the far-left and third-from-right fingers to expose the zodiac and metal (iron) symbols associated with the earth element.
Move forward and operate the gold staircase control lever to descend to the lower level. Move forward, turn around and zoom in on the elevator gear mechanism. Turn the crank to raise the steps in the staircase. Climb the staircase back to the nave level and then continue up the staircase to the tower.
Moving around the tower from left to right, look through each telescope and note the basic shapes of each building and its associated symbol:
Building Description      Symbol              Seen later to be

Rounded turrets,          Filled triangle     IronDune Castle
buried in sand            pointing down

Tall structure with       Open triangle       Grey Mountains Asylum
guy-wires, surrounded     pointing down
by icy mountains

Large building with       Filled triangle     Frigid River Branch
blue roofs, broken        pointing up         Conservatory
columns to the side

Many roof                 Open triangle       Steppinthrax Monastery
spines, red sky           pointing up
Return to the lower level (via down arrow). Move forward through the open gates to the end of the stone walkway. Look through the telescope at the skull-like sculpture with the elemental symbol for earth (filled triangle pointing down). Turn around and climb the steps to the mine train. Activate the mine car by clicking on the building shape associated with the earth element (upper right) -- other selections result in various one-way train rides!
Ride the mine train car to the end of the line. Go up the stone steps to the right and click on the black sculpture on the raised platform.
Click on the triangle at the top of the altar, and then zoom in on the highlighted alchemist (second from the right). Watch the video sequence inside the coptic cross.
On the temple map, the Air puzzle is located in the right rear of the nave, well behind the altar area.
Move forward into the air-puzzle tower and zoom in on the star chart on the floor. Using the following notation (with numbers denoting purple stars and letters blue ones):
	                                                         A         D

	                                                            C

	            3                                        B         E

	1               4            6
	         2                           8
	                     5
	                                 7
click on the following stars in sequence:
	Click		Blinking Stars

			1  2  6  8  A  B  D

	  8		1  2  6  A  B  D  E

	  1		2  A  B  D  E

	  2		A  B  E

	  C		A  B  C  D  E
A beautiful blue bird flies up and a spiral staircase appears; take it up to the tower.
Incidentally, the colored horns produce sounds of natural disasters:
	Horn		Sound
	----		-----

	Red		Fire

	Yellow		Earthquake

	Lavender	Thunder

	Blue		Wind

	Green		Water
and are not required for solution of the Air puzzle.
Move around to the right side of the gas machine in the center of the tower room. Zoom in on the color wheel and note the relative proportions:
	Red		1 unit
	Green		2 units
	Blue		2 units
	Yellow		2 units
Zoom out, then zoom in on the circular base under the crystal globe. Click on the black scarab to darken the room. Return to the control panel on the front of the gas machine and note that the gas flows are now visible. Based on the color wheel, the following gas settings are required:
	Green		Full on (already done)
	Red		Half on
	Blue		Full on
	Yellow		Full on
	Cyan		Not used
These settings are made by dragging the levers to the appropriate notches. However, note that mouse motion may be extremely sensitive at this point and it may be very difficult to move the levers without repeated attempts (and a great deal of patience). It worked best to start the hand cursor with the lever in the crook between its thumb and forefinger; if the hand cursor changed to an arrow, it was necessary to start the hand-drag over again. Be sure not to release the mouse button until the hand cursor has closed its fist in the desired target position, even if the cursor jumps around erratically. It may be necessary to actually lift up the mouse and repeat its track, all while continuously holding down the mouse button.
Click (only once) on the now-clear crystal globe (there may be very slow cursor response at this point). Click on the steaming altar triangle, then watch the video sequence.
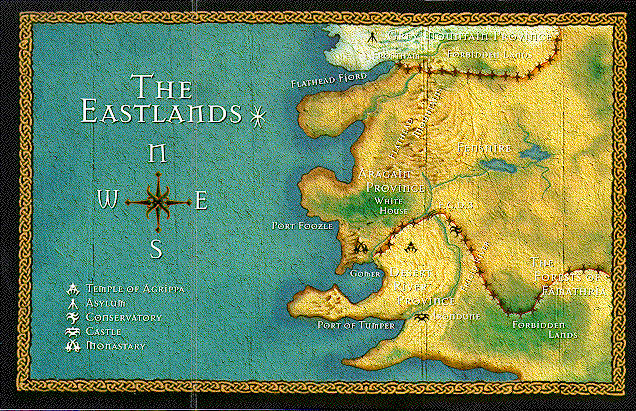
Enter the planetarium structure directly behind the altar area. This room is the main jumping-off point for the remaining puzzle sections in the game, all of which are outside the temple (see the Eastlands map in the Z booklet that came with the game). There may be some mouse/cursor responsiveness problems with the planetarium controls -- see the comments in the Air puzzle section.
Drag the left control knob halfway up, then to the right. Put Nemesis' globe in the now-raised holder. To activate the planetarium sun, drag the left control knob to the left, then up.
The right control knob is used to select each puzzle destination:
			Conservatory		Castle

	Monastery						Asylum
To select a destination, drag the right control knob until a typewriter-bell sound is heard at the appropriate angle indicated above (always in the upper half of the circle). At this point, the planet associated with the destination is lit up by the sun in the solar system model. After a traveling video sequence, the desired destination is reached. Nearby, there will be a rotating planet sprite. Click on this image to return to the planetarium if a different destination is desired.
Here are the CD-ROM's associated with each destination:
	Destination		CD-ROM

	Monastery		  2
	Conservatory		  2
	Castle			  3
	Asylum			  3
On arrival at the monastery, go through the doorway to the right, turn around and pick up the zorkmid coin lying on the ground. Move through two doorways and up the stone steps to the monastery entrance. A sign on the door says the monastery is closed, so you will need to find an alternative entrance. Enter the drainpipe on the ground to the right of the doorway. Turn around and put the zorkmid into the donation box. Read the "fortunes" from the Gods of Emotion that come out of the box:
	Symbol				Emotion

	Black oval with two dots	Fear
	M-mouth				Anger
	Horizontal line			Boredom
	Smile				Happiness
	Spine diagram			Spine
	Frowning eyes			Suspicion
Note the curse on you if you open the donation box and take back the zorkmid! However, this action can be used to produce alternative fortune texts. For more amusement, check out the bulletin board on the other side of the walled-up doorway.
Cross the room and go up the steps. Take the plates for the six emotion symbols from the four urns in the hallway (the segmented-circle and slanted-claw symbols are not needed and should be left behind to avoid unnecessary inventory). Zoom in on each of the Gods-of-Emotion heads and place the corresponding symbol plate underneath it. Choices can be made by examining the facial expressions and tones of voice of each head:
		Fear		Anger		Boredom

	Steps							Hallway

		Suspicion	Spine		Happiness
If plates are placed from left to right, they are also in the same order as in the cards produced by the donation box. On completion of the plate placements, the heads speak in turn to produce a complete rhyme about Yoruk. Make note of the order in which the heads speak:
	Sequence	Emotion		Symbol

	   1		Anger		M-mouth
	   2		Suspicion	Frowning eyes
	   3		Spine		Spine diagram
	   4		Boredom		Horizontal line
	   5		Fear		Black oval with two dots
	   6		Happiness	Smile
Facing the dead-end hallway, take the stairs to the right. Continue straight on and open the door at the end of the hall. Enter the room with volcanic floor grates. Move forward and watch the video sequence. Note the interesting optical illusion caused by the gold 3 x 3 grid at the bottom of the wooden structure.
Turn right and enter the side room. Click on the baptismal for another video sequence. Click twice on the floor grate in the back of the room. Click on the note to obtain a substitution code:
	Letter		Symbol

	  O		Infinity sign
	  P		Trident with cross at the bottom
	  E		Curvy backwards E with two spirals
	  N		Circle with six dots, cross at the bottom
Return through the fire-grates room to the hallway. Follow the hallway straight ahead down and up the steps to the other end. Enter the bell tower and take the spiral wooden staircase to the top. Enter the doorway behind the ropes of the bell-ringing mechanism.
Open the solid door third from the end on the right, and enter Alexandria's room. Explore this room for clues to the childhood of one of the game's main characters, noting in particular the reference to Alexandria's locket and clicking on the front of the music stand for a video sequence.
Return to the hall (facing Brother Will's room), turn right and proceed through the double doors at the end of the hallway into Malveaux' study. An important clue in this room is Sophia Hamilton's letter referring to the love between Bishop Malveaux' adopted daughter Alexandria and General Kaine's son Lucien. Click on the hookah for a video sequence. Zoom in on the shelf on the left side of the room and pick up the gold-framed magnifying glass. Note also Dr. Sartorius' notes on the treatment of his father's fatal disease.
Return halfway back down the hallway and notice that the stairs to Malveaux' quarters are blocked -- another way in will need to be found. Return to the bell tower and look at the poster on the wall. The first five symbols in the sequence for the seventh bell are missing, but we can infer what they are from the order of the talking heads.
Move over to the front of the bell-ringing mechanism and press the buttons in that order, or use the following diagram:
	   1     6         -     5     -         2     3

	-     -     -   -     -     -     4   -     -     -
A rope then descends from a trapdoor in the ceiling. Click on this rope to ride it up the tower. As soon as you pass the open window, click on it to exit the bell tower.
Move to the end of the terrace, turn around and enter Malveaux' room. From the left side (not front) of the table with the red and blue candles, click on the gold medallion for a video sequence. Click the book on the nightstand; note the reference to a marriage between Alexandria and Lucien. An essential clue is the order of the flame colors in the picture on the wall above the bed. Left to right, they are:
BlueUse the magnifying glass on the blurry picture on the bed to derive a skull orientation sequence:
Yellow
Red
Orange
White
Facing frontFinally, touch the brownish book in the left-hand bookcase to return through a secret passage to the main monastery hallway. Move forward to the intersection, then go either right, right or left, left to enter the back hallway (behind the secret passage).
Facing 90 degrees left
Facing 45 degrees right
Facing 45 degrees left
Facing 90 degrees right
Find the entrance to the scriptorium and move to the central bookstand at the back, where the St. Yoruk book yields a video sequence regarding the marriage of Alexandria and Lucien. For the complete Yoruk legend, check the four books to the left and right of the central bookstand. The essential fact (in the last book) is Yoruk's passage through a ring of fire using a bronze shield studded with five red rubies.
Proceed to the back of the scriptorium and exit through the open door on the left.
Move to the central intersection of the walkways and note the circle of familiar glyphs. Click on them in the order required to spell out OPEN, or use the following table:
	Order		Position

	  1		 2 o'clock
	  2		10 o'clock
	  3		 3 o'clock
	  4		12 o'clock
A metallic clank is heard, indicating that the gate is now unlocked to the down staircase off of the walkway near the gallery entrance. Take this staircase down to the museum level, and note the announcement about the theft-prevention system.
Move into the museum, and note the locked trapdoor in the floor. Turn around and zoom in on the circular grey stone pedestal. Here, the alarm system may be deactivated and the trapdoor unlocked by pressing any of the four knobs. Before returning to the trapdoor, explore the museum displays thoroughly and pick up the ruby from Yoruk's shield (next to the snake sculpture) and the Torch of the Endless Fire (next to the shield replica).
Open the trapdoor to the crypt. Click on the mummies to left and right for interesting comments. Move forward into the crypt, where you will see a large stone tower. Take the stairs down and then to the right. Go through the open gate and light the torch you are carrying from the lit one on the wall. Move to the sarcophagus in the back of the room.
Zoom in on the nameplate on the front of the sarcophagus. Brush off the soot to reveal Yoruk's name. Zoom out and open the lid of the sarcophagus. Get inside it and close the lid. Put the ruby you are carrying into the center hole in the shield under the lid. Take the shield. Open the lid and get out of the sarcophagus. Put your lit torch in the wall receptacle.
Exit the room and go back up the stairs. Continue to the right into the red-glowing room. Mouse action may be slow here due to the detailed flames animation. Move forward until you encounter the wall of flame. Click the shield on the flames to extinguish them.
Move forward, then turn right and zoom in on the five-skulls puzzle. By clicking on the left or right eye sockets, position the skulls using the orientation sequence from the book on Malveaux' bed. This will open a secret door behind you. Enter through it into Malveaux' laboratory.
Move to the alcove on the left and pick up the gold key and scrap of metal. Go to the equipment with the lion's head and spiral tube. Turn left and zoom in on the rectangular wall hatch. Open it and insert the key into the slot. Turn the key to wind up the metal-compression apparatus. Zoom out and move the control knob at the right of the hatch to open the egg-shaped device on the left. Put the twisted metal scrap into the receptacle. Click the control knob twice and retrieve the now-spherical metal.
Zoom out and move to the opposite side of the room where the acid-bath apparatus is located. Put the metal ball into the basket suspended above the boiling liquid. Zoom out and move the weights at the end of the rope to immerse the metal in the bath. Retrieve the now-white metal ball from the basket.
Cross over to the opposite side of the room. Turn the wheel on the valve for the lower pipe connected to the central column in the room. This starts the flow of lava through the pipe. Turn around and face the lion's-head heating apparatus. Touch the flame control panels to set up the flames in the color order described in the picture on the wall of Malveaux' bedroom (the "white" flame actually appears purplish).
Drop the metal ball into the lion's mouth. Quickly move down to the exit pan and pump the bellows (if you dawdle, the metal will cool and you will have to start the procedure all over).
Click on the metal zodiac symbol and change CD's at the prompt. Watch the video sequence, noting the progress of the solar eclipse. Click on the zodiac symbol suspended above the altar. Zoom in on the central bowl and watch the video sequence of Malveaux' death. Zoom out and then zoom in on the highlighted alchemist (second from the left). Watch the video sequence inside the coptic cross.
The music during the traveling video to the Conservatory is reminiscent of Return to Zork.
On arrival at the Conservatory, enter through the doorway and turn right. Move straight past the orchestra setup on the left and note the Z'orchestra diagram next to the archway:
	               gederaglini     frobophone


	                 nambino          miano
	wertmizer                                       popperkeg

	         violin                          fleezle
On the other side of the archway is a phonograph.
Pass through the archway and open the door at the end of the short hallway. Move into the lobby and cross it to the open doorway opposite the large window of the ticket booth. Enter the Conservatory office. Zoom in on the wooden box on the side table with the lighted blue lamp. Open the box and pick up the tuning fork. Turn to the right and proceed to the piano bench. Zoom in on the small red box above the keyboard and insert the tuning fork. Touch the tuning fork and listen to the A undertone -- you need to match it on the piano keyboard
Press the A key that is the sixteenth complete white key from the right. Move around to the back of the piano and zoom in to the inside. Take the key. Zoom out, turn right and look at the green book on the stand. This book illustrates some of the Z'orchestral instruments, as does the Z book that came with the game.
Move around to the back side of the desk and check the bottom drawers for notes. Zoom in on the desktop and put the key into the socket in the lamp. Pull the lamp chain to disclose a map of Hamilton's secret laboratory. Note the arrows moving down from the boiler room beneath the prop room under the stage and out to the right. Also of interest are the procedural notes written in the margin:
PREPARE the Boiling SolutionTo the right of the side table where you found the tuning fork, zoom in on the phonograph album bin. Flip through them and take the last two:
SEED with Crystal
PURIFY the Crystal
RING the Notes Together
Introduction to the OrchestraReturn to the lobby and exit through the door to the left of the stairs (marked "Practice"). Put the Introduction album (all-blue label) on the phonograph and crank it up. For some interesting messages from Nemesis and Hamilton, play the album backwards by clicking on the direction switch in the shadows of the left corner:
Alexandria Wolfe Debut Album
Paul is deadPlay the Introduction album forwards to get an idea of the sounds of the eight Z'orchestral instruments. For additional clues, you can click on the instruments themselves on the raised orchestral platform in the same room as the phonograph. Then, play Alexandria's album (green-and-blue label) forwards and pay close attention to the Standard Zorkian Conclusory Fanfare at the end:Redrum
I'm such a bitch
Mom always said, "Oooh, smokin'!"
popperkegTurning now to the raised orchestral platform, put each instrument on the chair of its corresponding Z'orchestral section, using the layout from the diagram on the wall and the following instrument descriptions:
nambino
popperkeg
wertmizer
violin
	Instrument	Appearance

	violin		typical

	nambino		copper-colored drum with gold rings, membrane facing up

	miano		C-shaped lyre with about seven strings

	fleezle		clarinet bent into a U-shape

	popperkeg	purplish-brown tube with bulge in the middle and shiny
			brass endcap

	frobophone	unwrapped French horn

	gederaglini	two-ended thin green horn with blue bulge in the middle

	wertmizer	central keyboard with white bellows at each end
When all instruments have been correctly placed, you will hear an orchestra tuning up, followed by Sophia Hamilton describing the Harmony of the Spheres to Alexandria:
C D E B GReturn to the lobby and take the stairs up to the second level (use the left staircase from the landing). Proceed around the balcony to the right and enter the pupils' dormitory. Move all the way to the right, into Alexandria's section. On the dresser, zoom in on the mirror and inside the music box for video sequences. Check the letters from Lucien and Malveaux under the floorboards. From the scrapbook on the bed, take the last concert poster.
Return to the balcony, then turn right and explore Hamilton's room. In the Alchemy book on the purple sofa, note the reference on the second page to the Harmony of the Spheres:
C D E BThere are various letters on the dressing table. Click on the bathtub behind the screen for an interesting video sequence. Return back downstairs to the lobby.
At the foot of the stairs, turn left and replace the torn concert poster with the one in your inventory. This opens the auditorium entrance. Put all record albums from your inventory back into the record bin in the Conservatory office -- you won't be needing them any more (click on the upper part of the rear wood panel after all the albums in the bin have been tilted forward). Exit the office and pick up your concert ticket from the ticket booth. Be sure to note that your seat is in Box C.
Enter the auditorium by clicking your ticket on the closed doors and then opening them again. Take the stairs up to the second balcony (two full floors up from the lobby level) -- the second staircase can be seen if you move to the right and then turn around. Enter Box C (the doors on this level are labeled). Zoom in on the table and use the opera glasses to watch Alexandria complete the concert (except for the Standard Zorkian Conclusory Fanfare) -- Lucien appears to be her only audience!
Return to the lobby level and move forward into the darkened orchestra pit. Pick up the baton. Using the Z'orchestral layout and fanfare sequence, use the baton to complete the concert. Watch for cursor highlights to let you know which of the darkened Z'orchestral sections you are directing.
Move forward from the conducting dais into the stage area. Turn right and enter the backdrop control room. Check the clipboard on the desk and note that the only backdrops with access holes on the right are the fifth (checkerboard courtyard) and seventh (straw hut). All other backdrops need to be raised, so after turning on power to the control panel with the red button, press all blue buttons except the first and third from the right. Zoom out and move through the holes in the backdrops to the rear of the stage. At the blank easel, turn around and descend the stairs between the railings.
In the prop room, move between the swan and the large blue drum. Face away from the drum and operate the crank. Turn around again and descend to the boiler room by bursting through the drum.
Look down and zoom in on the floor hatch. Pick up Alexandria's locket -- oops, it's dropped into the water! Dive into the water -- you then have only a limited time to look down, get the locket, and then rotate around to exit through the doorway (mouse responsiveness may be sluggish at this point).
You have now entered Hamilton's laboratory, and are treated to the haunting closing theme of Zork Nemesis. Turn right and move between the blue crystal and green sculpture to the hatchway in the corner. Go through this hatchway back in to the boiler room. Move left to the heat control levers on the wall. Put Alexandria's locket on the second lever from the left to hold its valve in an open position, providing heat through the pipes into the laboratory. Return to the laboratory through the furnace door you exited.
Immediately turn right and check the laboratory map on the wall. Note the positions of the sacred-note crystals (the other blue crystals are red herrings). Also, the position of a wall alcove of green crystals is indicated next to the D crystal.
Take the white calcium bromide tablet from the mouth of the green sculpture. Pick up a green crystal from the wall alcove. Put both the crystal and the tablet into the firepit. Next, touch the blue crystals in the correct order: C D E B. Move back to the firepit and touch the clear crystal for the final note (G) of the sequence.
Zoom in to the firepit. Click on the metal zodiac symbol and change CD's at the prompt. Watch the video sequence, noting the progress of the solar eclipse. Click on the zodiac symbol suspended above the altar. Zoom in on the central bowl and watch the video sequence of Hamilton's death. Zoom out and then zoom in on the highlighted alchemist (at the far right). Watch the video sequence inside the coptic cross.
On arrival at IronDune, click the control lever to take the elevator inside the castle. Move forward and descend the stairs either to the left or the right. Enter the doorway centered under the staircases. Enter the room and pick up the broken sword on your right. Take it to the fireplace in the central part of the room and attach it to the broken end of the sword blade on the mantel; watch the video sequence. Pick up the now-complete sword and exit the room back to the circular entry area.
Move to the doorway at the foot of the left set of stairs. Note the style of the displayed suit of armor. Zoom in on it and put the sword into its scabbard in order to open the door to the weapons room.
In the weapons room, note the stained-glass windows depicting five styles of armor:
	Style			Location			Helmet

	Basket facemask,	Outside Thaddeus' room		Closed
	spined shoulders

	Samurai			Weapons room			Closed

	Conquistador		Opposite weapons room		Open

	Roman			Outside Lucien's room		Open

	Traditional,		Outside weapons room		Closed
	with breast plates
Return to the entry area and take the first (right-hand) stairs up to the first landing. Turn right and take the side stairs up to Lucien's room landing. Open the helmet of the suit of armor. Enter Lucien's room. Pick up the bag of gunpowder under the armoire (there's also a letter there). Go to the blank easel opposite the fireplace and use its paintbrush to uncover the military code on the canvas:
Exit Lucien's room and continue up the stairs to the far right. At the top landing, turn right and enter the games room. On the wall to the left, note the controls for the automatic pool table:
First Button:Play each pool game by first pressing the game setup button (1 through 4) and then pressing button 5 to shoot. Note the final sequence of pool balls at the end of each game:
Candles and BroomsticksSecond Button:
Shaving a CatThird Button:
Fishing in the DesertFourth Button:
Triple SplitterFifth Button:
SHOOT!
	Game				Ball Sequence

	Candles and Broomsticks		1  7  4  3  5  9

	Shaving a Cat			4  7  1  3  9  5

	Fishing in the Desert		7  4  1  9  5  3

	Triple Splitter			4  3  5  9  7  1
Exit the games room and descend the stairs to the right. At the first large landing, close the helmet on the suit of armor. Rotate right and enter Thaddeus' room. Check the desk drawers. In the left one, take the vial of nitro. Also note the poem referring to the suit-of-armor code for gaining access to the castle dungeon. Use the vial of nitro to open the trunk at the foot of the bed. Inside is a red scroll describing how to break the IronDune siege, with references to some of the military actions in Lucien's painting code. The blue scroll contains the Eastlands map from the Z booklet that came with the game. There are other items of interest in Thaddeus' room, but none critical to further gameplay.
Exit Thaddeus' room and continue down the stairs to the near left. At the foot of the stairs, turn right and continue down into the circular entry area. Immediately turn right and open the helmet on the conquistador suit of armor. If the samurai suit of armor in the weapons room has its helmet closed (the default), a mechanical sound will now be heard and the way to the dungeon is open. Cross the entry area and enter the weapons room.
You can now proceed into the dungeon through the doorway off to the left of the weapons room. If you activate the torture devices, you will obtain some of the military codes from Lucien's painting:
9: Split the TroopsHowever, these gruesome tasks (and indeed the entire suit-of-armor code quest) are completely unnecessary since the five correct codes (and in the right sequence) are clearly marked on the inside cover of the Z booklet that came with the game:
6: Infiltrate & Destroy
12: Verify Message
10: Distraction
1: Build Bridge
10 1 9 6 12Return to the hall where you found the sword. At the entrance, turn left and zoom in on the rear of the metal dog sculpture (cannon). Open the hatch and drop the bag of gunpowder you are carrying. Move around to the muzzle and use the ear switch to load the bones-ammunition from the dish. Go back to the rear area and use the tail lever to fire the cannon. This has the effect of opening the far door to the library.
Enter the library and, if desired, check out the animated military tableaux. However, the essential one is the second from the right (Battle in Progress), which houses a command radio for the battle raging outside IronDune castle. Enter the 5-number military code sequence and press the red Enter button. Return to the weapons room. Move to the Age of Kaine area on the right, where a display case has been broken open.
Zoom in on the display case. Press on the lights on the neck of the canister to open it. Open the dark cylinder and transfer the Thaddium core to the canister; close the canister. At this point, you have only a limited time to find a proper receptacle for the canister (in the tank's power source). Immediately return to the circular entry area and exit through the main doors directly across from the stairways, past the Old Soldier. Proceed forward into the tank and place the canister in the purple-blue receptacle. Be sure to close the lid.
Turn around and enter the appropriate code (Fishing in the Desert) into the tank's control panel. Click on the joystick on the right. Exit the tank when it stops. Zoom in on the Mold Primer and configure it for Kaine's zodiac symbol. Pull the handle and remove the mold from the drawer. Enter the elevator at the back of the room.
Take the elevator down and exit to the right. Again, there is a limited amount of time to complete the following tasks. Zoom in on the control panel on the right. Press the large red power button, and then these four of the grid buttons:
	+---+---+---+---+
	|   |   |   | X |
	+---+---+---+---+
	| X |   |   |   |
	+---+---+---+---+
	|   | X |   | X |
	+---+---+---+---+
This establishes a good median temperature for the iron forging process. Zoom out. Move forward and zoom in to the central machine. Put the mold you are carrying into the brown tray at middle left. Click on the ARM button to make the articulated arm enter the brown tray; wait for it to extract a glowing metal piece. Click on the FAN button to cool the metal. Finally, zoom in on the cooled metal piece and click on it. Change CD's at the prompt. Watch the video sequence, noting the progress of the solar eclipse. Click on the zodiac symbol suspended above the altar. Zoom in on the central bowl and watch the video sequence of Kaine's death. Zoom out and then zoom in on the highlighted alchemist (second from the right). Watch the video sequence inside the coptic cross.
WARNING: This location involves certain tasks, imagery and sounds that some players may find repulsive. If children are playing the game, parental discretion is strongly advised. If you wish to skip the walkthrough of this part of the game and obtain the information derived from it, link here.
On arrival at the asylum, enter Floor 01 through the open doorway. The first door on the left is the records room; click twice on the flashlight on the rear table for a video sequence. Check the records in the drawers.
Move to the opposite side of the central core and take the elevator down to the B level (don't forget to close the elevator doors and use the red power button before selecting a destination floor). Open the elevator doors and enter the morgue. Position yourself in the back right corner and face the right-hand wall. Open the drawer fourth from the corner in the third row from the bottom. Remove the cadaver and close the drawer. Turn around and put the body into the rectangular box in the bloody alcove. Move to the control panel in the center of the room and face back toward the alcove. Zoom in on the controls and click on each of the three levers from left to right. Return to the alcove and pick up the decapitated head. Save your game at this point.
Take the elevator back to Floor 01 and enter the first door on the right. Move forward and put the severed head on the spiked stand. Press any of the five red buttons to hear what the talking head has to say; the button at the lower left discloses the first part of the safe combination:
First part of safe combination: 36-24-36Turn around and get the safe (it looks kind of like a bottle) out of the freezer in the corner. Turn right and face the X-ray machine.
Put the safe where the X-ray gun can illuminate it. Turn on the X-ray using the yellow-tipped lever. Zoom in to the safe to disclose a key inside and the rest of the safe combination:
Second part of safe combination: 20-18Turn off the X-ray machine, then zoom into the top of the safe. Enter the full combination 36-24-36-20-18. Remove the red beaker.
Cross to the opposite side of the room and place the beaker in the mechanical arm. Zoom in on the glass bowl and retrieve the key. Return to the elevator in the main core and use the key to reach Floor 20.
Enter the doorway opposite from the elevator. Move forward into the room. Zoom in on the open doorway to the right for a video sequence. Other information is available on the table to the left. Sit in the Thousand-Fingers chair. Move forward and exit the room. Open and enter the first door on the left (this must be done while you are still under the "influence" of the chair). You are now in another elevator; take it up to Floor 21.
There is quite a bit of information on Floor 21, but in particular be sure to obtain the rubber hammer from the bed in the center of the back wall, move the switch on the asylum model to the right, and note the Purification of Tin procedure in The Blood Alchemist book:
	   Purification of Tin
	+-----------------------+
	|  Given that Flourine  |
	|  is Present in This   |
	|  Atmosphere:          |
	+=======================+
	|  Helium Raises        |
	+-----------------------+
	|  Oxygen Alone Is      |
	|  Without Effect       |
	+-----------------------+
	|  Hydrogen and Oxygen  |
	|  Burn Cooly and       |
	|  Create Water         |
	+-----------------------+
Exit out the back door of the room, into the circular gallery (some gruesome images here). Move to the left and face right. Break the glass with the rubber hammer. Take the severed hand and use it to open the electrified keypad at the gallery entrance -- press any of the 9 keys (thanks to Steven C. Den Beste for lending a hand here).
Enter the core and take the ladder up to Sartorius' laboratory. Fill, then empty the sink to charge the batteries. Move the oxygen tank lever left and the hydrogen tank lever right. Zoom out and use the electrical switch to the right of the glass globe; the molten metal falls into the mold. Move the oxygen tank lever right. Zoom out and use the electrical switch again; the metal cools. Move the helium tank lever right. Zoom in and click on the metal zodiac piece.
Watch the video sequences, noting that the solar eclipse is nearly at hand. Resist the urging of the four alchemists to drink the Elixir of Life. When Lucien gives you the gold ring, click on it.
Face the left-hand fountain in the center of the courtyard. Click on the right elephant's tusk to turn off the water. Zoom in on the sun/hand ornament and use Lucien's ring on it to enter the subterranean crypt. Move forward into the center of the eye structure to enter the tomb. Note the orientation of figures in the interior:
	Wolfman		Elephant

		Sarcophagus

	Snake		Dragon

		Entrance
Zoom in to the sarcophagus from the rear and click on it for a video sequence; Alexandria's ring appears. Click Lucien's ring on Alexandria's; they turn into a pair. Put the rings into the bowl in front of the dragon, then click on either the gold triangle or the dragon's eye. Collect the disk of molten metal and put it into the tray in front of the elephant. Click on the gold triangle. Pick up the blob of cooled metal and put it into the snake's mold. Click on the ruby triangle. Collect the molded result and put it into the receptacle in front of the wolfman.
Return to the elephant's location, turn around and face the sarcophagus. Move up and forward to disclose a copper-colored magic wand. Take the wand to the wolfman and put it into his raised hand. Click on the gold metal and watch the video sequence.
Zoom in on the altar from the walkway overhead. Quickly click the fused rings on Alexandria's body; watch the final video sequence.
For game credits, exit the courtyard through the open gates, turn around and click on the ripped painting.
Tasks Completed		Title			Task

	0		Adept
	1		Novice			Element
	2		Apprentice		Element
	3		Scientist		Element
	4		Doctor			Element
	5		Seer			Metal
	6		Evoker			Metal
	7		Diviner			Metal
	8		Alchemist		Metal
	9		Master of Alchemy	Final Quest
Copyright © 1996 Balmoral Software (http://www.balmoralsoftware.com). Portions copyright © 1996 Activision, Inc. All rights reserved. Republication, redistribution or conversion is expressly prohibited without the prior written consent of Balmoral Software. Contents subject to change! For the latest information, see http://www.balmoralsoftware.com.