
Copyright © 2017 Balmoral Software (http://www.balmoralsoftware.com). Portions copyright © 2010 Animation Arts Creative GmbH. All rights reserved. Republication, redistribution or conversion is expressly prohibited without the prior written consent of Balmoral Software.
Lost Horizon is a 2010 release from distributor Deep Silver using the excellent game interface from Animation Arts previously seen in the Secret Files trilogy of games. In this interface, the spacebar can be used to highlight all hotspots in the current game panel, and the mouse icon shows in green which mouse buttons can be pressed. Left-clicking initiates active verbs, such as Use, Take, Open, Put, Move, Give, Talk to, Select, Enter, Exit and Combine (in the inventory bar). Right-clicking executes passive verbs such as Examine or Read, and can be used to skip video sequences and dialog. The top center of the screen is usually a safe place to position the cursor when right-clicking to skip dialog sequences. Movement of characters is accelerated by double-clicking. Hand-drawn graphic backgrounds are of the same high quality as was seen in the Secret Files trilogy. As in these previous games, most of the puzzles in Lost Horizon are inventory-based. There are a few standalone puzzles, but these are relatively straightforward to solve. Each puzzle has Easy and Difficult versions that can be selected by the player. If you have stopped playing the game for a while, you can get a quick recap of your major objectives using the "Tasks" in-game feature. Lost Horizon has a main menu on which the basic game functions such as Load Game, Options and Quit are accessible on a static background. Although most main menu labels are not provided unless you mouse over the appropriate regions of the image, these regions are large and easy to find.
As a general rule, be sure not to miss any hotspots, especially along the edges of the screen, or in areas without a lot of contrast with the magnifying-glass icon of the hotspot. Also be sure to walk to the edges of each screen to scroll sideways in case the scene is wider than what's initially displayed. If you get stuck, try combining new inventory items with existing inventory items and using them on all hotspots. Also, right-click items in the inventory list to see if their descriptions have changed. Occasionally, you may need to move a character out of the way in order to interact with a hotspot in the scene.
This walkthrough provides a minimum path through the game; other gameplay sequences and dialog choices can provide additional backstory elements.
{Cutscene}
Use Artefact on Stone
{Cutscene}
You're now playing Fenton Paddock in a Hong Kong nightclub, with your only inventory items being a wallet and lighter
When talking to the nightclub singer, if you take all the first responses
Nice dress.then the singer will give you her room number on a napkin, distract the Tong thugs and you can escape.Let's get to know each other...
I thought diamonds were a girl's best friend.
Let's get back to that dress.
Conversely, if you take all the second responses
You're talented. Drink?then the singer will leave and you can take the following actions to escape:Come on...
Changed your mind?
Take BottleGiving any other sequence of responses to the nightclub singer will loop back to an earlier point in the dialog tree.Use Absinthe on Wok
Use Lighter on Wok
Use Serving cart
{Cutscene}
Outside the nightclub, you'll be stopped by Tong thugs and can select any of the six responses, all of which produce the same result:
Does it matter?{Cutscene}Grill me.
Makes no difference.
Behind you! A three-headed dragon!
Great that I ran into you! I'm still looking for two dazzlingly handsome fellows for our dance group.
I ... er ... hm ... I've got nothin'.
Use Lighter on Tar
Depending on which item you have in inventory, use either Cork or Napkin with Softened tar
Use either Tarred cork or Tarred napkin with Hole
Examine Wallet in inventory
Use Coins on Hinge
Use Hinge on Lid
{Cutscene}
Enter Fenton's office, talk to Huxley
{Cutscene}
Take Bellows
Talk to Gus
I need your help.Scroll left and enter Fenton's officeThat's all for now.
Take Measuring tape and Alarm clock
Exit office, then exit left To the city
Use the map to go to the governor's palace
Examine Alarm clock in inventory
Combine Alarm clock & Key to alarm clock
Use Set alarm clock in Rubbish bin
Examine Tree at left
Take Ball
Exit and use the map to go to the nightclub
The front entrance is blocked by the Tong gang, so return to the Back alley
Examine Swarm of flies
Combine Measuring tape & Ball
Use Ball and measuring tape on Rod
Use Bellows on Swarm of flies
Enter Back door to the nightclub
Talk to Barkeeper
I'm looking for Yen Wuang.Talk to NianzuSee you later, Shen.
I'm looking for an old friend of mine. Maybe you can help me.Exit the nightclub and alley and use the map to go to the airportSee you later.
Scroll left and enter Fenton's office
Use Safe, discover wallet is gone
Exit office, then exit left To the city
Use the map to go to the harbour
See you.Use Fly-filled bellows on Light
Examine Wallet in inventory
Exit and use the map to go to the airport
Scroll left and enter Fenton's office
Use Note with number on Safe
Use Safe
Exit office, then exit left To the city
Use the map to go to the nightclub
Enter Back door to the nightclub
Use Photo of Wuang on Nianzu, a new location appears on the city map
Exit the nightclub and alley and use the map to go To Wuang's house
Use Door
Take Bamboo
Use left Door
{Cutscene}
Take Hanger
Exit downwards to Room
Use Door to the balcony
Combine Bamboo pole & Hanger
Use Pole with hook on Lantern
Use Door, exit to the Room and then to the hallway
Use Lantern on Nail hook
Examine Window
Use Door
Talk to Kim
{Cutscene}
Talk to Kim in the truck
Step on it!Before the 6-second timer runs out, talk to Kim in the truck
Hit the brakes!If the timer runs out, repeat the speed up/slow down sequence
Use Pole with hook on Broken piece of glass
Use Broken pole on Broken piece of glass
Use Broken piece of glass on Tarpaulin
Combine Broken pole & Rag
Give Pole and rag to Kim in the truck
Use the icon at the top of the screen to switch to Kim
Take Key
Give Key to Fenton on the loading ramp
Use Pole and rag on Cigar lighter
Give Torch to Fenton on the loading ramp
Switch to Fenton
Use Key on Crate
Use Crate
Use Fireworks on Motor
Use Torch on Fireworks
{Cutscene}
(The game demo ends here)
Take Parachute, Canister, Bag of flour and Pumpkin
Use Pumpkin on Fixture
Combine Canister & Holey pumpkin
Combine Bag of flour & Pumpkin filled with water
Use Door twice
Use Pumpkin filled with flour mush on Fighter plane
{Cutscene}
Take Sled and Propeller blade
Use Propeller blade on Crate
Use Crate
Use Path at left
Use Horn on Snowdrift
Use Snow-filled horn on Smooth rock
Combine Sled & Lid
Use Sled with cover on Furrow
Use lower Wing on Crevasse
Use Propeller blade on other Wing
Take Wing hull
Use Cockpit
Combine Pieces of broken record & Pilot's jacket
Scroll right to the other side of the crevasse
Exit right to the crash site
Use the Path at top
Combine Sled with cover & Lambskin
Combine Folding table & Sled with lambskin
Use Fake sheep on Argali
Take Horn and leather strap, Incense sticks and Weird lumps
Return across the crevasse to the Messerschmitt
Combine Horn & Argali dung
Use Argali dung in horn on Fire
Examine Horn and leather strap in inventory
Use Leather strap on Puddle
Scroll right and exit to the crash site
Use Wing hull on Ledge
Use Ledge
Use Frozen leather strap on Parachute
Use Parachute on Cockpit
Use Parachute
Combine Incense sticks & Burning argali dung
Use Burning incense stick on Kim
{Cutscene}
Take Rope
Examine or use Warning sign
{Cutscene}
As Kim, take Warning sign and Newspaper
Use Crate
Scroll left and use Warning sign on Holes in the snow
Scroll right and use Log, Newspaper, Pot and lid, Sticky tape, Gas burner and Glowing cigar butt with Crevasse to transfer these objects to Fenton
Switch to Fenton
Take Chunks of ice
Combine Gas burner & Glowing cigar butt
Combine Incense sticks & Lit gas burner
Use Burning incense stick on any one of the Passageways
Use leftmost Passageway
Take Pocket knife
Combine Pot and lid & Chunks of ice
Combine Sticky tape & Ice-filled pot
Combine Log & Pocket knife
Combine Sealed, ice-filled pot & Wood chip
Use Newspaper on Rubbish
Use Lit gas burner on Newspaper at the top of the rubbish pile
Use Pressure cooker with ice on Fire
Take Pot
Combine Broken horn & Rope
Use Grappling hook with Crevasse
Use Grappling hook or Crevasse
Use Case
Use Sealed, water-filled pot on Vent
Use Beam
Enter Tent
Take Tent peg
Exit
Use Tent peg on Toolbox
Combine Pieces of broken record & Glue
The Jigsaw puzzle has this solution
Combine Hand grenade & Vice
Combine Glued record & Gunpowder
Examine Saw blade in cover in inventory
Combine Newspaper & Glue
Combine Empty cover & Glued newspaper
Combine Fixed record & Empty cover
Enter Tent
Use Fixed record in cover on Records
{Cutscene}
Exhaust the dialog choices with Thomas:
Are you OK?Take Soldier's uniformI need to know what happened here.
What are the Germans doing here?
What about Richard?
Any idea how we could get out of here?
Use Keyring on Thomas
Exit
Scroll to upper left and use Thomas inventory icon on Truck
{Cutscene}
Use Keyring on Door at left
Enter the building with antennas on top
Take Pencil
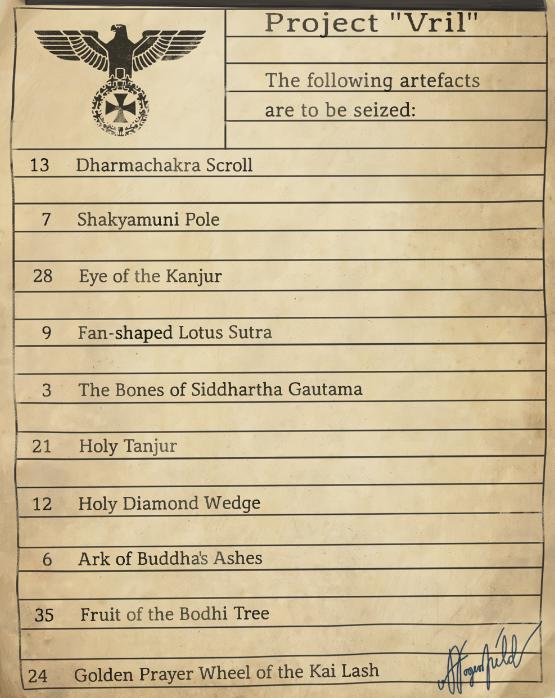
Use Tape reel on Tape recorder to hear a reference to Object 28
Examine List to determine that Object 28 is the Eye of the Kanjur
Back out and take Forms
Combine Pencil & Blank form
Select Eye of the Kanjur
Exit the hut and scroll upwards
Give Completed form to German soldier
{Cutscene}
Use Tent peg on Signpost
Use Lever
Talk to Kim
Use Lever
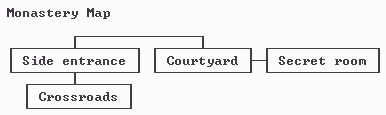
Use the Path to the monastery
{Cutscene}
Use Bird's nest
Exit back to the crossroads
Use Egg shell on Oil puddle
Use the Path to the monastery
Use Wooden planks with Drain
Use Wooden plank with Dragon's claw
Use Tent peg on Prayer wheel
Use Tent peg on Gap
Repeat 4 times until all signs are used up:
Use Signs on Wooden wheelEnter Side entranceUse Wooden wheel
Use Egg shell with motor oil on Pulley
Use (raise) Pulley
Use Prayer wheel on Pulley
Use Pulley
Combine Tent peg & Tin
Use Disgusting meat on Wooden slab
Use Pulley
Examine Knapsack in inventory
Combine Glue & Torch
Combine Compass & Torch with glue
Use Torch with magnifying glass on Kennel
Combine Baking powder & Canteen
Combine Foaming canteen & Canteen lid
Use Capped foaming canteen on Snow slab
Use Strange chest
Both the Easy and Difficult versions of the Battery puzzle have the same solution. Numbering the Plugs at left from 1 to 5, top to bottom, connect them in order to the Adapters at right in the following pattern:
For example, the top Plug (#1) connects to the top Adapter, and the Plug second from the top (#2) connects to the bottom Adapter
Examine Western wall
Use Prayer wheel on rightmost of three Ornaments
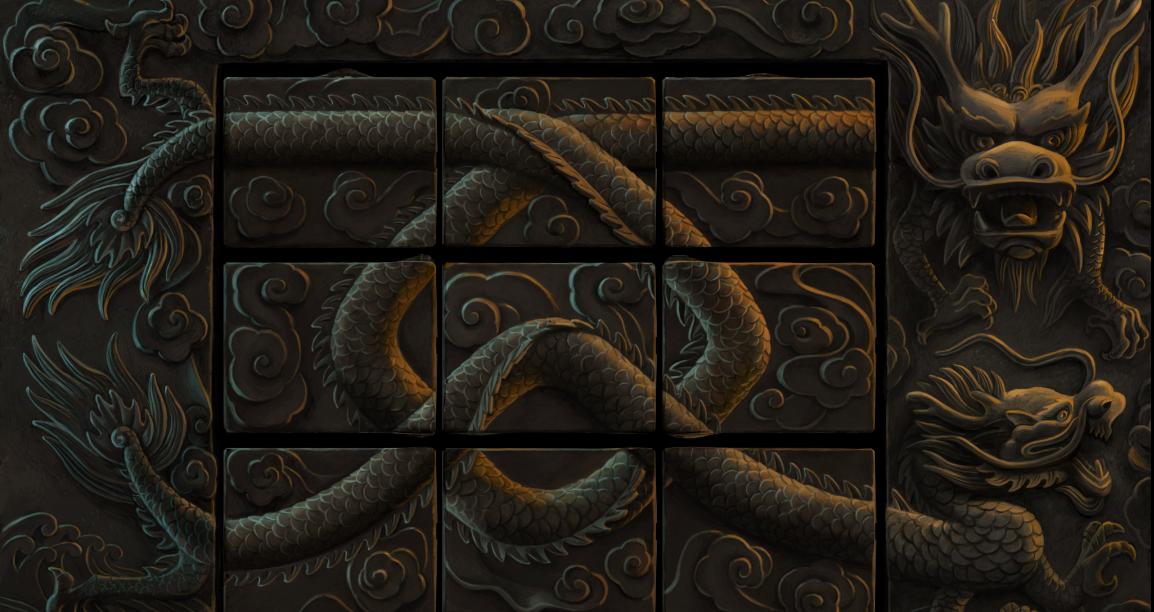
Use Mosaic
The Dragon puzzle is solved by selecting the correct one of three selections for each of nine tiles. Both the Easy and Difficult versions of the puzzle have the same solution. There is no reset function for the puzzle, but if you're playing the puzzle from the beginning, the solution can be found by pressing the tiles the following number of times:
The Easy version of the puzzle highlights each tile when it has the correct selection.
Exit into the Secret room
{Cutscene}
Examine Symbols
Talk to Kim
{Cutscene}
Exit to the bazaar
Use the North exit from the bazaar
Take Crank
Enter the Gendarmerie
I'm looking for Professor Hayes.ExitThat's all for now.
Return to the Alley off the bazaar
Talk to Jeweller
I've got this ring here...Enter Antique shop, then move to the rearI'll be off now.
Talk to Monsieur Lacoste
I'm here to pick up a small case for Professor Hayes.Exit back to the alley and bazaarI'll be going now.
Talk to Greengrocer
Anything in particular that you recommend?Combine Well crank & Half melonHow much is your fruit?
What can I get for five francs?
I'll take the half melon.
See you later.
Enter Dyer's shop
Use Melon rind with Barrel of clean water
Return to the bazaar and exit to Alley
Talk to Snake charmer
The music is beautiful.Give Melon filled with water to Snake charmerAbout this flute...
I'm off then.
Exit to the bazaar
Examine Poster
Exit to the desert
Use Trough to get Hay
Use Well crank on Sparkling stones
Use Flute on Camel
Exit to the desert
On the map, select Berbers' fairgrounds
On the map, select the city
Exit to the city
Talk to Cloth merchant
How much does a djellaba cost?Exit to AlleyHow much for the djellaba then?
I have a garment ticket here...
The white djellaba.
Talk to Jeweller
I want to sell a crystal.Exit to the bazaarI'll be off now.
Enter the Dyer's shop
Talk to Dyer
What are you dyeing here?Exit to the bazaarCan you dye my djellaba blue?
Take the North exit
Enter Gendarmerie
Talk to Gendarme
Could you stamp this form for me?ExitThat's all for now.
Use Polished quartz on Crank holder
Use Hay on Ray of light
Use Well crank on Cell window
Combine Application form & Stamp
Return to Alley off of bazaar
Enter Antique shop and go to the rear
Talk to Monsieur Lacoste
Take Small case
Return to the bazaar and use the North exit
Use Small case on Cell window
Return to the bazaar and exit to the desert twice
On the map, select Oasis
Talk to Nomad
IndigoExit to the desertI'll go now.
On the map, select the city
Exit to the city
Enter the Dyer's shop
Talk to the Dyer
I picked up the indigo shipment.Exit to the desert twiceCan you dye my djellaba blue now?
Here it is.
On the map, select Berbers' fairgrounds
Scroll left and enter the Shaman's tent
Why not? Yes.Exit to the desertThe performance was very impressive.
Will you sell me some of this thorn-apple?
I'll just be off then.
On the map, select Oasis
Take Plants
Exit to the desert
On the map, select Berbers' fairgrounds
Enter Wrestling tent
Talk to Promoter
Yes.Re-enter Wrestling tent
Use Thorn apple blossoms on Bucket
Talk to Promoter
Yes.Exit to the desert
On the map, select the city
Exit to the city
Use the Thimblerigger's stand
Yes.Select the Middle cup
Select any cup
Combine Well crank & Small, empty case
Use the Thimblerigger's stand
Give Ornamental gold ball to Thimblerigger
Use Gold detector on Right cup
Select Right cup
Yes.Use Gold detector on Left cup
Select Left cup
Use the North exit
Enter Gendarmerie
Talk to Gendarme
{Cutscene}
Examine Advertising pillar
Take Loose poster
Enter museum
Why did this place close early today?Now have Info sheetWhat exhibits are currently running?
What events are on today?
Goodbye
Examine Info sheet in inventory
Take Cardboard box, get Old rubber glove and Sandpaper
Use Rubbish bin, get Lid, Dried bouquet and Broken bottle neck
Combine Sandpaper & Lid to get Polished lid
Examine Dried bouquet in inventory to get Florist wire and Dried flowers
Examine Devil sheep
Use Broken bottle neck on Whiskers
Exit museum and to the city
On the map, select Olympia Stadium
Use Old rubber glove on Gas bottles
Combine Florist wire & Horrendous balloon animal
Exit to the city
On the map, select Pariser Platz
Use Horrendous balloon animal on string with Pram
Take Napkin
Examine Napkin in inventory to get the name of the cafe
Use Napkin on Ketchup
Take Lolly
Combine Whiskers & Sticky lolly to get Sticky whiskers
Exit to the city
On the map, select Museum
Examine Drainage
Use Sticky lolly on Drainage to get Reichsmark coin
Enter museum
Examine Double doors
Use Ketchup-covered napkin on Doorknob
Use Poster on Doorknob
Exit museum and to the city
On the map, select Pariser Platz
Use Jacket
Talk to Journalist
Use Reichsmark coin on Telephone booth
Please connect me to the Cafe Erika at Pariser Platz.Now have Glasses and Press passDo you happen to have a guest named Edison?
Talk to Tourist
What are you taking pictures of?Combine Sticky lolly & Ketchupped posterWhy isn't photography allowed?
I'll leave it to you then.
Put Sticky, ketchupped poster on Traffic sign
Talk to Tourist
You won't believe this, but I found a sign here that says photography isn't allowed.Take Camera
Exit to the city
On the map, select Olympia Stadium
Examine Hat
Talk to Organ grinder
I like your hat.Now have HatI have this polished metal bowl here...
Use stadium Entrance
Enter Locker room
Use Trainers to get Shoelaces
Take Coat hook
Use Coat hook on Ventilation grill
Use Ventilation shaft
Take Dumbbells
Examine Shelf
Use Coat hook on Foot of shelf
Use Shoelaces with Coat hook on foot of shelf
Use Dumbbell with Coat hook tied to foot of shelf
Use Coat hook with sharp edge on Metal panel
Take Suit
Examine Table
Take Measuring tape and Table tennis balls
Use Ventilation shaft
Combine Broken bottle neck & Measuring tape
Combine Broken bottle neck & 1-metre measuring tape
Use Rubbish bin, get Cleaner
Combine Table tennis balls & Cleaner
Put Cleaner and table tennis balls into Rubbish bin
Use 75-centimetre measuring tape with Melted table tennis balls in bin
Combine Cut measuring tape & 75-centimetre measuring tape with glue
Exit locker room and to the stadium
{Cutscene}
Exit to the catacombs
Use Dried flowers on Lamp
Use Small torch on either Torch holder
Use Altered measuring tape on Measuring tape (on table)
{Cutscene}
You're now back in the museum, with no inventory
Take Barrier
Use Barrier on the "To the reception" hotspot
Examine Table
Take Champagne bottle and Champagne glass
Examine Champagne glass in inventory to get Cork and wire frame
Examine Cork and wire frame in inventory
Use Wires from champagne cork on Wall cupboard
Use Wall cupboard to get Mop and Hydrochloric acid
Use Hydrochloric acid on Door
Open Door
{Cutscene}
Use Red box
Exit Up
Use Metal handle on Display case
Use Display case to get Piton
Use Cloakroom to get White scarf
Combine Piton & White scarf
Combine Mop & Hook on scarf to get Long hook
Exit through Door
Use Long hook on Large console
Combine Champagne bottle & Cork
Use Corked champagne bottle on Small console
Use Metal handle on Red box
Take Fire hose
Use Fire hose on Railing
Use Fire hose on Small room
Use Briefcase
{Cutscene}
Select any of the responses to the train station attendant:
I'm touring Central Europe, and I would very much like to visit the famous Wewelsburg Castle.Examine Memorial crossI'm a journalist from England; I'm writing an article on famous sites, away from the Olympic Games.
I'm a professor; I'm here studying a rare breed of wildlife.
Take Candles
Examine Info board
Use Sign
Examine Sign
Use Burning candle on Rope
Take Axe
Use Axe on Chain
Use Axe on Lantern
Combine Burning candle & Lantern
Use Entrance
Slowly move to the right of the screen, staying on the tracks near the top of the screen. The tracks meander a bit, but continue moving mostly to the right.
When another track joins from below, continue moving to the right.
When a second track joins from below, continue moving to the right.
Soon thereafter, the track will make a turn towards the bottom of the screen; continue following the tracks.
After a turn in the tracks back to the right of the screen, take the branch track leading to the bottom right of the screen. At this point, you can press the spacebar to disclose a Skeleton hotspot at the lower right corner of the screen.
Examine Skeleton
Take Pot
Use Stairs
Open Curtain
Take Dirty mirror and Nutcracker
Use Nutcracker on Hook
Take Hand drill
Exit Up
Use Suit of armor to get Gloves
Take Tin soldiers, Candle holder and Wild boar pelt
Exit to the workshop
Combine Pot & Tin soldiers
Use Pot filled with tin soldiers on Fireplace
Combine Empty candle holder & Pot with molten tin
Combine Hand drill & Tin in candle stick to get Coin-shaped tin wafer
Use Secret door (you don't have to renegotiate the mine maze)
Use Coin-shaped tin wafer in Sweet dispenser
Use Pot with Rain barrel
Combine Lemon sweets & Pot of water
Combine Wild boar pelt & Pot of lemon water
Combine Dirty mirror & Pelt soaked with lemon water
Use mine Entrance
Go Up from the workshop
Exit To the outside
Use Hand drill on Telescope
Use Entrance
Use Threaded hook on Crack
Use Clean mirror on Hook
Use Telescope on Clean mirror
Exit to the outside
Use Telescope on Village
Examine Church
Use Entrance
Take Clean mirror and Hook
Exit to the workshop
Use Pelt soaked with lemon water on Fireplace
Examine Chimney
Use Gloves on Ladder rungs
Go to North Tower
{Slow cutscene}
Use Hand drill on Stone slab
Use Threaded hook on Stone slab with drilled hole
Use Crank wheel twice
Use Opening
Examine all four Lecterns, the last one will contain the Piri Reis map
Use Eye of the Dragon on the last Lectern you examined
{Cutscene}
Take Bundle of reeds, Bamboo pole (with Cloth), Chicken feathers, Pot shards, Clay jug and Basket
Examine Broken basket in inventory to get Smooth stones
Combine Pot shards & Broken basket in inventory to get Stitching and Thin wooden sticks
Combine Pot shards & Thin wooden sticks to get Stick with arrowhead
Combine Chicken feathers with Stick with arrowhead to get Small dart
Try to leave Village to the left
Use Hut
I found these two black stones, I'm wondering if they're valuable.Use Bundle of reeds in Fire pitI'll see if there's anything I can do.
Use Flint stones with Reeds on fire pit
Leave Village to the left
Use Unknown destination
Take Mushrooms and Herbs
Exit to the path and go to the Village
Examine White fur
Use Herbs on Goat
Use Hut
I found these strange mushrooms in the jungle. Are they edible?Combine Broken clay jug & Sedative mushroomsI'll see if there's anything I can do.
Use Jug of mushrooms in Burning fire pit
Use Cloth with Clay jug on fire pit
Combine Small dart & Jug of tranquiliser
Combine Bamboo pole & Tranquiliser dart
Combine Stitching & Little goat
Use Leashed goat on Large tree
Scroll left and Leave village
Go to Swamp
Use Blowgun with tranquiliser dart on Tiger twice
{Cutscene}
Use Broken clay jug with Lagoon
Exit and select Village on the map
Use Jug of water on Blood stains
Use Cloth on Wet blood stains
Scroll right and take another Bundle of reeds
Exit left and select Swamp on the map
Use Plane
Use Cockpit to get Cardboard box
Examine Cardboard box in inventory to get Radio
Examine Radio in inventory to get Small crank
Use Small crank with Cover to get Cable
Climb down
Exit and select Lagoon on the map
Use Lagoon
Combine Radio & Cable
Combine Blood-covered cloth & Radio and cable
Use Radio, cable and bloody cloth on Lagoon
Use Small crank on Radio and bait
Use Lagoon
During the 47-second timer:
Examine GateRepeat the dive if necessary to complete these stepsUse Recess
Take Metal rod
Use Broken clay jug on Ground
Exit and select Swamp on the map
Use Metal rod on Vine
Use Bundle of reeds with Severed vine
Exit and select Lagoon on the map
Use Metal rod on Plants
Examine Stone column
Use Oil-soaked reeds on Carving
Use Empty cardboard box with Lagoon
Use Wet cardboard on Oiled carving
Use Cardboard covered carving
Combine Jug of wet clay & Cardboard mould
Exit and select Village on the map
Use Cardboard mould with wet clay on Burning fire pit
Use Metal rod with Clay on fire pit to get Clay shape
Exit left and select Lagoon on the map
Use Lagoon
During the 47-second timer:
Use Clay shape on RecessUse each of three Murals to get three Round stones
Pick up another three Round stones from the floor
When you have all six Round stones in inventory, use the central Stone
Place the six Round stones into the six Holes. The order of placement is immaterial as the stones will always show up in the same pattern. The Whack-a-Mole puzzle can be solved in five moves. To see this, number the stones as follows:
Only a raised stone can be pressed. When a raised stone is pressed, other stones are either raised or lowered according to the following table, where a blank entry indicates no change to the current stone position:
Since the lower left triangular portion of this table is all blank, it can be seen that pressing stones 1-5 in the indicated order affects only higher-numbered stones. The final down position of each stone is determined by the bottom non-blank entry in each column.
After pressing stones 1-5, take Artefact
{Cutscene}
Switch to Richard in the past
Take Torch
Use Pile of shards to get Nut
Use Stone slab
Take Gears
Exit
Take Chain and right-hand Pillar
Use Stones
Use Metal post on Stalactite or Stalagmite
Exit to the Room at right
Take Square stone
Exit back to the cavern
Use Metal post on Mound of soil
Use Mound of soil to get Wet dirt
Exit into the Room at left
Put Square stone on Stone pedestal
Exit back to the cavern, then follow the Path at the bottom of the screen
Select Southwestern cave on the map
Put Nut into right-hand Bowl
Put Wet dirt into right-hand Bowl
Combine Torch & Chain
Use Torch on chain with Lava to get Burning torch
Use either exit and select Southeastern cave on the map
Take Icicle
Put Icicle in Tub
Use Burning torch on Tub
Put Wooden gear in Tub
Put Chain in Tub
Use either exit and select Northern cave on the map
Use Burning torch on Coffin
Switch to Fenton in the room with the discs
Take Stone block
Exit
Open Coffin
Use Coffin to get Bone
Take Pebbles
Exit to the Room at right
{Cutscene}
As Kim, examine Table
Use Table
Back as Fenton, take Crystals
Exit back to the cavern, then exit to the Room at the top
Select Southeastern cave on the map
Use Tub to get Frozen gear wheel on chain
Use a Crystal in each of the three Recesses
Take Tail piece of dragon amulet
Use either exit and select Southwestern cave on the map
Use Frozen gear wheel on chain with Lava
Combine Hollow stone & Chain
Use Hollow stone on chain with Lava
Put Lava-filled stone into Recess
Put Bone into left-hand Bowl
Take Body piece of dragon amulet
Combine Tail piece of dragon amulet & Body piece of dragon amulet
Use either exit and select Northern cave on the map
Enter the Room at left
Use Wooden gear with Gears
Save your game at this point
To solve the Discs puzzle, note that feeding each head with pebbles produces the following results:
From the starting position, the outer disc needs three counterclockwise quarter-turns to line up its red line with those on the post, and the inner disc needs one (the middle disc is already in the correct position). Since only the left head moves the outer disc, feeding it pebbles three times moves that disc into the desired position. But that also moves the inner disc three quarter-turns, when only one is desired. The final adjustment is made by feeding the right head two times, which moves only the inner disc into the correct position. In summary,
Feed pebbles to left head three timesThese steps can be completed in any orderFeed pebbles to right head twice
Take Head piece of dragon amulet
Combine Incomplete dragon amulet & Head piece of dragon amulet
Exit to the cavern, then exit into the Room at right
Use Dragon amulet on Force field
{Cutscene}
As Kim, use Table
Use Shards of glass
As Fenton, use the Amulet on two of the four Platforms
As Kim, use Broken piece of glass
Use Glass fragment on Ropes
Back as Fenton, use the Amulet on the remaining two Platforms
{Cutscene}
Save your game at this point
For a quick win of the fight with the Countess, select A: Aggressive attack three times, and the Countess will expire under a pile of wooden crates
For a different win, select B: Cautious attack three times, and the Countess will fall into the lava from a high walkway above
For yet different endings, start by selecting B: Cautious attack once, followed by C: Retreat twice, then save your game
Select either attack mode (A: Aggressive or B: Cautious), and Kim will shoot the CountessRegardless of your choices, you will eventually win the fightSelect C: Retreat, and the Countess will fall into the lava without shooting
{Endgame sequence}
A Bonus section is now added to the game's main menu, which is accessible by moving the mouse over the picture above the lit marquee. The Bonus section provides the following activities:
Play prototype version, an interesting, different version of the game involving an intro scene flying over the Himalayas, then a switch to Hong Kong ten years later in which Kim must escape from Wuang's house as in Chapter One of the released gamePlay puzzle, a jigsaw puzzle of the main game characters inspired by the movie Titanic
Fight the final battle, a repeat of the martial arts encounter between Kim and the Countess at the end of the released game
Copyright © 2017 Balmoral Software (http://www.balmoralsoftware.com). Portions copyright © 2010 Animation Arts Creative GmbH. All rights reserved. Republication, redistribution or conversion is expressly prohibited without the prior written consent of Balmoral Software.


