
Copyright © 2002 Balmoral Software (http://www.balmoralsoftware.com). Portions copyright © 2002 Wanadoo Edition and DreamCatcher Interactive, Inc. All rights reserved. Republication or redistribution is expressly prohibited without the prior written consent of Balmoral Software.
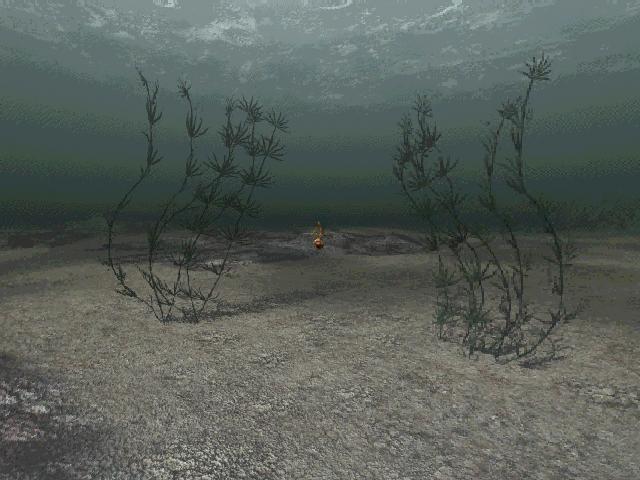
The Cameron Files: Secret at Loch Ness is a recent release from Wanadoo Edition and DreamCatcher Interactive that provides the player with an engrossing story in which mysteries are explored in a Scottish castle in the year 1934. This game is more serious in tone and has fewer puzzles than Clandestiny, which was the last game in which we did this sort of thing. Loch Ness is a relatively short adventure on two CD's that uses fairly well-articulated cyberpuppets for the characters. This technology seems to be getting a little better over time, and the characters' facial expressions in this game show definite improvement over older games. Graphical backgrounds are all texture-mapped, but the effects of shortcuts taken by the developers are evident here and there. Some simulations, such as those of cobwebs in the attic, are unrealistic and show the limitations of the rendering techniques. But for the most part, a lot of detail is shown and the full-screen display mode combined with node-based 3D navigation is effective, even though no movement transitions are provided. Most gameplay is in the first person, with the occasional cutscene shown in third person. These cutscenes are rather well done, and include environmental effects as well as a variety of camera angles. Video sequences can be skipped by pressing the spacebar.
The basic game control features are functional, but leave something to be desired. The 3D navigation does not provide for any sort of automatic rotation at a position node, and so ends up requiring far too much lateral mouse sweep. The inventory screen is accessible by right-clicking the mouse, but unfortunately this action does not toggle the screen and a particular icon must be clicked to return to gameplay. On the plus side, there is a clear indication in the inventory screen when an item must be combined with another one, and most paper items are collected in a separate "wallet" screen. Extraneous inventory is removed periodically in the game, so the inventory screen rarely gets cluttered. The interface also includes an automatic journal feature in which comments from the main character are periodically recorded and which helps to recall events and dialog if the game is interrupted. The game manual is well done. The saved-game and exit menu is accessible by pressing the Escape key, but once again this action is not a toggle and a hotspot must be selected in order to return to the game. The saved-game interface is hokey, with far too few saved-game slots available and no overwrite warning or confirmation provided. Players needing more than the eight slots provided should know that the saved-game files are stored in the game installation directory as SAVED_x.BIN files and can be transferred elsewhere as needed, although only eight at a time are ever available in the game. The first slot (SAVED_1.BIN) is located underneath a triple-spiral "triskel" symbol, with other slots following in sequence to the right. Unfortunately, Loch Ness has a very annoying requirement to insert CD #1 to start or restore the game, even though CD #2 is needed for much of the gameplay. What were they thinking?
Navigation in the game works well, with an intelligent cursor that lets you know when an inventory item is needed. There are a number of doors that never open in the game, but for those that do, the cursor clearly indicates where the possibilities are or may be in the future. We found the cursor sometimes difficult to see against the darker backgrounds, and one with more contrast might have been more effective. On occasion, the player needs to search previously-visited areas for changes or added hotspots. A very useful map in the inventory allows you to quickly navigate to other areas of the game, but this feature is inactive until partway into the game.
Gameplay is broken into five days, and the storyline is fairly absorbing with lots of relevant detail added while maintaining a plot thread consistent with the established backstory. The protagonist of the story, Alan Parker Cameron, is an interesting character with just the right personality for a detective. The dialog in the game is never overdone, so the story is easy to follow and the action is usually logical. Since the gameplay is mostly single-threaded, the trigger events are sometimes hard to find. However, Cameron's journal often provides clues as to what to do next, and his notebook is augmented with new information as the game progresses. No logic errors or inconsistencies were experienced in the game. Backtracking is minimized through the use of the map in the inventory screen, but the story does have an occasional one-way plot device that simplifies gameplay.
Loch Ness has very few puzzles, with virtually all challenges involving finding and manipulating inventory items. Solutions always seemed reasonable, but sometimes you may find that you need a particular item even though you are surrounded by many similar items that would be "logical" to use instead. There are quite a few, perhaps too many, timed sequences in the game, and you're unable to save your game during these periods.
Voice acting in the game is very good, with believable accents and dialog. Atmospheric sound effects are prevalent throughout the game, with some nice directional effects particularly noticeable in certain locations. Background music is minimal, sometimes a bit too loud and annoying, but never sounding repetitive. No bugs or technical issues were experienced with this game when the latest DirectX drivers were used.
In summary, The Cameron Files: Secret at Loch Ness is a reasonably well-crafted and relatively-easy game that provides an interesting and unusual environment to explore.
After the introduction in which scenes from the forthcoming gameplay are shown, you'll start in the sitting room of Devil's Ridge Manor (see map). To skip this game intro, press the spacebar twice. Move forward once into the room and Lady MacFarley will appear. You'll find out from Lady MacFarley that Lord MacFarley has disappeared and that their daughter Moira MacFarley will not be back until tomorrow. The servant Shastra tells you that your room is on the first floor (one flight up from the ground floor). Return to the foyer and take two flights of stairs up to the guest room. Approach the window on the far side of the room, then turn left and approach the nightstand to the right of the bed. Pick up Cameron's bag from the bed. To access its contents (your inventory), right-click the mouse. Most (but not all) of your inventory items will be used only once in the game. The bag contains FLASK OF BOURBON, KNIFE, ROPE LADDER, CAMERA, COPPER OXIDE POWDER, INK, and BLANK PAPER. Return to the sitting room downstairs, then approach the orange-colored sofa on the far side of the fireplace. Lift its center cushion and examine Lady MacFarley's locket underneath. Pick up a SMALL KEY and some PILLS from inside the locket. Cameron's notebook suggests discovering the kitchen, so we'll go there next through the doors to the left of the sofa (see map).
On entering the kitchen, approach the sink to the right of the fireplace at the far end of the L-shaped room. Pick up a RAG from the sink. Return to the kitchen entrance door, then turn left and move forward once into the other part of the room. Turn right and zoom in on a decorated box on the wall to the left of the entrance door. Pick up a PASSKEY from inside this box. Turn around and note the dumbwaiter on the opposite wall. Turn right and open the drawer in the second table to the right of the dumbwaiter. Pick up a CANDLE and some MATCHES from this drawer. At this point, a short cutscene plays in which Lady MacFarley rings the servant bell from her room. To see the effect of this again, zoom in on the bells on the wall opposite the table. Return to the dumbwaiter and operate its handle to send a steaming cup of tea upstairs. Turn right again and climb the spiral staircase at the far end of the room. Exit through the door at the top of the stairs, then turn right and go through the door into the laundry room. Move forward into the room and pick up a CUP OF TEA from the dumbwaiter. Exit the laundry room, move through the hallway and enter Lady MacFarley's room.
Turn right and talk to Lady MacFarley in her bed. Cameron suggests drugging her, so in your inventory screen add the pills to the cup of tea, then give the CUP OF TEA + PILLS to Lady MacFarley. This gives you the freedom to explore her room at will. Zoom in on the chest of drawers behind you, open its drawer and pick up a bottle of CHLOROFORM. Approach the bathroom in the turret at the opposite corner of the room and zoom in on the dressing table to the right of the midget bathtub. Use the small key in your inventory to unlock the wooden box on top of the table. Open the box and obtain an ATTIC KEY. Exit the bathroom and move to the mirrored table at the left of Lady MacFarley's bed. Open its drawer and pick up a PICTURE inside, which shows some flowers and a tall bottle with a Celtic cross, behind which a ghostly figure has appeared. Could this have something to do with the banshee mentioned in Cameron's notebook? Exit the room and move through the hallway to Lord MacFarley's room. Use the passkey to unlock the door to this room.
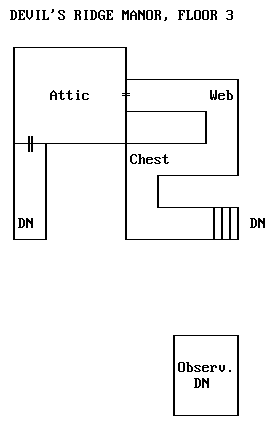
Enter the room, then immediately turn left and open the bookcase next to the plaid chair. Pick up a MEMORANDUM between the books; this shows up in Cameron's wallet on your inventory screen and describes telegraph device codes. Turn right and zoom in on the chair side of the desk near the fireplace. Use the left-pointing cursor to check out the left corner of the desk. Apply the copper oxide powder to the white fingerprints on the table, then use ink and the blank paper on them. Return the sheet with the FINGERPRINTS to your inventory. Exit the room, then turn left and proceed through the hallway to the back staircase. Go up these stairs to the attic level. Follow the meandering hallway until you reach a locked door at the end. Unlock this door with the attic key and go inside. You're locked inside in the dark!
You can't light a match, so move forward once, then turn sharp left and zoom in on a standing candelabra. Use the candle and matches to add some light to this room. Move to some boxes opposite the candelabra and pick up a CROWBAR inside one of them. Turn left and zoom in on a cabinet along the wall, next to a broken statue. Open the cabinet and pick up a folded map inside, which activates the map function in your inventory that will sometimes allow you to quickly change locations in the game. Move toward the turret alcove at the opposite corner of the room. Before going up the three stairs into the alcove, turn left and zoom in on some photos on top of a table with a candle. Open the box on top of this table and pick up a photo album inside. Take the photo of Lord MacFarley, which shows up in Cameron's wallet. Enter the alcove, then turn around and try to exit back into the main room. You'll hear a sound behind you - use the crowbar to remove the boards blocking the window and take a look outside. Use your camera to take a picture of the Loch Ness monster, then put the PHOTOGRAPH into your inventory. Exit the alcove and approach the door to the right of the cabinet in which you found the map earlier. Use the crowbar to open this door and exit into a short hallway. Move to the end and descend through the trapdoor in the floor into the laundry room. At this point, Cameron sees the first appearance of the banshee and needs a drink.
Return to the sitting room and approach the small table in front of the fireplace. Use the flask of bourbon in your inventory with one of the glasses on this table and you'll find your crystal. Pick up the CRYSTAL from the glass to store it in your inventory. Exit the sitting room and cross the foyer to the drawing room opposite. Enter the drawing room and open the cabinet in the corner to the left of the fireplace. Pick up a green bottle of MEAD from inside the cabinet, then turn around and approach the glass-fronted cabinet on the other side of the fireplace. Open this cabinet with your knife, then take the AULD ALLIANCE TREATY from a decorative box inside (this shows up in Cameron's wallet). Go back to the foyer and leave the house through the front doors. Walk or use the map in your inventory to visit the greenhouse adjacent to the mansion.
Enter the greenhouse and use your knife to pick up a PHALAENOPSIS FLOWER from the center flowerbed. Walk or use the map in your inventory to visit the cross on the lakeshore in front of the house. Put the flower and mead at the base of the cross to emulate the picture you saw in Lady MacFarley's room, and another cutscene with the banshee ensues. She explains the legend of the crystals of Sirdach and your mission to prevent them from falling into the wrong hands.
Exit the guest room and go downstairs to the previously-locked music room. Move forward into the garishly-lit room and stop the stuck phonograph at the far side of the room, allowing you to hear some muffled voices from elsewhere in the house. Go up the spiral staircase in the opposite corner of the room. Climb as high as you can, then turn around and zoom in on the trapdoor in the ceiling. You'll eavesdrop on Bruce MacGrab and Moira MacFarley discussing a crystal hidden in Lord MacFarley's office, and goings-on in MacGrab's whiskey distillery.
Return to the foyer, then zoom in on the obscure brown briefcase sitting on a bench next to one of the staircases. This belongs to MacGrab, who is still visiting Moira elsewhere in the house. Open the briefcase and pick up a SIGNET RING and MACGRAB'S MAIL. A cutscene involving Bruce MacGrab follows. He refers to a proposition in a previous conversation that you may never have had with him, then invites you to visit his distillery via a boat ride on the river.
Walk or use the map in your inventory to go to the stone bridge next to the mansion. Turn right and move once toward the house, then turn left and approach the dock area on the river. Pick up a pair of oars on top of a locked chest next to the dock and use these with the rowboat to go up the river to MacGrab's distillery. Cameron observes an armed guard entering the distillery. Approach some whiskey barrels in the yard and pick up a PAIR OF PLIERS between them. Go to the water wheel, then turn right and walk toward the back door of the distillery. Use the pliers to unlock the door, then enter the distillery.
Save your game at this point since you can disturb the guard if you're not careful. Immediately after entering the distillery, move forward once, then turn right and move forward twice into the next room. If you take a different path and knock some bottles lying on the floor, the guard will surprise you in the next room and it's game over. Once in the room containing the boilers, move forward once, then turn right, move forward, turn right again and enter the distillery office. In your inventory window, combine the chloroform with the rag and use the rag & chloroform on the sitting guard. To the lower right, zoom in on MacFarley's cane lying on the floor. Open its top and pick up the CHEST KEY inside. Zoom out and don't forget to pick up the CANE itself from the floor. Also zoom in on the briefcase next to the guard's chair and pick up the BOOK OF KELIA from inside it.
Exit the office and return to the covered loading dock behind the waterwheel. Cameron refers to finding the entrance to the distillery's cellar. Cross the water channel using the plank, and face the waterwheel's axle. Use MacFarley's cane to stop the waterwheel (for some reason, you can't use any of the shovels lying around). Re-enter the back door of the distillery and open a hatch in the now-drained water channel inside. Descend the ladder to the distillery cellar.
Open the chest underneath the electric chair and pick up MIRROR DISKS and AMBER DISKS. Zoom out and click on the chair to disclose a doorway behind it. Use the signet ring to unlock the door. Go through the door and follow the tunnel beyond until you reach a junction. Select the exit above which is a rectangle containing a large X. Follow this tunnel to a metal gate at the end. Go through the gate into the cellar underneath the house, then use the map in your inventory to return to the house foyer (or exit the cellar outside and walk around). Head for the music room and approach the yellow alcove to the right of the fireplace. Use MacFarley's cane on the wall emblem to open a secret door to Lord MacFarley's office at right. Enter the circular office, then turn left and approach the glass-fronted bookcase. Use the chest key to open the lower part of this bookcase and observe the words "foedus francorum cum scotis anno dominici" written on the inside of the door. Checking Cameron's wallet, you'll find that the Auld Alliance treaty has the same words written on it, along with the date MCCXCV (1295) in Roman numerals. Enter this date in order to open the safe and retrieve ARMCHAIR DIRECTIONS that will appear in the wallet.
Zoom out and go up the stairs to the balcony, where the bookcases all have weird texture maps for the books. Continue around the balcony and go up another flight of stairs to the laboratory. Move forward once into the room and zoom in on some papers on the bench at right. Pick up a METALLIC GLOVE and a WINDOW HANDLE behind the equipment. Return downstairs to the balcony and approach the armchair between the bookcases. Using the instructions in the wallet, click on these parts of the chair in order:
Exit the guest room and return to MacFarley's office downstairs (you'll have to reopen the office door using the cane on the symbol in the alcove). Open a drawer in the desk in the center of the office and pick up an INDIAN DAGGER and the OBSERVATORY KEY. Go back up two flights of stairs to the laboratory and use the observatory key to open the metal door in the center of the room. Go up another spiral staircase to the observatory at the top of the tower. Open the large cabinet to the right of the railing and pick up a RAVEN STATUETTE and a red notebook of FILES. The files appear in the wallet and describe the order in which objects should be placed in a laser apparatus. Zoom in on the telegraph device opposite the cabinet. Using the instructions in the memorandum in the wallet, follow these steps:
Return downstairs to the laboratory and move around the staircase cylinder to the end of the benches. Turn right and zoom in on a laser apparatus on the bench. Using the files in the wallet, place objects on the laser in the following order:
Retrieve the raven statuette and red crystal, and you'll hear a bell indicating that a response has been received on the telegraph. Go back upstairs to the observatory and zoom in on the tan-colored platform at the rear of the telegraph apparatus to obtain three responses from Scotland Yard, which all appear in the wallet. These responses include MacFarley's message, which indicates that the Celtic triskel is buried in the chapel, the key to which is behind a painting in his office. Other messages implicate MacGrab and describe a monster-shaped submarine.
Go downstairs to the office and move the painting behind the desk. Unlock the box behind the painting using the Indian dagger, then open the box and pick up the CHAPEL KEY and POEM inside. Walk or use the map in your inventory to go to the chapel behind the mansion.
Try to open the chapel with its rusty key and it'll break off without unlocking the door. The banshee will appear and tell you that the key to the triskel is in the Book of Kelia. Return to the dock area adjacent to the stone bridge and use the pliers to unlock the chest next to the wooden platform. Open the chest and pick up a ROPE and a GRAPNEL. Combine these in your inventory. Return to the chapel and walk around to its right side. From here, there's a nice view of Lord MacFarley's observatory at the top of the mansion tower. In the corner of the chapel walls, look up and use the rope & grapnel to climb up to the roof, a one-way trip (not sure why you can't use one of the many ladders lying about, but whatever...). Zoom in on the stone tablet that was described in the poem and use the alphabet code in the Book of Kelia to translate the name "Sirdach" into the symbols on the tablet. Press the symbols in the following order:
	      1
	    4   5
	  6       2
	3           7
If you press any symbols out of order, you'll have to back out from the puzzle to reset it. After the tablet rotates, use the grapnel to get inside the chapel.
From your position facing the green-and-red window with a yellow cross, turn to the left and zoom in on the large square stone tablet to disclose the message
Return to the center of the chapel and click on the highlighted stone pedestals until each is facing you. This opens a door in the floor; descend to the crypt underneath the chapel. Move forward and pick up the triple-spiral triskel from the pedestal, which locks you inside the crypt. Put the raven statuette on the pedestal to open the far door. Go through this door and you'll find yourself back in the tunnels underneath the estate. Use these tunnels or the map to return to the mansion foyer, where the servant Shastra talks to you about MacFarley, MacGrab and the Loch Ness monster.
Exit the guest room and return to the sitting room downstairs, where a strange monster-like sound can be heard. Approach the windows in the corner behind the pool table and look outside to see another appearance of the Loch Ness monster. Use the map to go to the greenhouse, then turn left and zoom in on a wheelbarrow just visible behind the greenhouse. Click on the hose inside the wheelbarrow and you'll take it to the mansion cellar. Inside the cellar, open the large cabinet at right to retrieve a diving suit. On the opposite side of the room, open a wooden chest and pick up a diving helmet and boots. Go back near the outside cellar entrance and put the diving suit, helmet and boots into the tilted-up wheelbarrow there. Turn right and approach a wooden box on the other side of the room containing a large spiral wheel, which is an air pump for the diving suit. Cameron will suggest getting the help of Fergus Mohr. Return to the greenhouse and enter it, then turn left and click on Mohr.
Underwater in Loch Ness, your goal is to find the secret submarine entrance. At each position node, be careful not to disturb your initial orientation before moving the cursor as described below. If necessary, save your game frequently to avoid getting lost. From your initial position:
Return to the loading dock behind the waterwheel and pick up a bag of SAWDUST next to the wheelbarrow. Enter the distillery and move into the boiler room, then exit through the front doors. You'll get knocked out by an unknown assailant and the triskel will be stolen from you. Back in the distillery cellar, pick up a LEATHER STRAP on the wall beneath the windows. Attach the strap to the rightmost window, then turn around and attach the other end of the strap to the winch across the room. Operate the winch to remove the bars from the window. Exit the cellar through the window, then turn right and look down to see the woman's handbag. Save your game at this point since a very fast timed sequence follows.
Pick up the handbag and the girl will reappear pointing a gun at you. Now very quickly open your inventory window and click on the pistol, then aim and click the crosshairs cursor on the sandbag above the girl. Approach her body and take MACGRAB'S NOTEBOOK from her (other) handbag. Zoom out from the girl and you'll see another cutscene with the banshee.
Use the map in your inventory to return to the greenhouse, then turn around and enter the mansion cellar. Go through the metal gate at the far end of the cellar to re-enter the tunnels under the estate. Follow the tunnel to the junction, then select the exit above which is a blue raven symbol. Follow this tunnel to a stone triskel symbol at the end. Turn around and zoom in on the concentric rings of stone. Click on the outer stone ring until North (Alban Arthuan) is highlighted by the beam of light at the rear. Rotate the inner stone ring until the Cancer (69) and Gemini (II) symbols are on either side of the South symbol in the foreground and you hear the sound of a stone sliding behind you. Turn around and go into the passage visible behind the triskel symbol.
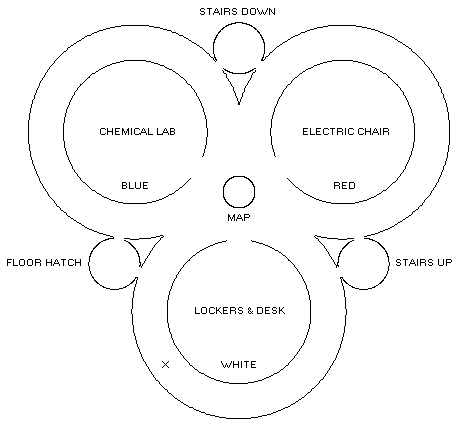
Go up a flight of stairs into MacGrab's laboratory, which is a complex of three circular rooms and three small alcoves alternating around a central foyer. The rooms are color-coded on a map in the central foyer, but these colors are used for reference only since the rooms themselves have no obvious corresponding colored appearance. It's quite easy to lose your bearings here, so consult our map if necessary.
Each alcove contains two exits at right angles to each other. Go through the left-hand exit from the alcove at the top of the stairs (the "stairs down" alcove at the top of the map) and you'll be facing the circular wall of the blue room. Turn right and follow the corridor around the blue room until the doorway to another alcove is visible on your right. Go through this doorway into an alcove with a hatch in the floor. Go through the right-hand exit from this alcove and you'll be facing one of the circular windows into the white room. Click on this window to see a cutscene with the evil MacGrab, in which he discloses his plans to destroy London. A quick timed sequence will immediately follow, in which you must hide from MacGrab's henchmen. To survive, turn around and re-enter the floor-hatch alcove you just came from. From there, take the right-hand exit again, then turn right and follow the corridor around the white room. When you reach the central foyer, a tri-color map will be visible on the central post. Turn left and enter the white room containing lockers and a desk. Go to the apparatus on the opposite wall and click on it to activate the map in the central foyer which controls the doorways into two other rooms. Turn around and zoom in on the desk. Take the TRISKEL CHEST from the top of the desk and open the desk drawer to obtain METALLIC PLIERS and a PLATINUM KEY. Exit the white room and zoom in on the map on the central post in the foyer. Open the doors to the blue and red rooms by clicking on their symbols to orient the openings of their inner and outer rings. If hotspots are not available here, be sure you have walked along the corridor surrounding the white room. Also, be aware that if you have occasion to leave the "stairs up" alcove through its left-hand exit, you'll suddenly zip over to the position indicated on our map by an "X".
Zoom back from the map on the central foyer post and bear right to enter the red room. Turn left and approach the unconscious Lord MacFarley wired up in an electric chair. Look up at the sign on the wall, which cautions you to cut off the power supply to the helmet before the handcuffs. Save your game at this point since there is a danger of electric shock.
Zoom in on the control machine for the electric chair and turn off the center switch, then the other two switches. The light above each switch will change from green to red as the switch is turned off. MacFarley is still unconscious (or asleep), so back out from the control machine and use the green bottle of water on the table to wake him up.
When you move away from the table, a five-minute timer will start in which you must save Moira (or build a bomb). There is no way to save your game during this sequence, so you must move quickly. Return to the alcove with the floor hatch and zoom in on the combination lock above it. Use the code 421 from MacGrab's notebook to unlock the floor hatch. Descend through the hatch, then turn left and proceed through another door into the submarine pen. Move forward once toward the submarine, then turn left and walk toward some tools to the left of three large pipes. Pick up a STARRY KEY from a bucket there, then turn around and walk to the other end of the dock. Moira is trapped in a cage to your left, so turn right and approach the cage control panel on a support beam.
Zoom in on the control panel and connect the starry key to the receptacle on the left side. Click the action cursor beneath the large control level, just above the bottom of the screen (if you click too high on the lever, the cage will move the wrong way and Moira will be drowned). Turn around and approach the cage. Let Moira out by cutting the chain with your pliers. After ordering her away, go back up and enter the blue room.
Examine the brown book on the bookshelf to find a recipe for dynamite:
120 ml nitric acidTurn around and approach the metal cabinets over the lab bench. Open the cabinet and pick up a PIPETTE and 5-ML GLYCEROL (taken together), 20-ML SULFURIC ACID and 30-ML NITRIC ACID. Move left and zoom in on the end of the lab bench, next to the open doorway. Add the nitric acid four times to the graduated beaker, until fluid appears in the beaker (the bottle of acid refills itself automagically). Add the sulfuric acid four times to the beaker, until its fluid level visibly changes. Add the glycerol to the beaker and the fluid level will change once more. Pick up the beaker and pour it into the container at left. Use the pipette on the left-hand container, then add sawdust to the dark-green bottle at far right. Transfer the pipette from the container at left to the bottle. Pick up the bottle and it will show up in your inventory as NITROGLYCERIN.
80 ml sulfuric acid
5 ml glycerine
Add to distilled water
Remove nitro-glycerine deposit
Mix nitro-glycerine with sawdust
Return to the underground dock via the alcove with the floor hatch. Go up the gangplank onto the submarine, then turn left and proceed to its stern section. Look down and attach the bomb to the submarine. Go back up and find the alcove with the stairs leading up. Go up the stairs and zoom in on the combination lock at the end of the short hallway. Use the code 532 from MacGrab's notebook to unlock the door and allow you to enter the triskel room. Move to the right and unlock the hatch of the glowing cylinder using the platinum key. Open the hatch and place the triskel chest on the platform. Retrieve the heated triskel using the metallic pliers and place the triskel into the chest. Pick up the chest, then return to the subterranean tunnels via the "stairs down" alcove. Use the map in your inventory to return to the mansion, then make your way to Lord MacFarley's observatory (you'll have to open the door to his office one more time using the cane).
Zoom in on the laser apparatus next to Moira and you'll see a cutscene showing the submarine and a weird monster-shaped force field or hologram. The next sequence involves an arcade-style shooting gallery in which you must orient the aiming crosshairs of the laser on the "monster" in order to destroy it. The H.M.S. Grondo-Conqueror sinks with all hands.
Place the triskel chest on the cross down by the lake and watch the endgame sequence.

MacGrab Laboratory Map:
Copyright © 2002 Balmoral Software (http://www.balmoralsoftware.com). Portions copyright © 2002 Wanadoo Edition and DreamCatcher Interactive, Inc. All rights reserved. Republication or redistribution is expressly prohibited without the prior written consent of Balmoral Software.