Copyright © 1998 Balmoral Software (http://www.balmoralsoftware.com). Portions copyright © 1997 I. Hoffmann and Associates, Inc. All rights reserved. Republication, redistribution or conversion is expressly prohibited without the prior written consent of Balmoral Software. Contents subject to change! For the latest information, see http://www.balmoralsoftware.com.
Notes
Puzzle 1: Complex Sequential Movement
Puzzle 2: Picture Puzzles
Puzzle 3: Polyominoes
Puzzle 4: Exchange
Puzzle 5: Arithmetic
Puzzle 6: Mazes
Puzzle 7: Pattern Grid
Puzzle 8: Sequential SeriesPuzzle 9: Adjacency
Puzzle 10: Rotating Stars
Puzzle 11: Layers
Puzzle 12: Numerical Mazes
Puzzle 13: Solitaire
Puzzle 14: Memory
Puzzle 15: Dissection
Puzzle 16: MazePuzzle 17: Complex Sequential Re-ordering
Puzzle 18: Unilateral Triangular Symmetry
Puzzle 19: Logic Passage
Puzzle 20: Runes
Puzzle 21: Slider
Puzzle 22: Hexagonals
Puzzle 23: Logic Planning
Puzzle 24: Inductive Reasoning
Final Puzzle
Gems of Darkness is a sequel to 1995's Jewels of the Oracle (JOTO), which was developed by Eloi Productions and published by Discis Entertainment (both now out of business). Many of the puzzles in Gems of Darkness are similar to or extensions of puzzles in JOTO.
When Gems was first released in 1997, it suffered from a very poor marketing effort by its publisher, Hoffmann Associates. Outside of Canada, the game never was made available in retail outlets and generally could be obtained only through Internet sales channels. Very little information was available from either Hoffmann or the game's developer, Bardworks (successor to Eloi Productions). The recent sale of the game to Dreamcatcher, Inc. has resulted in much wider commercial availability. The game has been repackaged under the new name Jewels II: The Ultimate Challenge.
Each of Gem's puzzles may be played in Easy or Hard mode, and the difficulty level can be set individually for each puzzle. A token/gem is awarded for each puzzle solved, regardless of difficulty level. When 24 tokens have been collected, a final puzzle challenge is made available. These pages contain solutions to all of the puzzles in the game.
Quick Start:
Click the mouse when the white publisher's logo screen appears.Trivia:
Wait for the Bardworks logo to disappear (not skippable).
Click the mouse when the music starts.
Click the mouse when the animation of the excavation begins.
Click the mouse when the animation of Professor Bhandam begins.
The Bardworks logo shown during the game startup is a solution to the Assembly of the Planners puzzle in JOTO.Nits:Actor Henry Ramer plays Professor Bhandham in the only live-action video sequences in the game. In 1983, he co-starred with Elizabeth Taylor and Carol Burnett in the Canadian TV-movie Between Friends, also known as Nobody Makes Me Cry.
Floors don't cycle back from 3 to 1 in the Professor's journal.
Accessing the journal resets the puzzle.
CD-ROM #1 has to be reinserted every time the game starts!
Lots of Projector GPF's were experienced under Windows 3.1. The game ran more reliably under Windows 95.
You have to zoom out from a puzzle in order to access the game control menu.
The game booklet says that each room contains a surprise hotspot, but in fact, about a quarter of them do not.
Accidentally pressing the Esc key immediately exits the game without warning.
This shunting puzzle is a slightly more complicated version of the Hall of the Nightsky puzzle in JOTO. Define the piece positions:
	   1     2     3

	4     5     6     7

	   8     9    10
Rotate or tilt the piece holders to allow pieces to be slid from one position to another. Puzzle solutions are easier to visualize if the following connectivity diagram is used:
Easy Puzzle
36-move solution:
Hard Puzzle
The Hard puzzle adds two more pieces blocking the exit pathways.
58-move solution:
Hotspot: Click on the wall to the right of the entrance opening; a face appears.
These 5 x 7 jigsaw puzzles are similar to the 4 x 7 ones in The Memory of Bhandam puzzle in JOTO. Four different puzzles can be selected by moving the lever in front of the wall panel; the solution of any one of them produces a token. Initial piece locations are jumbled randomly, but the target pictures remain the same. In Hard mode, only one puzzle piece can be seen at a time. In Easy mode, correctly-placed pieces become visible, making it much easier to solve the puzzle.
Solutions:


Hotspot: Move forward, then turn right and click on the leftmost jar for a "duck-feet" animation.
These puzzles actually involve pentominoes, since all pieces consist of five squares, and are smaller versions of the Assembly of the Planners puzzle in JOTO. Seven different puzzles can be selected by picking different drawers that pull out of the wall. The solution of any of the puzzles produces a token. Although individual pentomino pieces can be rotated before placement in the puzzle, all but the first and last solutions shown below involve no rotations. The Easy and Hard versions of the puzzle are identical.


Hotspot: Move forward and click on the large rock at left for a bit of levity.
This puzzle is a two-dimensional extension of the Leap of the Locust puzzle in JOTO, in which you must return all balls to a like-colored background. A ball can either move one square or jump over a ball of the other color. Once a ball has been placed onto a matching background, it cannot be moved again. The puzzle actually consists of independent, overlapping sub-puzzles.
Easy Puzzle
The solution procedure is to first solve the horizontal sub-puzzle, then the vertical one. Using the the position notation

a 16-move solution is
D F G E C D F E B H I E A B H E
Hard Puzzle
A similar "layered" approach is used to solve six overlapping sub-puzzles. Using the the position notation

a 38-move solution is
	J  L  M  H  P  U  M  E  H  P  M  K  I  F  N  Q  I  A  F
	N  I  J  L  K  G  O  S  R  T  S  K  C  B  D  C  G  O  K
Hotspot: Move forward and click on the large rock at right to startle a green snake.
This puzzle is reminiscent of the Turning of the Divasah puzzle in JOTO, but is actually easier to solve. Denote the panels in the pool by the letters
	   A
	F     B
	E     C
	   D
and number the control levers from 1 to 6, left to right. Each of the six levers rotates one or more panels:
Lever 1 rotates panel ASince the levers control the panels in this pattern, it is easy to set up any desired panel arrangement by first configuring panel F with lever 6, then panel E with lever 5, and so on until finally panel A is configured with lever 1.
Lever 2 rotates panels A and B
Lever 3 rotates panels A, B and C
Lever 4 rotates panels A, B, C and D
Lever 5 rotates panels A, B, C, D and E
Lever 6 rotates all six panels
Patterns on each panel follow the same six-element sequence:
Pattern 1: Light spirals on dark background, no borderStarting patterns for the panels randomize with each puzzle invocation. Press the right side of a lever to cycle panel(s) through the pattern sequence from top to bottom; press the left side of a lever to move backwards in the sequence.
Pattern 2: Wide striped ribbons, ringed border
Pattern 3: Checkerboard
Pattern 4: Constellation, four-line bumpy border
Pattern 5: Dark feathers on light background, no border
Pattern 6: Large 5-line geometric figures, no border
Use the levers to make the patterns on all six panels the same, then pull the larger lever at lower right to release a "coin" from the pool. Once all six panels have the same pattern, the setup for a different coin can be obtained simply be moving lever 6. In Easy mode, any set of three coins generates a token; in Hard mode, the coins must be for Patterns 1, 3 and 5 (in any order), as shown in the clues hotspots in Puzzle 16 and Puzzle 19.
Hotspot: Move forward and click on the wall behind the circular pool to see a floating golden tetrahedron.
Several maze tablets must be traversed in order to drag the light-blue square to the green crystal target position on the last tablet. The Easy puzzle has four different tablets, the Hard puzzle, nine. Tablets can be traversed in any order as long as the last tablet is positioned on the right. Only the tablet not containing the light-blue square can be changed by the "jukebox" levers. This puzzle is suggestive of the cubical maze in the Path to Mahiman puzzle in JOTO. Ignoring dead-ends and loops in the mazes greatly simplifies the possible paths. Since the following tablets are identical:
	Easy Puzzle   Hard Puzzle

	Tablet 1      Tablet 1
	Tablet 2      Tablet 3
	Tablet 3      Tablet 6
	Tablet 4      Tablet 9
the solutions for the Easy and Hard puzzles are the same except for tablet numbers. The following steps describe the solution to the Easy puzzle, with the alternatives for the Hard puzzle shown in square brackets:
Press the second [third] lever from the left to bring up Tablet 2 [3] on the
right. Drag the light-blue square to the right, crossing the gap between the
tablets. Continue on the right-tablet path around a doubly-nested spiral,
first inwards in a clockwise direction, then outwards in a counterclockwise
direction. When you reach the  junction
at left center, continue downwards. Continue around the counterclockwise spiral
until you approach an exit point on the left edge of Tablet 2 [3]. Press the
third [sixth] lever from the left to bring up Tablet 3 [6] on the left. Cross
the gap between the tablets and continue following the path on the left tablet.
When you reach the
junction
at left center, continue downwards. Continue around the counterclockwise spiral
until you approach an exit point on the left edge of Tablet 2 [3]. Press the
third [sixth] lever from the left to bring up Tablet 3 [6] on the left. Cross
the gap between the tablets and continue following the path on the left tablet.
When you reach the  junction in the
lower right region of the tablet, move left. At the adjacent
junction in the
lower right region of the tablet, move left. At the adjacent
 junction, move up. At the
junction at right center, continue
upwards. At the
junction, move up. At the
junction at right center, continue
upwards. At the  junction near the
center of the tablet, continue left. Follow the path into the upper-right area
of the tablet until you approach an exit point on the right edge of Tablet 3
[6]. Press the far-right lever to bring up Tablet 4 [9] on the right. Cross
the gap between the tablets. At the
junction, move left. At the junction,
move right. At the adjacent junction,
continue right. At the junction, move
left. At the junction (still in the
upper-left region of the tablet), move down. At the
junction immediately to the left of the
target, move right and capture the green crystal.
junction near the
center of the tablet, continue left. Follow the path into the upper-right area
of the tablet until you approach an exit point on the right edge of Tablet 3
[6]. Press the far-right lever to bring up Tablet 4 [9] on the right. Cross
the gap between the tablets. At the
junction, move left. At the junction,
move right. At the adjacent junction,
continue right. At the junction, move
left. At the junction (still in the
upper-left region of the tablet), move down. At the
junction immediately to the left of the
target, move right and capture the green crystal.
Hotspot: Click on the square lyre at left to see its strings light up in a colored pattern.
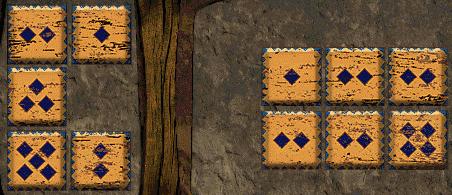
The objective of this jigsaw-style puzzle is to rotate and/or exchange pieces to form complete bands consisting of the double-triangle symbol flanked by the triangle and five-circles symbols.
Easy Puzzle
In the Easy puzzle, it's possible to configure the bands so that they all lie strictly within the confines of the puzzle rectangle:

Hard Puzzle
The solution to the Hard puzzle has additional partial symbol bands extending
outside the puzzle perimeter. It is only approximately based on the Easy puzzle
solution given above, and was found more by matching the "grain" of
the pieces:

Hotspot: Press the rectangular rock in the lower left corner to activate a Flintstones race car.
Pull the lever at left to cycle through nine different missing-piece puzzles, the solution of any one of which produces a token. The Easy and Hard versions of the puzzle are identical.


Hotspot: Move forward and click on the rock at right to see a carving.
The objective of this puzzle is to lower all 36 buttons. Pressing any one button changes the state (up or down) of itself and up to four neighbors. Notation:
O : Button initially raised
( ): Press this button
It's not too hard to solve the Easy puzzle by first lowering buttons in adjacent (non-overlapping) areas, as shown in the diagram below. The following 7-move solution is also shown in the Professor's hint book:

Hard Puzzle
The layout of raised buttons suggests not only a 3 x 3 quadrant (fourfold) symmetry, but also symmetry along the quadrant diagonals connecting the corners of the 6 x 6 grid to the center. Ignoring the Professor's hint that 16 moves are required for a solution (which is wrong anyway), we found the following 12-move solution by considering possibilities satisfying the 8-way symmetry of the puzzle:

Hotspot: None evident.
Click on the right half of a blue hexagon to rotate the star clockwise; click on the left half to rotate counterclockwise. Position notation:
	A     B
	   C
	D     E
8-move solution:
Rotate B clockwise
Rotate D clockwise
Rotate A counterclockwise
Rotate B clockwise
Rotate E counterclockwise twice
Rotate A counterclockwise
Rotate D clockwise
17-move solution:
Rotate E clockwiseHotspot: "Shell game" at lower center.
Rotate A counterclockwise
Rotate D counterclockwise three times
Rotate E clockwise
Rotate C clockwise
Rotate D counterclockwise
Rotate B clockwise
Rotate E clockwise
Rotate C counterclockwise
Rotate E clockwise
Rotate B clockwise
Rotate C clockwise
Rotate B clockwise
Rotate A counterclockwise twice
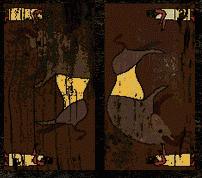
The puzzle is in the center of a circular passageway. The lever along the left side passageway has no effect; the lever along the right side passageway discloses the puzzle. Opposite heads and tails of two animals must be abutted so that a third puzzle piece can be overlaid, forming a new image. A puzzle piece can be rotated by clicking on its corner and repositioned by dragging it. Most of the puzzle difficulty lies in setting the correct separation distance between the two animal images.
Easy Puzzle


Hard Puzzle

Hotspot: Animated mortar-and-pestle in rear corner of left passageway.
These puzzles are expanded versions of the Path to Utsavah puzzle in JOTO. When you have landed on a square showing N marks, in the next turn you can move exactly N squares in any of the four cardinal directions as long as you don't move off the board. In the solutions below, moves are shown in alphabetical order.
Easy Puzzle
14-move solution:

Hard Puzzle
Of the three possible paths through the narrow link between the two square areas, one could not be reached from the starting position and one was preferred over the remaining choice due to fewer moves in the left-hand square area.
15-move solution:

Hotspot: None evident.
This puzzle is a triangular version of the Peg Solitaire ( Kutu of Ekakin) puzzle in JOTO. As in the earlier game, this puzzle desperately needs an "undo last move" function.
Easy Puzzle
Position notation:
	 1   2   3   4   5   6   7   8

	   9  10  11  12  13  14  15

	    16  17  18  19  20  21

	      22  23  24  25  26

	        27  28  29  30

	          31  32  33

	            34  35

	              36
One hole is initially placed at position 24. A solution that leaves the last ball in this hole is:
31-24
19-28
36-31-24
30-19
12-25
35-30-19
32-25
10-12
13-11
15-13
17-28
4-17
2-4
5-3
7-5
18-29
13-24
22-11
9-22-31
24-33
25-14
26-15
8-21-6-4-2
1-3
31-24
3-18-29
33-24
Hard Puzzle
Position notation:
	       1   2   3   4   5

	     6   7   8   9  10  11

	      12  13  14  15  16

	        17  18  19  20

	          21  22  23

	            24  25
Three holes are initially placed at positions 7, 10 and 22. A solution that leaves the last ball in one of these holes is:
8-10
11-9
13-22
9-18
16-14
18-9
3-15
1-3
20-18
17-19
6-17
23-14
15-13
17-8
3-13
5-3
24-17-8
3-13
25-18
13-22
Hotspot: None evident.
In this tedious pattern-matching puzzle, the objective is to identify pairs of symbols occurring in two rows of balls. Only three symbols at a time can be accessed in each row; to see more, move the levers at the top to other positions by clicking on the white dots. The left lever controls the top row of symbols, the right controls the bottom row. Number balls 1-3, left to right.
Easy Puzzle
Number lever positions 1-6, left to right.
	Left Lever   Top-row Ball   Right Lever   Bottom-row ball

	    1             1              4               1
	    1             2              2               1
	    1             3              3               2
	    2             1              1               2
	    2             2              5               2
	    2             3              4               3
	    3             1              2               3
	    3             2              1               1
	    3             3              5               3
	    4             1              6               2
	    4             2              6               1
	    4             3              6               3
	    5             1              3               3
	    5             2              3               1
	    5             3              4               2
	    6             1              1               3
	    6             2              5               1
	    6             3              2               2
Hard Puzzle
The Hard puzzle adds a dozen more symbols. Number lever positions 1-10, left to right. Complete the Easy puzzle solution above, then use:
	Left Lever   Top-row Ball   Right Lever   Bottom-row ball

	    7             1             10               2
	    7             2              8               3
	    7             3             10               1
	    8             1              7               3
	    8             2              9               2
	    8             3              9               3
	    9             1             10               3
	    9             2              9               1
	    9             3              7               2
	   10             1              8               2
	   10             2              7               1
	   10             3              8               1
Hotspot: Move forward and click on a bowl on the floor to see an animated bonfire.
These puzzles are similar to the Harmony of the Hassuna puzzle in JOTO. Neither solution requires rotating any pieces.
Easy Puzzle

Hard Puzzle

Hotspot: Move forward across the rope bridge and click on the green statue at left to see a wink.
Click on the top of the table to access the puzzle.
Easy Puzzle

Hard Puzzle

Hotspot: Move forward and click on the base of the table to disclose the following clues for Puzzles 5 and 20:

Easy Puzzle
Using the notation

a solution is found when the grid contains both of the columns

A 5-move solution is:
4 7 5 3 9
Hard Puzzle
Using the notation

a solution is found when the grid contains all of the sequences

Since there is only one H symbol in the grid, the above sequences cannot all appear as columns - one or more must appear as rows. A 12-move solution containing each of the four sequences as either a row or a column is:
5 5 14 16 3 4 15 12 14 9 2 13Hotspot: Move forward and click on the golden statue of the puzzle reset tool to see it flap its wings.
Click on the yellow triangle on the wall to access the puzzle.
Easy Puzzle

Hard Puzzle
A solution to the Hard puzzle is just the mirror image of the above solution to the Easy puzzle:

Hotspot: Click at the base of the wall to see an animation of nested jars.
This puzzle is an extension of the Abhoranam of Day and Night puzzle in JOTO, in which all disks must be transferred from the left position through the center position to the right while never leaving any position with more black disks than white.
Easy Puzzle
The Easy puzzle starts with five white disks and three black ones. A 26-move solution is:
	BW  Left to Right
	W   Right to Left
	WW  Left to Right
	W   Right to Left
	WW  Left to Right
	W   Right to Left
	BW  Left to Right
	W   Right to Left
	WW  Left to Right
	W   Right to Left
	BW  Left to Right
	W   Right to Left
	WW  Left to Right
Hard Puzzle
The Hard puzzle is somewhat more difficult in that it starts with four white disks and four black ones. A 28-move solution is:
	BW  Left to Right
	W   Right to Left
	BW  Left to Center
	W   Center to Left
	WW  Left to Right
	W   Right to Left
	BB  Left to Center
	B   Center to Left
	WW  Left to Center
	BW  Center to Left
	WW  Left to Center
	B   Center to Left
	BB  Left to Center
	BW  Center to Right
	B   Right to Center
	BW  Center to Right
	W   Right to Center
	BW  Center to Right
	B   Right to Center
	BW  Center to Right
	B   Right to Left
	BB  Left to Right
Hotspot: Move forward, then turn right and click on the chest to disclose the following clue for Puzzle 5:

Number the control levers 1-4 from left to right. The levers control the rotation of three concentric 15-symbol rings. Some of the symbols on the rings have been seen throughout Gems of Darkness, but a few are reminiscent of the Runes of Eridu puzzle in JOTO. Lever 1 rotates the middle ring counterclockwise and the outer ring clockwise. Lever 2 rotates the inner ring counterclockwise and the middle ring clockwise. Levers 3 and 4 undo the operations of Levers 2 and 1, respectively. The six triplets of symbols shown in the clues hotspot in Puzzle 16 must be arranged vertically under the triangular pointer at the top of the puzzle. When a triplet has been properly positioned, one of the six blue triangles in the center of the puzzle darkens.
Easy Puzzle
To solve the Easy puzzle, the symbol triplets may be obtained in any order. A 30-move solution is:
Move Lever 1 twice and Lever 3 five times
Move Lever 1 twice and Lever 3 three times
Move Lever 1 once and Lever 3 once
Move Lever 1 three times and Lever 3 three times
Move Lever 1 three times and Lever 2 twice
Move Lever 1 once and Lever 2 four times
Hard Puzzle
To solve the Hard puzzle, the symbol triplets must be obtained in the same left-to-right order shown in the clues hotspot in Puzzle 16. A 42-move solution is:
Move Lever 3 six times and Lever 4 three times
Move Lever 1 five times and Lever 2 once
Move Lever 1 three times and Lever 3 four times
Move Lever 1 six times and Lever 3 once
Move Lever 3 twice and Lever 4 three times
Move Lever 2 four times and Lever 4 four times
Hotspot: None evident.
These sliding-piece puzzles operate differently from the standard ones involving a space - here the pieces are manipulated in two dimensions by means of cyclic rotations. Use the clockwise move notation:

Easy Puzzle
The Easy puzzle requires reassembly of an 8-piece picture:
A 19-move solution is:
4 8 5 3 3 3 5 1 3 5 5 7 3 6 6 6 3 3 1
The Hard puzzle requires reassembly of a 12-piece picture:

A 40-move solution is:
	4  6  4  3  2  3  4  4  1  1  2  3  6  4  4  5  7  1  5  3
	6  8  6  2  2  4  1  7  7  5  4  2  7  5  5  3  3  3  7  7
Hotspot: Move forward and click on the hammer to see it animate.
This pattern orientation puzzle is similar to the Hall of Ascendancy and the Horses of Asvah puzzles in JOTO, but with hexagon-shaped tiles rather than squares. Number the hexagons as follows:
	   1     2

	3     4     5

	   6     7
Hexagons may be exchanged by dragging one to the position of the other. The solution below requires no piece rotations.
Easy Puzzle
A 3-move solution:
Exchange hexagons 3 & 6
Exchange hexagons 7 & 1
Exchange hexagons 2 & 5
Same solution as for the Easy puzzle.
Hotspot: None evident.
The objective of these puzzles is to use the "bug" to dispose of balls into the hole. The bug can move only one ball at a time and can only push it from behind. As a result, many positions (shown by shading in the diagrams below) are "off limits" to a ball - once a ball is put there, the bug can never move it to the disposal hole. These "warehouse" puzzles are like the Hall of the Sun puzzles in JOTO, but again an Undo button is desperately needed to allow recovery from an inadvertent move. One misstep and you'll have to start the long, tedious solution all over again from scratch!
Bug movements can be entered using the keyboard arrow keys, but beware of "overloading" the keyboard input buffer by holding down a key too long. Abbreviations:
L: Left
R: Right
U: Up
D: Down
Easy Puzzle

Starting from its initial position shown by the asterisk at lower right, the bug must dispose of 23 balls into the hole indicated by the asterisk at lower left.
A: U2 L2 U4 L4 U2 L2 D L D L7 D L2 U R U R D6
B: U5 R5 U2 L D R D L5 D L2 U R U R D6
C: U5 R4 U2 L D R D L4 D L2 U R U R D6
D: U5 R3 U2 L D R D L3 D L2 U R U R D6
E: U5 R5 D2 L U R U L5 D L2 U R U R D6
F: U5 R2 D R U R2 D2 L U R U L5 D L2 U R U R D6
G: U5 R2 D2 R U R D3 L D2 R U5 R U L5 D L2 U R U R D6
H: U5 R7 U R2 D L9 D L2 U R U R D6
I: U5 R10 D2 L U R U L10 D L2 U R U R D6
J: U5 R9 D2 L U R U L9 D L2 U R U R D6
K: U5 R8 D2 L U R U L8 D L2 U R U R D6
L: U5 R9 U2 R D L D R3 U R2 D L14 D L2 U R U R D6
M: U5 R14 D R2 U L16 D L2 U R U R D6
N: U5 R16 U2 L D R D L16 D L2 U R U R D6
O: U5 R18 D L2 U L2 D4 R2 U3 R U L17 D L2 U R U R D6
P: U5 R16 D L R D3 L2 U3 R U L15 D L2 U R U R D6
Q: U5 R12 D R U R3 D4 L2 U3 R U L15 D L2 U R U R D6
R: U5 R12 D2 R U R3 D3 L2 U3 R U L15 D L2 U R U R D6
S: U5 R16 D3 L D L U3 R U L15 D L2 U R U R D6
T: U5 R16 D6 L U2 R U L D L U3 R U L15 D L2 U R U R D6
U: U5 R14 D4 R D2 L3 U2 R3 D R U4 R U L17 D L2 U R U R D6
V: U5 R14 D4 L U3 R U L14 D L2 U R U R D6
W: U5 R13 D4 L D2 R U5 R U L14 D L2 U R U R D6
Hard Puzzle

Starting from its initial position shown by the asterisk at upper left, the bug must dispose of 37 balls into the hole indicated by the asterisk at upper right.
A: D R5 D R4 D R9 D4 R2 U2 R3 U2 L3 R U2 L D R D R2 U2 L U
B: D R D2 L U3
C: D2 L2 U R D R U2
D: D L2 U R D R U
E: D2 R3 U L2 D L U2
F: D R2 U L D L U
G: R D5 L U5
H: D5 L2 U R D R U5
I: L2 D3 R D2 L D2 L2 U4 R3 D R U4
J: D5 L2 U D3 L2 U4 R3 D R U4
K: L2 D8 R2 D R U R3 D R U6 L4 D L U4
L: D3 R6 U2 L D R D L5 D L U4
M: L2 D8 R4 U L3 D L U4 D3 L2 U4 R3 D R U4
N: D3 L8 D4 R6 D R2 U L D L U4 D3 L2 U4 R3 D R U4
O: L2 D8 R2 D4 L4 U L2 U3 D3 R2 D R4 U5 L4 U4 L4 D4 R6 D R2 U L D L U4 D3 L2 U4
   R3 D R U4
P: L2 D8 R4 D2 L U3 L7 D4 R2 D R4 U4 R U L2 D L U4 D3 L2 U4 R3 D R U4
Q: L2 D7 L4 D3 R2 U L D L U2 D3 R2 D R4 U5 L4 U4 L4 D4 R6 D R2 U L D L U4 D3 L2
   U4 R3 D R U4
R: L2 D7 L4 D2 R U L U R4 D R2 U L D L U4 D3 L2 U4 R3 D R U4
S: L2 D7 L4 D5 L4 U2 R4 D R U3 L U R4 D R2 U L D L U4 D3 L2 U4 R3 D R U4
T: D3 L13 U L2 D9 L D R2 L U10 R2 D R5 D4 R2 D3 L6 U L2 R2 D R6 U3 L2 U4 L5 U
   L2 D9 U5 R2 D R3 D2 U2 L3 U L2 D3 R3 D
   R6 D R U3 L U R4 D R2 U L D L U4 D3 L2 U4 R3 D R U4
U: L2 D7 L6 D L2 D L2 R2 U2 L D2 L D R6 D R U3 L U R4 D R2 U L D L U4 D3 L2 U4
   R3 D R U4
V: D3 L13 U L2 D7 R4 U R D L D R5 D R U3 L U R4 D R2 U L D L U4 D3 L2 U4 R3 D R
   U4
W: D3 L13 U L2 D4 R2 D2 U2 L2 D3 R4 U R D L D R5 D R U3 L U R4 D R2 U L D L U4
   D3 L2 U4 R3 D R U4
X: D3 L13 U L2 D4 R2 D2 R2 U R D2 L D R5 D R U3 L U R4 D R2 U L D L U4 D3 L2 U4
   R3 D R U4
Y: D3 L13 U L2 D6 R4 U R D2 L D R5 D R U3 L U R4 D R2 U L D L U4 D3 L2 U4 R3 D
   R U4
Z: D3 L13 U L2 D9 L D2 R U4 L U R5 U R D2 L D R5 D R U3 L U R4 D R2 U L D L U4
   D3 L2 U4 R3 D R U4
a: D3 L13 U L2 D12 R2 U R U L2 R D2 L2 U5 L U R5 U R D2 L D R5 D R U3 L U R4 D
   R2 U L D L U4 D3 L2 U4 R3 D R U4
b: D3 L13 U L2 D10 L4 U L2 D R5 D R U4 L U R5 U R D2 L D R5 D R U3 L U R4 D R2
   U L D L U4 D3 L2 U4 R3 D R U4
c: D3 L13 U L4 U L4 D3 R D7 L D R5 D R U4 L U R5 U R D2 L D R5 D R U3 L U R4 D
   R2 U L D L U4 D3 L2 U4 R3 D R U4
d: D3 L13 U L4 U L4 D3 R D R D6 L D R4 D R U4 L U R5 U R D2 L D R5 D R U3 L U R4
   D R2 U L D L U4 D3 L2 U4 R3 D R U4
e: D3 L13 U L4 U L4 D3 L D R U R D7 L D R5 D R U4 L U R5 U R D2 L D R5 D R U3 L
   U R4 D R2 U L D L U4 D3 L2 U4 R3 D R U4
f: D3 L13 U L4 U L4 D4 L D L U R3 D4 L2 U3 L U R2 U R D7 L D R5 D R U4 L U R5 U
   R D2 L D R5 D R U3 L U R4 D R2 U L D L U4 D3 L2 U4 R3 D R U4
g: D3 L13 U L4 U L4 D4 L D4 L D L2 U R5 U R D3 L D R4 D R U4 L U R5 U R D2 L D
   R5 D R U3 L U R4 D R2 U L D L U4 D3 L2 U4 R3 D R U4
h: D3 L13 U L4 U L4 D4 L D4 L3 U3 R2 D R U L U R2 U R D7 L D R5 D R U4 L U R5 U
   R D2 L D R5 D R U3 L U R4 D R2 U L D L U4 D3 L2 U4 R3 D R U4
i: D3 L13 U L4 U L4 D4 L D4 L3 D2 R D R8 D R U4 L U R5 U R D2 L D R5 D R U3 L U
   R4 D R2 U L D L U4 D3 L2 U4 R3 D R U4
j: D3 L13 U L4 U L4 D4 L D4 L D2 L D R8 D R U4 L U R5 U R D2 L D R5 D R U3 L U
   R4 D R2 U L D L U4 D3 L2 U4 R3 D R U4
k: D3 L13 U L4 U L4 D4 L D4 L D5 L U4 L U R5 U R D3 L D R4 D R U4 L U R5 U R D2
   L D R5 D R U3 L U R4 D R2 U L D L U4 D3 L2 U4 R3 D R U4
Hotspot: Click on the stone block to the right of the wooden doors to cause an apparition to materialize.
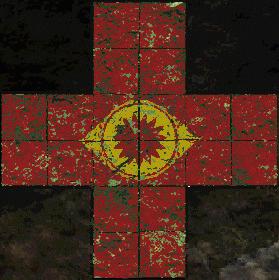
These puzzles require the correct placement of geometric pieces on the star figure by dragging them from the left. Once the mouse key is released and a piece is positioned on the star, it cannot be moved back to the left side. There's no progress indication with this puzzle; you know it's solved only when all of the pieces have been correctly placed. In that sense, the puzzle is analogous to the infamous Hall of the Hidden Links puzzle in JOTO, but perhaps with more logical clues from which to derive the solution.
Easy Puzzle
The solution to the Easy puzzle associates triangles with squares and semicircles with circles, and pieces on the outer edge of any "vane" of the star are always arranged in symmetric pairs. In addition, opposite vanes always have different shape themes:

Hard Puzzle
The solution to the Hard puzzle produces a pattern that has bilateral symmetry - if folded in the middle, the top and bottom halves of the puzzle exactly match and similarly, the left and right sides of the puzzle correspond:

Hotspot: None evident.
After the tokens have been collected from the solution of all 24 puzzles, the final puzzle at the end of the passageway behind the Professor's desk is accessible. The key to solving it is the initial "code string" shown before the panels are opened:

consisting of six pairs of symbols. Opening the panels briefly displays an array of token symbols on the left wall, in the same orientation as shown (more clearly) in the token box. On the right wall is a 7 x 7 table that shows a yellow symbol pair at the intersection of each row and column. These rows and columns are themselves identified by blue symbols along the top and left side of the table. Nine 7 x 7 tables can be cycled by pressing the button at the top left corner of the table. Plugging in the code string symbol pairs into the table produces uninteresting results if the left member of the pair is used as the table row and the right member as the table column, but conversely, if the symbol pair represents a table column and row, the corresponding table entry is always a pair of repeated symbols. It's likely the resulting six different symbols have some significance.
Indeed, the solution to the final puzzle is to enter these six symbols on the left wall in the left-to-right order suggested by the code string:

In the endgame sequence, the secret of the Kavi is revealed and you learn about the true Gems of Darkness.
Copyright © 1998 Balmoral Software (http://www.balmoralsoftware.com). Portions copyright © 1997 I. Hoffmann and Associates, Inc. All rights reserved. Republication, redistribution or conversion is expressly prohibited without the prior written consent of Balmoral Software. Contents subject to change! For the latest information, see http://www.balmoralsoftware.com.