Copyright © 2023 Balmoral Software (http://www.balmoralsoftware.com). Portions copyright © 1996 Inscape and EMG. All rights reserved. Republication, redistribution or conversion is expressly prohibited without the prior written consent of Balmoral Software.
Drowned God provides some unusual puzzle challenges imbedded in a disorganized hodgepodge of plot fragments relating to just about every conspiracy theory ever created. If there is a cohesive story in this game, we couldn't find it. But if you enjoy puzzles and can tolerate digging them out of a nonsensical game structure, Drowned God may be your cup of tea.
The game is known to have a number of bugs, but most can be fixed if Patch 4 is installed. A word of warning about installing the game - you must use the default installation directory C:\DrownGod\ or else DirectX has to be installed manually and the patch installation fails. In that case, you can manually replace the main game executable file C:\DROWNGOD\DROWNGOD.EXE; the one from Patch 4 is dated 9-DEC-96. Our copy of Drowned God had a flaky third CD-ROM, causing frequent invalid-page-fault crashes near the end of the game, even after Patch 4 had been installed. These difficulties were probably aggravated by the game's cheap cardboard CD-ROM folder and the ridiculous requirement that CD-ROM #1 be inserted every time the game was restarted. What were they thinking?! We thought we'd left that behind with Timelapse , Connections , Titanic , Beyond Time and Atlantis , but apparently not. At any rate, we overcame these problems by installing a CD-ROM emulator and limping through a hard-drive build of the third CD-ROM. However, we still had occasional game crashes immediately after restoring certain saved games, as well as lockups where we had to wait 20 seconds or more for the sound and cursor to reactivate.
Only six saved-game slots are available, absurdly few by any consideration. A workable but tedious alternative is to manually save the *.DAT files from the game installation directory to another location before overwriting the saved-game slots.
Ambient sound effects are satisfactory, but not as atmospheric as in other games we've played recently, such as Journeyman Project 3. The game's music is well done (we especially liked it at the top of the puzzle pyramid in Chesed), but the segments are so incredibly short that even the best sequences end up sounding painfully repetitive. Perhaps it would have been more tolerable if there had been some sort of game control panel that would allow the music to be turned off. We also occasionally encountered sequences of gameplay in which two different soundtracks were playing at the same time.
Graphics are fairly good, but the game interface offers only an instantaneous slideshow without even rudimentary transitions to project the sensation of movement. There are no keyboard controls for navigation; moving about is the usual point-and-click experience with the mouse. Unfortunately, video sequences other than the introduction are not skippable, and so interminable periods of gibberish must often be endured to get through the game. The few characters encountered in the game are unconvincing cyberpuppets. There are lots of spelling and grammatical errors in the text-based backstory items sprinkled throughout the game. Credits that play at the end of the game are nearly unintelligible, but the truly curious can find them in a more readable form in the CD-ROM booklet.
The best thing about Drowned God is its handful of puzzles, some fairly unusual by current game standards and a few offering a tough AI opponent. But many players may find them an insufficient justification to persevere through an otherwise poorly-designed story.
Walkthrough Abbreviations
F: Forward (Fn for n repetitions)
B: Back
L: Left
R: Right
T: Turn around
U: Up
D: Down
Some objects and placenames in this walkthrough may be subject to different interpretations.
After a few minutes watching the introduction (skippable by pressing Esc or clicking the mouse), you'll start the game in the "Bequest Globe", which is really nothing more than a cylindrical room with a doorway to a central spiral staircase. Facing double doors flanked by columns, wait for the voice to finish, then zoom in (twice) on the pulsating access screen at left. Enter a player name, terminated by the keyboard Enter key. After a numerical conversion of the letters, you'll receive a "sacred" number and symbol, also shown in the top row of boxes on the screen. Make a note of these - they'll be needed later. Click on the screen to show four previously-incarnated lives (different for each sacred number). Don't worry about the personal details, just click on the boxed word at lower right to cycle through them. After the appearance of a hexagon and another cryptic voice message, move U B F to the main doorway. Click on either 1 or 9 hotspot to open the doors.
Move F R F6 and zoom in on the computer terminal in the upstairs (Kether) room. After more instructions, the terminal will display a code number (3). Move R2 F12 to a display in the downstairs (Malchut) room. Note the "pi" symbol at the top of the display. Click on the screen and receive another code number (8) after some more doubletalk. Move R2 F6 R F2 R and zoom in twice on the glowing access screen. Here your task is to enter the number received from the Kether room at left ("delta" symbol) and the Malchut room at right ("pi" symbol). Click the mouse to select either hotspot, but use the keyboard to enter the numbers, terminated by the Enter key. After a strange poem, note the location of the Binah node at the upper right corner of the square inside the hexagon pattern, as well as its symbol (grail). Move U B F and click on the 2 hotspot to open the doors.
On your arrival in Binah, you'll find yourself inside a Stonehenge formation:
Move L F10 L F4 R into the Armored Torso and zoom in on the shield puzzle on the back of the chair. The objective is to connect all the nodes with a single non-intersecting, closed curve; one solution is based on the idea of using nodes mostly on the right side to approach the center, leaving a single path on the left side to return to the outer perimeter:
After watching a video sequence showing your objective in Binah, move L F4 L F2 and click on the mist several times to view black-and-white video sequences describing more of the backstory. After the mist disappears, click on the Stonehenge arch to obtain the Tower (XVI) tarot card. Click on the card to store it in your inventory, then move T F6 back into the armored torso. After what's-his-name disappears, move F2 R and zoom in on the control panel of the "Majestic 12 Computer Puzzle". Use the pair of red buttons at left center to cycle through the sacred symbols until yours appears (these symbols are in order, so you can just click the right-hand red button one less than your sacred number). Click on Binah's location at the upper right corner of the square inside the hexagon pattern, and click on the top (grail) slider at upper right. Finally, click on the large green button at left center and an elevator will be disclosed.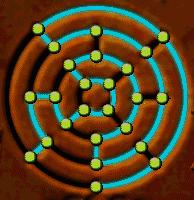
Move F3 R F6 L F15 through Leonardo da Vinci's workshop (we liked the one in Buried in Time much better!) and the Helmet to Merlin's Oak. By carefully moving the cursor over the tree trunk, you should be able to identify three separate drawers, one above the other. The first click on a drawer produces no obvious response, but actually decides the final outcome of the puzzle. To finish the puzzle after the first click, click once each on all three drawers (in any order). Depending on which drawer was first selected, the puzzle has three possible outcomes:
Your objective is to release the elemental, which will in turn gain you access through the gate leading to the dock, so be sure to first select the bottom drawer. After the points of light appear, move T F4 R2 F7 L and click on the dockside figure's helmet to summon a boat.
First drawer selected Puzzle outcome Top Goblet in top drawer Middle Sarcophagus & skeleton in middle drawer Bottom Elemental in bottom drawer
Move R F2 R F10 to the Knights Templar puzzle in the Tower. Save your game at this point. In this Nim-style game, you alternate moves with your drunken opponent to extinguish flames on the diamond-shaped board. To win a game, you must extinguish the last flame to force your opponent to take a quaff from the goblet. You must win two games before your opponent does. Generally, your opponent always wins the first game, so this is equivalent to you winning the next two games in a row. Your opponent plays randomly, so there is no fixed solution.
There are ten buttons on the lower edges of the board, each of which can be used at most once in a game. The two buttons that line up with the position of the goblet can never be used. Pressing one of the eight remaining buttons douses all flames in the selected row or column, as well as in all other rows or columns that are on the opposite side of the selection from the goblet. This means that you can never put out flames on both sides of the goblet in a single move.
After losing the first game, your opponent lets you place the goblet and then he takes the first move. In this case, you can always force a win by placing the goblet in the center of the board. You then mirror your opponent's moves with respect to the goblet. For example, if he pressed the lever second from the far left, you would next press the lever fourth from the far left. In each case, you would extinguish exactly the same number of flames as he just did. Each pair of moves douses an even number of flames, so your opponent will eventually be left with just the goblet since there are 24 flames to start with.
But in order to win the very next game in which your opponent places the goblet and then you move first, he must make a mistake. If at any point you can create a rectangle of flames with the goblet in its center, you can force a win by subsequently mirroring his moves. This is easy to accomplish when the goblet is placed on a line extending from the middle of a side of the board (but not in the center). Otherwise, he has a good chance of winning unless he fails to mirror your moves correctly.
If you don't win two games in a row, you'll be sent back to the dock, after which it's faster to restore your saved game and try again.
Move F T and take the Iron Maiden elevator up to "Morgan Le Fay" (Morganna). Move F and click on the elemental to obtain the Star (XVII) tarot card. Move F2 to get two messages from Morganna. Click on her figure for a final message, then move R2 F2 T and take the elevator down past the knight to the lower level of the tower.
Move F2, open your inventory and transfer the XVI card to the receptacle on the table, unlocking the tunnel door to your right. Zoom in on the open book and leaf through its pages by clicking the folded-page icon at lower right. Note the 3 x 3 magic square on the second page (used nowhere in this game) and a reference to 555. When you are finished looking at the book, move U and, if desired, note the cute little animations on the painting.
Move L F4 through the white door to the Newton-Einstein puzzle. The objective of this puzzle is to arrange the lines of an imaginary dialog between Isaac Newton and Albert Einstein in the correct order. Each room, identical except for subtle clues on the apple picture and blackboard in the background, is associated with a single one of the eight lines. The Yesterday and Tomorrow doors at the back of each room can be used to move forward or backward in the set of unordered responses. When the correct line is added to the ongoing conversation by pressing the NOW button under the rotating heads, everything arranged so far is repeated. The complete conversation sequence is given in the game booklet. The solution of this puzzle is made simpler if you map out the unordered sequence of responses, then use the Yesterday and Tomorrow doors to move through the sequence to each desired conversational line. The unordered lines do not appear to be scrambled for each gameplay, so one solution is to repeat the following sequence seven times:
Click on NOW buttonfollowed by a final click on the NOW button. On successful completion of the conversation, pick up a copper ball under the rotating heads and move T F8 L F2 L F L F through another door into Leonardo's workshop. Deposit the copper ball from your inventory into the hole in the control panel to activate the automaton and release a cylinder in the back of the workshop. From the control panel, move U L F2 and zoom in on a book at lower right to show a column-row code sequence to use with the Star tarot card:
Click on Yesterday door
Click on Yesterday door
Click on Yesterday door
Move U R F L F R F2 D and pick up the cylinder. Move U L F2 to a grid on one of the workshop tables and zoom in on the grey tarot-card receptacle at lower left. Insert the XVII tarot card into the receptacle. Using the code above, click on the column and row corresponding to each of the grid squares in the code, in the following order: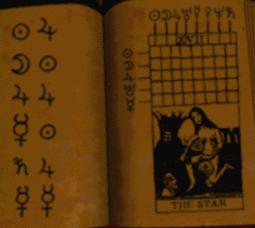
You can then view Leonardo's "slide show" using the red button at lower right and the zoom-in cursor. When you've finished looking at all nineteen slides, the screen will burn up and you'll be able to retrieve the Star (XVII) tarot card.
Column Row Entry 1 3 17 2 1 2 3 3 19 5 1 5 8 3 24 5 5 37
From the table, move L2 F R F5 L F T and save your game. Take the Iron Maiden elevator up (twice) to Morganna and move F3. If you get an "Unknown asset type" error message and the game locks up, you probably need a game patch. Give Morganna your XVII tarot card, then put the cylinder into the indicated receptacle and obtain the Moon (XVIII) tarot card in return. Move R2 F2 T and take the elevator down twice to the lower level. Move F2 R F11 R F6 into a darkened corridor.
Lighten up the place by putting the XVIII tarot card into the receptacle at lower left. This light is available for a limited amount of time (less than three minutes), as indicated by a ticking sound in the background. Additional clock sounds can be heard as the timer runs out. Move F4 and zoom in on the box containing the Matching Puzzle. This is a timed puzzle in which several pairs of symbols, split among the four sides of the box, must be selected. The box can be rotated by positioning the cursor near its sides. If you fail to complete all the matches within the timed period, you'll have to restart the process by clicking on the glowing panel of the light fixture. Here's one matching strategy that minimizes the number of turns of the box:
Click on Eye of Horus, turn left to matchOn completion of the Matching Puzzle, you'll be transported back to Stonehenge and must revisit various areas in Binah to "set the clocks back":
Click on Cross, turn left to match
Click on Triangle Inside Square, turn left to match
Click on Cup, turn left to match
Click on Scales, turn left to match
Click on Three-Barred Cross, turn left twice to match
Click on Magen David, turn right to match
Click on Sun, turn left twice to match
To return to Stonehenge from each destination, move T once or twice until you're facing the pulsating portal, then move F2. Each destination portal disappears once its clock is set back. The last portal from Stonehenge returns you to the Bequest Globe.
Leonardo's Workshop: Click on the rapidly-rotating clock in the mechanical drawing
Newton-Einstein Puzzle: Click on the clock face
Armored Torso: Click on the control panel, then on the top (Binah) slider
Merlin's Oak: Click on the top drawer
Morganna: Click on the candle at lower right
Move F to the main doorway and click on either 1 or 9 hotspot to open the doors. Move F R F6 and zoom in on the Kether screen. Pick up the Magician (I) tarot card and move R F to the world map. Activate the map with the I tarot card. Click on the Stonehenge location, and if desired, explore the menu choices. Select Return and move R F R F back to the screen to obtain the next code number (4). Move R2 F12 and zoom in on the Malchut screen. Pick up the Temperance (XIV) tarot card, move R F L and zoom in on the brown panel. Open the panel with the XIV tarot card. Move R F2 R F back to the screen to obtain the next code number (8). Move R2 F6 R F2 R and zoom in twice on the glowing access screen. As before, enter 4 and 8 into the computer, terminated by the keyboard Enter key. After another strange poem, note the shutters-like Chesed symbol, move U D F and click on the 3 hotspot to open the doors.
Your initial position in Chesed is between a tunnel and a trench:
Move R F4 R F L F3 L F R F2 through the trench and up to the top of the tomb pyramid, where you can hear some distinctly Blade Runner-style music. Zoom in on the pair of plates to the left of the tomb opening and pick up one of them. Move U T F2 L F R F3 R F R F2 to the top of the calendar pyramid and insert the plate into the circular calendar. Move T F L F L F3 L F R F2 back to the top of the tomb pyramid. Repeat the process of ferrying the remaining three plates (unfortunately, only one at a time) from the tomb pyramid to the calendar pyramid. When the last plate has been inserted, click on the calendar at the 11, 1, and 2 o'clock positions, then finally at the 2:30 position. Click on the tongue of the central face and pick up a pentagon it disgorges. Move T F L F L F3 L F R F4 into the tomb pyramid. Insert the pentagon into the sarcophagus at right to gain access to the interior of the tomb. Move F L F2 R F R F2 to the Nine Men's Morris game.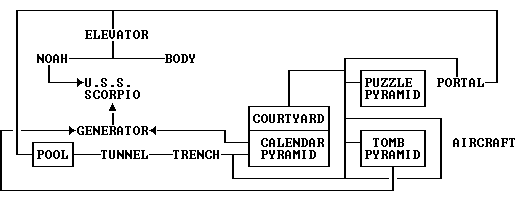
This game randomizes each time it's played, so no fixed solution is possible. The most straightforward way to guarantee a quick win of the Nine Men's Morris game is with the assistance of simultaneously-run software such as Carl von Blixen's excellent freeware NMMWIN program (42 KB). In NMMWIN, set the Deep Thinking and Human vs. Human Options to allow the responses given by the Drowned God AI to be entered as those of the second human player. Your own best responses (including the first move) are provided using NMMWIN's hint system (Ctrl-H). If you use this approach, be sure to carefully observe where your opponent's orange piece is played, especially after you've removed one of his.
On completion of the game, you'll receive the lower half of the Emperor (IV) tarot card. Move T F R F R F R F7 R F2 R F2 to the top of the puzzle pyramid. The object of the rock slab puzzle is to select yellow holes so that they and the white holes surrounding them in a cruciform pattern completely fill out the array. The only solution is to pick the following holes:
On completion of the puzzle, you'll receive a golden sphere and the portal behind the puzzle pyramid will be opened. Move T F2 R F L F L F to the courtyard puzzle. This game randomizes each time it's played, so no fixed solution is possible. Any square in the 4 x 4 grid can be raised or lowered by clicking on it; some squares reverse the state (up or down) of multiple squares. A little experimentation will show that no square affects the state of any square behind it or to its left, so the entire courtyard may easily be filled up by raising the necessary squares, working from left to right in each row starting from the back. The leftmost square in the row second from the front appears to lead down to another doorway, but this is an inaccessible red herring in the game. When the courtyard is completely filled in, open the door in the background by clicking on the large ring above it. Move F2 L F2 into the interior of the pyramid and click on the wall panel three times to obtain the rest of the Emperor (IV) tarot card.
Move L F5 R F R F4 R F3 R F L F15 D through the trench and tunnel to the pool on the other side of Chesed. Transfer the water in the pool to the large glass container behind it by inserting the sphere in your inventory into the lower right-hand hole in the Rod of Osiris pattern. Retrieve the sphere, move U T F2 R F2 R F2 R F2 L F to the glass container and watch a video segment showing an alien figure. When he is finally finished talking, you'll be looking down at a control panel for the glass container. Click on the left-hand A (alpha) symbol to release Darth, obtain the High Priest (V) tarot card and open the door connecting the empty pool to an underground passage.
Move R F2 R F2 R F R F17 R F3 through the underground passage to a five-keyed alien organ. The undergound passage is also accessible from a large hole behind the puzzle pyramid. Press any of the organ key(s) six times (interspersed with video clips) and you'll be elevated to a higher level.
Move R2 F2 to the headless, tattooed alien in a glass sarcophagus. Click on the panel and move the mouse to scan over the body from above (which does seem to show a head at left). When you can see a three-barred cross (Rod of Osiris), click the mouse to transfer a particle to your inventory. Repeat the procedure for three other Rod of Osiris tattoos and their associated particles. One tattoo is on the chest area, one in the genitals area and one on each foot. This is a 30-second timed puzzle, indicated by a crescendo of sound.
When you've collected all four particles, move T F4 to the NOAH machine and an indentation will appear at the back of the "tongue" sticking out of the machine. Deposit one of the particles into the depression and watch a video sequence describing the creation of a "manimal". Repeat the process for the other three particles, and note the appearance of a pig-man - we'll see more of him later. When all particles have been used, you can pick up a sphere and the Lovers (VI) tarot card.
If desired, save your game. At this point, you have several ways of reaching your next destination. The quickest method is to place a tarot card into one of the receptacles on NOAH, then move R to get teleported to the U.S.S. Scorpio submarine (1 move). But to reach the same goal via other paths, don't play any tarot cards here.
For a route via the portal and the Calendar Pyramid, move T F2 R2 D T F2 R F12 U F L F2 L F R F L F3 R F R F to a previously-inaccessible door in the Calendar Pyramid (30 moves). Place one of the tarot cards in inventory into one of the three receptacles on the wall. This takes you on a one-way trip to a generator room. Move L F2 to ride in an elevator and reach the submarine.
For a slightly-longer route via the portal and the Tomb Pyramid, move T F2 R2 D T F2 R F12 U F L F2 L F4 L F6 R F3 into the Tomb Pyramid (34 moves). Place one of the tarot cards in inventory into one of the three receptacles on the wall. This takes you on a one-way trip to a generator room. Move L F2 to ride in an elevator and reach the submarine.
For a route via the pool and the Calendar Pyramid, move T F2 R2 D T F2 L F13 and exit up either set of steps. At the top, move L F R F13 R F L F3 L F4 L F L F3 R F R F to a previously-inaccessible door in the Calendar Pyramid (37 moves). Place one of the tarot cards in inventory into one of the three receptacles on the wall. This takes you on a one-way trip to a generator room. Move L F2 to ride in an elevator and reach the submarine.
For the longest route via the pool and the Tomb Pyramid, move T F2 R2 D T F2 L F13 and exit up either set of steps. At the top, move L F R F13 R F L L F3 L F R F6 R F3 into the Tomb Pyramid (52 moves). Place one of the tarot cards in inventory into one of the three receptacles on the wall. This takes you on a one-way trip to a generator room. Move L F2 to ride in an elevator and reach the submarine.
Arriving at the submarine's teleporter room, move F4 R F2 L F3 L F5. If and when you're blocked by what's-his-name, move T2 and try the door again. Move F5 L F2 R F5 L F L and zoom in on a Morse code chart on the wall:
Move U L F L F L F L and grab the key hanging from the periscope man's neck. Move L2 and take a look through the other periscope. Move U R F and click on the striped plate to listen to a radio broadcast. Move U L F7 L F3 R into the captain's cabin and zoom in on the radio on the desk. Using the obvious clue from the open Bible, use the red button on the radio to send Morse code for the word "GENESIS", using the chart above: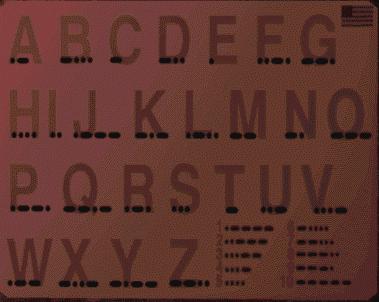
Hold the red button down longer for a dash, and be sure to pause slightly between each letter. As each letter is successfully transmitted, the column of small green lights next to the speaker will light up sequentially. There seems to be a certain rhythm required to solve the puzzle as it often fails at the three dots of the first "S" if the cadence isn't right. When all seven letters have been sent, click on the lit green button to unlock the closet behind you.
Move L2 F2 L into the closet and zoom in on the folder of papers on the desk. Use the folded-page icon at the lower right to leaf through five sheets of paper and pick up the key taped to the back of the folder. Move U L and use the latch to exit the closet (musn't touch!). Move F2 R F3 L F8 L F3 R F3 R F2 L F4 back to the teleporter room.
Remove the keys from your inventory and click the arrow icon on the vertical slot just to the left of the "NEGTANK" label at the bottom of the display panel. Smoothly moving the mouse diagonally to the upper right (instead of in the opposite direction), position the point of the left key close to the slot and click to activate the teleporter room (Rod of Osiris) puzzle. This puzzle randomizes each time it's played, so no fixed solution is possible.
The objective of this puzzle is to move the white dot (representing the Rod) to the position indicated by the highlighted squares on the grids. Each grid indicates the desired position of the Rod in two of three dimensions. Four dials on the sides of the panel control the movement of the Rod, and each dial moves it in one or more directions. To change a dial's setting, carefully position the triangular cursor to the left or right of the white dial pointer and click. When the dials are set to the desired positions, press the rectangular red button below the display to reposition the white dot accordingly.
You can turn around at any time to observe the current status of the Rod's orientation. When doing so, note that the Rod has a central spine and six rib-like extensions, three on each side. Its spine is slightly longer at the bottom than at the top, and the upper-right rib is missing a sphere at its end:
You have up to four tries to position the white dot in the highlighted square, as well as provide a vertical rotational orientation with the missing sphere of the Rod at upper right as shown above. If you fail, the puzzle will randomize and you'll have to start over by re-inserting the pair of keys.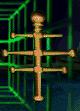
The puzzle can be solved in one try using the following steps:
Step 1. Move T to observe the Rod's rotational orientation. Look closely to find the position of the missing sphere and determine how many clockwise eighth-circle (45°) turns are needed to orient the Rod vertically with the missing sphere at upper right. For example, if the Rod looks like this:
then five clockwise turns are needed. Move T back to the control panel. Numbering the lower-right dial settings 1 through 6 from left to right, use the following table to determine its setting:
There are no settings to move the Rod by 90° or 270°. If the Rod should somehow be oriented with a horizontal central spine, you can use up an extra turn by picking an incorrect rotation and trying again.
Clockwise turns needed Dial setting 0 1 1 2 3 3 4 4 5 5 7 6
Step 2. Look at the middle grid and count how many squares (0-5) that the white dot needs to move down in order to reach the bottom row. Call this number Z. Calculate
Z - {dial setting in Step 1} + 13and call the result A. For example, if Z is 4 and the lower-right dial is set all the way to the right, then
A = 4 - 6 + 13 = 11Remove all multiples of 6 from A and call the remainder R (in mathematical terms, R = A modulo 6). R should then be a number between 0 and 5. Again numbering the lower-left dial settings 1 through 6 from left to right, set it to
Step 3. Look at the top grid and determine the compass direction of the white dot from the central square. Using the following table, set the upper two dials accordingly:
If the white dot is already centered, set both upper dials to their left positions.
White dot location Dial position Upper left dial Upper right dial North Right Middle Northeast Middle Middle East Right Left Southeast Left Right South Middle Right Southwest Right Right West Middle Left Northwest Left Middle
Step 4. Press the red button at the bottom of the display. If the dials have been set correctly, the white dots on the display will blink.
The screenshots below illustrate an example:
1. The Rod needs to rotate clockwise 3/8 of a circle (135°), so the lower-right dial (1-6) is set to position 3.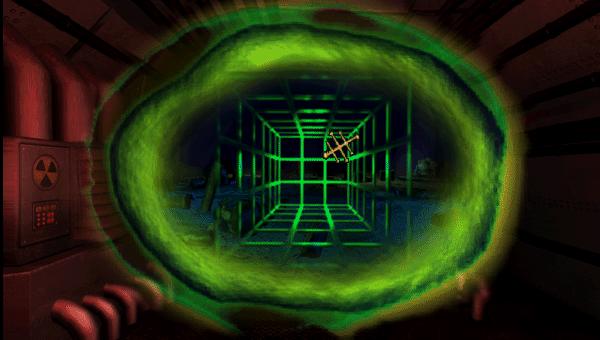

2. In the middle grid, the white dot needs to move down Z = 4 squares. Then
A = 4 - 3 + 13 = 14and R = 2, so the lower-left dial (1-6) is set to position R + 1 = 3.
3. In the top grid, the white dot is northeast of the central square, so the upper-left and upper-right dials are each set to their middle positions.
4. Press the red button and the white dots on the display blink.
After the puzzle is solved, turn around and replace the missing sphere on the Rod of Osiris and you'll be transported back to the Bequest Globe.
Move F to the main doorway and click on either 1 or 9 hotspot to open the doors. Move F R F6 and zoom in on the Kether screen. Pick up the High Priestess (II) tarot card and move R F to the world map. Activate the map with the II tarot card. Move R F R F back to the screen to obtain the next code number (5). Move R2 F12 and zoom in on the Malchut screen. Pick up the Empress (III) tarot card, move R F L and zoom in on the brown panel. Open the panel with the III tarot card. Move R F2 R F back to the screen to obtain the next code number (9). Move R2 F6 R F2 R and zoom in twice on the glowing access screen. As before, enter 5 and 9 into the computer, each terminated by the keyboard Enter key. After another strange poem, note the pentagonal Din symbol, move U T F and click on the 5 hotspot to open the doors.
On your arrival in Din, you'll find yourself in a library. Move L and zoom in on the Traffic Control puzzle, the object of which is to select a path that allows a train to traverse a network
from left to far right without being stopped by red lights or broken path segments. At each node the direction to take to the next node is controlled by rotating the blue arrow representing the train's current location and heading. Click on the destination node to continue the trip. After some experimentation with the puzzle, a few things become apparent: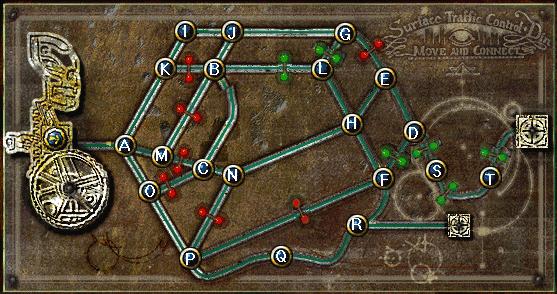
Node D is reached at move 14.Then the train must arrive at Node E or F at move 13. However, the path A O P F H L B C N P Q R F shows that a red light prevents movement from F to D at move 14, so by elimination,
Node E is reached at move 13.(The first twelve moves in the above sequence can also be used to confirm that the smaller destination square at lower right is not the desired path endpoint.)
It follows that the train must arrive at Node G or H at move 12. However, the path A O P F H L B C N H E G shows that a red light prevents movement from G to E at move 13, so
Node H is reached at move 12and
Node F, N or L is reached at move 11.Next we examine the traffic light behavior in the middle of the path, assuming the usually-broken path between Nodes B and C is used. Suppose the path moves downwards from Node B to Node C at move 8, as in the example paths given above. Here are all the possibilities for the following three moves (9-11):
These are all disallowed for the reasons given above, so the path must instead move upwards from Node C to Node B at move 8. One possible path for arriving at Node C at move 7 is A O P F H N C. Following this, the path B J G L is allowed, so an overall solution to the Traffic Control puzzle is
N P F Red light prevents path from P to F N H F Would require backtracking from F to H O P N Red light prevents path from C to O M B L Red light prevents path from C to M N H L Would require backtracking from L to H
A O P F H N C B J G L H E D S TAfter you've solved the puzzle, pick up the Chariot (VII) tarot card and move U R. The room you're in contains a hidden trap door in the center of the floor, so to avoid it you'll have to stay close to the walls. Move forward toward the painting of a winged man to the left of a bookcase, then move R F2 R F L and zoom in twice on a microscope to see a network of rotating pentagonal rooms. Move U2 L2 F R2 through the trap door into Room 07 in the maze you saw in the microscope. To reach the end of the maze (Room 01), use the left exit door from odd-numbered rooms and the right exit door from even-numbered ones, moving F2 through each door.
Take the left exit from Room 01 and the left exit from the next, dark-blue room. Move forward as far as possible, past a slowly-rotating gear at left (you'll encounter an attendant along the way), then move R F2 to a closed door. When the attendant is finished talking to you through a hatch in the door, move T F2 L F3 and take the left exit into the next (gray) room. Follow the attendant out of this room through the left exit. Continue to the end of the arched hallway; along the way you'll be interrupted several times by the attendant. At the far end of the hallway, move R F3 and watch a video segment showing the duplication and cancellation of the attendant. Pick up the Book of Orion and glove from the floor, then move U and take the right exit. Continue forward through a turnstile (locked unless you're carrying the Book of Orion) and on into the Theatre of Memory.
When you've gone forward as far as possible, move L2 F2 R and zoom in on the two standing dolls. Open the left-hand one to obtain the Justice (XI) tarot card and open the right-hand one to disclose two handwritten notes on the hatch, the bottom one of which makes a reference to the number 555 and a "talking head" named Baphomet. Move B3 R F2 L F5 L F2 upstairs to the Carl Jung memory puzzle.
This puzzle is a version of the Mastermind game in which you try to determine a
hidden sequence of symbols by making guesses. After each guess, you'll find out
how many symbols are in the correct locations and how many other symbols are
mispositioned. Each possible solution consists of four symbols drawn from a set
of eight, with repetition of symbols allowed. Therefore, there are
This puzzle randomizes each time it's played, so no fixed solution is possible but you can use the built-in solver below. Instructions: In the game, zoom in on the slot machine and pull the big lever to get started.
Step 1: Click on the up and down triangles until the row of four symbols match the starting guess below. When the 4-symbol sequence has been entered, pull the big lever to display the results of the guess.Continue this back-and-forth process until a solution is reached in the game and a long video segment plays on the slot machine, after which you can pick up the Flying Saucers book. To reset the puzzle, press the Reset button below and turn away from the slot machine in the game.Step 2: Back on this webpage, select the number correct and the number in the wrong place by selecting one of the buttons in each row at right.
Step 3: Press the "Find next guess" button, and the best choice for the next guess will be displayed in the row at left. Back in the the game, repeat Step 1 using the new row of symbols.
It may be convenient to use a capital letter as shorthand notation for the eight possible symbols:
gas MaskIf correctly used, the solver is guaranteed to find a solution in 8 or fewer guesses, with 5 or 6 being average.
Alien
sKull
big Ears
Spots on head
big Nose
Glasses on forehead
Bald man
Move T F L F L F2 L F L F2 to the Aleister Crowley puzzle. After the voice finishes talking, click on your sacred symbol. Wait for the voice again, then click on the large central triangle. After the talking heads finish their chatter, put the glove from your inventory onto the disclosed picture and pick up the Book of Lies after some more gibberish from the talking head.
Move T F L F L F2 R F4 R F9 R F4 L F3 back through the turnstile and on into a subway car at the Skull station. Zoom in on the subway map:
Click on the locomotive-shaped button at upper right and wait to be transported to the Locomotive station. Move U T F9 L F4 into a control room, where you'll see a shadowy figure monitoring some gauges. You must evoke several responses from this figure by fiddling with the controls; the easiest way to do this is to click on the large 12-pointed control knob at left and wait for each of the figure's responses: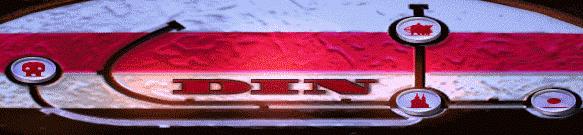
After the equipment has powered down, move T F4 R F9 back into the subway car and zoom in on the map. Click on the house-shaped button immediately to the right of the "DIN" label and wait to be transported back to the area where you first arrived in Din. Move U T F9 L F7 back into the library, which can now be seen is in a house on railroad tracks. Zoom in on the stock ticker to obtain instructions for operating the locomotive:
First click Figure looks at you, then returns to his gauges Second click Figure waves at you, then returns to his gauges Third click Figure approaches you, then descends in an elevator Fourth click Equipment powers down
Move U R2 F L and insert the three books you're carrying into the bookcase. Move F into a secret room behind the bookcase and explore the framed pictures near the four corners of the room: LOST ANGELS, FIREBIRD, MAJESTIC, and GENE ISIS. Along one side wall is a plain stone door containing a receptacle for a tarot card; if you're ready to move the entire house along its railroad tracks to a new position next to the Theatre of Memory, insert the VII tarot card into it, then move F2 and pull the handle (if you want to see the movement sequence repeated, move B F and pull the handle again). Move B T F4 and zoom in on a brownish pyramid along the opposite wall, beneath a hanging noose. After the pyramid opens up, zoom in on the talking head inside and use the mouse to enter the code number (555) that you found earlier inside one of the dolls in the Theatre of Memory. Listen to everything Baphomet has to say by clicking five times on the blood pump sticking out of its head.
After the head lowers and the pyramid closes, move R2 F L F and open the door back to the library. Move F L F3 R F9 back into the subway car and zoom in on the map. Click on the red-dot button at far right to be teleported to a trailer. Move F2 R and zoom in three times on a video screen for the circuit board puzzle. The objective here is to connect each of four pairs of symbols using strictly non-intersecting paths on the circuit grid. Activate one end of a path by clicking on one of the symbols, then click on the desired white line segments along the path. One solution to the puzzle is:
On completion of the puzzle, pick up the Hermit (IX) tarot card. At this point, you can optionally explore more of the backstory of the game by clicking on the video screen and selecting one of the symbols in the four corners of the display, then using the associated password you found in the room behind the library: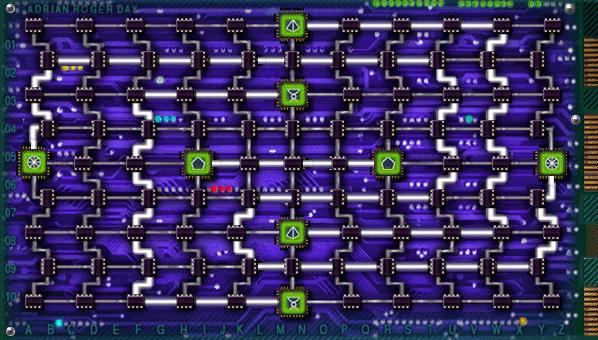
	Chesed			Binah
	GENEISIS		LOSTANGELS

	Din			Chokmah
	MAJESTIC		FIREBIRD
To return to the main display, click on its representation at upper left; use the yellow up and down arcs to page through text.
The large central triangle in the main display was designed to give you access to a bonus web-based puzzle; sadly, Inscape's web site is no longer available. Can anyone describe the bonus puzzle?
From the video screen, move U L F R and zoom in on a globe on the nightstand to return to the subway car. Click on the locomotive-shaped button at upper right and wait to be transported to the Locomotive station. Move U T F9 L F4 back to the control room. Set up the controls using the information you obtained from the stock ticker in the library; from left to right,
Move F4 R F9 back into the subway car and zoom in on the map. Click on the skull button at far left to be transported back to the Theatre of Memory. Move U T F12 R and open the bookcase in the library. Move F6 L F11 through the secret room and into a crypt below the theatre. Click on the circular speaker at left to hear the story of the Comte St. Germain. Pick up a glowing red star fragment.
Move B R2 F9 R F L F4 L F2 L and open the wall panel on the upper theatre level. Move F6 U F2 into a surreal area, then pick the right-hand door (the left-hand one can be used to return to the theatre). Move F6 into a dungeon and click on the circular speaker at left to hear the story of the Man in the Iron Mask. Pick up another glowing red star fragment and move B T F5 R F2 R F4 L F3 L F back to Baphomet, the talking head. Open the pyramid, click on the head and deposit the two star fragments from your inventory. Choose either head by inserting your XI tarot card into the indicated receptacle. Either choice leads to the same outcome.
Back in the Bequest Globe, click on either 1 or 9 hotspot to open the doors. Move F R F6 and zoom in on the Kether screen. Pick up the Devil (XV) tarot card and move R F to the world map. Activate the map with the XV tarot card. Move R F R F back to the screen to obtain the next code number (6). Move R2 F12 and zoom in on the Malchut screen. Pick up the Death (XIII) tarot card, move R F L and zoom in on the brown panel. Open the panel with the XIII tarot card. Move R F2 R F back to the screen to obtain the next code number (7). Move R2 F6 R F2 R and zoom in twice on the glowing access screen. As before, enter 6 and 7 into the computer, terminated by the keyboard Enter key. After yet another strange poem, note the Chokmah wheel symbol, move U T F and click on the 4 hotspot to open the doors.
From your initial position in Chokmah facing a warning sign on a barbed-wire fence, move T F4 toward a silvery trailer in the distance. Open its mirror-like door and move F3 to a brain implant puzzle. To complete the puzzle, you must use your white piece to land on top of your opponent's blue piece by forcing him to move to a node adjacent to your position. A careful check of the network shows that this outcome is impossible unless you can break the alternate pattern of yellow and purple nodes; in other words, in his next move your opponent will always move onto the same color as you've just landed on and so will always be at least two nodes away from you. However, if you move your piece through the triangle on the left side of the network (containing two adjacent yellow nodes), you'll break the pattern and can easily force a win as long as your opponent doesn't also go through the triangle.
When you've finished the puzzle, pick up the Hanged Man (XII) tarot card and move R2 F5 L F2 L F4 R F into the diner. Answer the phone, then move R2 F L F L and zoom in on a radio on the countertop. If necessary, highlight the top of three tuning bands using the up button at left, then use the button at right to drag the red station selector to the third station from the right (approximately above the C in "INC."). After Edgar Cayce starts talking, move U R2 and meet the Pigman. Give him the XII tarot card and obtain the Judgement (XX) tarot card in return. After the Pigman dematerializes, move L or R and get whacked by what's-his-name, returning to the Bequest Globe.
Move F and click on either 1 or 9 hotspot to open the doors. Move F R F6 and zoom in on the Kether screen. Pick up the Sun (XVIIII, or XIX) tarot card, then move L F R F L and use the XIX tarot card to open the door. Move F and pick up the Strength (VIII) tarot card from the podium inside the anteroom. For the Kether endgame, insert the VIII tarot card in the receptacle on the door ahead of you, then move F3 and obtain The Fool (0) tarot card.
Otherwise, move T F R F2 R F11 and zoom in on the Malchut screen. Pick up the World (XXI) tarot card, then move L F R F L and use the XXI tarot card to open the door. Move F and pick up the Wheel of Fortune (X) tarot card from the podium inside the anteroom. For the Malchut endgame, insert the X tarot card in the receptacle on the door ahead of you, then move F3 and obtain The Fool (0) tarot card.
For the "best" endgame, move T F R F2 R F5 R F2 R2 F and deposit both X and VIII tarot cards into the receptacles, then meet some aliens.
Copyright © 2023 Balmoral Software (http://www.balmoralsoftware.com). Portions copyright © 1996 Inscape and EMG. All rights reserved. Republication, redistribution or conversion is expressly prohibited without the prior written consent of Balmoral Software.