
Copyright © 2017 Balmoral Software (http://www.balmoralsoftware.com). Portions copyright © 2016 Daedalic Entertainment GmbH. All rights reserved. Republication, redistribution or conversion is expressly prohibited without the prior written consent of Balmoral Software.
Chapter List Game Chapter Deponia Chapter I: Kuvaq Chapter II: Junk Mines Chapter III: Lower Ascension Station Chaos on Deponia Chapter IV: Grandma Utz's Hut Chapter V: Floating Black Market Chapter VI: Red Rust Sea Chapter VII: Blast Tower Goodbye Deponia Chapter VIII: Cruiser Route Chapter IX: Hotel Menetekel Chapter X: Organon Cruiser Chapter XI: Clone Lab Chapter XII: Porta Fisco Chapter XIII: High Boat
Deponia: The Complete Journey is a 2016 release from publisher Daedalic Entertainment that includes the first three games of the cartoon series. The menu system of the software allows a New Game to be started at the beginning of any chapter, listed above. The premier game is simply called Deponia, and seemed the more enjoyable of the three due to its plot development and accessible puzzles. However, by the second and third games of the series, the tone of the gameplay had deteriorated due to repetitive interaction with tiresome characters and less than logical actions required to move forward. In some cases, these involved dialog sequences to be chosen in a specific but arbitrary order. There are a few timed sequences here and there, but with one notable exception, they were straightforward. The exception was an arcade-style combat mini-game that seemed gratuitously inserted into the second game. Fortunately, this mini-game (like most of the others) can be skipped by pressing a button on the screen at the appropriate moment.
Actually, the mini-games in all three game episodes were a welcome relief from the monotonous and strained humor pervasive in the games. Most of the mini-games were challenging but consistent self-contained logic puzzles that were a pleasure to figure out. Solutions for our favorite mini-games have been included below for the second and third games (a few were omitted due to tedious gameplay or annoying characters). Kudos to the mini-game design team at Daedalic Entertainment for their contributions to the mini-game designs, some of which are quite original.
I: Kuvaq
Use Cushion
Take Green Sock
Open Suitcase to get List
Take Torch and Oil Can from right
Exit To the Living Area
With Locker Door at left closed, try to take Toothbrush next to Washbasin
Open Locker Door
Take Detergent and Bolt Cutter
Take Chafing Chit from closed Bathroom Door
Open Bathroom Door
Step to the side to see the inside of the door
Take Plunger from Bathroom Door
Open Door of Toni's Room
Try to exit into Toni's Room
Take Severe Slip from guillotine blade
Go down ramp to lower level
Take Malicious Memo and Fork from Sink
Use Sink to get Pot with Water
Use Can o' used Oil with Sink to get Empty Can
Take Bitching Post-it from Fridge Door
Open Fridge Door and take Yellow Sock
Click on Coat to get blue Sock
Take Nagging Note from Sofa
Use A Bunch of Notes with the Oven (stove)
Use Hand Torch on Memos in Oven
Put Pot with Water on Hotplate on top of the stove
Use Detergent with Pot
Put yellow and blue socks into Pot
Use Fork with Pot to get Pair o' green Socks
Use Empty Can with Crumbs on the Sofa to get Provisions
Use Plunger on Closet box at the base of the ramp
Use Mouse Hole to get Mouse Trap
In inventory, combine Provisions & Mouse Trap to get Trap with Bait
Use Trap with Bait in Dark Corner halfway up the ramp to get Toothbrush
Exit In Rufus' Room
Put Provisions in Suitcase
Put Toothbrush in Suitcase
Put Pair o' Socks in Suitcase
Put Bolt Cutter in Suitcase
Click on Bolt Cutter in list to remove it from Suitcase
After dialog with Wenzel behind the house, take Wrench
Exit Into Toni's House
Go down ramp and exit In Front of Toni's House
Use Wrench to get Mailbox
Exit Into Toni's House
Go up ramp and exit Behind Toni's House
Open Door of Pod
Open Storage Space and take Battery
Take Suitcase and put it into Storage Space
Use Wrench on Seat
Put Mailbox onto Base Plate
Open Mailbox
Take Battery and put it into Mailbox
Click on Control Panel of harpoon
This knight-move mini-game can be skipped if desired
All ten shortest solutions consist of 9 moves each and use only half of the six available controls; here is one solution:
Rufus will have some dialog with Toni
I'm leaving. For good.Use Hand Torch on Fuse
{Cutscene}
Use Chain twice
Exit into Chute
Open Suitcase, take Socks and Provisions
Use Provisions on Cogwheels
Timed sequence: You then have 60 seconds to use Pair o' Socks with open Hatch on the side of the blue hopper
Use Hatch with Sock
Take Maintenance Arm
Use Robot Arm with Hatch at left
{Cutscene}
Exit In the Hatch
Click on the Left green or Middle blue Lever
{Cutscene}
Exit To the Village Center
The playable demo of the game ends at this point
Your inventory is empty
Exit Into the Town Hall
Take Magnets
Note the distinctive headgear of the three people waiting in line
Exit To the Assembly Hall
{Cutscene}
Learn that Goal must be wakened
Exit Into the Assembly Hall
Use Doorknob
Step to the side to see the inside of the closet
Take Balloons
Exit To the Town Hall
Exit To the Village Center
Note that some of the houses in town resemble the hats of the people waiting in the Town Hall:
Exit Into the Alley
Use Magnets with Detonation Plan
Move the magnets to the locations resembling the hats seen earlier:
Back
Use the Blast Signal
This has the effect of removing all three people ahead of you in line to see the Mayor
Exit Into Lonzo's Bar
Take Dart
Take Sign
Talk to Lonzo
Did you hear about the stranger? The girl?Got recipe for espresso
Is there something on your menu that can give someone a real boost?
Take Red Curtain
Exit To the Alley
Exit To the Emergency Station that has now opened
The Emergency Station is in Doctor Mode (Lever in the top position)
Use Balloons with Laughing Gas to get a filled balloon
Take Dentist's Drill and Dissecting Scalpel
Exit Into the Alley
Use Balloon filled with laughing Gas on Parrot, get Stunned Parrot
Exit To the Emergency Station
Use Balloons with Laughing Gas to get a filled balloon
Move the Lever down to the middle position (Policeman Mode)
Use the Police Box to remove the Foot Fetters
Move the Lever down to the bottom position (Fireman Mode)
Take the Fire Extinguisher out of the Fire Fighter's Cabinet
Put the Foot Fetters into the Fire Fighter's Cabinet
Move the Lever up to the middle position (Policeman Mode)
Take Handcuffs from the floor
Move the Lever down to the bottom position (Fireman Mode)
Take Asbestos Gloves
Use Handcuffs on Hatch to prevent the Fire Escape from closing
Move the Lever up to the middle position (Policeman Mode)
Exit Into the Alley
Exit To the Village Center
Exit Into Toni's Shop
I've got to go.Try to take Vouchers
Take Hook, also get Key of First Aid Kit
Combine Hook & Balloon filled with laughing Gas
Exit To the Village Center
Exit Into Wenzel's House
See you later.Exit Into the Bathroom
Take Sponge
Use Balloon with Hook with Furnace
Exit Into the Living Room
Exit Into the Basement
Use Dentist's Drill on Pipe
Exit Into the Living Room
Exit To the Village Center
Exit To the Water Reservoir
Use Pipe
Use Tap of Reservoir
Exit Into Wenzel's House
Take Divining Rod
Exit Into the Living Room
Exit To the Village Center
Exit Into the Town Hall
Take Waiting Number from the floor
Exit To the Mayor's Office
I came here for the elysian girl.Use Globe
But I was the one who found her!
I'm starting to run out of good arguments here.
That's all.
Take Glass
Use Bell
Use Cushion
Take Planet's Magnetic Field
Use Divining Rod on Water Emblem
Take Key to the Cupboard
Use Key of Booze Cabinet with Keyhole
Take Booze
Exit Into the Town Hall
Exit To the Village Center
Exit To Toni's House
Use Asbestos Gloves on Chili Pepper
Exit Into Toni's House
Use Sponge in Pot to get Wet Sponge
Go up the ramp
Use Key of First Aid Kit with First Aid Kit
Take Tranquilizer
Exit Behind Toni's House
Take Funnel, Dud and Torch
Combine Dissector's Scalpel & Dud to get Black Powder
Exit Into Toni's House
Descend ramp and exit In Front of Toni's House
Exit To the Village Center
Exit To Front of Town Gate
Use Wet Sponge with Windshield
Right-click on Windshield to observe pink color, pirouetting puppet and sign saying "Sugarpuff"
Exit To the Emergency Station
Take Lock Pick
Exit via Fire Escape
Exit To the Village Center
Exit Into the Alley
Talk to Hannek
What exactly are you guys doing down there?Got Key of Truck
Maybe you have my key, too?
Sugarpuff.
Pink.
I love the ballet.
Exit To the Emergency Station
Move the Lever up to the top position (Doctor Mode)
Use Lock Pick on Doctor's Cabinet
Take Syringe and Stimulant
Move the Lever down twice to the bottom position (Fireman Mode)
Exit via Fire Escape
Use Sign on Bulletin Board
Use Red Curtain on Bulletin Board
Use Syringe on Bull to get Syringe with Tuarine
Use Key of Truck with Truck Door
Use Lever to unlock the Hood
Use Hood
Use Dentist's Drill on Battery
Use Glass with Acid
Combine Syringe with Tuarine & Glass of Energy-rich Water to get Energy-rich, revitalizing Water
Combine Booze & Energy-rich, revitalizing Water to get Energy-rich, revitalizing and clear Water
Exit To the Village Center
Combine Dart & Tranquilizer to get Prepared Dart
Combine Funnel & Prepared Dart to get Blow Pipe
Exit down To Toni's Shop
Use Blow Pipe with Window
Exit Into Toni's Shop
Take Vouchers
Put Chili Pepper into Grinder
Put Black Powder into Grinder
Put Stimulant into Grinder
Use Crank
Use Grinder twice to get Coffee Powder
Exit To the Village Center
Exit Into the Alley
Exit Into Lonzo's Bar
Put Energy-rich, revitalizing and clear Water into Filler Cap
Put Coffee Powder into Closed Tray to get Espresso
{Cutscene}
Exit To the Alley
Exit To the Village Center
Exit Into the Town Hall
Exit To the Assembly Hall
Try to use Funnel with Goal
Exit Into the Assembly Hall
Use Hand Torch on Cardboard Box
Exit To the Stage
Take Stethoscope and use with the Bag on Mayor Lotek
While the argument goes on between Lotek and Gizmo, use the Funnel on the noseless one
Use Espresso with the Funnel
{Cutscene}
Heck, this is simply useless.Learn that your next objective is to contact Cletus, which you can do by radio
Exit Into the Alley
Exit To the Village Center
Exit Into the Town Hall
Exit To the Assembly Hall
Exit To the Stage
Take Microphone
Take Clock
Exit To the Town Hall
Use Mayor's Clock with Opening Hours
Exit To the Post Office
Talk to Postbot
Dude, you're no fun at all.You'll learn that the Postbot likes popping bubble wrap that is used whenever excessive postage appears on a package
See you later.
Open right-hand Hatch
Right-click on the white Cat to learn that it applies postage
Open left-hand Hatch
Right-click on the yellow Cat to learn that it runs a hamster wheel that moves packages on the conveyor belt
To get the most postage (4 stamps) on a package, you'll need to slow down the conveyor belt and speed up the stamping
Give Tranquilizer to yellow Cat (its head should then be nodding)
Give Espresso to white Cat (its eye should then be twitching)
Give Vouchers to Postbot
The package will then be delivered by a large pigeon
To get past the Postbot, you'll need to disrupt this delivery process by allocating a small pigeon for the delivery. He'll not be strong enough to fly away with a large package, and will drop it along with the bubble wrap.
Exit To the Operator's Platform
Put Planet's Magnetic Field into Cupboard
Save your game here
Magnetic Field Device Mini-Game
Click on Cabinet to bring up (skippable) mini-game
Refer to the Instructions ([?] button) to determine that four buttons can be pressed on the display whenever they are lit. Identify these buttons as follows:
The number of bars at the top of each puzzle column corresponds to the number of lit buttons in that column, and indicates the size of pigeon that will be placed in the birdhouse holes in the background: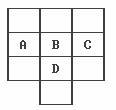
Each pigeon hole has an associated weight shown by the small flags of weight symbols (1, 3, 2 left to right), and the initial puzzle configuration has the correctly-sized pigeon placed for each hole weight:
Pigeon size Bars Pigeon face color Small 1 Purplish Medium 2 Dark grey Large 3 Off-white
There are always exactly 6 of the buttons lit up on the display. To place the smallest pigeon in the largest hole (used for delivering the largest packages), you'll need to find a puzzle configuration with one bar in the middle column. The other five bars will be distributed in the left and right columns, resulting in two possible bar configurations:
	3  1  2
	2  1  3
Only 4 puzzle moves are required to obtain the first of these configurations from the starting puzzle arrangement. Using the notation given above, press buttons
B B A DThis produces the desired puzzle arrangement
Back and exit Down
Give Vouchers to Postbot
The small pigeon drops the package
Click on Bubble Wrap three times
Exit To the Post Office
Note the 4 x 4 array of postal boxes at left
Take Note
Click on Note in inventory:
The holes and numbers on the note describe which digit is to be used from each of the corresponding postal box numbers:
Use the Clock Face
Hole Box row Box column Box number Which digit Digit used 1st 1 3 360 1st 3 2nd 2 1 116 3rd 6 3rd 4 2 245 2nd 4 4th 3 4 489 3rd 9
Enter the code 3 6 4 9
Take Nodding Bird
Exit Back to the Post Office
Open Replacement Cat's Hatch
Take Replacement Cat and get two
Exit To the Town Hall Entrance
Exit To the Mayor's Office
Use Two Replacement Cats with Teletypewriter
Use Nodding Bird with Communicator
Exit Into the Town Hall
Exit To the Village Center
Exit Into Toni's Shop
Combine Stunned Parrot & Espresso
Use Parrot with Pole
Exit Into Toni's Shop
Take Parrot
Exit To the Village Center twice
Use Parrot with Emergency Phone
Exit Into the Town Hall
Exit To the Post Office
Exit To the Operator's Platform
Take Headphones
Exit Down
Exit To the Vault
Use Microphone with Radio
Use Headphones with Radio
Use Radio
{Cutscene}
I've found your fiancee!Exit To the Town Hall Entrance
I want you to take me with you to Elysium.
I want a passage to Elysium or nothing at all.
Exit To the Village Center
Exit Into the Alley
Exit To the Emergency Station
Use Bed Sheet
From the jail cell, use Cat with Tree
Exit To the Village Center
Exit Into Wenzel's House
Exit Into the Basement
Open Cupboard
Use Divining Rod with Basement Door
{Cutscene}
Use Mine Bike
Take Headlight to get Halogen Lamp
Exit To the Viaduct
Click on Skeleton to get Leg of Skeleton
Take Mirror
Open Signaling Light Base
Take Red Signaling Light
Put the Halogen Lamp into the Signaling Light Base
Talk to Doc
Who are you?Got Avial Power Inverter from Doc
I'm a handyman myself.
Just as a thought: In case a fellow handyman faced a problem ...
When the mine bike doesn't start for example ...
Nothing that I couldn't handle myself.
I have to get moving.
Exit To the Tunnel
Use Avial Power Inverter with Mine Bike
Use Junk Heap
Refer to the Instructions ([?] button) for the identification of parts for three power inverters:
In the game close-up:
Power inverter bases: Pyramid/Sphere/Cube
Washer on left side of base: Dark/Light/Squarish
Cylinder on top of base: Tabbed/Striped/Plain
Gear center on right side of base: I/Y/X
the washer stem on the left side of the spherical base is squarish (green), so the rest of its layout can be found by trial-and-error from the nine possibilities for its cylinder and gear. To remove a component, left-click then right-click on it. After the Dorsal Power Converter is assembled, the components of the pyramid base can be found by trial-and-error from the eight remaining possibilities for its washer, cylinder and gear. The final associations are:
Assemble these components for two of the three power inverters to get Avial, Dorsal and Bi-Nausal Power Inverters.
Base: Pyramid Sphere Cube Name: Avial Dorsal Bi-Nausal Washer: Blue Green Purple Cylinder: Tabbed Striped Plain Gear center: I X Y
Use Avial Power Inverter with Mine Bike
Use Mine Bike and Set Off
Use Switch to access the upper level
Take Cloth
Exit To the Tunnel
Use Lever to turn on the red Signaling Light overhead
Press Button to disclose a secret passage back to the lower level
Exit To the Viaduct
Note that the skeleton on the signaling flag has been lowered
Take Key
Take Booze
Use Cloth with Booze
Combine Dirty Mirror & Cloth with Alcohol
Use Polished Mirror with Skeleton
Exit To the Tunnel
Exit Up
Exit To the Control Center
Use Key of Trackman with Key Box
Take Wrench
Use Mine Bike and Set Off
Dismount
Exit To the Viaduct
Use Wrench on Maintenance Hatch
Take Fuse
Put either of the Power Inverters into Maintenance Hatch
Exit To the Outer Turn
Take Bottle and Lever
Exit Back
Exit To the Tunnel
Use Lever with Shunting Lever Box
Use Shunting Lever to move Mine Bike to rear track
Use Mine Bike and Set Off
Exit To the Crane
Open Maintenance Box
Use Fuse with Maintenance Box
Use Crane Lever
Exit To the Tunnel
Exit To the Viaduct
Talk to Doc
I have some more interesting challenges.Use Empty Bottle with Booze to get Filled Bottle
Doc, I am too fidgety.
Right-click on Horizon
Doc spells out R I V E R amongst the colored letters, using the same letter R for the beginning and end of the word
Exit To the Tunnel
Exit To the Turn
Exit To the Crane
Use Leg of Skeleton with Seat
Right-click on Horizon
Make the only selection starting and ending with the same letter: PUPUP
Use Crane Lever
Exit Up
Use Mine Bike
Set Off
Use Switch
In this mini-game you must set the controls to allow the mine bike to exit the mine maze at lower right. The results of the settings are shown in schematic form on the wall of the control center:
and in a more-detailed video that plays after you Set Off:

Each of the yellow, red and green levers at lower center can be positioned forward or back to control the points (switch directions) on the track of the corresponding color. There are two locations, marked by P2 and P1 on the schematic and by small horizontal bars on the midline of the track in the video, that flip all of the switch settings of the corresponding color whenever the mine bike passes over them (in either direction). The setting at P2 is controlled by the left-hand switch beneath the three levers, and that at P1 by the right-hand switch. Each of the P2 and P1 switch dials can be set to any one of the three switch colors.
There are 2³ = 8 possibilities for the three lever positions, and 3² = 9 possibilities for the two switch dial settings, resulting in a total of 8 x 9 = 72 overall combinations. However, these can be reduced somewhat by noting that in any setting with the yellow lever back, or with both the red and green levers forward, the mine bike passes over neither position P1 nor P2, and so the settings of the switch dials is irrelevant. This reduces the possibilities from 72 to 24. Of these, four arrangements of the dials and switches allow the mine bike to escape:
Set Off
Lever Switch Yellow Red Green Left (P2) Right (P1) Solution 1 Forward Back Forward Yellow Red Solution 2 Forward Forward Back Green Red Solution 3 Forward Back Forward Green Red Solution 4 Forward Back Forward Red Red Starting position Forward Forward Forward Yellow Yellow
{Cutscene}
Take Anchovies on a Stick
Right-click Anchovies on a Stick in inventory to get Stick
Move Shelf
Use Plug to activate Cotton Candy Machine
Move Lever all the way forward so that green phospor is pulsating at the front of the machine
Use Stick with Cotton Candy Machine to get Phosphor Cotton Candy
Use Phosphor Cotton Candy with Suspicious Lamps to get Glowing Phosphor Cotton Candy
Use Chewing Gum Dispenser
Use Chewing Gum with Anchovy Machine to get Chewed Gum
Exit To the Lobby
Exit To the Concourse
Take Mosaic Stone from the floor
Scroll right and take Pebbles
Exit To the Elevator
Open Utility Cabinet
Take Mop, Soap and Bucket
Exit To the Concourse
Scroll left and exit To the Lobby
Scroll left and exit To the Tower
Use Bucket on Barrel with Water
Exit To the Lobby
Exit To the Concourse
Combine Soap & Bucket with Water
Combine Mop & Bucket with Soapy Water
Use Mop with Soapy Water on Dirty Mosaic Table
Use Glowing Phosphor Cotton Candy on Hatch of cleaned mosaic
Combine Chewed Gum & Mosaic Stone
Save your game here
Use Mosaic Stone with Chewed Gum on Hole
Place all mosaic pieces as follows, except the brown/yellow one with extra material on its upper edge. The numbers on the pieces indicate how many right-click rotations are needed:
Try three times to place the final hexagonal yellow stone, and the mosaic crumbles off the wall
Open Fusebox and take Torch Light
Use Fuse Switch to reset the elevator password
Use the Mosaic Stones to retrieve the Chewed Gum
Exit To the Elevator
Use Mop with Oil Tank Lid to get Greasy Mop
Use Controls
{Cutscene}
Use Lever
Take Flag
Take Embellishment
Exit To the Elevator
Exit To the Concourse
{Cutscene}
Combine Chewed Gum & Embellishment to get Slingshot
Combine Pebble & Slingshot
Use Slingshot with Pebble on Lamp
Combine Mop Handle & Embellishment to get Hook
Use Hook on Lampshade
Combine Lampshade & Flag to get Organon GetUp
Combine Greasy Mop & Organon GetUp to get Improvised Cletus Costume
Right-click Improvised Cletus Costume in inventory to wear it
Attempt to scroll left
Exit To the Elevator
Exit To the Platform
Talk to Cletus
What's the agreement between you and the Organon?Got Backup Cartridge from Cletus
Alright. Great. There's no one who hates Deponia more than I do.
It stinks.
Let's just say I hate this place.
The Organons said something about a backup cartridge ...
I need the backup cartridge.
Goal is unconscious.
Exit To the Elevator
Exit To the Concourse
Right-click Improvised Cletus Costume in inventory
Attempt to scroll left
Exit To the Candy Shop
Use Anchovy Machine
Take Anchovies on a Stick
Use Anchovies on a Stick on Puddle of Phosphor to get Bait
Use Torch Light with Bait to get Glowing Bait
Use Torch Light on Puddle of Phosphor
Exit To the Lobby
Use Torch Light on Part of Phosphor Trace
Exit Down
Use Torch Light on Part of Phosphor Trace
Exit To the Tower
Use Torch Light on Phosphor Trace
Touch Piece of Fence
Exit Behind the Tower
Use Stack of Needles to get Straw
Use Hook with Grating
Exit Into the Cable Chute
Use Glowing Bait with Hook
Exit To Wrecked Cable Boat
Exit Into Wrecked Cable Boat
{Cutscene}
Remove the implant in the side of Goal's face
Take Duster
Take Key
Exit To the Wrecked Cable Boat
Use Bozo's Key with Chest
Right-click on Chest to get Degreaser and Steel Brush
Save your game here
In inventory, right-click on Cartridge
The objective of this mini-game is to clean the Reading Head, Chip and Contact Pins of the Cartridge
Some rules are evident:
{Cutscene}
Move Reading Head State Contact Pins State Chip State Action to take 1 Clean Dusty Clean Use Duster on Contact Pins 2 Dusty Greasy Dusty Use Degreaser on Contact Pins 3 Dusty Corroded Dusty Use Duster on Chip 4 Dusty Dusty and Corroded Greasy Use Degreaser on Chip 5 Dusty Dusty and Corroded Corroded Use Duster on Reading Head 6 Greasy Dusty and Corroded Dusty and Corroded Use Degreaser on Reading Head 7 Corroded Dusty and Corroded Dusty and Corroded Use Duster on Contact Pins 8 Dusty and Corroded Dusty, Greasy and Corroded Dusty and Corroded Use Duster on Chip 9 Dusty and Corroded Dusty, Greasy and Corroded Dusty, Greasy and Corroded Use Duster on Reading Head 10 Dusty, Greasy and Corroded Dusty, Greasy and Corroded Dusty, Greasy and Corroded Use Steel Brush on Contact Pins 11 Dusty, Greasy and Corroded Cleaned Dusty, Greasy and Corroded Use Steel Brush on Chip 12 Dusty, Greasy and Corroded Cleaned Cleaned Use Steel Brush on Reading Head
Goal is now awake and engages Rufus in conversation
Cletus is a traitor.Exit To the Wrecked Cable Boat
Enough talking.
Select any of the 3 plans
Exit Into the Cable Chute
Exit Behind the Tower
Exit Front of Tower
Use Straw with Pool
Exit Trunk
Exit Left Window
Use Crank
Exit French Door
Take Fork
Exit Pipe
Use Fork with Horn
Use Horn to close hood and open Canopy Top
Exit Canopy Top
Take Platypus Soft Toy (causes first squawk)
Cross the (empty) Board to the near side by clicking on the canopy top (no hotspot)
Use Platypus Soft Toy with Board
Exit Fence Exit (causes second squawk)
Exit To the Crane
Use Crane Lever
{Cutscene}
Exit To the Platform
You go ahead and sort that out between the two of you.Take Bag to get Cletus' Rags
Right-click Cletus' Rags in inventory
Talk to Squabblers
Don't make me laugh!Take Cletus' Speedos
Use Speedos with Flagpole
{Cutscene}
Pull out Goal's implant on the right side of her head
{Cutscene}
In dialog with Goal:
Say, Goal ...{Cutscene}
It's like this ...
Well ...
It's just that ...
Alright then. I'm going to tell you now.
Exit To the Elevator
Exit To the Concourse
{Cutscene}
Take Cartridge
Scroll right and exit To the Elevator
In dialog with Cletus:
You've won. Here's the cartridge.{Cutscene}
Exit Ramp
Use Handle
{Cutscene}
In dialog with Bozo, select any of the responses
{Cutscene}
Right-click on the Take-out menu:
The objective is to order and exchange food items in such a way that a free fortune cookie is obtained. Using the supersizing/downsizing rules and the equivalency of a large hamburger and a large drink, we can infer the following item values:
Using these values, we can see that each Meal costs 1.0 more than the sum of its component item values. So to solve the puzzle, it's necessary to increase the aggregate value of the food items collected by 1.0. The only way to increase value is to exchange two small hamburgers (value 2 x 0.5 = 1.0) for one large hamburger (value 1.5), which increases the total food value by 0.5. If we make this exchange twice, we can come up with the necessary shortfall of 1.0, but we will need to start with at least 3 food items (apart from fortune cookies) in order to have at least two items (2H1) available for the second exchange. Therefore, the only meal that can be used for the puzzle solution is Meal 2. Here is a solution sequence:
Item Abbreviation Value
(zlottis)Small drink D1 0.5 Medium drink D2 1.0 Large drink D3 1.5 Small hamburger H1 0.5 Large hamburger H2 1.5
Action Food items Actual value Displayed cost Select Meal 2 2H1 + D2 2 x 0.5 + 1.0 = 2.0 3.0 Convert 2H1 to H2 H2 + D2 1.5 + 1.0 = 2.5 3.0 Convert hamburger to drink D3 + D2 1.5 + 1.0 = 2.5 3.0 Downsize large drink to small D1 + D2 0.5 + 1.0 = 1.5 2.0 Downsize medium drink to small D1 + D1 2 x 0.5 = 1.0 1.5 Convert to small hamburgers 2H1 2 x 0.5 = 1.0 1.5 Convert 2H1 to H2 again H2 1.5 1.5 Convert to drink D3 1.5 1.5 Downsize drink completely (Fortune cookie only) 0.0 0.0
Click on Egg
An array of holes in the soil is displayed:
This simple game can be won in just one or two turns. Each time you click on the mound of soil with the egg, a meerkat transfers the egg to another location. If you can block all possible destinations with the two stones and the meerkat trap, you win the mini-game and get the Platypus Earth Egg. The meerkat changes to any of the knight-move positions reached by moving two squares in one cardinal direction and then one square at a right angle, always staying within the 4 x 4 grid. If the meerkat is in a corner square, he can also move to the diagonally-opposite square. Therefore, if the meerkat is at any of the 4 corner positions or 8 edge positions (C or E in the diagram above), he has exactly three possible moves and you can block them all. However, if he's located at one of the interior (I) positions, he has four possible moves and will have to move to a Corner or Edge position at his next move. In that case, you can trap him simply by trying a second time.
Click on the Egg in the funnel
The egg is shown circulating through a complex of pipes:
This easy puzzle can be solved by tracing the path backward from the red exit arrows at the bottom. Each pipe junction can be put into a red or blue position. It's not necessary to make changes to any pipe junction "on the fly" when the egg is in located at any particular position. The solution is as follows:
Pipe #8 BlueThe settings of Pipe #1 and Pipe #6 are irrelevant. The final arrangement is:
Pipe #5 Blue
Pipe #4 Blue
Pipe #3 Blue
Pipe #7 Red
Pipe #2 Red
Right-click on Radar:
In this mini-game, the torpedo-laden dolphins can move rectilinearly, but the submarine can sometimes sneak past them by moving diagonally into an open space. The sub won't move onto a square that is directly in front of the oval head of a dolphin icon. For a win in the shortest number of moves, it's probably easiest to trap the sub in one of the corners of the playing field blocked in by the fixed obstacles. One area that seems to work effectively is the two-row region at lower left. The moves described below seem to work nearly every time, once the sub is positioned at the desired location. However, it takes some patience to get the sub into that area initially, since it moves with some randomness. Unfortunately, it's not possible to back out and save the game at an intermediate point.
The initial goal of this strategy is to get the sub to move twice to the southwest, from its starting position to A and then on to B. Once it's in this position, it's fairly easy to trap it in the confined area to the west if the dolphins have been placed correctly.
Your first move:
After your first move, the sub has about an equal chance to move to the west, southwest, or south, so you can expect to have it reach position A about 1/3 of the time. If it doesn't move to the southwest, you can reset the puzzle using the button at upper left, and try again.
Top Dolphin Middle Dolphin Bottom Dolphin Desired Result Forward Left Forward Sub moves southwest to position A
Your second move:
From position A, the sub will move to the northwest, west, or southwest. There's about a 20% (1 in 5) chance that the sub will move in the desired southwest direction to position B. If the desired behavior doesn't occur, you can reset the puzzle. It takes an average of about 14 puzzle resets to get the sub to reach position B in two moves.
Top Dolphin Middle Dolphin Bottom Dolphin Desired Result Forward Forward Forward Sub moves southwest to position B
Once the sub is at position B, the following move sequence should trap it and win the game:
Move Top Dolphin Middle Dolphin Bottom Dolphin 3 Right Forward Right 4 Right Forward Forward 5 Forward Forward Forward 6 Left Left Left 7 Right Forward Forward 8 Left Right Forward 9 Right Forward Forward 10 Forward Forward Right 11 Forward Forward Forward 12 Forward Forward Forward 13 Forward
If you use a transporter containing an animal, you'll merge with it on arrival at the destination transporter. You can undo the effect of the fusion by using the destination transporter to return to where you came from. If you are Rufus by himself (human), then you can walk between inside transporters I-1 and I-2, and amongst any of the three outside transporters. If you are Rufus+Fly, you can fly between any of the three inside transporters. If Rufus is merged with the Frog or the Platypus, he is too big to exit the destination transporter. The objective of the mini-game is to reach transporter I-3 as Rufus alone, so that you can leave the booth and climb the ladder to the exit hatch above. This is the only way to solve the puzzle.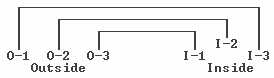
Outside transporter O-1 is paired with inside transporter I-3
Outside transporter O-2 is paired with inside transporter I-2
Outside transporter O-3 is paired with inside transporter I-1
These restrictions prevent any direct solution to the puzzle because there seems to be no way to vacate transporter O-1 so you can use it as Rufus alone to reach the exit via transporter I-3. But take a look at the animals -- the fly is an obvious reference to the horror movie and provides the only way to reach transporter I-3 without swapping with transporter O-1. The platypus is a game mascot. But why a frog?
Here's a puzzle solution in 11 steps:
Play-by-play:
Step Action Description 1 O-3 Merge with the fly in transporter O-3 (any other choice leaves nowhere else to go). 2 I-3 As Rufus+Fly, fly into transporter I-3 to get the fly by itself into transporter O-1. 3 O-3 The frog is now adjacent to the fly outside, but its tongue is too short to reach it. Use transporter O-3 again. 4 I-2 Walk to transporter I-2 and use it to swap the frog to the inside. 5 O-3 Use empty transporter O-3 to go back inside. 6 I-2 Walk to transporter I-2 and merge with the frog. 7 Eat Rufus+Frog is now big enough for its tongue to reach the fly. Click on the fly to eat it, vacating transporter O-1. 8 O-2 Use transporter O-2 to separate Rufus from the frog. 9 I-1 Walk to transporter I-1 and use it to return outside. 10 O-1 Use transporter 1 as Rufus alone to reach transporter I-3. 11 Exit Exit upwards through the hatch.
P: Platypus
G: Frog
F: Fly
R: Rufus
Outside Inside Result O-1 O-2 O-3 I-1 I-2 I-3 Start P G F Rufus outside After using O-3 P G Rufus+Fly inside After using I-3 F G P Rufus outside After using O-3 F G P Rufus inside After using I-2 F G P Rufus outside After using O-3 F G P Rufus inside After using I-2 F R+G P Rufus+Frog outside After eating fly R+G P Rufus+Frog outside After using O-2 G P Rufus inside After using I-1 G P Rufus outside After using O-1 P G P Rufus inside at I-3 Exit
The objective of the mini-game is to turn off (make blue) all nine elements of the oven, using a sequence of five green controls along the perimeter of the 3 x 3 array of oven indicators. The starting state of the puzzle has the center indicator with the desired blue color, and the other eight indicators red. Each control undoes itself, so no repeated controls will appear in the shortest solution. The shortest solution is in 5 moves, and there are 20 such solutions. Each of these solutions uses only 4 of the 6 controls. One solution is:
Put Bozo's towel into Washing machineThe objective is to have both Rufus and Cletus' clothes outside the machine at the same time. The game Instructions indicate that if a laundry stage is black on the corresponding laundry tag disclosed by moving the mouse over the object, then the item stops at that stage. They also indicate that only one laundry item can occupy each stage of the washing machine. Since the laundry tags are the same for the three items from inventory, those items are indistinguishable in the solution. A solution in 6 steps is as follows:
Put Fitted sheet into Washing machine
Put Pillowcase into Washing machine
There are only 17 distinct states in the game, so finding the solution is relatively easy as long as Rufus is behind Cletus' clothes in the sequence:
At the two points indicated by asterisks, the game action seems to violate the rules given in the Instructions. For example, right before the puzzle is solved, the arrangement of items is X X R - - C, and adding a third inventory item should produce the sequence X X X R - C, which is consistent with all of the laundry tags but would leave the player with no action to take!
Exit To the computer core.
As in other mini-games, there is no way to save your intermediate progress. The first objective is to clear a path of white squares for Goal to walk on so she can reach Terminal 1, identified by the large down-arrow at left. The starting position of the game is shown below:
There are initially eight white squares at the start of the game, appearing somewhat grayish in color. Following is a diagram of the squares and cameras:
The only important thing is the orientation of the eight cameras, identified by A - H in the diagram above, which also shows compass directions and the positions of Terminals 1, 2 and 3 that are Goal's goals of the game. Depending on its orientation, each camera illuminates a vertical (north-south), horizontal (east-west) or diagonal row of squares, if one exists in that direction from the camera. For example, Camera A has three possible orientations: it can shine on the two squares leading from it in the northwest direction, on all five squares leading upwards (north), or on the three squares to the northeast. Conversely, Camera D has only two orientations: it can light up the 6 squares to the west, or the same 3 squares to the southwest that can be lit by Camera A, but not any squares to the south since there are none in that direction (the terminal areas don't count). The colors of the squares and of the lights on top of the cameras are unimportant except that a square of any color other than white indicates that it is illuminated by one or more cameras.
As described in the game instructions ([?] icon), Rufus can alter the orientation of a camera by occupying the square immediately adjacent to the camera and in the same direction the camera is facing ("in front" of the camera), then moving onto another square that the camera can point to. The central region of squares indicated in the diagram above are all not adjacent to cameras, so occupying them does not change the current arrangement of camera orientations. Rufus can use these safe squares to selectively access cameras. Rufus and Goal can move only in the four cardinal compass directions within the grid; they cannot move diagonally.
Movement abbreviations:
N: NorthHere is a sequence of 16 moves to allow Goal access to Terminal 1:
E: East
S: South
W: West
Xn: Move n times in direction X
Move E4 N4 to shine Camera A to the Northeast, Camera B to the Northwest, and Camera E to the West.Click on Goal to move her to Terminal 1:
Move W S2 W3 N E to shine Camera G to the Southeast and Camera H to the East.
Here is a sequence of 26 moves to allow Goal access to Terminal 2:
Move N to change Camera G to the East.Click on Goal to move her to Terminal 2:
Move E S4 E W2 to change Camera A to the Northwest.
Move N E3 S to change Camera B to the West.
Move W N2 E2 S to change Camera C to the West.
Move W2 N3 E to change Camera F to the Southeast. a
To move Goal to Terminal 3 and complete the game, you will have to get her to pause part of the way along her path so you can orient the cameras appropriately. This is necessary because Camera D either illuminates the exit square from Terminal 2, or intersects any possible path to Terminal 3. We can set up Camera D in the former orientation once Goal has left Terminal 2. To do this, use the following sequence of 15 moves:
Move S to change Camera E to the Southwest.Click on Goal to move her to Terminal 3 and complete the game.
Timed sequence: Click on Goal, then IMMEDIATELY move E so that both Rufus and Goal are moving simultaneously (repeat if necessary).
Move S W5 N S E N2 S to clear the rest of the path to Terminal 3.

Back out, use the Button and exit To the conveyor belt to see the results of this arrangement:
Freezer Burner Club Laser Saw
What's important here is that the Freezer/Burner/Club sequence caused Rufus to be restored. Also, the Laser was unable to stitch a sliced Rufus (who is otherwise normal) back together as suggested by the hint in the Instructions. Perhaps Rufus needs to be in a different state before he is lasered. Try using the Saw/Laser combination after Rufus is charred:
Rufus
frozenRufus
charredRufus
restoredRufus
slicedRufus
sliced
or after he's frozen:
Solution 1: Freezer Burner Saw Laser Club
Either of these sequences restores Rufus and the game continues. Other solutions can be found as long as the following are true:
Solution 2: Freezer Saw Laser Burner Club
Freezer precedes Burner, which precedes ClubThere are three more solutions meeting these requirements:
Saw precedes Laser
Laser does not follow Club
Saw/Laser combination does not precede Freezer
Solution 3: Freezer Saw Burner Laser Club Solution 4: Saw Freezer Burner Laser Club Solution 5: Saw Freezer Laser Burner Club
Use Door sensor
Exit To the med bay
Click on the tapeworm six times as he tries to hide in the thorax
Select the Lung and right-click on it once so that its hole is at right
Place it into the top 2/3 of the thorax
Select the Intestine and right-click on it twice so that its hole is at right
Place it into the bottom 1/3 of the thorax
Select the Heart and right-click on it twice so that its purple half is at left
Place it between the holes in lung and intestines
Select the purple Some random organ and right-click on it three times so that its hole is at lower right
Place it to the left of the heart
Select the Stomach and right-click on it once so that its connections are at top and upper left
Place it below the heart
Copyright © 2017 Balmoral Software (http://www.balmoralsoftware.com). Portions copyright © 2016 Daedalic Entertainment GmbH. All rights reserved. Republication, redistribution or conversion is expressly prohibited without the prior written consent of Balmoral Software.


