
Copyright © 1999 Balmoral Software (http://www.balmoralsoftware.com). Portions copyright © 1998 Shine Studio. All rights reserved. Republication, redistribution or conversion is expressly prohibited without the prior written consent of Balmoral Software. Contents subject to change! For the latest information, see http://www.balmoralsoftware.com.
Comer is an interesting new game that is essentially a one-man effort by Kyle Choi's Shine Studio in Hong Kong. In this fantasy, the title refers to various historical and fictional figures that have "come" to Earth and may have been involved in evolutionary changes, or at least uncovered information about them. Played strictly from the first-person perspective, your goal in the game is to find out the truth behind the legends of the Comers' visits, and in some sense you are a "Comer" yourself to the various environments presented in the game. Purporting to be very Myst-like, the game uses a similar slide-show interface and limited cursor operation. Visually, it's perhaps a bit more blocky and "clean", somewhat reminiscent of other, low-budget Myst clones such as Celtica and Entombed. Music and sound effects are excellent throughout Comer, definitely one of the best things about the game. A wide range of musical styles are presented in different areas, and Shine Studio is offering the game's music on an audio CD, available separately.
Navigation is self-evident point-and-click, but the game could probably use a "hot" cursor that would indicate allowable movement directions and possible interaction - in its current state you must rotate at each node position and exhaustively try all combinations to see what works. However, that is no worse than in Myst itself and many similar games that have come later.
Although the game is rather short, it does provide some engrossing puzzles to solve along the way, most appearing to be reasonably fresh and original. The manual suffers from poor translation into English, and the synthesized voices in the game may be hard to understand, but this does not detract much from enjoyment of the game. The mechanism for saving games is serviceable and includes a file overwrite warning, but opening a saved game usually restores you to a much earlier place in the environment. Although all previously-solved puzzles do not need to be redone, quite a bit of additional navigation may be required to retrace your steps to the place where you saved the game. All game images provide a very high degree of continuity - if you've made changes to the environment, you can expect them to be reflected in the backgrounds. The ending of the game is somewhat misleading in that you continue to have some freedom of movement, so it may not be clear that it's over.
There is a very limited demo of this game, but with no real interaction with the environment or puzzles to solve, it offers little more than a visual slideshow of a portion of the game.
In summary, Comer is not bad for a one-man project (and even Myst needed two). Currently, the game is available only directly from Shine Studio - without wider distribution, this game may end up being more of an underground favorite than a mainstream release. It certainly deserves a look for players who enjoy Myst-style adventure/puzzle games.
F: Move forward (Fn for n repetitions)
L: Move left
R: Move right
D: Move down
U: Move up
LL: Move to lower left
UL: Move to upper left
LR: Move to lower right
UR: Move to upper right
The telephone is basically a red herring, but if desired, move F and lift the telephone handset to disclose its number: 21283778. Dialing this number plays a backwards recording of a Chinese voice. From the telephone, move R for an aerial view of the "solar open house". Move R2 F2 to the end of the floating platform. Use the cursor to drag first the T and then the S from left to right, changing MYST ART into MY START (unfortunately, at this point the cursor does not change to its usual grasping-hand shape to indicate that something can be manipulated in the environment). When the words have been transformed, they change into a light blue (Cyan?) color - as other puzzles are solved throughout the game, successful solutions are often indicated by a change into this color. The word transformation activates an elevator platform; move F L D to descend to ground level. A further descent takes you to an underground sea cave from which further passage is blocked by water. From ground level, move F3 L F6 L2 F into the house. Click twice on the telephone handset to disclose its number: 19640210. If you return to the floating platform, you can listen to an introductory message by entering this telephone number:
Congratulations for having been chosen as the 28th of all the Comers to this land. This is not just a physical journey, but the one of imagination and of mind. So explore, be challenged and enjoy.From the telephone in the house, move L2 F L UL F L F U and click on the ceiling above the armchair to view a movie clip showing the solar house in winter. Additional clicks on the ceiling will display other movie clips of future destinations in the game. Move D R2 F3 and click on the circular device to disclose a clock. Click again to show a calendar, and click once more to display an abstract time-measuring mechanism. Move F to see a similar display on the larger structure in the pond outside, then move L F R F9 D F6 through a water-filled hallway and down an elevator to a dark subterranean passage. Click on the nested-circles switch at left to turn on the lights in the hallway. Rotate the doorknob at right and move F R F L F into the "white room". There are a few objects in this room, including a piano that plays a tune when touched and four wall hangings suggestive of the seasons of the year, but the white globe you're facing is the most important. Use the "hand" cursor to drag the globe upwards, producing an immediate climatic cooling for the northern hemisphere. Move L UL F2 and turn the doorknob to leave the room. Move F5 UL through the illuminated passage and back to the surface. Move L2 F3 L into the now-frozen hallway and view the first in a sequence of images describing the main storyline of Comer. The sequence continues to the right, showing a "dinosaur" destroying a mountainside village by fire and the appearance of an armed creature with a face of light that vanquishes the beast and saves a maiden that had been offered as sacrifice. On the other side of the hallway more images continue the story, which seems to end on a sad note. Exit the house through the double doors and move F3 UR F3 back into the elevator. Descend to the cave and move F across the frozen sea.
After a switch to CD-ROM #2, you'll find yourself at the end of a walkway extending into the ocean. Dragging the miniature tower at left rotates the main tower, but always returns its ladder to an accessible position straight ahead. From the end of the walkway, move F3 U F into the main tower, then immediately move R2 F to rotate the tower towards the land. Move D F7 and observe another display of three triangles. In this land and the next, you'll need to accomplish seven tasks before progressing on to the final part of the game. Move UR F L F R F R F D into the first flimsy hut and drag down the plunger, changing the ring at its base from yellow to blue and providing power to the projector above. Move U F L and click on the fish button to watch a movie clip about the "27th Comer" (Einstein?) and a possible explanation for the story seen in the solar house images. This completes Task #5.
Move R F2 R F2 L2 F3 UL R F U F L F R up the hill into the second hut (COMER 21). Zoom in on each side of the desk and drag the hand cursor over its handles to investigate the contents of its six drawers, suggesting that Leonardo da Vinci is the 21st Comer:
	da Vinci sketch                    Strange letter
	of two hands

	Picture of gondola                 Picture of
	                                   palm-lined road

	da Vinci's                         Cartoon of
	Vitruvian Man                      mountain dinosaur
From the desk, move R F R2 UL and click on the six squares on the "closet" until they match (abstractly) the contents of the corresponding six desk drawers:
When the correct combination is entered, the closet door opens to reveal a picture inside. Press on the large red button at the top to transform the picture into something more recognizable. This also changes the button on the cross-shaped post in the background from yellow to blue, completing Task #2.
From the open closet, move L2 F2 LL UR F5 L F R into the hut above the first one. This is the "dragon wash" puzzle; click the LL cursor on the bulge ("ear") at left for an overhead view. Rotate the gold button clockwise twice until the lower third of the semicircle is colored yellow. Move LR LR to the other "ear" and rotate its button counterclockwise four times until the lower two-thirds of the semicircle is colored yellow. Move LL and drag the switch on the front of the basin, changing its light from yellow to blue and completing Task #3.
There are other areas of this hut to explore, but no further interactions. From the basin, move R F D F2 R F3 U F3 into the hut of the 15th Comer (Sindbad). Note the unusually-titled "One Thousand and Two Nights" book, then move L LR and enter the 1002 combination using the buttons on the pole. The pole raises up, revealing a periscope apparatus. Drag down one of the gold handles and flip the switch inside from yellow to blue, completing Task #4.
Move F3 D F6 L U F2 D L into the uppermost hut. Listen very carefully to the lower-register notes in the background music, after the initial sequence of 16 single notes. They are:
E(I) E(II) C(II) E(I) C(II) A(I) etc.where (I) refers to one octave and (II) to the octave above it. Move L to play these notes on the hanging chimes. If the chimes are numbered as follows:
	                   7  8  9 10 11 12
	 1  2  3  4  5  6

	                  19 20 21 22 23 24
	13 14 15 16 17 18
then the correct sequence to play is 17,5,1,17,1,22. After the correct six notes have been played on the chimes, the viewpoint automatically shifts downwards to a clamshell device and a switch which turns blue. This completes Task #1.
Move F R2 D2 L F2 D F L F6 through the crossroads in the path and across the rope bridge to a circular platform. Note that although a 16-note chime sequence plays here, it is not the sequence needed to solve Task #1 in the uppermost hut. Move D and click on the line of symbols at the top to display miniatures of the devices associated with your seven tasks (the two at right haven't been seen yet). Move U, then listen and watch as five of the seven panels in the rope bridge are filled in. Each panel corresponds to one of the tasks you've solved. Move R F3 to another platform and through a green portal into the next region of the game.
After a switch to CD-ROM #3, you'll be facing some oriental pavilions surrounded by a green forest. Sound effects here are particularly reminiscent of the Channelwood Age of Myst. Move F3 L and observe the pattern of bird and leafed branch. Move L2 F2 and note the bow and arrow pointed at the bird. Clicking on the tail leaves of the arrow causes the bird to be shot; instead, repeatedly click on the arrow shaft just above the bow until it turns away from the bird. Click on the tail of the arrow to fire it, then click near the lower end of the bow to rotate it into the shape of a leafed branch. Move L F2 to see a changed picture, then move R F4 through the "blue door" that has been opened by your solution of the bird puzzle. Ahead of you is a miniature layout of the pavilions in this valley - your job is to collect a card from each picture on the walls and deposit it into the appropriate place in the layout.
Begin by moving L to the picture of a circular pavilion with a green tree trunk in the foreground. Press the button at lower center to collect a card from the picture; the cursor changes to show that you're carrying the card. Move UR F2 L2 F and insert the card into the vertical receptacle at upper right, facing the corresponding circular pavilion. If you need to reset the puzzle to the beginning, you can press the button at the lower center of the table. Move F R and take a card from the picture of the two-story pavilion. Move L F and insert the card into the vertical receptacle at lower right, just below the one you last used. Move F L2 F to the back of the room and take a card from the picture of the small staircase. Move R2 F2 and insert the card into the horizontal receptacle at lower left, between the models of the bird puzzle and the pavilion in which you're now located. Move F L and take a card from the picture of the bird puzzle pavilions, then move R F and insert the card into the horizontal receptacle at upper left. Finally, move F UL F L and take a card from the picture showing tall pine trees, then move UL F2 L2 F and insert the card into the horizontal receptacle at upper center. A light begins to glow in the skeletal structure at lower left, showing that you've activated something there.
Move F L2 F R F2 L F5 D F up a side stairway and browse the 1002nd Night book left for you by Sindbad. Close the book, move U and pull down the power switch, changing its stripes from yellow to blue and completing Task #6.
Move L2 F4 R F2 L F UL F4 UR F UR F and walk around the hanging bell, observing the diagrams on each of its four sides. Together, they indicate the location of a hydraulic float and valves that can be used to control the flow of water. Starting with the first side of the bell,
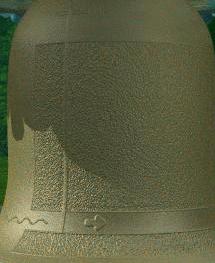
a main valve allows water to enter the system. The next side of the bell

shows that water may rise to five different levels, ascertained by a float mechanism at the top. The third side of the bell

shows five individual valves that control the water output. An arrow at the fourth level indicates that water exiting only from that level will activate a pull ring.
Navigation in this area is easier by means of an overhead map:
From the bell, move to the pavilion of valves. Here, the five small valves control the water output and the large valve controls the water input. The selected subterranean water level can be determined from the location of the float apparatus by lowering its cone-shaped float and checking how much time it takes to reach the water (or the dry bottom). From left to right, the output valves control water levels from top to bottom. The proper settings are all valves fully clockwise, except that the second valve from the left and the large valve are fully counterclockwise. With these settings, the handle of the float apparatus will make only about two revolutions before the float hits the water, and the water indicator at the other end of the valley will indicate 100.
Move to the chair pavilion and sit down. Turn around so you're facing away from the chair, then move U2 and pull the metal ring, changing its sleeve color from yellow to green and completing Task #7.
Move D2 R F4 L F3 UR UR F4 through a brown portal and back to the platform near the airship. After a switch back to CD-ROM #2, move F2 R UL and observe that all seven panels in the rope bridge to the airship are filled in. Move F3 into the airship cockpit. Push the right lever to start the propellers (which you can observe by turning around), then push the left lever to launch the airship and fly to the volcanic island.
After a switch to CD-ROM #4, you'll find that your airship has crash-landed into a lake in the caldera of an extinct volcano. Move R2 F8 toward a cluster of romanesque columns in the lake. Your way is blocked by one of the columns; the puzzle here is to set each of the five rectangles to its appropriate background color by cycling through its sequence of five colors. From the initial puzzle state, the solution is:
Click the top rectangle twiceMove F L F R F R F2 and note the angel figure on the four-sided pyramid. Move F R2 F L F L F R F9 L F4 UR F6 across the lake in a bamboo boat and into a large pyramid-shaped building (another path to the left encircles the building). Look in each compass direction and note the pattern of open and closed bars across the windows:
Click the next rectangle twice
Click the middle rectangle four times
Click the next rectangle twice
Don't click the bottom rectangle
			.
			_
			_
			.
			_
			.
	_		_		.
	.		_		_
	_				.
	.				.
	.				_
	_				.
	_		.		_
	.		.		.
			.
			.
			.
			.
			.
			.


			^
If desired, look down and note Greek words on the floor in each direction. Return to the entrance doorway, facing in, and press the circular button on the wall at right. This raises a post in front of each window. Move F2 and set the light patterns on each post according to the pattern of bars in the window behind it - a light for each open bar and no light for each closed bar. In particular, all lights must be lit on the post at the entrance doorway. Face the entrance and press the circular button at the top of the post to activate an elevator down into the basement of the pyramid. Move D F4 R F2 and press the yellow sun-symbol button on the projector control panel to watch another message from the 27th Comer. Move L F12 through a tunnel into the "gear room".
Each clockwise rotation of the wheel in this room causes the pyramid at the lake to rotate once - to save you the tedium of having to return to the surface to check the results of each rotation, here are the four pyramid images produced:
 Initial
Appearance
Initial
Appearance
 After One
Rotation
After One
Rotation
 After Two
Rotations
After Two
Rotations
 After Three
Rotations
After Three
Rotations
The second and third images provide clues to tasks you must complete in the basement of the pyramid building. From the initial puzzle state, rotate the wheel clockwise exactly three times to display the arched-doorway image on the lake pyramid. Move R F7 U2 F6 R F4 UL F9 L F R F R F2 back to the surface and the lake pyramid. Click on the arched-doorway image to open it, then move F R2 F L F L F R F9 L F4 UR F6 R2 and press the elevator button. From the middle level of the basement, move F4 R through the now-open doorway toward a group of angelic pictures. Click on the palette and move L. Use the palette cursor to add wings to the angel picture. Move L and click on the lamp the angel is holding, changing the cursor. Move L F9 through another open doorway. Click the lamp icon on the the main engine at the bottom of the glider to ignite its rockets. To get rid of the lamp icon, move F R F8 L and click on the hand of the angel.
Move L F4 R2 to the elevator platform, then move D F4 R F2 back to the movie projector. Since you've completed the wings-painting and glider-igniting tasks, the corresponding symbols at the bottom of the projector control panel have already changed from yellow to green. Press the yellow sun-symbol button to watch the endgame sequences. The Greek words seen earlier in the pyramid building have been translated into English:
		Spirit

	Soul		Wisdom

		Game
At this point you can still wander around the pyramid building and its basement, but at the lake all the trees have "lifted off" and the bamboo boat is sunk. The game is over.
Copyright © 1999 Balmoral Software (http://www.balmoralsoftware.com). Portions copyright © 1998 Shine Studio. All rights reserved. Republication, redistribution or conversion is expressly prohibited without the prior written consent of Balmoral Software. Contents subject to change! For the latest information, see http://www.balmoralsoftware.com.