Copyright © 1998 Balmoral Software (http://www.balmoralsoftware.com). Portions copyright © 1996 Trilobyte, Inc. All rights reserved. Republication, redistribution or conversion is expressly prohibited without the prior written consent of Balmoral Software. Contents subject to change! For the latest information, see http://www.balmoralsoftware.com.
In Trilobyte's Clandestiny, you control the fate of one Andrew MacPhiles, who has recently inherited a Scottish castle full of ghosts, and an earldom along with it. Along with his girlfriend Paula (who wants to be the next Countess MacPhiles) and a friendly handyman named Fergus, Andrew must solve the mystery of the MacPhiles curse. Clandestiny is the third installment in Trilobyte's series of puzzle games (after The Seventh Guest and The 11th Hour) and provides an interesting mix of first-person gameplay and third-person cartoon segments. Leaving behind the tired venue of the Stauf mansion used in the first two games, Clandestiny is much more interesting, absorbing and humorous with a well-written plot tying the abstract puzzles together. Generally, the cartoons in Clandestiny work better at immersing the player in the story than did the full-motion video (and marginal acting) used in The 11th Hour. As a result, Clandestiny comes across as a nice improvement in Trilobyte's lineage, and we hope this type of game design continues to be pursued.
Clandestiny's gameplay is very light-hearted, if you can forgive the occasional pun. We particularly liked the joke (90 KB) by the Riddling Rat. Everything is given an authentic touch, even down to a blast of bagpipe music when starting the game and a real Scottish cookbook within the castle. Paula's appearance is very attractive - it's nice to see a good-looking cartoon for a change. Manipulation of inventory items is absent since all of the game's puzzles are stand-alone mental challenges. An online "Guidebook to Scotland" contains hints for puzzles and riddles, as well as educational background information. A few locations in the game provide additional information. Web-based anagram generators may be helpful in solving or shedding light on some of the riddles.
The music in Clandestiny is quite good, usually with acoustic instrumentation and what sounds like authentic Scottish melodies. The organ music played in the castle's chapel is particularly moody. Although several dozen megabytes on the CD-ROM's are used to store background-music files in MPEG format, the segments ended up sounding rather short.
Graphic backgrounds are rendered, with a cartoon overlay during the animation sequences. Many of the backgrounds are repeated on both CD-ROM's, which is a nicely-done way of reducing the amount of disk swapping required to play the game. In fact, only one CD-ROM change is necessary if the gameplay sequence in the following walkthrough is used.
There are a few minor flaws in Clandestiny, but none of them show-stoppers. Only nine save-game slots are provided, far too few considering the number of rooms in the castle. As a workaround, separate sequences of SCLAN.* files can be maintained and copied to the installation directory as needed (for better results, do the copying after the game is exited). Flames and other live-action sprites appear motionless unless a cartoon segment is running; in other words, there are no incidental animations adding to the atmosphere. It would have been more interesting to be able to set the puzzle difficulty level on the fly (as in Jewels of the Oracle), instead of having to reinstall the whole game in order to change the level. Also, there is no way to tell what difficulty level you're currently playing at. In the door riddles, it would have been nice to be able to use the keyboard to enter letters, rather than having to carefully position a cursor with the mouse. Some of the display angles in the backgrounds are a bit tricky; for example, a door will be accessible in one view but inaccessible in another. Probably the most annoying thing about the game was the occasional "lying" cursor - situations in which a shaking-hand cursor indicated no path was available when one actually could be found by clicking anyway. Unless these occurrences (and there are several) are bugs, one wonders what the game designers had in mind in requiring a lot of extra pixel searching, defeating the idea of a smart cursor.
But overall, Clandestiny is an enjoyable experience for players who like the challenge of puzzles and riddles. It is clearly an improvement over both of its predecessors, with a humorous and engrossing plot doing a much better than usual job of tying puzzles together.
Right-click the mouse to skip cartoon segments (except introductions to door riddles).
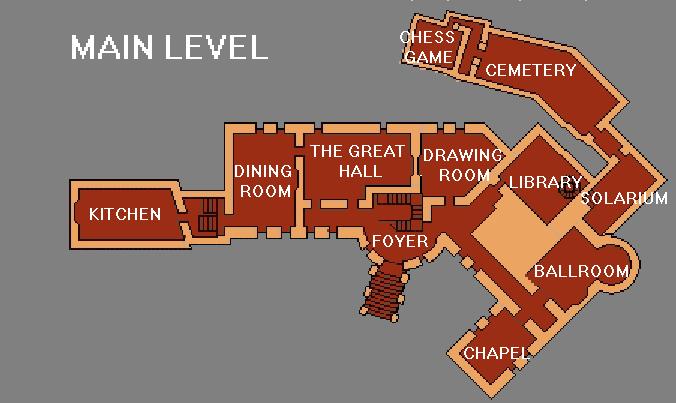
At the foot of the stairs in the castle foyer, you'll find the Tour Guide (brochure), containing some historical information about Castle MacPhiles. At this point, you can optionally visit the Ballroom, but you'll find no puzzles or riddles there.
Notation:
	     A
	B   C D   E

	   F   G
	     H

	  I     J
Cowardly:
F H showingNervous:
Click on either sugar cube
C D G H showingBrave:
Move G to A
Move A to F
Move F to J
A B C D E F G I J showingSolution of the Sugar Cubes puzzle activates doors to the Dining Room, Drawing Room and Library.
Move B to H
Move A to F
Move G to A
Move I to G
Move J to D
Move A to G
Move E to H
Move F to J
If the first was the last
      then the fourth I would be
And then my second the eighth
      from the last don't you see?
The last one ten
      and two more from the end
Which now is the first,
      you'll remember, my friend.
Solution: WHO
Puzzle: China Knights
This puzzle is reminiscent of the Knights Puzzle in The Seventh Guest.
Positional notation:
A   B   C   D

E           F

G   H   I   J
Knights-movement adjacency matrix:
Cowardly:
Click on the red bowl at upper center, then on the empty red placemat at lower rightNervous:
	E -> I -> D
	C -> H
	J -> C -> E
	H -> C -> J
Brave:
	D -> I -> B
	E -> I -> D
	J -> C -> E
	A -> H -> C -> J
	F -> H -> A
	B -> I
	G -> B -> F
	I -> B -> G
Solution of the China Knights puzzle activates the door to the Kitchen, and is required to activate the Tower Bedroom door.
I am unfettered
      and unbound
   To roam the great wide earth
         so round
      I'm also given
            and never bought
         I'm rare to find
               but ever sought
Solution: FREE
On the table to the left of the kitchen fireplace, you'll find the Cookbook of the Clan MacPhiles. Inside are many interesting and authentic Scottish recipes, along with an important written clue to solving the puzzle in this room.
Puzzle: Canals of Campbell's
Solution: CULLEN SKINK IS BEST SERVED HOT
Additional puzzle for Brave mode:
BUT HAGGIS SERVED IS BETTER NOTSolution of the Canals of Campbell's puzzle is required to activate the Tower Bedroom door.
      To be or maybe not to be
   Is a good way to start for me
And to end the same as first and last
   Will help you solve this really fast
      And finally to place inside
An 'A' then from this should you hide.
Solution: BEAST
Puzzle: Bookshelves: Bottom To Top
Solution:
FIVE LETTERS (top)Solution of the Bottom To Top puzzle is required to activate the Tower Bedroom door.
COWARD (bottom)
      F P B G Y N A Q

   Take 13 steps, out or in.
But step you must, then begin.
This riddle is a simple offset cipher.In the Library, you can take a look at the Book of Lore on the stand against the back wall, containing more Scottish culture and history. Opening the Library door activates access to or from the Second Floor via the spiral staircase.
Puzzle: Trade Winds
Cowardly:
Ship starts out in position A8Nervous:
Click on island square in lower right corner
Ship starts out in position E6Brave:
Move ship 2 spaces to upper right (to C8)
Move ship 5 spaces left (to C3)
Move ship 1 space to lower left (to D2)
Move ship 4 spaces to lower right (to H6)
Move ship 7 spaces up (to A6)
Move ship 3 spaces to lower left (to D3)
Move ship 2 more spaces to lower left (to F1)
Move ship 2 spaces down (to H1)
Move ship 7 spaces to upper right (to A8)
Move ship 7 spaces down to island square
Ship starts out in position A1Solution of the Trade Winds puzzle activates the door to the Tower Bedroom.
Move ship 2 spaces right (to A3)
Move ship 4 spaces down (to E3)
Move ship 2 more spaces down (to G3)
Move ship 1 space to lower right (to H4)
Move ship 3 spaces to upper right (to E7)
Move ship 3 spaces to upper left (to B4)
Move ship 3 spaces right (to B7)
Move ship 5 spaces left (to B2)
Move ship 1 space down (to C2)
Move ship 1 space left (to C1)
Move ship 1 space up (to B1)
Move ship 7 spaces right (to B8)
Move ship 1 space to lower left (to C7)
Move ship 3 spaces left (to C4)
Move ship 2 spaces to lower right (to E6)
Then continue with Nervous solution above
   If thee were me and I were thou
And we were both the same somehow
   Then I'd be thou and thee'd be me
So what would I be less one 'E'?
Solution: THE
Once inside the tower bedroom, you cannot leave until all puzzles have been solved. An interesting animation of the Loch Ness monster is visible through the telescope in this room.
Puzzle: Grafitti [sic] Secrets
This is a standard 3 x 3 sliding-piece puzzle. Pull out the stone at lower right to activate the puzzle. Using moves relative to the current position of the space (L: Left, R: Right, A: Above, B: Below), here are 1-move, 6-move and 20-move solutions for each of the puzzle difficulty levels:
Cowardly:
RNervous:
L2 A R2 BBrave:
L A2 L B R B R A L A R B2 L2 A R2 BSolution of the Graffiti Secrets puzzle activates the door to the Bathroom.
Enter and exit the bathroom, then revisit the Tower Bedroom puzzle.
Puzzle: Cryptic Identity: The Riddle
	MY FIRST IS IN KINGDOM,
	                  BUT NOT IN STATE,
	MY SECOND IS IN EMINENT,
	                  BUT NOT IN GREAT,
	MY THIRD IS IN GRISTLE,
	                  BUT NOT IN BONE,
	MY FOURTH IS IN GRANITE,
	                  BUT NOT IN STONE,
	MY FIFTH IS IN HOUSE,
	                  AND ALSO IN HOME,
	   TO WHICH I RETURN
	                  WHEREVER I ROAM;
	TO COMPLETE THE WHOLE,
	               MY LAST IS IN SPITE
	AND I'M ALWAYS THE FIRST ONE
	                        INTO A FIGHT.
Solution: KNIGHT
In Brave mode, tedious editing of an encoded version of the riddle is also required.
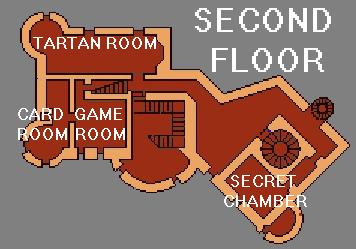
Solution of the Cryptic Identity puzzle activates doors to the Tower Bedroom, Secret Chamber, Tartan Room and the secret passage leading from the Library to the Solarium.
Puzzle: Bookshelves: The Truth Is Out There
Rearrange the books to form a phrase as well as a diagram of the Loch Ness monster seen earlier in the Tower Bedroom telescope:

There is no exit from the Solarium to the Cemetery (yet), so turn around, re-enter the Library and go back up the spiral stairs to the Second Floor.
My first's in a CASTLE
            but not in a KEEP
My last is in SLUMBER
            and also in SLEEP
My second and third
            are both found in THRONE
And my fourth can be found
            in DRAGON and DRONE
Solution: STONE
Puzzle: 13 Easy Pieces
Solution of this puzzle restores the sequence of pieces to a spiral formation:
	10 11 12 1
	 9    13 2
	 8       3
	 7  6  5 4
Cowardly:
		10 11 12 1
	Have	 9       2
		 8 13    3
		 7  6  5 4

	Move 13
Nervous:
		 9 10  2 3
	Have	 8    11
		 7  1    4
		13 12  6 5

	Move 3 2 11 1 12 13 7 8 9 10 11 1 12 13 6 5 4 3 2 1 12 13
Brave:
		 8  9  3 4
	Have	 7    10 5
		13       6
		 1  2 11 12

	Move 2 11 12 6 5 4 3 10 2 11 1 13 7 8 9 10 2 11 1 12 6 5 4
	Then continue with Nervous solution above
Solution of the 13 Easy Pieces puzzle is required to activate the Chapel door.
The 8 and 5 irons are the
               best clubs for me
   But what would they be
                  alphabetically?
Solution: HE
Entry into the Tartan Room activates the door to the Chapel.
The first is the twelth [sic] one
      of the order
The second the fifth one
      from the border
The third and the final one
      will be plenty
And happens along
      at number twenty.
Solution: LET
Puzzle: Cursed Coins
Cowardly:
A2Nervous:
C2 A2Brave:
E6 C6 C4 G7 C2 A2Solution of the Cursed Coins puzzle activates the Game Room door and the secret passage leading from the Foyer to the Armory. Exit the Chapel and change the CD-ROM at the prompt. Fergus will tell you Paula was last seen in the Game Room.
Puzzle: Coat of Arms
Create nine connected regions of five different symbols each:
Cowardly:
Click on all squares in region INervous:
Click on all squares in regions E-I (one region at a time)Brave:
Click on all squares in regions A-I (one region at a time)Click on the heart on the suit of armor to open a secret passage to the Armory. There is no exit from the Armory to the Tower (yet), so turn around, re-enter the Foyer and go upstairs.
First, take 'a dozen' and take away all but one
   Leaving the first to stay in the sun
      And next is subtracting
         the one out from none
Follow along now you are almost done
   The last thing that you're wanting to do
      Add the third from the third
         And then you're all through!
Solution: AND
Andrew is reunited with Paula and they both exit the Game Room through a doorway into an adjacent room. In order to reach the center of the room, you must move toward the sheep in the corner.
Puzzle: Leap Frogs
This puzzle is the same as the Locust Jump puzzle in Jewels of the Oracle and the Nexus puzzle in Buried in Time.
Positional notation:
1 2 3 4 5 6 7Cowardly:
4Nervous:
1 2 4 6 5 3 4Brave:
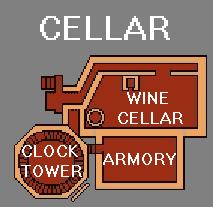
3 5 6 4 2 1 3 5 7 6 4 2 3 5 4Solution of the Leap Frogs puzzle activates doors to the Card Room and the Wine Cellar. Enter the Card Room; Paula gets pinched and falls down a dumbwaiter shaft. The quickest way to reach the Wine Cellar is to follow her down the one-way dumbwaiter passage.
XXV XIX XIX XX XIV IX V ' IVSolution: DESTINY'S
The Roman numerals in this riddle must be both rearranged and translated. For Roman numerals in positions
A B C D E F G H:follow these steps:
Exchange positions A and Hthen move the letters down from the top row.
Exchange positions B and G
Exchange positions E and F
Exchange positions G and H
Puzzle: Wine Racked
Build a path of green bottles connecting regions in opposite corners of the box. Your ghostly opponent's exact moves are unpredictable.
Cowardly:
Click on a hole at upper left to complete a line of green bottles connecting the bottom and top edges of the rhombus-shaped wine rack.Nervous:
It should be straightforward to complete a line of green bottles connecting upper-left and lower-right regions, especially if your opponent stupidly starts lining up his brown bottles along an edge.Brave:
Make a vertical or near-vertical column of green bottles from the top point of the rhombus to the bottom point. Your opponent's responses may vary, but it's not difficult to beat him.You are transported through a secret passage to the Cemetery. To return to the Wine Cellar, turn around, move forward and click on the pentagonal stone in the wall (even though the cursor is a shaking hand). If you previously solved the optional Library puzzle, you can also re-enter the castle through the Solarium. On the other side of the Cemetery is a garden containing a large-scale chess game.
Positional notation:
Without being captured by any red piece, move the flagged white knight to a position from which it can capture the red rook at back right.
Cowardly:
A7Nervous:
E6 F8 G6 E7 C8 A7Brave:
F1 G3 E2 C1 D3 C5 E6 F8 G6 E7 C8 A7G7 is a dead end from E6; there are no other paths. Solution of the Statue Paths puzzle opens up a passage to the base of the clock tower.
If backwards 'out' was meaning 'in'
Then 'ending' is where you'd 'begin'
So then if I found myself without
Where would I really be, no doubt?
Solution: WITHIN
You can return to the Chess Game and Cemetery by turning around and exiting the clock tower. If you previously solved the optional Coat of Arms puzzle, you can return to the castle foyer using the stairs on the far side of the Armory through the door at left. To reach the top of the clock tower, move through the open doorway flanked by a barrel and a mantel clock.
Puzzle: Gears
Denote colors by R, G and B and gear sizes by 1 (smallest) through 5 (largest).
Cowardly:
Move gear R1 from blue post to red postNervous:
Move gear G4 from blue post to green postBrave:
Move gear G2 from blue post to red post
Move gear G4 from green post to blue post
Move gear G3 from green post to blue post
Move gear G2 from red post to blue post
Move gear G1 from green post to blue post
Move gear R1 from green post to red post
Move gear G1 from blue post to green post
Move gear G2 from blue post to green post
Move gear G3 from blue post to green post
Move gear G4 from blue post to green post
Move gear G5 from blue post to green post
Move gear G4 from red post to blue postSolution of the Gears puzzle sends Andrew and Paula on a one-way trip to the Dungeon.
Move gear G1 from green post to red post
Move gear R3 from green post to blue post
Move gear G3 from green post to blue post
Move gear R4 from green post to blue post
Move gear G1 from red post to green post
Move gear R2 from red post to green post
Move gear R4 from blue post to red post
Move gear G3 from blue post to green post
Move gear R3 from blue post to red post
Move gear G3 from green post to blue post
Move gear R2 from green post to red post
Move gear G3 from blue post to green post
Then continue with Nervous solution above
         I'm Victory and not Defeat
      I'm Vanquish and not Retreat
   I'm Triumph and I'm Conquer too
   I'm Surmount and also I'm Outdo
      But I am just a simple word
   That often ye have spake or heard
      So if I am what I say to be
What word would you bestow on me?
Solution: WIN
Puzzle: Torture Rack (Part I) - Brave Mode only
Solution: DISMEMBERMENTS
Puzzle: Torture Rack (Part II)
Solution: STRANGULATIONS
Solution of the Torture Rack puzzle(s) causes the exit door to get bricked up, but there wasn't anywhere else to go from the bottom of the clock tower anyway. Solution of the puzzle(s) also activates the Oubliette grate.
Oubliette Door Riddle:
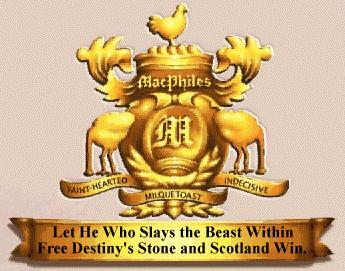
I'm first in WRIST but not in WATCH
 And next in SCOTLAND but not in SCOTCH
I'm third in GRASP but never in HOLD
  And fourth in YOUNG but never in OLD
Last I'm in WORSE and also in WORST
   And also my last is the same as my first.
Solution: SLAYS
Puzzle: Combination Lock
All tiles (including the < one) are restored "right side up" after a rotation. Therefore, there must be an even total number of rotations so that the < background symbol is not changed into an unmatchable >.
Cowardly:
Move stones 8 positions clockwiseNervous:
Move stones 3 positions clockwise and rotateBrave:
Move stones 10 positions clockwise and rotate
Move stones 6 positions clockwise and rotate
Move stones 1 position counterclockwise and rotate
Move stones 3 positions clockwise and rotate
Move stones 2 positions counterclockwise and rotate
Move stones 8 positions clockwise
Move stones 3 positions clockwise and rotateSolution of the Combination Lock puzzle sends Andrew, Paula and Fergus on a one-way trip to the sea caves far beneath the castle.
Move stones 8 positions counterclockwise and rotate
Move stones 9 positions counterclockwise and rotate
Move stones 1 position clockwise and rotate
Move stones 1 position clockwise and rotate
Move stones 1 position clockwise and rotate
Move stones 2 positions clockwise and rotate
Move stones 6 positions clockwise and rotate
Move stones 1 position counterclockwise and rotate
Move stones 2 positions counterclockwise and rotate
Move stones 1 position clockwise and rotate
Move stones 2 positions counterclockwise and rotate
Move stones 1 position counterclockwise and rotate
Move stones 1 position clockwise and rotate
Move stones 1 position counterclockwise and rotate
Move stones 2 positions counterclockwise and rotate
Move stones 8 positions clockwise and rotate
Move stones 7 positions counterclockwise and rotate
Move stones 3 positions clockwise and rotate
Move stones 3 positions clockwise and rotate
Move stones 3 positions clockwise and rotate
Move stones 3 positions counterclockwise and rotate
Move stones 6 positions counterclockwise and rotate
Move stones 2 positions counterclockwise and rotate
Move stones 4 positions clockwise and rotate
Move stones 3 positions counterclockwise and rotate
Move stones 7 positions counterclockwise
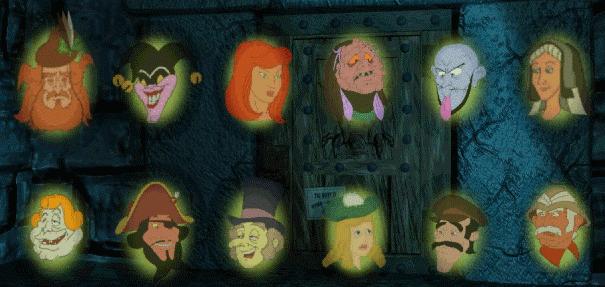
Puzzle: Babble On
Arrange the twelve ghosts in order, producing an approximation to the translation of Scotland's Stone of Scone prophecy:
Unless the fates are faithless foundThe correct order of ghosts is not the order in which they appeared to you when each gave you an object with which to battle the beast within. The correct order of characters is:
And prophets' voice be vain,
Where'er is placed this stone, e'en there
The Scottish race shall reign.
 Magnus         Jester      Rohaise      Gram        Torquil      Dame
 Og                                      Grizel                   Jennet

 Monster        Cap'n       Auld         Fiona       Sir          Buffalo
 MacPhiles      Hugh        Sot                      Thomas       MacPhiles
Positional notation:
	A  B  C  D  E  F
	G  H  I  J  K  L
Cowardly:
Swap positions A and LNervous:
Swap positions F and KBrave:
Swap positions G and J
Swap positions H and K
Swap positions I and L
Swap positions K and L
Swap positions A and DWatch the 5½-minute endgame sequence, followed by a long sequence of credits (skippable by rapidly pumping both mouse buttons simultaneously). To exit from the Clandestiny "eye" display, move the cursor to the top of the screen.
Swap positions B and C
Swap positions C and D
Swap positions D and K
Swap positions E and J
Then continue with Nervous solution above
Ghost First appearance Magnus Og The Great Hall Gram Grizel Kitchen Dame Jennet Drawing Room Cap'n Hugh Library Rohaise Tower Bedroom Monster MacPhiles Secret Chamber Sir Thomas Tartan Room Buffalo MacPhiles Game Room Auld Sot Wine Cellar Fiona Cemetery Jester Clock Tower Torquil Dungeon
Copyright © 1998 Balmoral Software (http://www.balmoralsoftware.com). Portions copyright © 1996 Trilobyte, Inc. All rights reserved. Republication, redistribution or conversion is expressly prohibited without the prior written consent of Balmoral Software. Contents subject to change! For the latest information, see http://www.balmoralsoftware.com.