
Copyright © 2006 Balmoral Software (http://www.balmoralsoftware.com). Portions copyright © 2005 DreamCatcher International, Inc. All rights reserved. Republication, redistribution or conversion is expressly prohibited without the prior written consent of Balmoral Software.
Installation is straightforward, and includes DirectX 9c drivers. Following installation, a CD thankfully is not required to play, but the game does require about 1.3 GB on the hard drive. Saved games are stored in a directory underneath the installation folder; these are not named, but are numbered along with corresponding screenshots as small bitmaps. We did notice occasional sluggishness in the graphic displays, although this might have been due to playing the game on a laptop. The CPU would sometimes peg at 100% and responses to mouse movements would be very slow. We were using a system with 1.6-GHz Celeron, 1 GB RAM and 32 MB video RAM. A full Pentium 3 or Pentium 4 processor may produce better results.
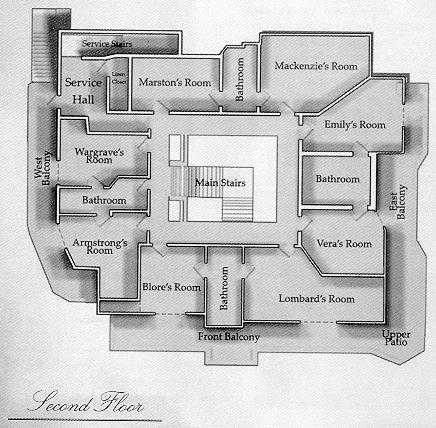
Navigation and game controls are standard for a point-and-click adventure. All input is made with the mouse, and there are no keyboard controls other than the [Esc] key, which can occasionally be used to skip cutscenes, but unfortunately not to skip dialog segments (of which there are many). There's a fair amount of walking back and forth in this game, which allows plenty of time to appreciate the graphics and detailed backgrounds, but a quick navigation method using an island map might also have been useful. It was sometimes easy to lose your bearings due to the constantly-changing viewpoints between scenes. The island map we've provided here may help in this regard.
The level of detail in the background graphics was quite enjoyable, with animation effects optionally available for clouds, water and lightning. The main characters are cyberpuppets, but usually have a good deal of realism in their facial expressions and body movements. There were a few discrepancies in the house floorplans provided with the game booklet, but these did not materially detract from gameplay. The progression of the game's story often depends on particular trigger events that may be hard to find. There are also quite a few "red herrings" in the game resulting in many unneeded inventory items. Finding these items and a use for them does not affect the storyline. Finally, we ran into one serious logic bug in the game, in which we were unable to find a particular item in the game that was essential for continuing.
Overall, And Then There Were None is a well-acted and interesting play, with an emphasis on verbal interactions. The element of suspense is maintained throughout as the central characters meet their doom one by one.
Return to the front patio of the house and talk to Rogers the butler - you are now locked inside the house.
Go to the game room and listen to the conversation.
Pick up three glasses from the left side of the table in the center of the parlor.
Go to the dining room and obtain a flashlight from the top drawer of the chest.
Go to the pantry and pick up the scoop in the flour bag. Use the scoop on the bag twice to get some batteries. Also pick up a cheese wheel with cloth.
Combine the flashlight and batteries in the inventory window.
Go to the servants' quarters and pick up a packet of sewing needles on the left side of the desk.
Go up the service stairs outside the servants' quarters (you can open the front hallway door on the right if desired - it was previously locked from the other side).
Talk to Mrs. Rogers at the linen closet in the upstairs service hall and offer to help her.
Go through the zigzag passageway and open the door to the upper landing.
Knock on the doors of Mackenzie, Emily Brent, Vera Claythorne and Lombard (see map).
Enter Blore's room and try to pick up the notebook on the nightstand next to the bed.
A dinner bell rings. Eavesdrop on the dining room conversation.
Return up the service stairs to the linen closet and take the silk sheets.
Enter Marston's room and take the coded message from the top of the chest.
Open the drawer of the right-hand nightstand and retrieve the code-breaking cypher.
Enter Emily's room and take the bible from the nightstand next to the purple bed.
In inventory, combine the bible, cypher and coded message. Read the decoded message into the notebook. Read the decoded message in the notebook to find a safe combination: L28 R11 L49.
Exit Emily's room to the balcony. Walk to the left until you reach the front corner of the balcony. Pick up the telescope and its tripod. Return through any unlocked balcony door to the main stairs.
Eavesdrop again at a dining room door, from either the main entrance or the kitchen.
Retrieve Dr. Armstrong's bag from atop the chest of drawers in his room.
Go to the servants' quarters and give the bag to Armstrong.
Go to the parlor. After the cutscene, return to the front entrance and take the phonograph record. Return to the parlor.
Talk to any six of the nine people present. The simplest sequence is to exhaust conversation (EC) with Armstrong, Marston, Rogers, Wargrave (by the fireplace at at the far side of the parlor), Claythorne and Mackenzie. Use up all conversation options with each person until there is nothing left to ask or say.
EC with all seven people now present (Armstrong, Wargrave, Blore after turning around, Brent, Lombard by the window, Claythorne and Mackenzie).
Enter Armstrong's room and look at him.
Enter Lombard's room, then enter Emily Brent's room.
In the morning, go to the dining room and watch the cutscene.
EC with all seven people present (Claythorne, Wargrave, Armstrong, Lombard, Brent, Mackenzie and Blore).
Go to the game room and EC Armstrong and EC Wargrave.
Enter the library and then exit outside through the French doors.
Navigate to the apiary and pick up a basket of fermented apples.
Go to the cliff and EC Claythorne.
Go to the beach below the sandy crossroads and EC Mackenzie.
Go to the path midway between the sandy crossroads and the front lawn and EC Lombard. He will give you a parachute plan.
Turn around and follow Lombard and Blore to the front lawn. EC Blore.
Go left through the garden to the woodshed and EC Blore again.
Enter the woodshed and pick up a shovel from the front and a bucket from the back.
Exit the woodshed and proceed to the water pump in the garden.
Use the bucket on the pump to fill it with water.
Return through the garden to the front patio and EC Brent.
Go into the kitchen and EC Rogers.
Near the fireplace in the parlor, EC Brent.
Enter the library and face the bookshelf on the far side of the room. Remove the dark brown book from the top red shelf, the tan book from the middle dark brown shelf, and the red book from the bottom tan shelf.
Place the red book into the space in the top shelf, the dark brown book into the space in the middle shelf, and the tan book into the space in the bottom shelf.
A secret door opens.
Enter the safe room and examine the desk and placard on the left wall.
Open the safe using Marston's combination in your notebook: L28 R11 L49.
Enter the safe and retrieve the rolled-up life raft.
Rearrange the shelves in the file cabinet on the wall to spell out RULE | THEW | AVES top to bottom. Some extraneous loot is collected along the way.
Enter the secret passage and turn on the lights.
Descend the steps into the grotto.
Go left along the metal walkway and pick up some oars from a pile of debris.
Go through the wooden doorway and look at the planks on the far side of the room (there are some unneeded pliers on the ground here).
Use the shovel on the depression in the ground to unearth an air pump.
Return along the metal grating to the foot of the steps, then continue walking to the right.
Pick up a propeller from the wrecked midget sub, then continue along the metal grating until it ends facing the open sea.
Assemble the rubber raft, oars and air pump, then place the inflated raft into the water at the end of the walkway.
After being shipwrecked, enter the hut and open the chest to obtain some ropes (tangled fishing nets).
Exit the hut and use the storm cellar doorway at the base of the rocks to return to the grotto (this doorway was previously locked from the outside).
Go up the steps and through the safe back into the library.
Go to the screening room and EC Claythorne and EC Lombard.
Go to the dining room door in the entrance hall and EC Rogers.
Go to the servants' bathroom and EC Blore.
Return to the kitchen area in front of the pantry and look at the fruit press at left. Disassemble the cheese cloth from the cheese wheel in inventory. Add the cloth to the fruit press along with the fermented apples, mini-sub propeller and one of the drink glasses. Operate the fruit press to obtain a glass of apple cider.
Go into Mackenzie's room and EC Wargrave.
Go into Armstrong's room and EC him.
Go to Claythorne's room.
Go with Blore to the woodshed.
Go outside through the library French doors and make your way to the goat corral.
Empty the bucket of water into the trough to distract the goat blocking the path.
Continue to the left until you reach the abandoned fishing village.
Enter the first hut.
There should be a red cylindrical gas can clearly visible just inside the doorway, immediately to the left of where Narracott is standing. If you see it, pick it up and continue below.
If you don't see the gas can, then you have run into a major logic flaw in the game, for you won't be able to progress in the game later if you don't have the gas can in your inventory. I suppose it's possible that as the result of some "trigger event", the gas can could "magically appear" in the hut later, or could be placed there by another character for some unexplained and undisclosed reason. If that's the case, I don't know what the trigger event would be. At any rate, the problem can be fixed by altering the saved-game file to artificially add the gas can item to your inventory. If you have a Windows operating system, the following procedure can be used (at your own risk):
CD "C:\Program Files\The Adventure Company\And Then There Were None\Saved Games"The command prompt should indicate the change in working directory. You can use a DIR command at this point to list the saved-game files you have in this folder. You can also use Windows Explorer on this folder to confirm that the slotN.bmp file contains a screenshot of Narracott in the first hut of the fishing village.
fixgas slotN.ac1This will alter the saved-game file by adjusting the inventory quantity counter and adding a string representing the "small gas can" to the inventory. The inventory section is identified in the saved-game file by the text "METI". If you get an error that this flag text cannot be found in your saved-game file, then this procedure may not work for you, sorry.
Pick up the leather goat harness to the right of the fireplace.
Make your way to the thorny thicket area nearby and throw the glass of apple cider onto the thorns.
The two grazing goats then helpfully eat through the thicket blocking the path.
Continue forward to the far side of a beach area, where you can pick up a spool of fishing line from the ground.
Go to the cliff and EC Claythorne.
If you haven't already done so, read Lombard's plan into your notebook.
Return via the library and front entrance to the front patio and EC Emily Brent after her altercation with Armstrong.
Give her the packet of sewing needles and the fishing line and then ask her if the parachute is ready.
Re-enter the house and look through the keyhole of Armstrong's room.
Go back to the front patio and talk to Brent to receive the sewn sheets.
Assemble the sewn silk sheets, metal tripod, leather goat harness and some tangled fishing nets to make a parachute.
Go to the woodshed and EC Blore.
Finding yourself at the beach, go to the cliff and use the parachute on the water.
After the cutscene, go to the apiary.
Turn around and EC Armstrong.
Exit the parlor (Wargrave and Armstrong say they are going to play snooker, but they are nowhere to be found in the game room).
Enter Lombard's room.
Go to the game room.
After the lights go out and Vera screams (sounding like a New Year's Eve noisemaker), go to the top of the main stairs and take a step towards any of the the bedroom doors.
Go to the back of the woodshed and look at the generator.
Use the small gas can in your inventory on the generator tank in back, then turn the generator back on using the switch at upper right.
Go to the tree by the apiary and pick up the tiny poison antidote lying in the grass next to the fencepost.
Use the "Belliman's Universal Embrocation" on Narracott.
EC Armstrong.
EC Claythorne.
EC Lombard.
Knock on Claythorne's bedroom door, then go outside to the front patio.
Knock on Claythorne's bedroom door, then go outside to the front patio.
Go back to Claythorne's bedroom a third time.
EC Blore.
EC Claythorne.
EC Lombard.
Go outside the library French doors and look at Blore's body (Vera initially objects).
Take the large hunk of marble from the path.
Go to the surf area below the sandy crossroads and look at Armstrong's body.
Use the hunk of marble on Gabrielle Steele (if you leave the room or do anything else, Vera will be shot).
Go to the dining room and pick up the last little sailor boy figurine from the table.
Go to the back of the screening room and look at the movie projector.
Place the figurine on the raised plate on the corner of the projector stand.
Open the top drawer of the projector stand and remove the reel of film entitled "Hello Again".
If the lamp is not already in the projector, open the third drawer and remove the bulb sitting on the red tray, then insert it into the hatch at the rear of the projector.
Replace any existing reel of film on the projector with the "Hello Again" reel.
Turn on the projector using its power switch at top center.
Watch a modified version of Agatha Christie's original story ending.
No information is given on how Wargrave was supposed to arrange his own death so neatly, but the details can be found in the original Agatha Christie book included with the game.


Copyright © 2006 Balmoral Software (http://www.balmoralsoftware.com). Portions copyright © 2005 DreamCatcher International, Inc. All rights reserved. Republication, redistribution or conversion is expressly prohibited without the prior written consent of Balmoral Software.