
Copyright © 1998 Balmoral Software (http://www.balmoralsoftware.com). Portions copyright © 1998 I. Hoffmann and Associates, Inc. All rights reserved. Republication, redistribution or conversion is expressly prohibited without the prior written consent of Balmoral Software. Contents subject to change! For the latest information, see http://www.balmoralsoftware.com.
Quick Start:
Hold spacebar down after white screen appearsWalkthrough movement abbreviations:
Release spacebar after Hoffmann logo begins to dim
It may be necessary to "pump" the spacebar to skip the desk sequence
F: Forward (or keyboard up arrow); Fn for n repetitionsKeyboard arrow keys can generally be used for movement, except when zooming out from a close-up or when using ladders.
L: Left (or keyboard left arrow)
R: Right (or keyboard right arrow)
B: Back (or keyboard down arrow)
The game always starts near the same position, but the direction you're facing changes randomly. Turn around until you're facing a stone tower with a ladder; you may need to approach it from one node away. Move F, then click the up arrow icon to climb the ladder. Move F, click up, then move F R2 and pick up the open Black-1 book on the desk in the top of the tower. In this book, note the associations made between the days of the week and the planets:
	Sunday      Sun
	Monday      Moon
	Tuesday     Mars
	Wednesday   Mercury
	Thursday    Jupiter
	Friday      Venus
	Saturday    Saturn
Use the right-arrow icon to leaf through the book until you come to the Chaldean Order diagram for the planets:
Zoom in on the open puzzle on the desk and use the colored sticks to connect the planets in weekday order, starting with the Sun symbol at lower left:

The color of the sticks is unimportant, but the cycle must be closed by connecting Saturn back to the Sun. When the puzzle is solved, pick up Bernadette's Diary Key; you can also view a "postcard" of the Kerry mansion elsewhere on the island.
Zoom out and note the locked box on the left side of the table; we'll return to this later once we find the right key for it. If desired, read the wall plaque referring to the collection of books and look through the telescope at left to see a gazebo in the distance. Move L2, click down twice, then move R F2 R F5 to the locked gate at the end of the hanging bridge. Click on puzzle pieces in the 3 x 3 grid to rotate them into the desired positions:

If no pieces have yet been disturbed, the following counterclockwise rotations will solve the puzzle:

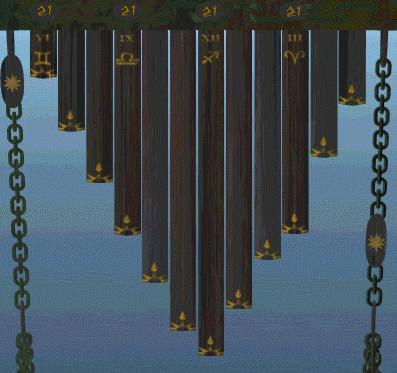
Move F and, if desired, read the plaque hanging from the roof of the gazebo. Move F2 to the gazebo's windchimes puzzle. Here, the objective is to rearrange the chimes so that they alternate sides as they progress up in size. If properly configured, the four labeled chimes will each be positioned below a "21" mark. However, note that two of the chimes are the same size; they may need to be exchanged to establish the correct order with IX on the left and III on the right:
When the puzzle is solved, the chimes flutter in the breeze and a drawer opens. Pick up Harp String #1 from the drawer and close the status display. Move B L2 and look through the telescope eyepiece to see a key on the roof of an arbor in the distance. On the way to picking it up, we'll take a detour into the chapel. Move B F6 R F3 and open the chapel door.
Move F L F and open the curtains covering the stained-glass window by first pulling the drawcord at left and then clicking on the upper-right edge of the curtain rod. Click on the scintillating eye of the swan image to obtain Amulet jewel #1. Close the status display, then zoom out and click right to see an area of the floor highlighted by the sunbeam from the window. Open the recessed floor panel and pick up Ascension (Brown-2) book #1. Close the status display, zoom out, move L2 and zoom in on the table next to the door. If desired, pick up the three organ rolls from the table and look at the two medieval books.
Move B F2 R F3 to the gates of the cemetery, where you can see the solution to the hanging-bridge gate puzzle on one of the stanchions. If desired, you can explore the grave markers in the cemetery to discover some of the former residents of Celtica island, including Bernadette O'Donnell, Franklin Morris and a U-boat sailor that must have stayed for years after the end of the war. From a position facing the cemetery entrance, move L F2 and pick up the key from the roof of the arbor. Move B L2 F9, then click the up arrow icon to climb the ladder. Move F, click up, then move F R2 and zoom in on the locked box on the table in the tower. Insert the Arbour Key into each keyhole to open the box, then retrieve Ascension (Brown-1) book #2.
Zoom out, move R2, click down twice, then move R F8 L F2 R2 and insert the middle eyepiece into the telescope to focus in on the writing on Bernadette's gravestone:
East was FireMove B L F10 to the mansion gate puzzle. Open the gate by rotating the dials until the words from Bernadette's gravestone are selected:
Evening was Light
	        E
	        A
	        S
	        T
	F I R E   E V E N I N G
	        L
	        I
	        G
	        H
	        T
Move F5 L F2 R F2 L F L F R F R into the Music Room on the upper level of the Kerry house:
Zoom in on the open music box on the table and click on its left panel, then move F. Your job is to set the musical note sliders so that the tune played by the left-hand crank matches that played by the right-hand crank. Starting arrangements for the musical sliders are randomized, but we found that most configurations could be solved by swapping the positions of two of the sliders, the fourth and sixth from the bottom, for example.
When the right panel of the music box opens, move F and pick up the Piano Key from the pouch underneath. Move B3 L and use the key to unlock the piano, from which you can obtain Harp String #2. Close the status display and move B L F2 L F2 R F to the pyramid puzzle in the bedroom. Combine the four crystal pieces to form a pyramid:

Once formed, the pyramid shows an important clue about a location in the cemetery. Move R F2 R F3 R F R F L F L F2 L F R and zoom in on the prism puzzle on top of the wooden stand. The objective of this puzzle is to position and orient the prisms and mirror so that a continuous beam of light is transmitted from the source at upper left into the front of the large dome. Progress is indicated by spots of light shown on the faces of the prisms. The solution is:

Click on the now-glowing center of the dome to obtain Amulet jewel #2. Close the status display and move B L F2 L F L F3 into the study, where you can zoom in on some diary sheets on the desk. By repeatedly zooming out and then back in again, you can disclose all the lines of a poem:
Intimate dreams,Zoom out, then move R F L and check out three stacks of cards on a table. Each triplet of cards must be turned over as a set, always obeying the rule
Secret desires
Put into words each day.My musings give me comfort
More than I can say.I share my heart with no one
It is safely locked away.
x 3x+3 3(3x+3)+3that is, each card is 3 times the previous card, plus 3. The value of x is randomly chosen between 1 and 9. If there were a fourth stack of cards following the same pattern, they would satisfy the formula 27x+39:
	First     Fourth
	Card       Card
	  x       27x+39

	  1         66
	  2         93
	  3        120
	  4        147
	  5        174
	  6        201
	  7        228
	  8        255
	  9        282
Zoom out from the close-up of the cards after making a note of the left-hand card value x, and touch the picture above the table to disclose a wall safe. Zoom in on the safe and you'll see that a three-digit combination is needed. From the table above, use the fourth-card value corresponding to the last value of x you turned up. For example, if the left-hand card last turned up was 7, you'd use 228 for the safe combination. Turn the large wheel to open the safe and zoom in on the wooden box inside.
The lid of the box is a standard 3 x 3 sliding-piece puzzle; using the positional notation

a 20-move solution is
	F C B A D
	E H G D E
	H I F C B
	A D G H I
which produces the final image

and opens the box. Inside, pick up Scroll-3 and Bernadette's diary (Pink-1). If you've solved the Chaldean planets puzzle in the tower, you'll have Bernadette's diary key and will be able to read her diary. Inside it, you'll find much of the backstory of the game, as well as a reference to a missing windmill gear in her entry of September 30, 1899.
Move B R2 F3 L F3 into the greenhouse. Click on the herbal diagram at left to find out your task: you must "harmonize" the fluids in the three beakers you're facing. One solution is to add two drops of element "alpha" to the left beaker, one drop to the center beaker, and five drops to the right beaker. The left and right triangular buttons at the top of the cabinet can be used to re-orient the element droppers, and the three circular buttons can be used to apply the drops. After the puzzle is solved, pick up the Golden Key from the center beaker.
Move B4 R F3 into the backyard and approach the stone hut by clicking on its hotspot. Note the plaque on the wall:
BY THIS MONTH'SIs there any other way to align something? The first words of these instructions refer to the actual month of gameplay - the Celtica game software apparently checks the system date at this point. Move F into the hut and use the upper and lower eight-symbol rows to position all eight zodiac-symbol circles in a horizontal line corresponding to the current month of the year (expressed as a roman numeral between I and XII). Next, consult the Black-1 book and an almanac or some other source to determine the zodiac symbol and month range corresponding to the current date:
ZODIAC AND SIGN
ALIGN THE PLANETS
ALL IN A LINE
	Aries           March 21 - April 20
	Taurus          April 21 - May 21
	Gemini          May 22 - June 21
	Cancer          June 22 - July 22
	Leo             July 23 - August 23
	Virgo           August 24 - September 22
	Libra           September 23 - October 23
	Scorpio         October 24 - November 22
	Sagittarius     November 23 - December 21
	Capricorn       December 22 - January 20
	Aquarius        January 21 - February 18
	Pisces          February 19 - March 20
Use the two pairs of buttons in the center area of the device to set the month range and zodiac symbol. For example, in late July (Leo) the following arrangement would be used:

Pull the large lever at right to align the planets in the distance, then move B2 L and zoom in on the Sagittarius hotspot at the end of the aligned planets. Pick up the Zodiac Key, then move R F3 to the door in the backyard hedge.
Release a stone wall behind the door and obtain Ascension (Brown-1) book #3 by inserting the Zodiac Key into the lock corresponding to the current date's zodiac symbol you established earlier. Close the status display and open the door by using the Golden Key in the lock at left. Move F7 R through a stone tunnel and click on the pulsating purple light to enter the next island realm. If you cannot see the light in an alcove at the end of the stone tunnel, then you've failed to complete one of the tasks above.
Move R and click on the door. Click on it a couple of times more to dislodge a key; click down and pick it up to open the door. Inside the building, move R F2 and note the German map containing references to a lighthouse (Leuchtturm), observation post (Beobachtungsposten), amulet (Amulett) and crystal-growing (Kristallzeuchtung), as well as a U-boat track entering the interior of the island through a cave (Hoehle). Move B2 R F R F5 toward a tower in the distance and click on the hotspot on the ladder. Move R and click up the ladder with handrails. Move F and click up another ladder, then move F R F to a telescope on the top tower level. Click on the eyepieces in this order: left, upper, left, upper, left. This will provide successively closer views of a distant tower, allowing you to identify it as the one in Realm 1 at which you started the game. A gem is obviously used as the eye of a swan (Cygnus) in the windvane at the top of the tower. From the telescope, move B R and click down, then move R F and pick up the Ammo Clip next to the rifle. Load the gun by clicking the clip just ahead of the rifle's trigger. Click on the gunsight and fire at the swan's eye by repeatedly clicking the point of the cursor on it. After several attempts, you'll finally succeed in knocking the windvane down, to be picked up much later in the game. Move B2 R and click down the ladder. Move R F L F5 L F5 L F across a couple of rope bridges into another gazebo with a windchime. Rearrange the windchimes to provide a symmetric sequence of light and dark along the bottom:

When the puzzle is solved, the chimes flutter in the breeze and a drawer opens. Pick up a Sacred Key and Harp String #3 from the drawer and close the status display. Move L F5 L F2 and zoom in on the table in the observation post. Click on the black notebook to the upper left of the Enigma coding machine to obtain a second Scroll-3. Click on the roll of white paper at left for more information. Move B R and click on the elevator control panel at left. Note the references to tides (Gezeiten) and a cistern (Wasserkasten). Raise the lower-right lever, then lower the upper-right one to release the flow of water from the cistern. Lower the lower-right lever to call the elevator (Aufzug). Zoom out and click on the green elevator door to ride it down to a subterranean U-boat supply/repair depot. Move L and light a match in the alcove. Click on the lantern to light it, then pick up the Hatchet/Match and Lamp. Move R F3 L F L F to a barrel on the U-boat dock. Use the hatchet three times to remove the lock from the barrel, then use it on the hotspot in the lower left area of the barrel to drain the water out of it. Click on the interior of the barrel to disclose a wooden chest; pick up the Amulet from inside it. Close the status display and move B R F L F4 deeper into the cave. If desired, zoom in on the table at left and light a candle with the match, then pick it up. Move F and use the Sacred Key to open the wrought-iron gate.
Move F2 R F3 to the top of a discarded crate in a side cave. Click on the compass twice to cause it to act (sluggishly) as the mouse cursor. Move the compass to the extreme upper-right corner of its range, click the mouse, then click it again to the immediate right of the compass to obtain an organ roll ("Evening Light") and a gear. Put the gear in your inventory, then move B3 L F2 L F3 R F into another side cave. Click on the cluster of crystals to obtain Ascension (Brown-4) book #4. Close the status display and move B R F3 L F3 L F5 L F6 R past some ethereal cave waterfalls and through another stone tunnel. Click on the pulsating purple light to enter the next island realm.
Move F R F5 L F to a movable mirror at the side of the path. Click on the mirror to cause it to respond to your mouse motions. Orient the mirror nearly vertically and facing away from you toward the tower in the distance. When the correct mirror orientation is achieved, another mirror near the base of the tower will begin to pulsate with light. Click your mouse button to "fix" the mirror's position, then move B. You should now be able to see an inverted reflection in the mirror's surface. Move B R2 along a side path and you'll see that three mirrors on the island are now directing sunlight to a destination ahead of you. This is also the view displayed during the initial installation of the game. Move F3 and pick up three glowing Viking Runes hanging in the stone archway. Two more remain, but are inaccessible in the game.
Move B4 L F5 and click on the tower doorway at the top of the ladder. Click up the ladder, then move F R to a table on the middle tower level. Zoom in on the set of bottles at left. Click on the second bottle from the left ("Flower Petal"), then zoom out and click on it again in order to pick it up. Use it on the dead rose to bring it back to life; the vial will be placed in your inventory. Zoom out and click on the open book on the right side of the table to obtain the Black-2 book. In this book, note azimuth-293 and altitude-30 coordinates for the eye of the swan, as well as references to a harp and eagle. Click on the loose sheet of paper in the middle of the table for more references to these items, and several calendar dates all falling on the 21st of the month. If desired, take a look through the kaleidoscope on the table.
From the table, move R, click up the ladder and move F2. Pull the lever at the top of the ladder to activate the shutter control mechanism upstairs. Move F and save your game. Click on the circular dial directly below the barrel of the telescope, at the point where the support arms join the base. Use the knurled knob at upper right to set the azimuth angle to 293. When the angle is properly set in the center of the dial, the value at the far left of the dial will read 291 and the value at far right will read 29. To decrease the azimuth setting, click the right mouse button (thanks to Nicholas Neroutsos for pointing this out). Zoom out to a position somewhat closer to the telescope. Click on the square white button about midway up the left telescope support arm. Click on the box to set the altitude to 30 (click the right mouse button to decrease the setting). Zoom out and click on the sighting tube bolted to the side of the telescope. Pick up the glowing Amulet jewel #3.
Close the status display, move B2 R and click on the shutter control panel. Using the circular dial at left, set the numeric setting midway between 225 and 270, the only setting that will allow you to pull the lever at right and open the shutters of the dome. Zoom back out, click on the main eyepiece of the telescope and watch a movie of an eagle landing on a nest nearby. Move B F2 L F outside the observatory dome. Pick up the Harp from the windvane at the top of the dome.
Close the status display, move B L F3 B and click down the ladder. Move B and click down again. Click on the wooden door behind the ladder, move F3 R and pick up Harp String #4 from the eagle's nest. Close the status display and move L F7 R F into a dome-shaped stone hut.
Pick up the house-shaped Cap Stone at upper left and examine a scrap of paper at upper right describing an alignment of stone heads. Click on the floor to access the stone-head puzzle; the objective here is to align pairs of heads on the inner and outer rings of the circle, but not necessarily all on the lines indicated on the scrap of paper. To exit the puzzle, move the cursor to the extreme bottom of the viewport. To reset the puzzle, click on head 0 in the center. The solution to the puzzle is:
Move head 10 counterclockwiseClick on the hole in the center of the circle and use the Vial from your inventory to restore the ashes. Pick up Ascension (Brown-5) book #5. Close the status display and pick up two more Viking Runes that were underneath the book.
Move head 1 clockwise
Move head 3 clockwise
Move head 7 clockwise
Move head 5 clockwise
Move head 11 clockwise
Move B L F5 and zoom in on the control panel to the right of the gate. This puzzle requires the depositing of runes into the upper slots in order to set the dials. To reset the puzzle and eject any deposited runes into the bottom slot, press the center of the circular dial. One of the upper slots must receive runes totaling 21, with the remaining runes put into the other upper slot. Counting both vertical and horizontal marks on the runes, they have values 3, 5, 7, 8 and 10 (circle plus vertical bar). Put runes 5 and 7 into one of the upper slots and the remaining three runes into the other upper slot. Move F2 and pick up Ascension (Brown-6) book #6. Close the status display and move F6 R to the end of the stone tunnel. Click on the pulsating purple light to return to the first island realm.
Move F4, place the Cap Stone on top of the Celtic cross and pick up Ascension (Brown-7) book #7. Move B7 back to the first tower and pick up the Amulet jewel #4 that you shot down earlier. Close the status display and move F3 L F4 into a windmill. Zoom in on the yellowish control panel at right and open it using the lever at the extreme upper left. Move the gear from your inventory onto the middle one of three posts in the framed box at upper left. Arrange the other five gears from the cubbyholes to form a continuous power train to the shaft at lower right. Note that the medium-size gear from the cubbyhole must be placed vertically at the bottom of the box:

Close the box by clicking on either side panel and move B. Transfer power from the windmill to the pipe organ by clicking on the large lever sticking out of the floor at right. Click on the organ at left and insert the "Evening Light" organ roll from your inventory into the receptacle. Click on the lever at left to play the tune, then remove the organ roll to disclose a secret compartment. Inside it, pick up Scroll-1 (a note from Franklin to Bernadette) and Harp String #5. Close the status display and move B4 R F5 L F18 across the island and through the house to a newly-opened Stonehenge area beyond the stone tunnel. Click on the altar and watch the endgame sequence, followed by the game credits (skippable by clicking the mouse).
Copyright © 1998 Balmoral Software (http://www.balmoralsoftware.com). Portions copyright © 1998 I. Hoffmann and Associates, Inc. All rights reserved. Republication, redistribution or conversion is expressly prohibited without the prior written consent of Balmoral Software. Contents subject to change! For the latest information, see http://www.balmoralsoftware.com.