Black Mirror III: Final Fear
Black Mirror III
16 October 2019
Copyright © 2019 Balmoral Software (http://www.balmoralsoftware.com).
Portions copyright © 2011 dtp entertainment, AG. All rights reserved.
Republication, redistribution or conversion is expressly prohibited without the
prior written consent of Balmoral Software.
Black Mirror III: Final Fear is a 2011 release from the German video
game publisher dtp entertainment, AG. Consisting of six substantial chapters,
it is a lengthy and absorbing game that continues the saga of the cursed Gordon
family from the previous game in the series,
Black
Mirror II. Graphics are crisp and immersive, and the visual effects of
rain are particularly realistic. The sound effects are satisfactory, although
the endless cawing of crows in every outdoor scene grows tiresome. The music is
superb, and the game interface has a variety of features to streamline the
gameplay. New in Game III of the series are places where you can (and must)
play two different characters; in these cases, a green circle around an icon at
the top of the screen indicates the active character. There are a few optional
inventory items (identified in the walkthrough below), so don't pick them up
unless you want to carry them in your inventory for the rest of the game.
There are several timed sequences in the game, but they are not difficult.
Played in the third-person on static rendered backgrounds, a few of the scenes
required side-scrolling to reach all exits. A trigger event in the game that
allows the plot to proceed is often accompanied by the sound of scribbling in
Darren's diary, which can be referred to for guidance.
Game controls are fully explained in the accompanying manual. For example, you
can press [Esc] to skip the game startup logos or to bring up the game menu.
Several of the controls facilitate moving through the game during replays.
Left-clicking will skip through dialog, while pressing the [Tab] key will skip
cutscenes and certain blocks of dialog. Pressing the keyboard [Pause] button
will halt and resume dialog sequences. Double-clicking on an exit will
accelerate the character's movement. Occasionally, an Exit or other hotspot is
allowed to occupy the same space as the game menu that always occupies the
upper-right corner of the screen. In these cases, the [Esc] key can be used to
bring up the Save/Load menu. Entry of a saved-game name is echoed very slowly,
and if you use mixed case, you may need to pause so that the release of the
Shift key is recognized.
When holding an object, the arrow cursor icon includes an image of the object.
In these cases, if the cursor does not seem to respond when clicking it on a
hotspot, try double-clicking it on its target location. Also, when a
task (such as opening a door or gate) seems to be disallowed, ostensibly due to
its dependence on a trigger event, try performing the same task a second time
and it may be successful.
This walkthrough provides a minimum path through the game; other gameplay
sequences and dialog choices can provide additional backstory elements.
New game
{Cutscene}
Exit To the cells
Examine the Locker to get a Pencil
Click twice on Matt
{Cutscene}
Get Diary pages
Exit Back to office and get Dr. Jones business card
Enter the Old fashioned shop
Click twice on Abaya
- End conversation
Click three times on Walking maps to get one
Exit To the village square
Use Dr. Jones business card on the Telephone box
- End conversation
Optional activity and inventory: Pick up the Little card and use the
Fortune teller's card on the Telephone
Exit To the village square and pick up the Board from the picnic table
Exit in the Direction of pub
Take the Sponge to the left of the pub door
Exit To the village square and enter the Cafe
Examine the Counter
Click twice on Denise
- Doughnuts
- Coffee
Click twice on the Door to enter the storeroom
Examine the Shelf, then take the Doughnuts
Open the Chest freezer and put the Doughnut carton in it
Use the Sponge on the Wash bucket
Use the Wet sponge on the Chest freezer
Use the Door
Enter the Police station
Click twice on Constable Zak at lower right
- Police file
- End conversation
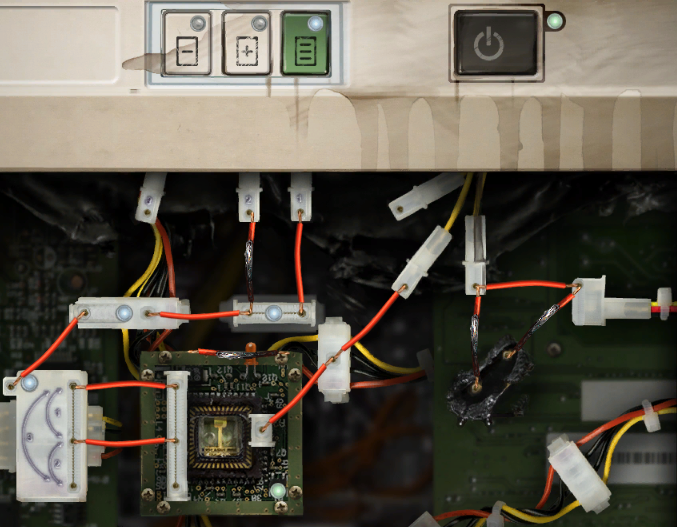
Examine the photocopier
To fix it:
Drag the horizontal red wire at the top to the two terminals at right
that are connected to burnt-out wires
Drag the lower of the two parallel horizontal wires at lower left up
into the middle position, closer to the upper horizontal wire
Right-click twice on the vertical wire at upper left to make it
horizontal, then drag it on top of the damaged horizontal wire
nearby
Press the black power button at upper right
Press the green button at upper center
The correct wire placements are:
Talk to Constable Zak
- Photocopier
- End conversation
Exit To the village square
Put the Menu into the Letter box
Examine the Letter box after Zak uses it
Right-click on the Letter to Dr. Jones to get a Copy of police file
Right-click on the Copy of police file
Cross Over the bridge
Exit right to Road to hotel
Use the hotel Entrance and get a Polaroid camera, a Samuel Gordon rucksack and a
Room key from Murray
Right-click on the Samuel Gordon rucksack to get a Samuel Gordon lighter, Bloody
plastic knife and Plastic soul key
Use the Exit at right
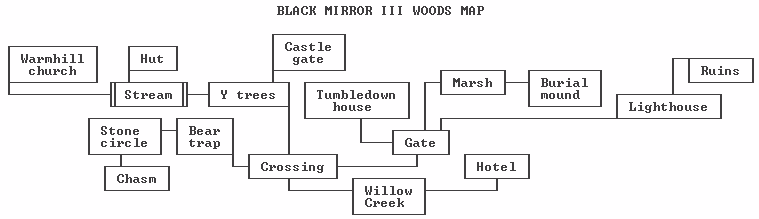
Exit To Willow Creek
Take the Road to woods at left
Use the Road at the top of the screen
Exit To the castle and use the Intercom
- End conversation
Click twice on Victoria and exhaust all five dialog choices
{Cutscene}
Use the Polaroid camera on Black Mirror Castle
Use the Walking map to go to Gordon's Palace Hotel
Enter the hotel and give the Photo to Murray
Exit To the rooms and into Room 2 to drop some extraneous inventory
Take the Letter and click on it to close
Exit to the Corridor and To the lobby
Click twice on Murray
- graveyard
- End conversation
Use the Walking map to go to Black Mirror Castle
Exit To the woods
Use the Unmade road at left
Scroll left at the stream crossing and take the Road at far left
Double-click on the Church door
Click twice on the Confessional
- Samuel's grave
- Father Frederick
- End conversation
Exit To outside
Night has fallen...
Exit Into the woods
Scroll right three times at the stream crossing
When the two hellhounds appear, quickly take the Beaten path at upper left
{Cutscene}
Take the Rake, Can and File
Use the Rake on the Bed to get a Cardboard box
Right-click on the Cardboard box to get Mr. Bubby, a luminous sticker and a
cork
Use the Samuel Gordon lighter on the Oil lamp
{Cutscene}
Click on the Peculiar shadow, then on the Oil lamp to get a Rusty key
Use the Rusty key on the Padlock
Examine the Box to get a Cowl, Corkscrew, Rule and Chainsaw
Use the Rule on the Floorboards
Combine Petrol & Chainsaw
Combine Corks & Chainsaw
Use the Chainsaw on the Floorboards
Use the Hole in the floor
{Cutscene}
The next day, leave the doctor's office and cross Over the bridge
Click twice on the Barrel to get a Parcel for Murray and Medicines
Use the Walking map to go to Gordon's Palace Hotel
Use the Entrance
Scroll left and enter the Office door
Use the Walking map to go to Warmhill church
Go through the Gate and pick up the Tree lopper
Use the Walking map to go to the Crossing in the woods
Exit right onto the Gravel Path
{Cutscene}
Use the Tree lopper on the Barbed wire
Use the Road
Examine the Place behind fence and the Place in the bushes
Examine the Dark place to get another luminous sticker
Examine the Place on edge of woods
Use the Walking map to go to Warmhill church
Double click on the Church door
Click twice on Father Frederick
- Church
- Samuel's grave
- End conversation
and get a List of burials from 1981
Right-click the List of burials from 1981, then talk to Father Frederick again
- Henry Stanton
- Robert Gordon
- End conversation
to learn that Robert Gordon was Victoria's son and that she was disappointed
in him
Use the Walking map to go to Willow Creek
Enter Dr. Winterbottom and talk to her
- Dr. Winterbottom
- Dr. Heinz Hermann
- End conversation
She speaks of Dr. Hermann as a fellow doctor and friend. Note the
dreamcatcher hanging in her window.
Use the Walking map to return to Warmhill church
Examine the Grave to the left of the Church door
Use the Gate and talk to the Gravedigger
- Henry Stanton
- End conversation
to learn that Henry Stanton was a lone wolf without any family
Exit To the graveyard
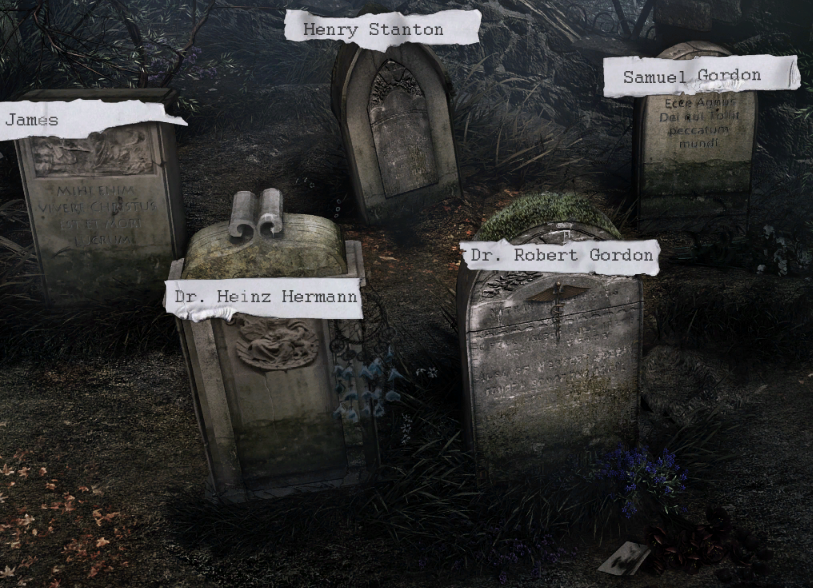
Examine the Large gravestone
and the Anonymous graves
Note the dreamcatcher on the gravestone at lower left; this looks like the one
in Dr. Winterbottom's office, so that grave is probably that of her friend
Dr. Heinz Hermann. Examine the gravestone at lower right to discover a card
from Victoria; this must be the grave of her son Dr. Robert Gordon. Examine
the gravestone at upper right to see that it has some old flowers on it; this
one is probably not Henry Stanton's grave since he was a loner and had
no family. Given that information, there are four possibilities for the back
row of gravestones:
| Henry Stanton | | Samuel Gordon | | James |
| Henry Stanton | | James | | Samuel Gordon |
| Samuel Gordon | | Henry Stanton | | James |
| James | | Henry Stanton | | Samuel Gordon |
You can try each of these to determine the solution:
Exit To the church and double-click on the Church door
Talk to Father Frederick
- Bible quotation from anonymous grave
- End conversation
Examine the Columns at far right to get a Note with message
Use the Walking map to go anywhere except the church, hut or castle
Click twice on Phil and exhaust the dialog choices
{Cutscene}
Click twice on the Ceiling
Use the Corkscrew on the Stretcher, then use the Improvised handle
Click on the Little red light
Examine the Refrigerated compartments and then the Body bag
{Cutscene}
Examine the Middle compartment and the Skeleton
Right-click the Skull to get a Film reel
Take the Thigh bone
Zoom in on the Writing desk and open the Drawer
Take the Book, Scalpel and Little bottles
Combine the Chemistry book & Empty bottle of smelling salts to discover that
smelling salts can be made from deer antlers
Back out and use the Scalpel on the Cassette player to get some Wires
Use the Wires on the Intercom
Click on the Projector, then double-click on the Door
Save your game at this point
Timed sequence. Make sure that your inventory bar is scrolled to the
right so that the Thigh bone is accessible. Use the Intercom, which will be
followed by a short cutscene. As soon as Phil appears and before he shuts
off the projector light, you have just a few seconds to select the Thigh
bone from inventory and use it on Phil.
Search Phil to get a Sawn-off shotgun and Phil's key ring
Use the Door to exit the morgue room
Take the Bottles and the Stag's head
Examine the Display case at right to get a Glass flask
Combine the File and the Deer antlers
Combine the Glass flask and the Powdered deer antler
Exit the room through the Cellar door
Click twice on the Projection screen to raise it
Take the Camera accessories
Lower the Projection screen
Put the Film reel and the Colour filter into the Projector
Click on the Projector, then double-click on the Projection screen
The projector controls are the top line of tiny symbols above the two
knobs (not the knobs themselves):
	|>	>>	>>>		<<	||	>>
	      (Speed)			   (Direction)
Select the slowest speed by clicking on the symbol in the upper-left corner
of the left-hand black box, and the left knob turns to that position. There
are about 50 film frames in the reel. Move forward through the frames by
clicking on the symbol in the upper-right corner of the right-hand black box.
At about the 30th or 20th frame (depending on whether you're moving forward
or backward through the sequence), a significantly darker image is displayed.
At that point, immediately press the || symbol at the top center of the
right-hand black box to freeze that picture.
To apply color filters, select one of the three white buttons above the
left-hand black box and/or the right-hand black box. Of the 16
possibilities, the combination Yellow (left) and Red (right) produces the
4-digit solution: 2180.
Zoom in on the Writing desk
Put the Powdered ammonia in glass flask on the Bunsen burner
Click on the Bunsen burner to turn on its gas
Use the Samuel Gordon lighter on the Bunsen burner
Zoom in on the Writing desk
Open the Metal box to get a letter from Murray to Phil
Use Phil's key ring on the Padlock
Open the Middle compartment
Use the Smelling salts on Ralph
Give Mr. Bubby to Ralph
{Cutscene}
Exit through the Door
Use Phil's key ring on the Cellar door
Use Phil's key ring on the desk Drawer at left to get a Hand gun, Ammunition and
a Valuable necklace
Examine the Post-It note to see a reference to the (original) large word
directly above Adrian's head
Examine the Computer, then use the strange alphabetical keyboard to enter MORGUE
and press the large enter key at far right
Optional inventory and activity: If desired, pick up the Diskette and
put it into the Computer. To play this inline version of Space Invaders, use
the keyboard arrow keys to control the position of the laser cannon and fire
it using the spacebar. Exit the game using the monitor button at lower
right.
Examine the Drawer at right, then open the Secret compartment to get a List of
money deposits and a Video cassette
Use the Video cassette in the Television
Exit through the Door
Night has fallen...
Use Phil's key ring on the Waste container at left to get a Small cardboard tube
and a Cast iron M
Put the Hand gun into the Waste container
Use the Walking map to go to Gordon's Palace Hotel
Enter the hotel
{Cutscene}
Scroll left and open the Office door
Use the Rule on the Steel cabinet
Open the Drawer in the desk to get information on opening the security
locker
Examine the Diploma at upper left
Exit To the lobby and To the rooms
Examine the Toolbox to get Pliers and enter Room 2
Use the Rule, Scalpel and Cast iron M on the Wall
Examine the Hole
Exit to the Corridor and To the lobby
Open the Office door and use the Telephone
Open the Steel cabinet
Use the Walking map to go to Black Mirror Castle
After the White Lady appears, it starts raining
Exit to the castle
Go through the Entrance gate
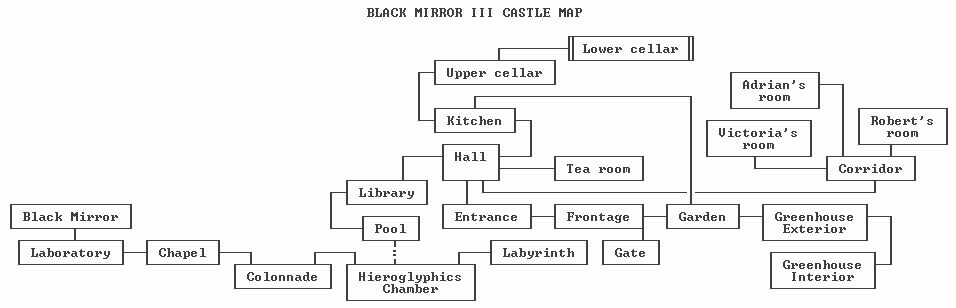
Exit to the Castle garden and use the Door to the kitchen
Take the Cigarette packet and the Candle
Combine Ammunition & Pliers
Combine Small cardboard tube & Black powder
Combine Samuel Gordon lighter & Candle
Combine Cardboard tube filled with black powder & Candle
Combine Packet of plain cigarettes & Cardboard tube sealed with wax
Exit through the Door to the garden
Go to the Frontage and then to the Entrance
Put the Home-made firework into the Lamp
Retrace your steps through the garden and into the
kitchen
Exit To the hall
Enter Victoria's room
Talk to Victoria and exhaust the dialog choices
{Cutscene}
After Victoria's funeral, use the Walking map to go to Black Mirror Castle
After learning that the castle workmen need to be paid, use the Walking map on
the Menhir
Go through the gate to the castle frontage
Examine the Facade to discover that soot needs to be removed from the castle
Examine the Lunchbox to get a Pack of toothpicks
Use the Walking map on the Menhir
Exit right to the Castle garden
Use the Walking map on the left Menhir by the ladder
Use the Walking map on the right Menhir by the tree
Exit To the greenhouse and then back To the castle to get the greenhouse added
to the walking map
Use the Door to enter the castle
Use the Bunch of keys on the Cellar door, then open the Cellar door
Take the Hose clips at upper left
Use the Walking map to go to the Greenhouse
Try twice to open the Door to the greenhouse
Take the Bucket, Garden host and Wooden shaft
Click twice on the Carpet to move it
Examine the Tiles
Open the Floor cache
Combine the Hose clips & Wooden shaft
Combine the Cast iron M & Wooden shaft with hose clips
Use the Improvised grappling hook to retrieve the Case
Right-click the Case, then right-click the Notebook
Use the Walking map to go to the Castle hall, then enter the Library
Examine the Family tree at right to find out about Dergham Gordon
Go to Victoria's room and examine the Painting above the bed
{Cutscene}
Leave the room and use the Door at right to enter Robert's room
Click on the Painting, then click on Dergham Gordon
Remove Part of the frame
Examine the Cavity in the frame
Use the Pack of toothpicks on the Seven holes
Use the Piece of picture frame on the Seven holes to create a Home-made key
Back out and go to the Tea room
Examine the Marble plinth
Use the Home-made key on the Holes
Press the Suspicious spot (button) on the front corner of the horse statue to
open the safe
Take the Cash and the Letter
Exit To the hall and use the Walking map on the Globe
Exit outside and give the Money to Gregory
- Renovate facade
The telephone rings from Dr. Winterbottom
{Cutscene}
Exit the doctor's office and Constable Zak will accompany you back to the
castle
Take the Bottle
Talk to Steve
- Accident
Take the Canister
Enter the castle
The spirit of Mordred temporarily takes over Adrian, and Inspector Spooner is
scared away
Use the Walking map to go to the Greenhouse, and enter it
Use the Industrial cleaner and brush on the Statue
Use the Walking map on the Statue
Referring to the Drawing of a star constellation:

or the image from your dream, combine the Walking
map & Pencil. Use the pencil icon to draw sight lines from the globe in the
castle hall through the other five menhirs:
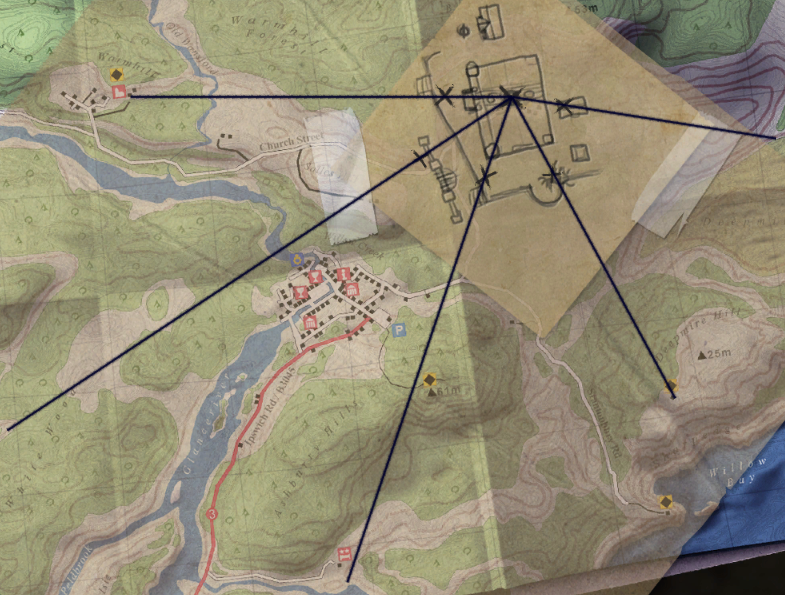
The five possible portal locations are:
Academy
Warmhill church
Riverside near hotel
Swampy area to the east of the castle
Woods location to the west of Willow Creek
Back out
and use the Walking map to go to Warmhill church
Use the Gate at right
Examine the Old door and pick up the Sheet of glass
Use the Gate
Double-click on the Church door
Talk to Father Frederick
- Letter from the Vatican
- Portals
- End conversation
Use the Walking map to go to Willow Creek
Click twice on the Bicycle to get a Patch Repair kit
Use the Walking map to go to Gordon's Palace Hotel
Fill the Empty plastic bottle at the Fountain
Use the Path at right
Give the Valuable necklace to Bobby
Take the Waders
Combine Patch Repair kit & Waders
Combine Broken bucket & Circular piece of glass
Right-click the Patched-up waders to wear them
Examine the Menhirs
Use the Bucket with glass bottom on the Dark place
Exit To the hotel
Use the Walking map to go to the Crossing in the woods
Exit right onto the Gravel path
Take the Gravel path at upper right
Exit To ruins
Exit To the lighthouse and use the Path
Click twice on the Beaten track
If desired, combine Walking map & Pencil to see that 4 of the 5 possible portal
locations have been ruled out
Pick up the Metal detector
Use the Walking map to go to the Tumbledown building
Use Phil's key ring on the Car and get a glow sticker
Examine the Car bonnet to get a Car battery
Use the Garden hose with the Tank cap at far right
Enter the building
Examine the Electrical junk to get a Transistor radio
Combine Old metal detector & Car battery
Combine Old metal detector & Transistor radio
Click on Cellar door
Use the Walking map to go to the Castle hall, and exit outside
Click twice on the Hammer drill to take it
Use the Walking map to go to the Crossing in the woods
Take the Path at left
Pick up the Branch
Use the Old metal detector on the Path to the left
Use the Hammer drill on the Rock
Night (and the temperature) falls...
Use the Bottle of water on the Holes
Use the Long branch on the Holes
Use the Walking map to go to the Castle gate
Click twice on Bobby and exhaust the dialog choices with him
{Cutscene}
Exit Dr. Winterbottom's office
Cross Over the bridge and enter the Cafe
Talk to Inspector Spooner
Use Phil's key ring on the Entrance
Click on the Cellar door
Click on Chilled compartment with corpse
Use the Walking map to go to Stone circle in woods
Examine the Rock
Examine the Chasm
Use the Walking map to go to the castle Greenhouse
Exit left To the castle
Take the Folding ladder
Use the Polaroid camera on the Stone tablet
Use the Walking map to go to Willow Creek
Cross Over the bridge and enter the Cafe
Click twice on Edward
- Hieroglyphics
- Burial mounds
- End conversation
Exit the Cafe and go to the Police station
Click twice on Inspector Spooner
- Miss Valley's house
- End conversation
Talk to Constable Zak
- Miss Valley's house
Take Note pad
Combine Pencil & Bare sheet of paper
Right-click Miss Valley's reply
Examine the Bookcase to get Miss Valley seminar work
Right-click Miss Valley seminar work
Use the pencil icon to underline:
sector I3
animal bones from
land
Talk to Constable Zak
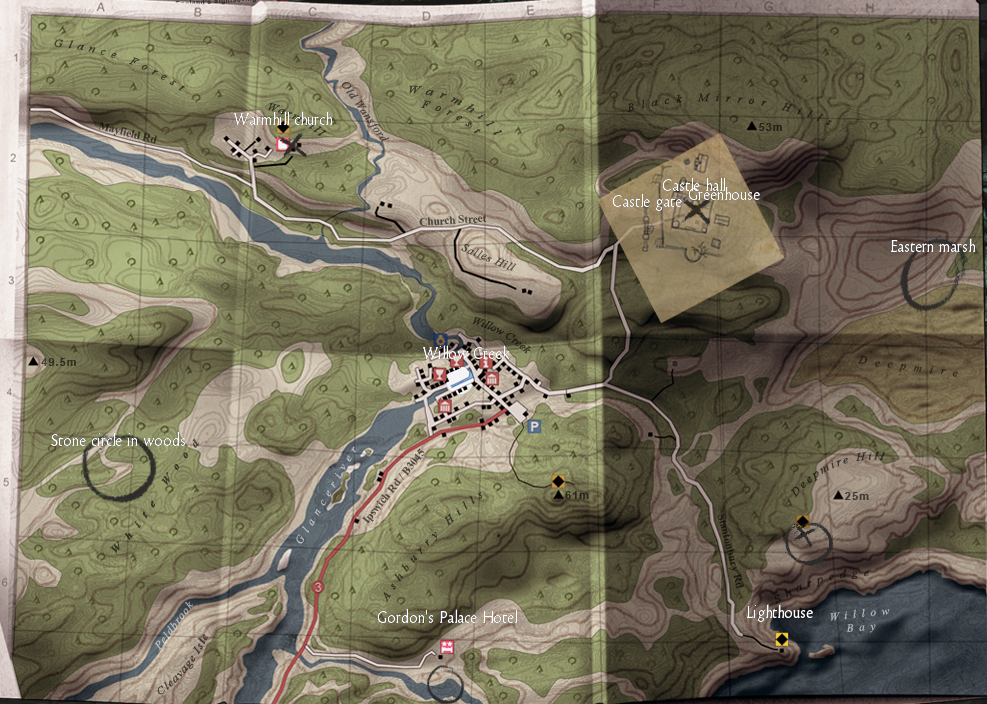
Use the Walking map to go to the Eastern marsh
Exit right to the Beaten track
Click on Branches to get Dry twigs
Enter the Burial mound
Examine the Leaves, Wall and Grave site
Use the Walking map to go to Dr. Winterbottom's office in Willow Creek
Talk to Dr. Winterbottom
- Effect of the medication
- End conversation
Exit the doctor's office, cross Over the bridge
and enter the Old fashioned shop
Talk to Abaya
- Heartburn
- End conversation
and you're given Antacid
Exit the shop and visit the Cafe next door
Talk to Edward
- Packet of coffee
- End conversation
Use the Walking map to go to the castle Greenhouse
Enter the greenhouse and take the Plants
Use the Walking map to go to the Castle hall
Take the Damp-proof sheeting
Enter the Kitchen and take the Pot from the stove
Use the Walking map to go to the Eastern marsh
Exit right to the Beaten path
Use the Roll of Damp-proof sheeting on the Burial mound
Enter the Burial mound
Examine the Stones
Put the Dry twigs into the Fireplace
Use the Samuel Gordon lighter on the Fireplace
Put the Pot onto the Fireplace
Put the Small packet of coffee into the Pot
Put the Antacid into the Pot
Put the Valerian into the Fireplace
Use the Pot
{Cutscene}
Examine the Black mould to get a Black ball
Use the Walking map to go to Stone circle in woods
Descend into the Hole
Put the Black ball into the Holder
Click twice on the Portal
Click twice on the Buried staircase
Use the Polaroid camera on one of the two Gaps
Click twice on Louis' corpse to get a Letter from Angelina
Examine Louis' corpse again
Use Louis' arm on one of the Gaps
Look in the other Gap to get a Black ball
Put the Black ball into the Holder
Use the Portal to enter the Ritual Chamber
Apparently an invisible version of Miss Valley's writing desk is here
Use the Book twice
{Cutscene}
Examine the Window to get a Rope
Look at Mordred's book
Use the Shards
{Cutscene}
Exhaust all the dialog choices with Valentina and Father Frederick
You are given the Book of the Guardians
It's raining again
Use the Walking map to go to the Castle hall
Click twice on Edward at the Castle gate
- Edward
Use the Walking map to go to the Castle hall
Go to Adrian's room
Take Mordred's book
Right-click the Book of the Guardians in inventory
Use the Walking map to go to Warmhill church
Knock on the side door of the church
Talk to Father Frederick
- Mordred's book
- Mordred's wife
{Cutscene}
The next day, the rain has stopped
Now playing as Valentina, the inventory is different and has no navigation map,
and Adrian's diary is not available
Use the telephone to find out your goal is to search for the entrance to the
catacombs under the castle
Use the Matches on the Columns
Examine the Columns
Go to Victoria's room
Along the way, you can find out you're unable to leave the castle
Examine the Machines to get a syringe of adrenaline
Pick up the Jewelry box
Exit Victoria's room and exhaust the dialog choices with Adrian
Give the Jewelry box to Adrian
Give the Sword handle to Adrian
Play as Adrian
Exit to the Passage
Open the Wardrobe to get a Grave candle and Pliers
Go to the Library and examine the Columns
Use the Sword handle in the Strangely shaped hole
Back out, return to the Corridor and talk to Valentina
- Missing jewel
- End conversation
Right-click the Walking map to go to Willow Creek
It's raining again
Cross Over the bridge and enter the Police station
- Missing jewel
- End conversation
to get a Bracelet
Combine Pliers & Bracelet to get a Ruby
Combine Sword handle & Ruby
Right-click the Walking map to return to the Castle hall
Go to the Upper cellar
Pick up the Extension cable and put it into the Socket
Put the Extension cable onto the Stairs to the cellar
Click twice on the Bucket to get some Gritting salt
Combine Samuel Gordon lighter & Grave candle
Go downstairs
Click twice on the Extension cable (next to Adrian's right foot), then
double-click on the Construction Light in the dark directly to the right of
the cable
Click twice on the 3-phase power cable, then double-click on the Puddles
Scroll right and click twice on the Water pump to open it
Click twice on the Wire rope, then double-click on the Water pump
Click twice on the pump's Power connection, then double-click on the Grate by
the well
Put the Gritting salt into the Puddles
Click twice on the Large lever in the back of the room
Click twice on the Chain, then double-click on the Water pump
Click twice on the Controls behind Adrian's right hand to raise a cage below
Valentina shows up
Go to the Library and examine the Columns
Use the (repaired) Sword handle on the Strangely shaped hole
Valentina shows up
Give the Rope to Valentina
Examine the Symbols on the four columns, left to right:
| House & jar | | Pitchfork & flower | | Bird & head | | Fish & hand |
Click three times on the cage to enter it (and stay there)
Play as Valentina
Return to the Lower cellar
Put the Rope on the Well
Return to the Pool via the spiral staircase in the library
Talk to Adrian
- Pull rope
- End conversation
Return to the Lower cellar
Play as Adrian
Use the Rope
Timed sequence. You now have about 90 seconds to enter the correct
symbols from the four columns. Using a compass analogue for the radial
positions:
Under the house symbol, press the jar symbol at the top (North
position)
Press the triangle button at far right
Under the trident symbol, press the flower symbol at the Northeast
position
Press the triangle button at far right
Under the bird symbol, press the head symbol at the East position
Press the triangle button at far right
Under the fish symbol, press the hand symbol at the Southeast position
The right-hand Stone door leads to the Labyrinth. Click twice on the Hole to
the left of the door to obtain a Labyrinth map. Click twice on the
right-hand Stone door to enter the Labyrinth.
The Labyrinth
Once inside, you can right-click on the Old note in inventory to view the
Labyrinth map. The Labyrinth is a network of rooms connected by doors (all of
which are initially closed). Hotspots in each room are visible only when the
active character is present in that room. Each door can be opened or closed by
a nearby Switch, but several doors have Switches on only one side, which
significantly limits the possibilities for positioning Adrian and Valentina, and
requires their collaboration for a solution. Note the two evil black clouds
("shades") that are present here. Entering a room containing a black cloud is
fatal to either Adrian or Valentina (although the resulting death sequence
always shows Adrian). If a player is separated from a cloud by closed doors, he
or she is immune from attack. A room is illuminated if the number of its open
doors exactly matches the corresponding Roman numeral shown on the
map
for that room. If a room is lit but has an open doorway
connecting it to a black cloud, the occupants of the lit room are immune from
attack. Conversely, if the occupied room is dark and connected to a room
containing a black cloud, an attack will ensue. Therefore, a player can safely
open a connecting door to a room containing a black cloud only if the number of
open doors in the player's room is one less than its map number, so that the
room lights up just as the door to the black cloud is opened.
If the black cloud kills one of the players, the puzzle is reset to the very
beginning when Adrian and Valentina first enter Room A. However, intermediate
progress can be saved at any point in the puzzle.
Rooms are identified by the letters A through K on the
Labyrinth map. A missing switch on one side of
a door is indicated by a red bar. Doors are referred to by their compass
direction from the center of a room; for example, Room G has doors in the North,
Northeast and Southeast directions.
The overall objective of the Labyrinth puzzle is to find several items hidden
within it, and escape with them back to the hieroglyphics chamber while avoiding
black clouds.
Can a black cloud be eliminated? No. If lights are on in all rooms
connected to a (dark) room containing a black cloud, and the dark room is then
illuminated, the cloud will attack any accessible person. For example, on
initial entry to Room A with the West door left open, have Adrian open the
South door (lights come on) and move into the lit Room G. Move him into the
L-shaped Room E. Since Adrian cannot himself close the door he just went
through due to a missing switch on his side of the door, have Valentina move
into Room G and close its Northeast door. Return Valentina to Room A, close
the West (entry) door and open the East door to the black cloud, which causes
the lights to come on in Room A and protect Valentina from the cloud. If
desired, move Valentina away from the cloud, perhaps all the way into Room G.
Finally, play as Adrian and have him open the North door of Room E, which
causes Room B to become lit. Even though the black cloud is now completely
surrounded by lit rooms, it will attack Adrian or Valentina (whomever is
closest).
Can a black cloud be moved? Yes, as will be seen in the solution given
below.
Solution sequence:
Start at the players' initial entry into Room A with its West door left open
Playing as Adrian, use the Switch to open the South door in Room A, then exit
through it (lights come on in both Rooms A and G)
Open the Northeast door of Room G and exit through it into the L-shaped Room
E
Play as Valentina
Close the West (entry) door
Open the East door facing the black cloud (lights come on)
Move south into Room G and close both its North and Northeast doors
Play as Adrian
Open the North door of Room E and the black cloud flees the light into the
darkened Room A
Exit north
Close the West door to isolate the black cloud
Examine the Niche on the north wall to get a Bowl
Play as Valentina
Open the Northeast door of Room G
Open the Southeast door and exit through it
Play as Adrian
Click on Room H to join Valentina
Click on the Sarcophagus twice to get a Crown
Open the East door of Room H and exit through it
Open the East door of Room I and exit through it
Open the North door of Room J
Room K is not used in the solution, but can be visited if desired (its
sarcophagus is empty)
Play as Valentina
Exit east into Room I
Open the North door and exit through it
Open the North door of Room F and exit through it
Open the West door of Room C
Open the East door of Room C
Exit south back into Room F
Close the North door of Room F
Open the East door of Room F and the black cloud flees the light into the
darkened Room C
Exit east
Play as Adrian
Exit Room J to the north
Click on the Sarcophagus twice to get a bishop's Staff
Click on Room F
Play as Valentina
Click on Room F to join Adrian
Close the East door of Room F
Open the North door of Room F, and the black cloud returns to its original
position in Room D
Make a place for the first black cloud:
Click on Room B
Close its East door and then open its West door
Exit south into the L-shaped Room E and close the door behind you
Exit west into Room G and close the door behind you
Play as Adrian
Click on Room G to join Valentina
Close the Southeast door of Room G
Open the North door of Room G and the black cloud vacates Room A
Play as Valentina
Exit Room G to the north
Play as Adrian
Click on Room A to join Valentina
Close the East door of Room A
Open the West door of Room A and exit through it
Back in the hieroglyphics chamber, pick up the Small boat between the headless
statue and the chasm
Click three times on the Sarcophagus second from the right to get a Fish
Click twice on the Sarcophagus second from the left to get a "Sign" (shield)
Click twice on the Sarcophagus at far left to get an Arrowhead
Click twice on the Dish at the base of the statue to deposit 7 objects from your
inventory
Drag any four of these objects into the dish, which causes it to descend
Back out from the dish, and several chains will move
Click twice on a Capsule to get a Golden key
Use the Golden key on the Stone door at left
Which four objects are correct for the dish?
There are 35 possibilities
Play as Valentina
Examine the Relief on the wall to the left of the statue
Click twice on the middle section of Hieroglyphics to learn that two of the four
standing people are a priest and a hunter. Non-standing people include a
king and a warrior. Making associations with the objects at the dish, we
have:
Arrowhead (hunter) - standing (include)
Boat - unknown
Bowl - unknown
Stick or staff (priest) - standing (include)
Crown (king) - non-standing (exclude)
Fish - unknown
Sign or shield (warrior) - non-standing (exclude)
Based on this information, the correct four objects would seem to be
Arrowhead + Staff + two of {Boat, Bowl, Fish}
There are 3 possible combinations; the correct one is
Arrowhead + Bowl + Staff + Fish
Back out, play as Adrian and zoom in on the Dish
Drag these 4 objects into the dish
Click on any of the 6 Capsules to get Several keys
Use Several keys on the Stone door at left, and exit through it
Take the exit at left to the Colonnade
Play as Valentina
Zoom in on the Altar to discover a Latin sentence, translated as
"At sunrise the king sent his warriors
into battle against the darkness"
Play as Adrian
Zoom in on the Altar
Starting with the Sun (sunrise) symbol at middle left, press adjacent symbols to
trace out the approximate meaning of the Latin sentence. The sequence can be
found by weapon associations and/or trial and error:

A secret passage is revealed;
exit through it
{Cutscene}
Click on the Old swords
Talk to Valentina
- Dagger
Exit through the Stone door
{Cutscene}
Close Mordred's book
Now playing as Valentina, look at The Black Mirror
Close Mordred's book
Look at the Altar
Exit back to the laboratory
Close Mordred's book
Examine the Old swords and the Alchemy table
Exit to the cathedral
Click twice on the Sarcophagus in the foreground
After a lot of yakety-yak, Valentina leaves and you're back to playing as
Adrian
Click twice on the Sarcophagus in the background to get a Tip of sword
Use the Polaroid camera on the Sarcophagus in the foreground
Click on the Sarcophagus again to get Mordred's Skeleton
Exit to the Secret passage and go through the Stone door into the Black Mirror
room
Put Mordred's Skeleton onto the Altar
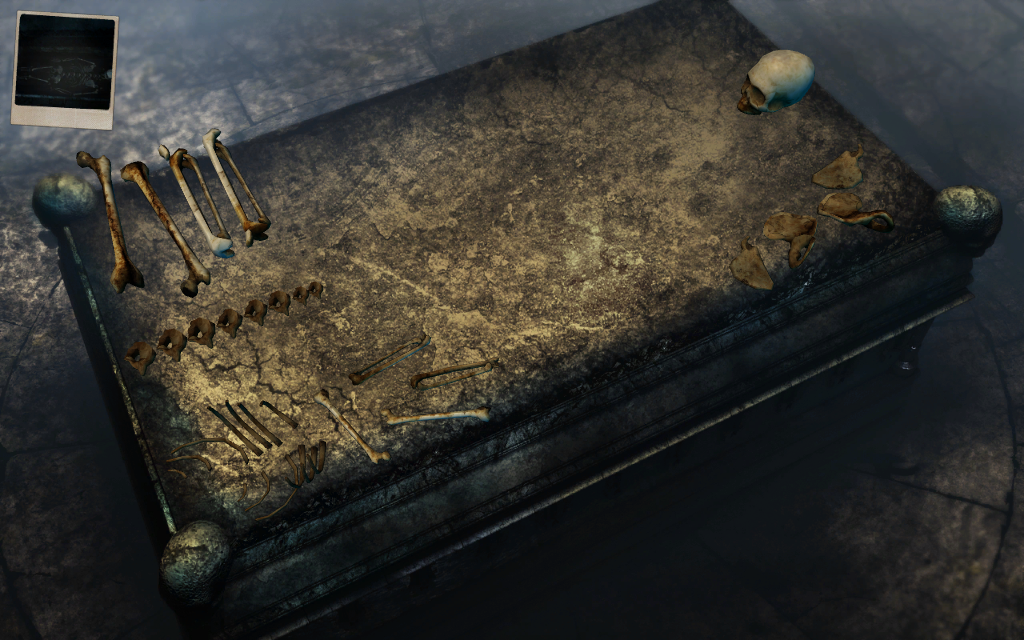
Skeleton Puzzle
Click on the Altar. Neither the inventory nor the game control menu is
available when in close-up on the altar, so the skeleton puzzle must be
solved in its entirety before proceeding.
From the initial bone layout, drag the spine at
left center up to the base of the skull until two white "proximity spots"
appear:

then release the mouse button to lock it into place.
The hip bones are the two center bones in the row of four near the front right
corner of the altar. Right-click the rightmost one
of these to rotate it clockwise, then drag it into proximity with the far side
of the spine base, like this. Right-click the
other hip bone to rotate it clockwise, then drag it into proximity with the
near side of the spine base, like this.
The thigh bones (femur) are at the rear left corner of the altar. Right-click
the left bone to rotate it clockwise, then drag it into proximity with the hole
in the near hip bone, like this. Right-click
three times on the other thighbone to rotate it counterclockwise, then drag it
into proximity with the hole in the far hip bone, like
this.
The shinbones (tibia/fibula) are next in position at the rear left corner of the
altar. Right-click the left bone to rotate it clockwise, then drag it into
proximity with the far knee, like this.
Right-click three times on the other shinbone to rotate it counterclockwise,
then drag it into proximity with the near knee, like
this.
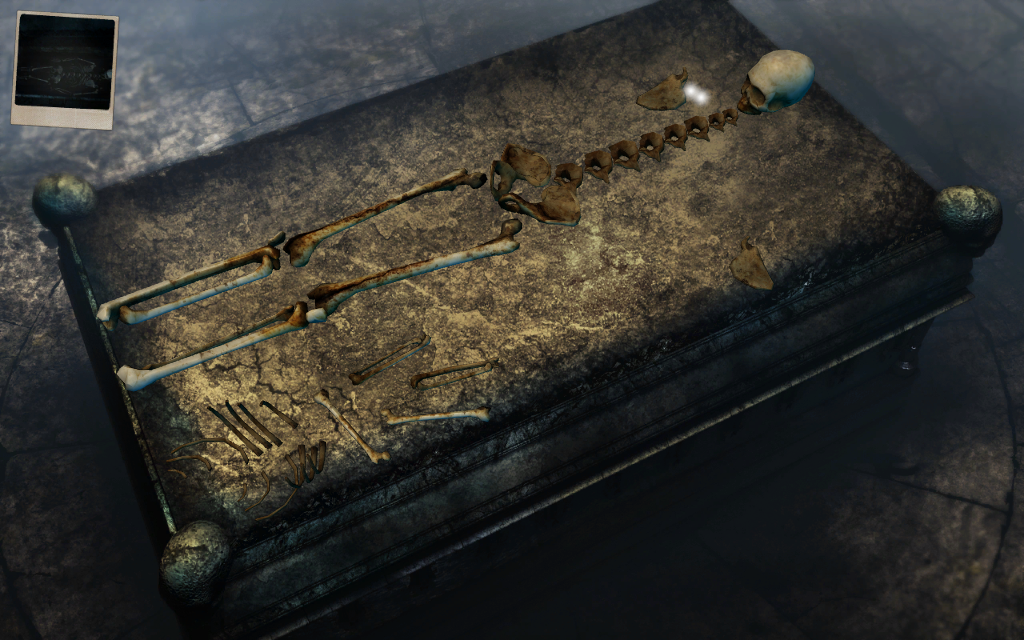
The shoulderblades (scapula) are the remaining two bones near the front right
corner of the altar. Drag the right bone into proximity with the far side of
the second spine vertebra from the right, like
this. Right-click the other shoulderblade to
rotate it clockwise, then drag it into proximity with the near side of the
second spine vertebra from the right, like this.
It is in the correct position when the third spine
vertebra from the right is just touching it.
The upper arm (humerus) bones are the two lighter-colored bones near the front
left corner of the altar, to the right of the ribs. Right-click twice on the
rightmost one of these, then drag it into proximity with the shoulder blade on
the far side of the skeleton, like this.
Right-click three times on the other upper arm bone, then drag it into
proximity with the shoulder blade on the near side of the skeleton, like
this.
The lower-arm (ulna/radius) bones are to the right of the ribs. Right-click
twice on the rightmost one of these, then drag it into proximity with the elbow
on the near side of the skeleton, like this.
Right-click twice on the other arm bone, then drag it into proximity with the
elbow on the far side of the skeleton, like this.
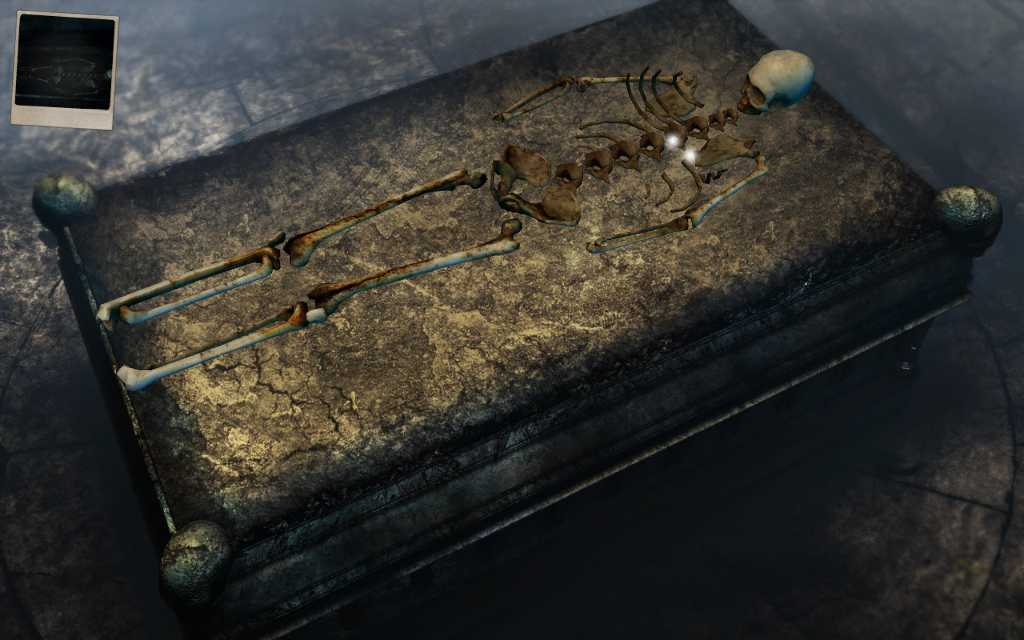
Drag the ribs farthest away from you into proximity with the far side of the
mid-spine, like this. Drag the remaining ribs
into proximity with the near side of the mid-spine, like
this.
Play as Valentina
In the Tea room of the castle, use the Dagger on the Black stain
Take the Sword
Exit the room
- Mordred's skeleton
- Can start
Use the Alchemy table to make Poison
Exit through the Stone door and give the Poison to Adrian
{Cutscene}
Give the Adrenaline to Adrian
{Cutscene}
Press [Esc] to skip the credits and watch the endgame sequence
Exit from the diary
If desired, some of the secondary characters in
Black Mirror I, II and III can be be seen with
Main menu | Extras | Pictures | #15 | Display picture
Lef to right, these include nurse Valentina Antolini (III), Inspector Spooner
(III), Reginald Borris (II), Father Frederick (I & III), Gravedigger Mark (I
& III), Tom (I, II & III), Murray (I, II & III), Bobby (II & III) and Dr.
Winterbottom (III), seated.
Labyrinth Map:
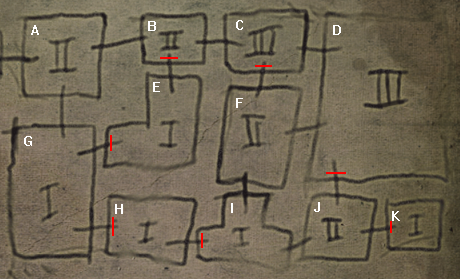
Table of Contents
Home
Copyright © 2019 Balmoral Software (http://www.balmoralsoftware.com).
Portions copyright © 2011 dtp entertainment, AG. All rights reserved.
Republication, redistribution or conversion is expressly prohibited without the
prior written consent of Balmoral Software.