
Copyright © 2019 Balmoral Software (http://www.balmoralsoftware.com). Portions copyright © 2009 dtp entertainment, AG. All rights reserved. Republication, redistribution or conversion is expressly prohibited without the prior written consent of Balmoral Software.
Black Mirror II: Reigning Evil is a 2009 release from the German video game publisher dtp entertainment, AG. Consisting of six substantial chapters, it is a lengthy and absorbing game that continues the saga of the cursed Gordon family from the previous game in the series, Black Mirror. Graphics are excellent, the only nit being an ocean location that could probably have benefited from more extensive water effects. The visual effect of rain seems quite realistic. The sound engineering is satisfactory, although a main character's voice is too quiet in early scenes of the game, and the endless cawing of crows in every outdoor scene grows tiresome. The music is superb, and the game interface has a variety of features to streamline the gameplay. The characters have a depth of emotions, and there is even some tongue-in-cheek humor with the extraneous background noises heard in indoor multi-floor locations, probably a little too representative of the real thing that any traveler has experienced.
There are several timed sequences in the game, but they are not difficult. Played in the third-person on static rendered backgrounds, a few of the scenes required side-scrolling to reach all exits. A trigger event in the game that allows the plot to proceed is often accompanied by the sound of scribbling in Darren's diary, which can be referred to for guidance.
Game controls are fully explained in the accompanying manual. For example, you can press [Esc] to skip the game startup logos or to bring up the game menu. Several of the controls facilitate moving through the game during replays. Left-clicking will skip through dialog, while pressing the [Tab] key will skip cutscenes and certain blocks of dialog. Pressing the keyboard [Pause] button will halt and resume dialog sequences. Double-clicking on an exit will accelerate the character's movement. Occasionally, an Exit or other hotspot is allowed to occupy the same space as the game menu that always occupies the upper-right corner of the screen. In those cases, the [Esc] key can be used to bring up the Save/Load menu. Entry of a saved-game name is echoed very slowly, and if you use mixed case, you may need to pause so that the release of the Shift key is recognized.
When holding an object, the arrow cursor icon includes an image of the object. In these cases, if the cursor does not seem to respond when clicking it on a hotspot, try double-clicking it on its target location. Also, when a task (such as opening a door or gate) seems to be disallowed, ostensibly due to its dependence on a trigger event, try performing the same task a second time and it may be successful. If you are playing with less than the maximum display resolution, the inventory bar at the bottom of the screen can occlude screen hotspots at certain key points in the game, preventing them from being used and halting progress. Saving the game and temporarily selecting a higher-res display setting can circumvent this problem.
This walkthrough provides a minimum path through the game; other gameplay sequences and dialog choices can provide additional backstory elements.
Photo shop
Click twice on the Wooden pallet
Examine and take the Developer
Examine the Crammed shelf and pick up a Carton of fuses
Right-click the Carton of fuses to get a Fuse
Click twice on the Fusebox to open it
Remove the cover
Click twice on the Broken fuse to remove it
Put the Fuse into the Holder and use the Main switch
Go up the Stairs
Click twice on the Advertising sign at far right
Exit to the Road to main square
Diner
Click on Biba's diner at far right
Open the Entrance to diner
Give the Letter for Mrs. Biba to Mrs. Biba
Examine and take the Vinegar
Pick up some Bread
Use the Exit door
After a conversation with the doctor,
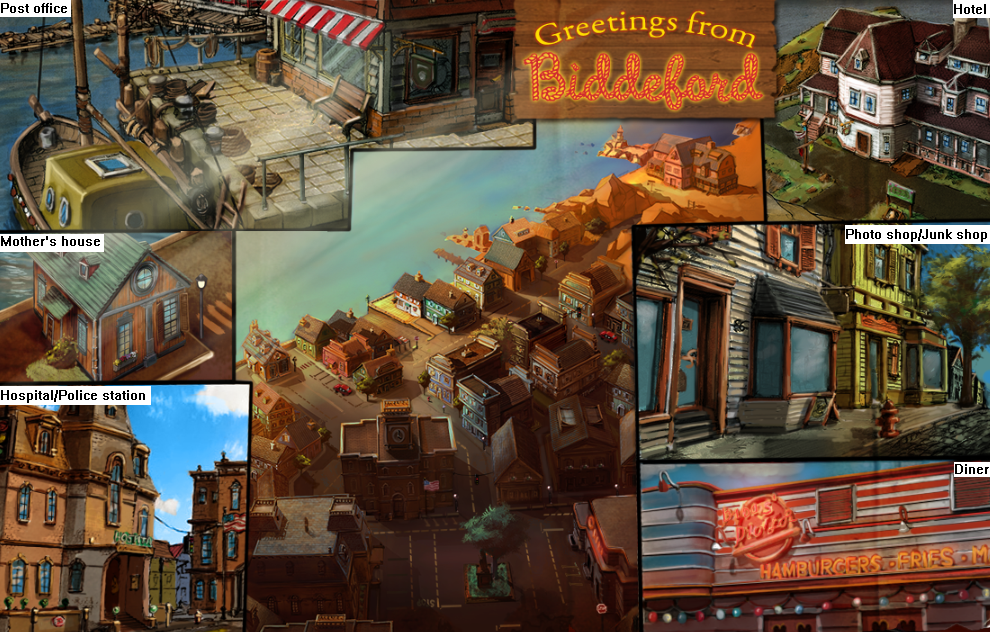
right-click the Postcard of Biddeford and return
to the photo shop
Exit to the Road to harbor promenade
Post office
Enter the Door to souvenir store
Talk to Rosie
Use the Exit door
Touch the Convertible, then quickly enter the Door to souvenir store
while the car alarm is going off
Give the Collection note to Rosie
Photo shop
Use the Postcard of Biddeford to return to the photo shop
Scroll left and open the Door to back room
Examine and take a Ball pen
Use the Telephone
Mother's house
Call ambulance
Examine and take the Pill dispenser
Click twice on the Handbag to get an Insurance card
Exit Into the bathroom
Examine the Bathroom cabinet to get the rest of the Medication
Exit Into the bedroom
Examine the Chest of drawers
Examine the Bottom drawer to get a Locked address book
Click twice on the Pot plant and pick up a Small key
Combine Locked address book & Brass key
Right-click the Address book
Exit Into the living room
Examine the Little cupboard and use the Telephone
Use the Exit door
Hospital
Open the Hospital entrance
Press [Tab] to skip through the waiting...
Examine the Bedside table to get a bottle of Laxativa
Examine and take the Stethoscope
Exit To the waiting room
Examine and take the Magazine
Mother's house
Use the Postcard of Biddeford to return to Mother's house
Exit To the bedroom
Examine the Bureau
Examine the Puzzle
This is a 3 x 4 slider puzzle that randomizes every time you zoom in on it. It
has the solution
The easiest way to solve this puzzle is to identify the jumbled pieces using the numbering above, and then use Balmoral Software's solver to find the moves required. For example, the jumbled arrangement
has the following input screen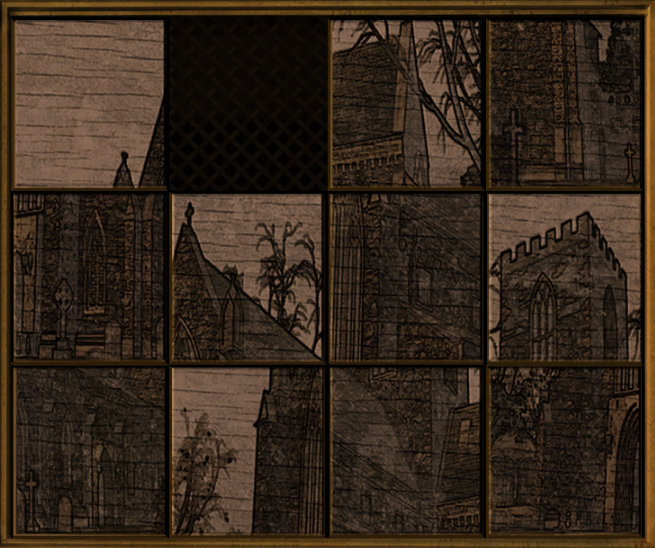
with a 28-move solution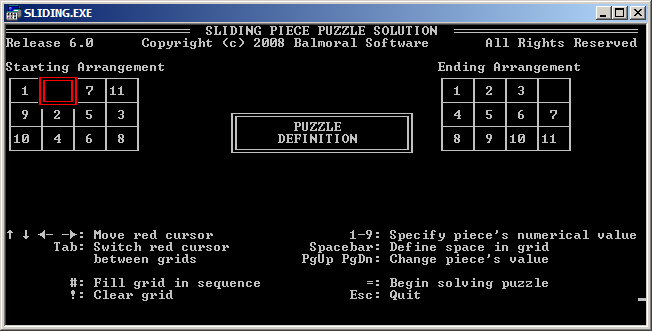
Photo shop
Use the Postcard of Biddeford to return to the photo shop
Try the Door to Fuller's store
Use the Gate to back yard
Click three times on the Tool shed to get some Fishing line
Examine the Dog cage, then pick up a Water bowl
Click twice on the Bucket to get a Handle
Combine Fishing line & Handle
Use the Fishing line with hook on the Pivoting window
Open the Back door to Fuller's store
Open the Back door to Fuller's store
Examine the World map
Examine the Card and look at the note at right to determine the order of
destinations in Fuller's world tour:
- Arizona/UtahBack out and exit To the sales area
- Hawaii
- Unknown (Egypt)
- Unknown (China)
- Europe (Germany)
Post office
Use the Postcard of Biddeford to return to the post office
Enter the Door to souvenir store
Examine the Blank collection notes
Talk to Rosie
- CustomerQuickly take the Blank collection notes
- Package for Darren
- CustomerGive the Magazines to the Customer
- Mr. Fuller
- Packet of photo paperUse the Exit door
- Finish conversation
Junk shop
Open the Junk shop door
Examine and take the Wire cutters
Talk to Eddie
- EddieExamine the Radio
- BlindnessUse the Coin catalogue
- Coin
Hospital
Use the Postcard of Biddeford to return to the hospital
Use the Hospital entrance
Scroll left and exit To station 1
Examine the Flowers and take the Greeting card
Combine Completed collection note & Ball pen
Post office
Use the Postcard of Biddeford to return to the post office
Enter the Door to souvenir store
Talk to Rosie
- Packet of photo paper
Photo shop
Use the Postcard of Biddeford to return to the photo shop
Open Gate to back yard and Back door to Fuller's store
Use the Stethoscope on the Safe
Right- or left-click on the numbered dial at left to rotate it clockwise or
counterclockwise, respectively. A timer starts as soon as you first click on
the dial, and you then have 60 seconds to solve the puzzle. The correct
multiple of 10 is found when a faint, high-pitched sound occurs, similar to
a coin dropping into a mechanism. When that occurs, the direction of motion
(mouse button) should be changed for the next number. There is a different
noise faintly heard at each change of direction. The solution is:
Left-click 9 times to 90Click twice on the Safe to get a Film can
Right-click 4 times to 50
Left-click twice to 70
Right-click 5 times to 20
Left-click once to open the safe
Put the Photo paper onto the Enlarger
Click on the Enlarger and watch the small red timer next to it. When the timer
reaches 00:05, click on the Enlarger again.
Put the Exposed sheet of photo paper into the Developer dish
After Darren stops talking and his subtitle text disappears (if applicable),
wait about 5 seconds and click on the dish
Put the Developed picture into the Water dish
Repeat the above steps
The doorbell rings and Mrs. Biba gives you a Letter to Fuller
Hotel
Use the Postcard of Biddeford to return to the post office
Examine and take the Metal bar
Examine The 'Wild Coast' Hotel sign at left to go to the hotel
Use the Hotel entrance
Talk to the Porter
- Poker gameand get a White cane
- Poker game
- Poker game
- Poker game
- Finish conversation
Brown combed-back hairExit To the beach
Long straight nose
Eyes close together
Thin lips
Sallow skin
Angular face
Pointed chin
Diner
Use the Postcard of Biddeford to return to the diner
Examine the String of lights to get a red Safelight bulb
Junk shop
Use the Postcard of Biddeford to return to the photo shop
Open the Junk shop door
Talk to Eddie
- White cane
- Slide projector
- Finish conversation
Mother's house
Use the Postcard of Biddeford to return to Mother's house
Examine the Cupboards to get a Bowl
Pick up the Empty tea kettle and fill it in the Sink
Put the Full tea kettle onto the Stove
Click twice on the Stove
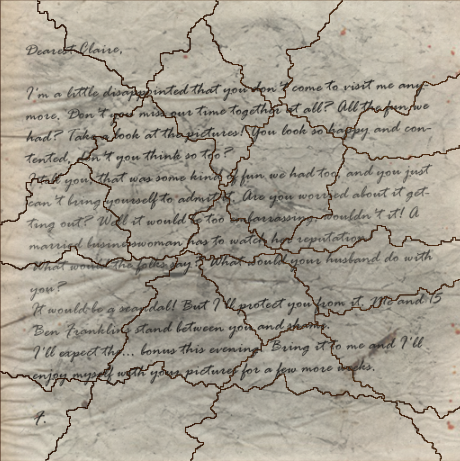
Put the Letter to Fuller onto the steaming Full kettle to find out the envelope
contains $1500
Exit Into the bathroom to get Photos and a Single picture of Angelina
Photo shop
Use the Postcard of Biddeford to return to the photo shop
Put the Blackmail money for Fuller onto the Door to Fuller's store
Hospital
Use the Postcard of Biddeford to return to the hospital
Open the Hospital entrance
Give the Bank book to the Nurse
In the diner, click on the photo
{Cutscene}
Police station
Use the Exit door
In the Photofit software, four facial characteristics have 5 settings each, so
there are 625 possible faces that can be made. A Reset button is at lower
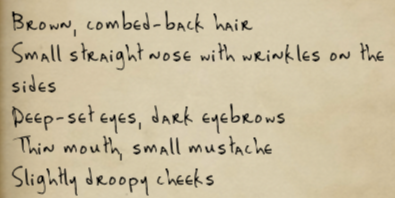
left. From the description obtained at the hotel
and the notes in the diary, here are the
possibilities based on the number of right mouse clicks from the Reset state:
This analysis reduces the number of possibilities to 2 x 1 x 3 x 4 = 24, and further study or trial-and-error can rule out more of those. The correct answer from the Reset state is:
Hair Chin 0: Bald 0: No moustache 1: Not combed back 1: No moustache ⇒ 2: Maybe ⇒ 2: Thin moustache ⇒ 3: Maybe 3: Thick moustache 4: Balding 4: No moustache Nose Eyes ⇒ 0: Maybe ⇒ 0: Maybe 1: Large ⇒ 1: Maybe 2: Large 2: Light eyebrows ⇒ 3: Maybe ⇒ 3: Maybe ⇒ 4: Maybe ⇒ 4: Maybe
Hair: 3 right clicksExit To the main square, and it's now raining
Chin: 2 right clicks
Nose: No clicks
Eyes: 4 right clicks
Save and Exit
Diner
Use the Postcard of Biddeford to return to the diner
Examine the Trash can to get Paper snippets
Right-click the Paper snippets to solve a jigsaw puzzle. In the close-up, items
are selected and released by left-clicking the mouse, and each item can be
rotated by right-clicking. It may be easier to position the border pieces
first. Once joined, multiple pieces can be moved together as one. The
solution is:
Photo shop
Use the Postcard of Biddeford to return to the photo shop
Use the Gate to back yard
Examine and take the Tow-rope
Use the Tow rope on the Grating
Put the Metal tube into the Rope loop
Be sure to retrieve the Metal bar as it will be needed later
Enter the Basement
If the lights go out, wait a few seconds for them to come back on
Click on the 1st Rope through the 5th Rope to identify the backdrops as follows:
1st Rope: BeachReferring to the information on the world map seen upstairs earlier, the ropes should be selected in the following order:
2nd Rope: Castle
3rd Rope: Great Wall of China
4th Rope: Monument Valley
5th Rope: Sphinx
Monument Valley (in Arizona)After all the scenes are raised, click twice on the Floorboards
Beach (in Hawaii)
Sphinx (in Egypt)
Great Wall of China
Castle (in Germany)
Post office
Use the Postcard of Biddeford to return to the post office
Enter the Door to souvenir store
Examine and take the Empty package
Hospital
Use the Postcard of Biddeford to return to the hospital
Use the Hospital entrance
Scroll left and examine the Delivery notes
Exit To station 1
Examine the Monitor, then pull the Cable
Quickly Exit to the waiting area and pick up the Delivery notes
Scroll left and talk to the Guard; he won't let you into the mortuary without a
pass
Diner
Use the Postcard of Biddeford to return to the diner
Use the Entrance to diner
Talk to Mrs. Biba
- CoffeeUse the Pot of coffee on the Doctor
- Finish conversation
Hospital
Use the Postcard of Biddeford to return to the hospital
Use the Hospital entrance
Scroll left and click twice on the Soda Machine to get a Soda bottle
Talk to the Guard
Examine and take the Syringe
Click on the Clipboards
Click on each of six Clipboards, then again on the one at lower left (Number
448)
Click twice on the Boxes and then click twice on Box 448 to get Fuller's bunch
of keys
Combine Laxative & Syringe
Combine Soda bottle & Syringe with laxative
Back out and use the Exit door
Give the Soda with laxative to the Guard
Exit To station 1
Examine and take the Scales
Exit To the waiting area and To the mortuary
Use the Scales on the Stretcher
Use the Scales on Fuller's corpse
Photo shop
From the police station, use the Postcard of Biddeford to return to the photo
shop
Open the Gate to back yard and enter the Basement
Use the Stairs and open the Door to back room
Examine the Cuckoo clock
Use Fuller's bunch of keys in the Hexagonal hole to get a Carton
Right-click the Carton to get Transparency
Exit To the sales area
Put the Transparency onto the Light box
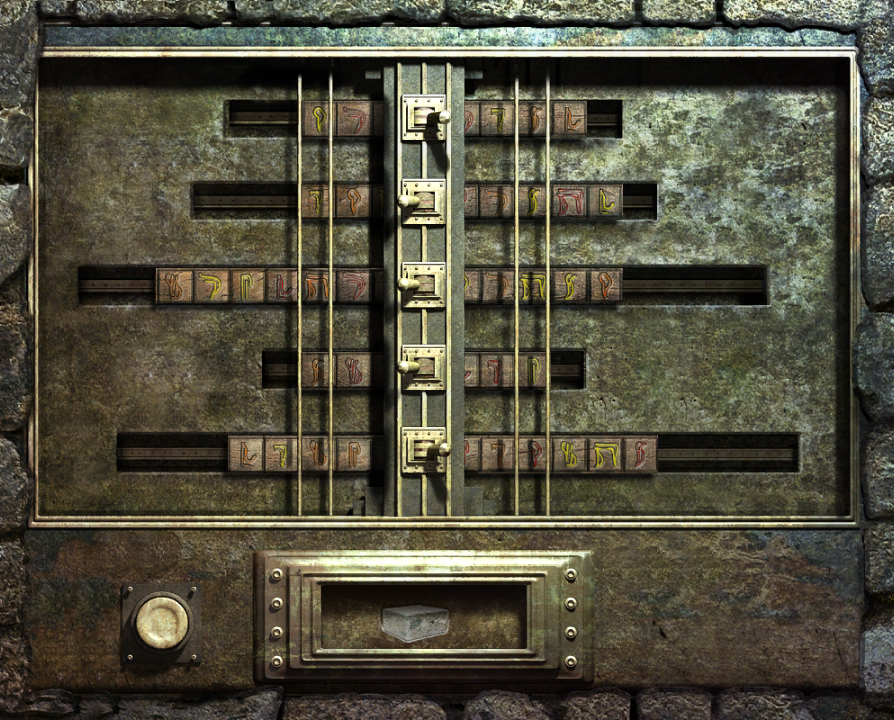
The objective of this puzzle is to superimpose the four transparencies to
disclose a secret number. To reset the puzzle, back out and repeat the step
above. As in the jigsaw puzzle solved earlier, items are selected and
released by left-clicking the mouse, and each item can be rotated by
right-clicking. The puzzle randomizes the image rotations each time it is
played. From the initial puzzle state, rotate each image until the building
at lower right is upside down and all other images are right side up:
Then align all four images exactly on top of each other to disclose the secret number 2 4 8 2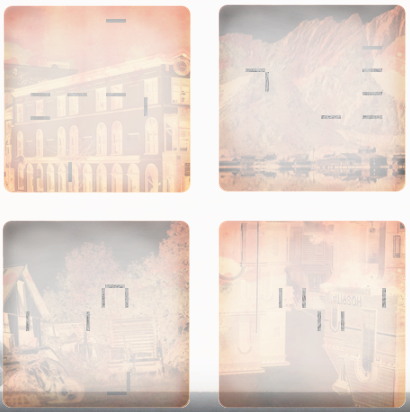
Police station
Use the Postcard of Biddeford to return to the police station
Use the Entrance to Police Station/Town Hall
Hotel
Use the Postcard of Biddeford to return to the hotel
Right-click the Slice of bread to get Breadcrumbs
Put the Breadcrumbs onto the Veranda
After the porter exits the hotel, quickly use the Hotel entrance. If you
don't get inside before the porter turns back towards you, you'll have to go
back to the diner to get more bread for the birds.
Take the Key and exit To Angelina's room
Examine the Lamp to get an electronic Bug
Click twice on the Ventilation to get a Radio
Exit To the foyer
Junk shop
Use the Postcard of Biddeford to return to the photo shop
Open the Junk shop door
Give the Radio to Eddie
It's stopped raining
Diner
Use the Postcard of Biddeford to return to the diner
Use the Wire cutters on the String of lights
Combine Wire cutters & Cable to get Copper wire
Mother's house
Use the Postcard of Biddeford to return to Mother's house
Examine the Telescope to get a Compass
Take the Headphones
Junk shop
Use the Postcard of Biddeford to return to the photo shop
Open the Junk shop door
Now that you have the Metal tube, Copper wire, Compass and Headphones, talk to
Eddie
- Finish conversationTalk to Eddie again
which is remarkably close to the real location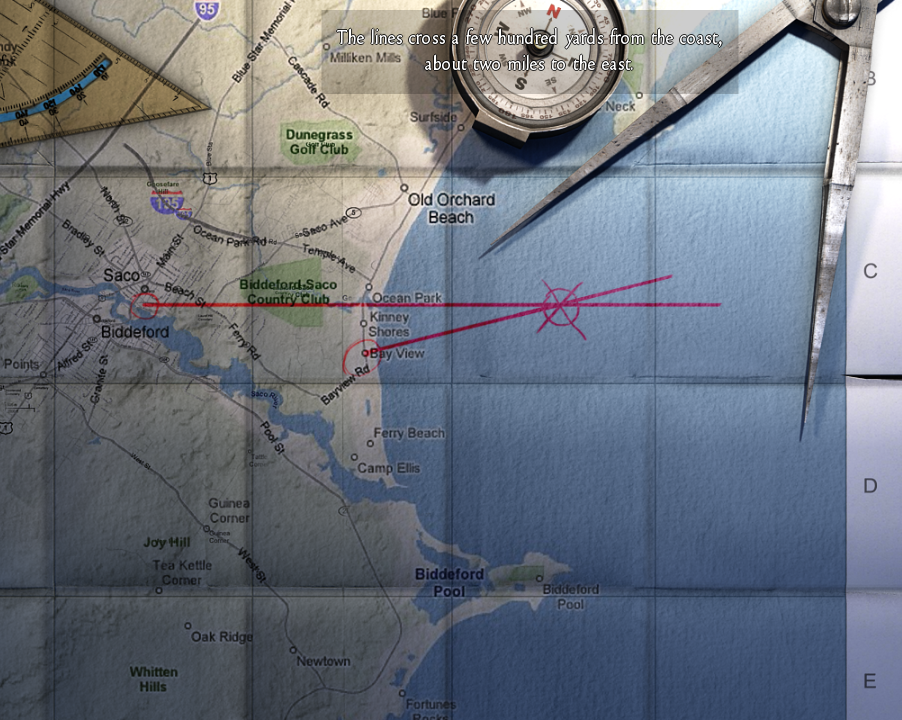
Boat
Exit to Lower deck
Examine and take the Folder and also get a Transparent foil
Put the Transparent foil onto the Picture near the swinging lamp
Right-click twice on the overlay to rotate it 180 degrees. Drag it against the
horizontal, vertical and diagonal lines on the map until it marks a
continuous path ending at the circled destination:
Darren then reads off a safe combination of: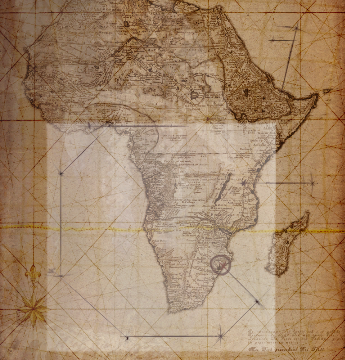
Southwest, South, Southeast, East, Northeast, NorthwestClick twice on the other Picture in the cabin
Right-click 3 times (SW)Examine the Safe to get a Ring and a Diskette
Left-click 7 times (S)
Right-click once (SE)
Left-click 7 times (E)
Right-click once (NE)
Left-click 6 times (NW)
Hotel
Use the Entrance
Examine the Flask
When Murray looks all the way to the left, take the Flask
Examine the Dishes to get a Knife
Click three times on the Postcards to get a Picture postcard (game navigation
map)
Exit To the rooms, at which point you'll lose a few inventory items, including
the Ring
Examine and take the Newspaper
Examine the Ashtray, then take the Matches
Use the Knife on the Clock to get some Batteries
Exit To the lobby
Talk to Murray
- AngelinaExit to the right
- Angelina's room key
- Finish conversation
- FireClick twice on the Key board to get Angelina's room key
Willow Creek
In the dialog with Miss Valley, select
- SanatoriumEnter the Museum
- Willow Creek
- Black Mirror
- The Order
- ChronicleRight-click the Picture postcard and select the hotspot closest to the words "Willow Creek"
- Bobby
- Bubble mixture
- Chili
- Finish conversation
- ChiliRight-click the Picture postcard and select the Willow Creek hotspot next to the two pine trees
- Finish conversation
- Bubble mixturePick up the Bottle of bubble mixture
- Finish conversation
- Tomto get a Lock picking tool
- Shops
- Shops
- Beer
- Shops
- Beer
- Shops
- Beer
- Shops
Hotel
Right-click the Picture postcard and select the hotel
Use the Entrance
Use the Lock picking tool on the Lock boxes
This puzzle randomizes every time you zoom in on it. An effective strategy is
to press the red arrow cursor just to the right of the far-right tumbler to
insert the pick, then adjust the wire from right to left so that each tumbler
is depressed just to the point where the dividing line between its gold and
silver parts aligns with the horizontal red line. For example:
When the lock clicks open, examine the Lock boxes to get a Letter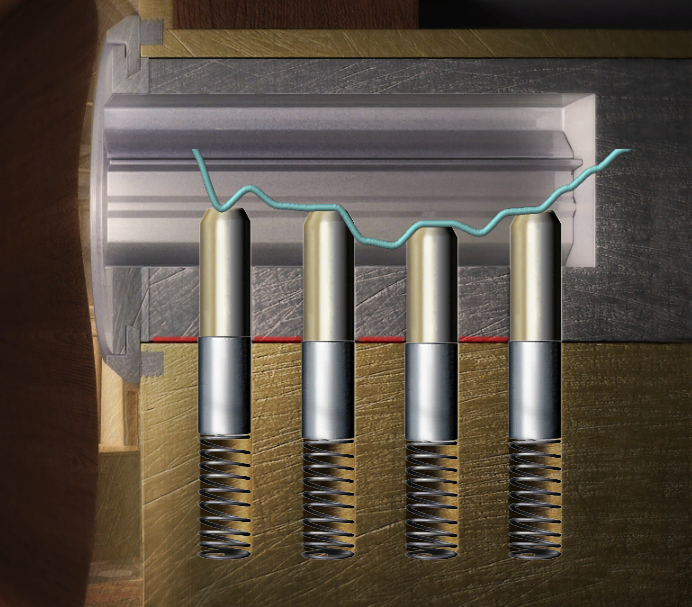
Click on the book to get its Contents page
(1) The Frog King or Iron Henry (17) The White Snake (25) The Seven Ravens (62) The Queen Bee
Click twice on the Hole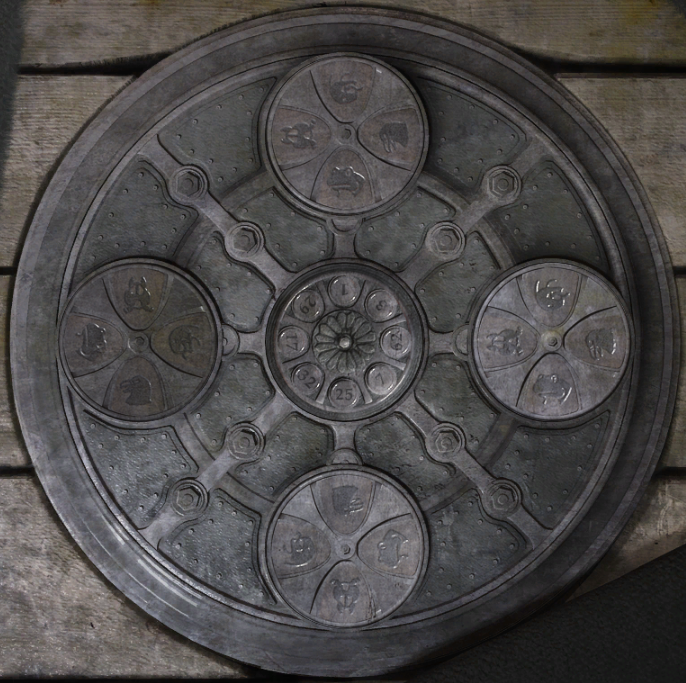
Sewer
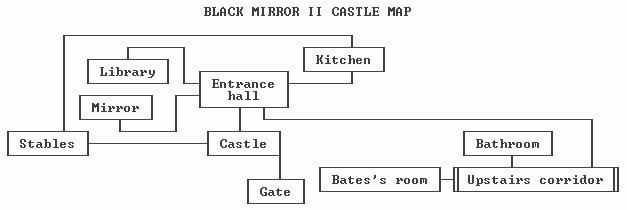
Referring to the sewer map, follow these directions:
Exit Round the corner
Exit To the right
Pick up an Iron bar at the top of the steps
Exit To the left
Exit Back that way
Exit Back left
Exit Backwards
Pick up a Wooden beam
Exit Forwards
Exit Back
Exit Back right (following the rat)
Use the Metal bar on the Grate
Put the Wooden beam on the Grate
Exit under the Grate
Exit Back left
Exit Right
Exit Right
Examine the Pipe and get a Small piece of cloth
Exit into the Pipe
Bunker
You can move the cursor around in the dark to find the
locations of hotspots in this room
Click on the ?? symbol at lower right to identify it as a Cloth, then pick it
up
Click on one of the ?? symbols at lower left to identify it as a Bucket with
oil, then use the Old rag with it
Click on one of the ?? symbols at lower left to identify it as a Metal tube,
then pick it up
Combine Oil-soaked rag & Metal tube
Combine Matches & Home-made torch
Examine the Metal door
Remove the Metal bar
Click twice on the Cable
Click twice on the Switch box
Exit through the Metal door
Examine and take the Igniter
Take the Chain
There is a Screwdriver here also, but it's extraneous inventory
Examine and take the Aluminum dish
Combine Knife & Aluminum bowl
Use the Knife on the Bars of the grate
Put the Welding powder into the Cell lock
Use the Igniter on the Camping stove
Use the Sparkler on the Camping stove
Use the Burning sparkler on the Cell lock
Open the Cell door and scroll to the left
Examine the Package,
then take the Self-inflating rubber dinghy
Examine and take the Hose
There's a Box of magnesium flares here, but it's extraneous inventory
Click twice on the leftmost of 3 levers on the wall to open the metal door at
far right
Open the right Locker, then click twice on it to get a Fuse cable
Open the middle Locker and examine it
Click twice on Reginald Borris's body to get Part of a poem and Insulation
tape
The shiny blood on the floor must be completely dry since Darren can safely step
in it without tracking
Open the left Locker, then click twice on it to get Dynamite
Click twice on the Hatch to open it
Exit down the Hatch
Take the Gloves, and also get a Wrench
The following two steps may require careful positioning to avoid the
inventory bar, or using a hi-res display setting:
Put the Dynamite on the hatch
Put the Fuse cable on the Dynamite
Exit To the main room
Click twice on the Junk
Use the Fuse cable (on dynamite) with the Detonating device
Click twice on the Detonating device
Exit down the Hatch
Examine the Hatch
Exit To the main room
Examine the Locker with dynamite to get another stick
Examine the Locker with box to get another Fuse cable
Exit down the Hatch
Put the Dynamite on the Concrete beam
Put the Fuse cable on the Dynamite
Exit To the main room
Use the Fuse cable (on dynamite) with the Detonating device
Use the Detonating device
Exit down the Hatch
Put the Chain on the Concrete beam
Use the Rubber dinghy on the Concrete beam
Click twice on the Rubber dinghy
Exit down the Hatch
Examine the Grate at upper left
Combine Insulation tape & Gloves
Examine the Cable at upper right, then use the Insulated gloves on it
Exit To the main room
Scroll right through the cell and Metal door at far right
Examine and take the Water hose
Combine Old hose & Hose
Attach the Long hose to the Outlet
Return to the open hatch and descend
Carefully put the Longer hose (on the water outlet) onto the Hatch
Exit To the main room
Scroll right back to the room with the two large water tanks
Use the Outlet
Return down to the location of the other end of the hose, and exit down the
lower Hatch
Quickly use the Wrench on the Grate
Click twice on the Old wagon
Click twice on the Button at upper right
Exit To the main room
Use the Wrench on the Compressor to get a Flywheel
Go through the Metal door at left
Examine and take the Heavy chain
Put the Heavy chain on the Crevice at upper left
Put the Flywheel on the Old wagon
Push the Old wagon
Connect the Chain (on grille) to the Old wagon
Click twice on the Floorboards
Examine and take the Planks
Click twice on the Stones
Use the Wooden beam with the Old wagon
Click twice on the Crevice
Examine the Wooden door and Exit
{Cutscene}
Wales
Click twice on the Bottle
Examine and take the Piece of glass
Use the Glass shard on the Bottle
Examine and take the Old cloth
Examine and take the Wooden strip
Put the Old rag into the Pool of kerosene
Take the Piece of glass
Use the Glass shard on the Kerosene soaked rag
Put the Wooden strip onto the Burning rag
Combine Burning wood strip & Bonds (not vice-versa)
Take the Sheet
Examine and take the Clothes dummy
Examine and take the Rope
Examine and take the Piece of rope
Examine the Strange place
Examine the Secret compartment to get a Toy car
Put the Rope on the Beam
Click on the Rope
Attach the Rope (over joist) to the Bale of cloth
Click twice on the Carton to get a Wig stand
Exit and see a vision
Put the Clothes dummy, Wig stand and White sheet onto the Chair
Use the Toy car on the Exit
Exit
Examine and take the Toy car
Examine and take the Sandwich paper
Click three times on the Fireplace to get a Charred piece of wood
Click twice on the Chest
Put the Greaseproof paper on the Decorations
Back out and click twice on the Grand piano
Observing that musical notes are read from left to right and can occur on a line
or in the gap between lines, the tracing at the top indicates notes with
relative pitches
0 2 2 1 4 2 1 2Eight white piano keys are active. Selecting any one of the four leftmost active keys as "0", press the keys in the relative positions shown above. For example, press the white keys directly under the following letters of the piano brand name:
u e e mb & e mb eThe piano responds with a sequence of 3 notes, 2 notes and 5 notes (the pitch isn't important)
- CastleGive the Toy car to the Boy
- Abductor
- Angelina
- Finish conversation
Summer house
Examine and take the Garden hose
Combine Hatchet & Worn-out garden hose
Click twice on the exit To the back
Examine and take the Pulley
Use the Hatchet on the Trees
Put the Pieces of rope on the Tree trunks
Examine the Tree trunks
Examine and take the Carrying slings
Put the Pulley on the Tripod
Put the Carrying sling on the Sarcophagus
Click twice on the Pulley
Click twice on the Sarcophagus to exit
Tower
Pick up the Tube
Use the Small tube with the Welding set
Combine Two hose ends & Heated tube
Click twice on the Poster and note the blood types listed on it:
AB B A OClick on the poster
Summer house
Scroll right
There's a Hook next to the door that you can remove with the Hatchet, but it's
extraneous inventory
Exit Forwards
Scroll right and attach the Mended hose to the Water tap
Exit To the back
Put the Hose (on the water tap) into the Marsh
Scroll right and exit Forwards
Scroll right and turn on the Water tap
Exit To the castle twice
Exhaust the dialog choices with Tom
Click on the Letter from Angelina
Museum
Right-click the Picture postcard and select the Willow Creek hotspot next to the
two pine trees
Click twice on the Cupboard
Examine the Display cabinet
Put the Display cabinet key into the Lock
Turn over and Read
Back out and click twice on the Trash bucket to get Chewing gum paper
Scroll right, then examine and take the Wooden plate
Exit To the Black Museum
Put the Wooden board onto the Shredding machine
Examine the Pivoting window
Put the Chewing gum paper onto the Pivoting window
Exit through the Pivoting window
{Cutscene}
Bunker
Scroll left and enter the Elevator
Exit To the main room
Close the Metal door
Use the Metal bar on the Metal door
Set the three levers on the wall into positions
Up Down DownScroll to the right and exit through the Metal door
Sewer
Referring to the sewer map, retrace your path back to
the hotel:
Exit To the tunnel, Left, Left and Front left
Exit To the tunnel, Front right, To the entrance and to Angelina's room
Lighthouse
Click twice on the Tall grass in the rain
{Cutscene}
- Finish conversationExit To the Lighthouse
- Ravenand get a Knight chess piece
- Chess pieces
- Whistle
Enter through the Gate
King Queen Knight Pawn
- Look around in Black MirrorClick twice on the Knitting basket to get a Thread
- Dirty bathroomTake the Teapot
- TeatimeReturn to the bathroom
- Water damageReturn to the kitchen and talk to Sally
- Water damageReturn upstairs and enter Bates' room
On Sir Egmont's portraitExit to the corridor
The builder's eldest sister
My Christian name
The nymph's numbers
- Sir EgmontRight-click the Picture postcard and select the castle gate
- Finish conversation
- Speeding ticketExit To the hall and To the library
- Finish conversation
- Bates' Christian nameto discover that another of Bates' symbols is a KNIFE
- Builder
- Finish conversation
- Speeding ticketto discover that the last of Bates' symbols is a CROSS
- Finish conversation
CROSSTo make these selections from the initial configuration with a Rose shown in each location:
ROSE
KNIFE
STAR
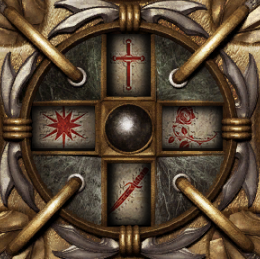
Right-click the top button twiceto get a Large key and a Medallion
Right-click the bottom button once
Right-click the left button three times
Click anywhere on the puzzle to close it
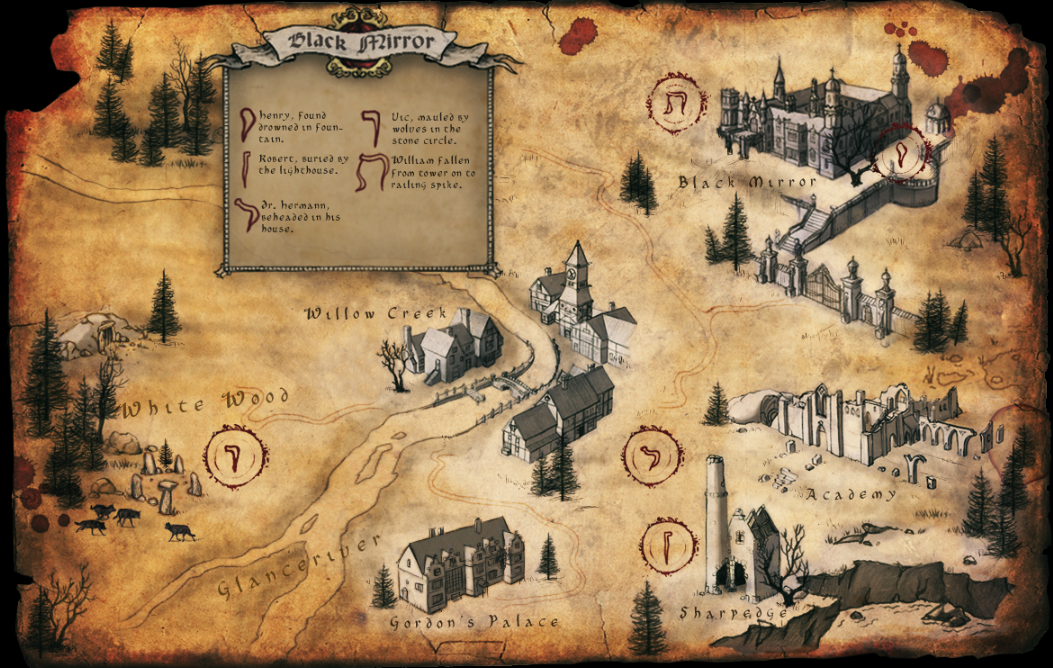
- Wooden plateRight-click the Picture postcard and select Black Mirror castle
- Finish conversation
The number of gold and silver pips on the left and upper sides of the puzzle grid indicate the number of lions and goats, respectively, in each row and column of the desired solution. The lower-right cell of the grid is left open in the solution and a metal ball appears there once the slider is solved. There are two possible solutions meeting these requirements:
Using moves relative to the current position of the space (L: Left, R: Right, A: Above, B: Below), here is a 30-move sequence for the first solution:and
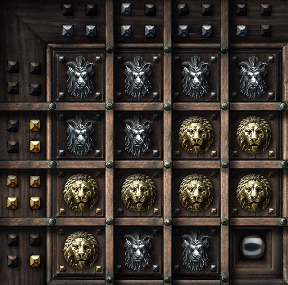
and here is a 36-move sequence for the second solution:A L B R A L L A A R R B B B L A L A A R B R B L L A R R B B
Pick up the Ball from the lower-right cellA L B L L A A R A R B B L A A R R B B L L L A R R R B L L L A R R R B B
1. Press the lower-left circular button to start the puzzle. A ball appears and cycles endlessly between the outer and next-to-outer rings.Exit through the Wall mirror2. Position the red cursor over the T-shaped pushbutton at upper left. When the ball is in the uppermost of the two rings, press the pushbutton.
3. Wait some time for the ball to reach the innermost marked ring, then quickly press the lower-right pushbutton to remove the inside ring barrier and allow the ball to reach the center. If the opportunity to press the pushbutton is missed, the ball will eventually return to the innermost marked ring, and you can try again.
...there's a flower on the outer left one, the left-handOpen the diary and select the Latest task, then go back one page to see a close-up of the Note:
middle one has a sun, the right hand middle one has
water and the outer right one is a snowflake.
which shows that Paving slabs #2 and #6 seem to control doorways, and have no red warning color associated with them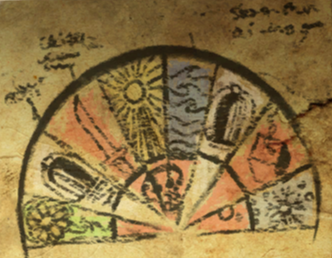
- Stone slab for left doorExit through the Stone door at left
Dress of green and hat of white,suggesting a flower with bell-like blossoms
all would agree a welcome sight,
with bells that in the wind do swing,
heralding the start of Spring.
Make things harder, make things softer,which could refer to fire
make a rich man, make a pauper.
Not too close but love me true,
Too close and I'll devour you.
Sails I have, but sail I don't, at least not on the sea.which suggests a windmill
But round and round and up and down, working hard for thee.
Grinding up with my back teeth, producing, as I said,
The main ingredient which you need to make your daily bread.
In the air it flies, on the ground it lies,which together with the image of a white tree infers snow
it adorns the trees, makes old men wheeze,
on the stove it melts, from grey skies it pelts.
Left-click the left knob twicewhich produces the solution
Right-click the top knob twice
Right-click the right knob once
Left-click the bottom knob once
Examine the Stone compartments to retrieve yellow, green and blue Ornate staffs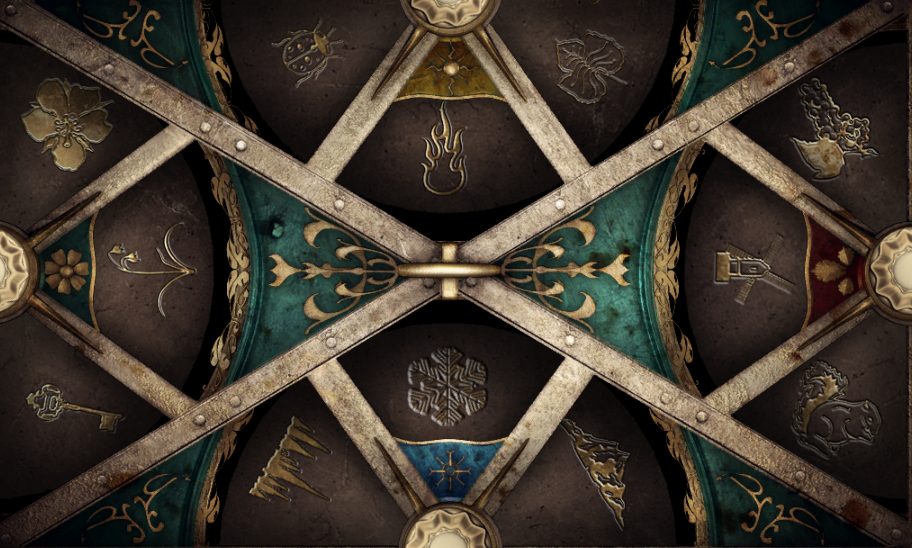
Exit To the grand hall
Yellow Spring Green Summer Blue Winter
- Stone slab for right doorObserving the faint red symbols on the remaining slabs, we have the following situation:
Exit through the Stone door at right
Paver slab Status #1 Disabled by staff #2 Opens left door #3 Symbol #4 Disabled by staff #5 Symbol #6 Opens right door #7 Symbol #8 Disabled by staff (Symbols shown in negative for clarity)
 for
Paver slab #7, which is in the fifth text column from the left:
for
Paver slab #7, which is in the fifth text column from the left:
Click twice on the Description panel to see a mechanism of bars for entering a column of five colored symbols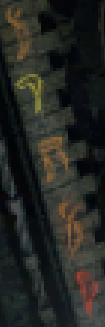
Move the top toggle switch to the rightPress the white button, and a stone block image is displayed
Move the second bar from the top once to the right
Move the third bar from the top once to the left
Move the bottom bar once to the left
Move the bottom toggle switch to the right
- LouisClick twice on the Holder
Copyright © 2019 Balmoral Software (http://www.balmoralsoftware.com). Portions copyright © 2009 dtp entertainment, AG. All rights reserved. Republication, redistribution or conversion is expressly prohibited without the prior written consent of Balmoral Software.


