 Second-Gate Hieroglyphs
Copyright © 1997 Balmoral Software (http://www.balmoralsoftware.com). Portions copyright © 1997 DreamCatcher Interctive, Inc. All rights reserved. Republication, redistribution or conversion is expressly prohibited without the prior written consent of Balmoral Software. Contents subject to change! For the latest information, see http://www.balmoralsoftware.com.
Beyond Time is not a bad game, really, just one that repeats many of the themes and ideas presented in title after title of the adventure-game genre. If you enjoy games with less than the latest high-definition graphics, a few puzzles and a contrived and derivative plot, then Beyond Time will probably fit the bill.
The game interface is well thought-out, with a menu of game control choices and online help just a mouse click away. A "smart" cursor is quite intuitive and easy to use. Convenient keyboard shortcuts are available for some functions (such as "I" to show/hide the inventory bar). Of course, it would have been nice to also have keyboard arrow keys for movement (as in Timelapse ). A nice touch is the inclusion of replay buttons to repeat FMV segments at various points in the game. Saved-game slots allow for long descriptions and are unlimited in number, although not file-based. The game has an annoying requirement to always start from CD-ROM #1, but this may be less onerous than in other games since Beyond Time comes on just two discs.
Beyond Time's graphics are weak at best, presented in a small gameplay viewport. Transitions between scenes are made in a slideshow format, without even the minimal animations found, for example, in older Director-based games. Clearly, some backgrounds could have benefited from a higher level of detail; e.g., the slab-like beds and pillows in the Labyrinth living quarters. Graphics generally seem a lot like 1995's Majestic (maybe a little bit better), but are based on the same kind of low-detail rendering. A few animal sprites are encountered, principally in the Dark Way, giving the game the flavor of a poor man's Timelapse.
The FMV acting in the game is soporific, especially difficult to endure in the myriad technobabbling video journal entries in the Labyrinth - simply way overdone. In these scenes, characters are always dressed exactly the same, even though the journal entries are supposed to cover a period of months. The choice of names for the "Travelers" seemed strange - Temogen sounds a lot like Temujin, Lantis a lot like Atlantis, etc. For any sort of replayability, a method to skip video segments is sorely lacking.
Probably the best thing about Beyond Time is its puzzles, sprinkled liberally throughout the game, but not particularly well-integrated into the overall plot. Especially in the earlier parts of the game, there seems to be a good degree of nonlinearity in gameplay, so various sequences of puzzles or artifact hunts can be worked on simultaneously. A few puzzles are reasonably complex, with the occasional red herring or bit of misdirection. However, our overall impression is that more and better puzzles would have improved the game - most puzzles will be quite easy for the reasonably-observant player. A notable example of a puzzle needing improvement is the Mandala Puzzle encountered late in the game - this particular puzzle has 114 legitimate solutions, but the game designers chose to accept only one of them! Beyond Time is marketed by the same company that has reissued Jewels of the Oracle (and a reference to JOTO is made on its packaging), but its puzzles have a long way to go before they're in the same league. If you're looking for a good puzzle game along the lines of Jewels of the Oracle, you'd be better off with Karma: Curse of the 12 Caves (if you can find it), which was published by the same company that produced Jewels of the Oracle.
Most of the music in Beyond Time is pretty good, but occasionally sounds somewhat like a TV movie. In the Labyrinth, the music is very reminiscent of the movies The Shining and John Carpenter's The Thing. Sound effects throughout the game are minimal, but by the same token, non-intrusive. The thunder and lightning at Tikal is a nice touch.
Beyond Time was developed by Jones Multimedia. Could the Doctors Jones be a little insecure about their level of advanced education? No less than 33 references to their titles appear in the game credits. We get the point, O Great Ones.
Beyond Time has a few bugs, but none that couldn't be worked around. DreamCatcher Interactive's toll-free technical support was helpful in acknowledging these problems and apparently plan on issuing a game patch in the near future. In particular, try to avoid operating the top of the obelisk in the west bank courtyard until absolutely necessary - several players have had lockups at this point, especially after viewing a video segment of the Fire God. We also had many "opltimer" error messages on the raised platforms of the space station's observation deck, but these could be ignored without crashing the game.
Overall, Beyond Time is a diverting adventure game experience, but won't go down in history as a classic. As a puzzle game, it can't compare to older and better titles. As an adventure game, it is overshadowed by many of the titles released in the last couple of years.
Click the mouse to skip the game introduction. If you wait and enter no selection at the main menu, you'll get a long introductory video sequence about missing historical artifacts worldwide.
Walkthrough Abbreviations:
F: Forward (Fn for n repetitions)
L: Left
R: Right
T: Turn around
U: Up
D: Down
LF: Left forward
RF: Right forward
Most puzzles reset to their original initial state if you zoom out from them.
For additional strategic clues, refer to the booklet that came with the game.
Not all areas are explored in this walkthrough, just the ones required to complete the game. There are a few animated sprites sprinkled around the game.
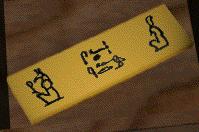
Once the amulet has been returned, all objects and inventory in the game become accessible. Move R F LF F L and note the Second-Gate hieroglyphs on the back side of the column:
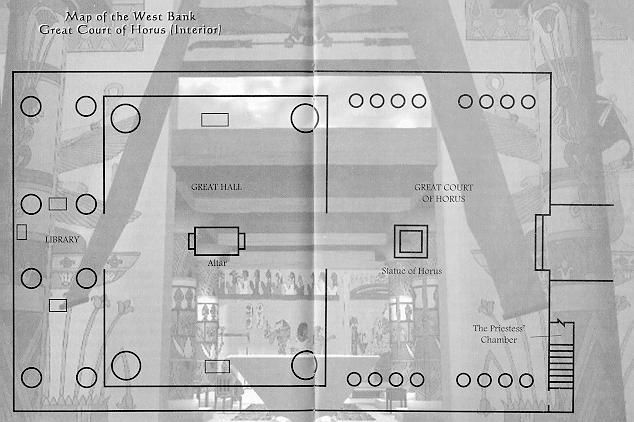
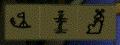
Move F3 R2 D and pick up the video display unit. Press the blue play button to learn the fate of the time "Traveler" (Temogen) that had stolen the amulet of Horus. Zoom out from the video unit and move U R F L F. Zoom in on the brown, parquet-topped table and open it to disclose the First-Gate hieroglyphs:
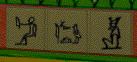
Move U2 R2 F R2 and open a secret panel on the bottom of the white altar to obtain the Fire Key. Move L F L2 LF F to see the Third-Gate hieroglyphs:
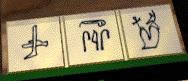
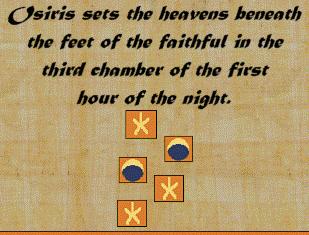
Zoom out from the wall and move L F R F2 R F to a green-topped table in the Library. Open its drawer to disclose the Fourth-Gate hieroglyphs:
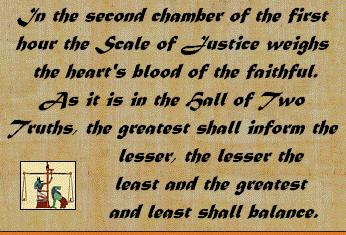
Move U L F L F R and examine the Book of Gates scroll from the shelf at left center. Note the references to the Scale of Justice, Osiris' pattern for the third chamber, and Osiris' coffin in the fourth chamber:
Close the scroll and move RF T R F L. Open the Book of the Dead scroll from the shelf at upper left and note the following information:
Number of grandsons of Osiris (sons of Horus): 4Close the scroll. If desired, wander around the Library and Court examining other scrolls and scroll fragments (all inexplicably written in English) for more of the game's backstory. Otherwise, move R RF F6 R F4 L F U2 RF F3 into the Priestess' Chamber.
Number present in the Hall of Two Truths: Great Nine and Little Nine
If you want to play the optional Organ Puzzle later in the game, remove the Air Key from a panel in the wall. Move D and examine the Betrayal of Osiris scroll at the top of the table. Here you'll learn that there were 74 betrayers of Osiris (Set, Aso and 72 others) and that Set cut the body of Osiris into 14 pieces. Examine the scroll at left to learn that each of the two-headed Serpents of Sakkara is the equal of the others, and that they form a triangle with equal sides. Close the scroll, move U T F R and zoom in on the Snake Puzzle.
The object of this puzzle is to arrange the twelve numbers 1,...,12 so that:
	 1		 7		 1		 4
	11		12		11		12
	 8		 4		 5		 7
	 6		 3		 9		 3

	    2  9  10  5			    2  6  10  8
However, the game only accepts the left-hand solution above.
When you've completed the puzzle, pick up the golden Eye of Osiris from the drawer that has opened. Move U L F2 RF RF F2 R and open the doors.
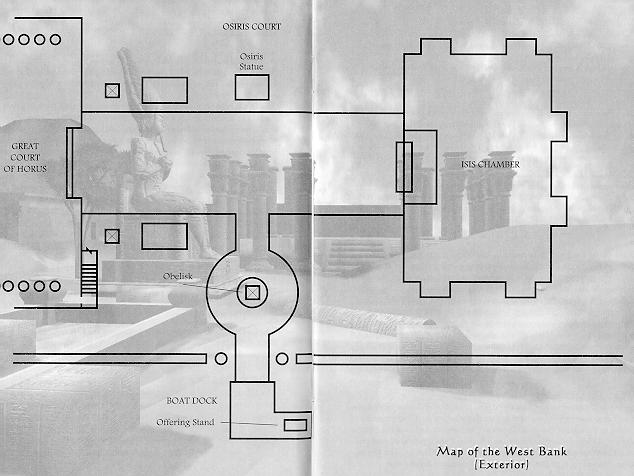
Move F2 L and zoom in on the reflecting pool outside the Court of Horus. Pick up the Water Key from the pool, then move U R F R F R LF F and zoom in on the earthen pot flanking the pathway. Pick up the Earth Key and move U L LF F R F to the Osiris statue in the courtyard. Verify that you have at least the Water, Fire and Earth Keys in your inventory (check the online help for hieroglyph details), then insert the Eye of Osiris into the base of the statue and move D F5 LF into the Dark Way. Insert the Water Key into the pedestal, move F5 into the Water Tunnel and pick up the bucket of water in the passageway. Further progress in this tunnel is blocked by a crocodile-infested moat, so move T F4 RF back to the pedestal and insert the Fire Key.
Move F5 into the Fire Tunnel and pick up a torch from the holder on the wall. Move F and douse the sheet of flames using the bucket of water in your inventory. Continue F5 to the Fire Obelisk and click on its top to orient the ankh symbol to the east. Check the online help for direction hieroglyphs. The proper orientation is most easily accomplished by aligning the ankh with the two-bar West symbol you're facing, then clicking the top of the obelisk twice. Move T D F9 RF back to the pedestal and insert the Earth Key.
Move F4 into the Earth Tunnel and pick up a bucket of sand in front of a closed stone door. Use the torch to burn through the rope connecting the two halves of the wooden rod, opening the door. Move RF F LF F2 RF and repeat the ankh orientation procedure. Move F RF F2 LF LF F2 and press the water symbol on the pedestal.
Move F5 into the Water Tunnel and put the bucket of sand into the receptacle at right, raising the drawbridge. Move F2 to the obelisk and orient the ankh. Move T T F6 LF back to the pedestal.
Optional Organ Puzzle
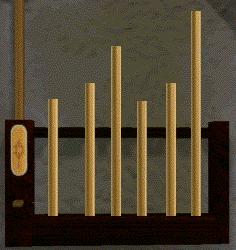
If you have the Air Key, you can try the optional Organ Puzzle (not required to continue the game). Save your game, then insert the Air Key into the pedestal and move F5 RF F. A gate closes behind you, so you must solve the puzzle in order to return to the surface. The object of the puzzle is to match the organ's tune to the cadence playing in the background (it may be easier to hear by temporarily turning off the Ambient Sound using the Menu button displayed by a right mouse click). The tune produced by an arrangement of organ tubes can be tested by pressing the air symbol on the left side of the organ. Organ tubes can be exchanged by dragging them with the mouse cursor. The proper arrangement of organ tubes is
When the puzzle is solved, you'll hear a tone and the gate raising behind you. Move T LF F5 RF RF back to the pedestal.
From your position facing the air symbol on the pedestal, move L2 F5 L2 and be sure to retrieve the Eye of Osiris from the Osiris statue. Move R F2 and zoom in on the combination door lock for the Isis Chamber. To enter the First-Gate hieroglyphs seen earlier in the Horus court, click the lock tumblers in this pattern:
1 2 1 First Gate CombinationMove F into the chamber and listen to Isis pose a question that must be answered in order to pass through the "First Gate" that you'll encounter later in the game. Pick up a golden jackal that she leaves for you. Move T F T and again zoom in on the door lock.
Repeat the entry procedure for the other three gate combinations and hieroglph sets:
	7  0  7		Second Gate Combination
	3  4  3		Third Gate Combination
	5  6  5		Fourth Gate Combination
and note that sometimes Isis will not appear in her chamber unless you turn to the left after entering. Pick up a golden ankh (key), falcon and urn.
From a position facing the Osiris statue in the courtyard, move L2 F U and orient the final obelisk so that the ankh is facing you (east). This completes the eastward orientation of all four obelisks, and the boat appears at the west bank dock. Move F5 L F L and place the golden urn, jackal and falcon on the offering stand. You are now ready to ferry the offerings, one at a time, across the Nile to the east bank dock. However, the following pairs cannot be left alone at any time:
Falcon & UrnSound familiar? Here's a sequence that will work:
Falcon & Jackal
When you've safely brought all three offerings to the east bank, they're returned to your inventory. Move L F L F5 and open the doors into the Labyrinth. After a CD-ROM change, move F to the golden statue and place all three offerings at the indicated positions on the platform at the statue base. Move F2 and open the doors.
Most of the living quarters in the Labyrinth (see map) contain numerous obscure video journal entries describing the team's work on a time machine, their use of it to pilfer historical artifacts, and their eventual failure due to unexplained forces. We'll skip these non-critical details in this walkthrough and will only visit living quarters when necessary, instead concentrating on the puzzles found elsewhere in the Labyrinth. Pass through the doors and move L LF F4 R.
Open the doors to the Scale Room and move F4 to the weighing table. One of the containers can be emptied into another by dragging both to the stands in the center of the table and pressing the lever. Reading the scroll on the table suggests that two equal measures (4) of blood need to be obtained from containers with capacities of 8, 5 and 3. In fact, the assumption of 8, 5 and 3 capacities is a red herring:
Let S and M denote the capacities of the small and medium containers, respectively. First, empty the large container into the small container, then empty the remainder of the large container into the medium. Further pourings from the large container are not possible, so we conclude that the large container is now empty. Also, pouring the medium container into the small one or vice-versa produces no change, so both small and medium containers are full; that is, the small container contains S units and the medium container M (and it follows that the capacity of the large container is at least S+M). Pour the small container back into the large container; the contents now are:
	Large	Medium	Small
	  S       M       0
Next, pour the medium container into the small one. Some liquid is apparently left over in the medium container, from which we infer that M > S:
	Large	Medium	Small
	  S      M-S      S
Empty the small container into the large one:
	Large	Medium	Small
	 2S      M-S      0
Finally, empty the medium container into the small one:
	Large	Medium	Small
	 2S       0      M-S
You can verify that the medium container is truly empty by trying to empty it into the large container. Also, it's not possible to pour any liquid from the large container into the small one, so the small one is full. Since it's full, we have
S = M - S,or
M = 2SThis indicates that the medium container is exactly twice the capacity of the small one, and the large container is (at least) three times the capacity of the small one. With capacities in the ratio 9:6:3, it is impossible to divide 9 units of liquid into two equal portions.
Return all liquid to the large container. Following the instructions seen earlier, empty the large container into the medium one, then the medium one into the small one. Ignore the medium container and balance the scale with the small and large containers. Click on the crystal pyramid to obtain the Tikal coordinates:
64:90:20 Tikal CoordinatesMove L F2 LF F8 LF RF R and open the doors to Osiris' Mummy Room.
Pass through the doors and move F3. Click on the ten strips of hieroglyphs to form the arrangement seen earlier, or click the strips in this pattern:
6 1 7 2 0 1 5 8 6 7 Coffin CombinationClick on the crystal obelisk to obtain the Space Station coordinates:
14:25:50 Space Station CoordinatesZoom out from the obelisk, move T F3 LF RF F RF and open the doors to the Crystal Orb Room.
Pass through the doors and move F. Move across the Third Chamber floor using the pattern of tiles seen earlier. Follow the scroll symbols from bottom to top:
StarIf you make more than one mistake, a cylindrical stone enclosure lowers and you're prevented from accessing the dais. Move F2 and click on the crystal globe to obtain the Atlantis coordinates:
Star
Moon
Moon
Star
19:60:30 Atlantis CoordinatesMove T F8 LF RF L and click on the yellow button to open the door to Daedelus' living quarters.
Move F and click on the chair in the corner. Move R and click on the scrap of paper lying on the chair to read a fragment of a note from Lantis:
Zoom out from the note, move R2 F LF F4 RF R and click on the purple button to open the door to Lantis' living quarters. Move F R and click on the paper lying on the desk to read the other half of Lantis' note:
Zoom out from the note, move R F LF RF F2 LF and open the door to the Jackal Room.
Pass through the door and move F. Put the Eye of Osiris from your inventory into the receptacle on the jackal statue, then click on the crystal cube to obtain the Lhasa coordinates:
85:80:40 Lhasa CoordinatesZoom out from the cube and move T F RF LF to the first of four Isis gates.
Click on the pedestal to repeat a question originally heard from Isis in her chamber on the west bank. Enter the answer obtained from the Betrayal of Osiris scroll in the priestess' chamber:
Number of evil ones that betrayed Osiris: 074Open the first gate and pass through it. Move RF LF to the second gate, where the answer to Isis' question is revealed from the Book of the Dead scroll in the library:
Number present in the Hall of Two Truths: 018Open the second gate and pass through it. Move LF to the third gate, where the answer to Isis' question is revealed from the Book of the Dead scroll in the library:
Number of grandsons of Osiris: 004Open the third gate and pass through it. Click on the green button to open the door to Howard's living quarters. Move F and click on the desk in the corner. Move D and open the burlwood box on the desk to obtain a key. Move U R F LF RF to the fourth gate, where the answer to Isis' question is revealed from the Betrayal of Osiris scroll in the priestess' chamber:
Number of Osiris body parts: 014Open the fourth gate and pass through it. Open the Guardian Doors by using the ankh key from your inventory, then move F. After a CD-ROM change back to disc #1, move F T into the elevator and click on the fuzzy red/green control panel to go up to the main Gate control room.
Move F2 L and click on the model of Earth at the extreme right. Press the red button to activate all Gate destinations on Earth. Move R and click on the gate control console at left. Move F D and press the red button to activate an image of Earth in the viewfinder. Click on the triangle of the viewfinder five times to display Lhasa at left. Click on the green button to access the coordinates screen. Enter the Lhasa coordinates found earlier (85:80:40).
On your arrival in the Tibetan monastery of Lhasa, move F and click on the forehead of the golden buddha to disclose a secret passage. Move D F LF F3 RF F LF F LF F LF F and examine a book lying on the table:
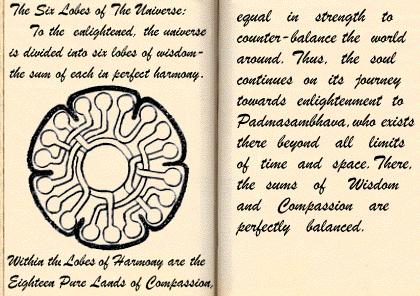
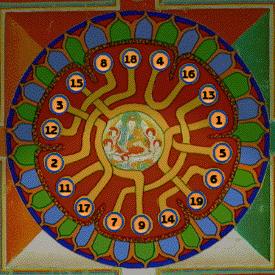
Here you'll learn of a mandala pattern in which 18 numbers are paired so that their sums are equal and certain triple groupings are also equal. Zoom out from the book and move LF LF F to the Mandala Puzzle. This larger version of the Snake Puzzle uses 18 numbers between 1 and 19 (10 is deceptively missing), which sum to 180. Thankfully, the numbers are represented using arabic numerals. As in the Snake Puzzle, only one of the possible answers will be accepted by the game. Unfortunately, given the criteria
When the puzzle has been completed, a broken key at the bottom of the puzzle is reformed and transferred to your inventory.
Move L F RF F2 R F5 RF F LF F RF F2 past the Monks' Room and open the main entrance doors. Click on the Gate to return to the Abydos control room. Move D and select Tikal as your destination. Enter the Tikal coordinates found earlier (64:90:20).
From the gate, move F3 L F4 L F3 L F2 to the Ball Court Puzzle. Note that the pedestal at this end of the court is numbered 1, 3, 4, 2 from top to bottom. Zoom in on the pattern on the ground and select a path from bottom to top by repeating the four-number sequence:
The solution of this puzzle opens doors at the top of the tall pyramid. Move F5 and pick up a power crystal from the circular platform. Move T F6 R F3 R F2 L F3 D F6 through the Ball Court and down to a subterranean chamber in another building. Use the key from Lhasa to unlock the doors. Open the doors, pass through the doorway and move F6 L F into the Sarcophagus Chamber. Click twice on the wall panel to disclose a green crystal. Move R and click twice on another wall panel to disclose an orange crystal. Move R RF and click twice on a third wall panel to disclose a purple crystal. Move R and click twice on a fourth wall panel to disclose a red crystal. When all four crystals have been revealed, you'll hear the sound of another stone panel opening. Move R LF F R to see a previously-hidden skull. Rotate the skull and click on the pedestal that you find yourself facing, opening the sarcophagus. Move F2 and wrest a power crystal from the bony fingers of the skeleton. The large door at the back of the Sarcophagus Room is for registered guests only.
Move U2 T F14 L F R F4 R F2 R2, then click F2 between the cylindrical columns of the Gate to return to the Abydos control room. Move D and select Atlantis as your destination. Enter the Atlantis coordinates found earlier (19:60:30).
In Atlantis, all surface paths lead to the same destination. From the gate, move F13 L and press the elevator "down" button to board a submarine. As in many other adventure games (Amber, Lighthouse and Riven , to name a few), your task is to slowly and laboriously negotiate an underwater maze with your vehicle. Use the crystals at the center of the control panel to reorient or move the vehicle. The maze's junctions do not necessarily form pathways at right angles, so it's important to note the appearance of the seascape through the porthole in various directions to avoid getting lost. A row of clue crystals at the top of the control panel indicates proximity to your goal.
Move F3 R F R F L F L F and use the T-shaped claw control to pick up the power crystal. Return to the dock by using the bottom control-panel button to turn the submarine around, then moving F2 R F L F L F3 and turning the submarine around again.
Move U L F14 to return through the Gate to the Abydos control room. You won't have enough power in the Gate to access your next destination, so the first order of business is to utilize the power crystals you've been collecting. Move T F3 T into the elevator and use the thumb of the open-hand cursor to click on the top (red) button of the elevator control panel. Move F L and click on the empty power-crystal receptacle. Insert one of the power crystals from your inventory. Move L2 and repeat the procedure for the next empty receptacle. Move L2 and perform the procedure again for a third empty power-crystal receptacle. Move L2 F L F L2 F T back into the elevator, noting that there is one empty power-crystal receptacle remaining. Click on the green button of the elevator control panel to return to the Gate control room.
Move F2 R2 and click on the model of a white planet. Press the red button to activate Traveler 1 destinations. Move L F and click on the gate control console at the extreme right. Move F D and press the red and green buttons. Enter the Space Station coordinates found earlier (14:25:50).
Move F and pass through the door into the docking bay. Move L F L and pass through the door into the elevator. Click on the control panel at left and select Floor 2. Move F2 LF F11 and click on the pyramid to disclose an access code (167) that will be needed later. Move R2 F11 and pick up a tan-colored elevator access card at right. Move T F3 L and re-enter the elevator. Click on the control panel and insert the access card into the slot. Select Floor 3.
Move F L F2 L F3 RF U2 R F to access the stateroom control panel on one of the raised platforms surrounding a tree. Click on the panel and press the red button to activate it. Enter the code number (167) you found on Floor 2, and access to Howard's stateroom will be granted. Zoom out from the control panel and move R F2 D F2 R F R F4 L F into Howard's stateroom. Click on the chest and open it using the key in your inventory, obtaining the last power crystal. If desired, wander around the stateroom discovering the various famous objets d'art it contains, as well as a non-functional door to the left of the entry hatch. From a position facing the chest that held the crystal, move L and zoom in on the pentagonal access hatch. Move F6 R2 F4 R and re-enter the elevator. Select Floor 1, move F R F R and pass through the door into the Gate room. Move F2 through the Gate.
Move T F3 T into the elevator and use the thumb of the open-hand cursor to click on the red button of the elevator control panel. Move F R and click on the empty power-crystal receptacle. Insert the power crystal from your inventory. Move L2 F L2 F T back into the elevator. Click on the red button of the elevator control panel to access the Crystal Matrix room at the top of the Gate control center. After listening to a tirade from the bitchy, sneering Project Commander, move L to a red crystal. Refer to left and right halves of Lantis' note obtained earlier to derive codes for each color of crystal:
	Violet		973
	Blue		625
	Red		147
	Green		832
Rotate L to enter these codes for each of four crystals. A tone will sound when you've entered the code correctly. After the poor-sounding, silly endgame sequence, you're returned to present-day Abydos and the game credits roll.
Copyright © 1997 Balmoral Software (http://www.balmoralsoftware.com). Portions copyright © 1997 DreamCatcher Interctive, Inc. All rights reserved. Republication, redistribution or conversion is expressly prohibited without the prior written consent of Balmoral Software. Contents subject to change! For the latest information, see http://www.balmoralsoftware.com.