Copyright © 1998 Balmoral Software (http://www.balmoralsoftware.com). Portions copyright © 1998 Take 2 Interactive Software, Inc. All rights reserved. Republication, redistribution or conversion is expressly prohibited without the prior written consent of Balmoral Software. Contents subject to change! For the latest information, see http://www.balmoralsoftware.com.
Black Dahlia, the latest release from Take 2 Interactive Software, tells a gritty detective story set in the 1940's.
The game's interface is a mixture of first-person gameplay on rendered backgrounds and third-person full-motion video segments using live actors against the same backgrounds. There are frequent grainy, sepia-tone "film clips" shown at key plot points throughout the game to indicate a change in time or place, particularly effective with their slightly-scratched appearance suggesting a 1940's newsreel. All FMV segments use alternate scan lines, so they end up having a television-like appearance that thankfully is absent from the first-person gameplay portions. Movement around the node-based environment is intuitive, using a 3D game engine very similar to Journeyman Project 3 - at any node in the game, you can smoothly move the viewpoint a full 360 degrees, as well as up and down. Black Dahlia's vertical range of motion is less than in JP3 (especially noticeable when in "flashlight" mode), but most of the time this was not confining. As is usual with this type of game engine, hotspots and movement options in the environment are indicated by a change in the cursor. We would have preferred a non-animated idle cursor, which would make the cursor changes easier to see.
Black Dahlia's graphics are very impressive, arguably the game's greatest strength in immersing you in the mood of the various times and locales of the game. For the most part, a lot of research effort has obviously been expended in order to portray an accurate depiction of the game's scenes.
Acting is absolutely first-rate, with Darren Eliker as Jim Pearson doing a really outstanding job. He's great at looking confused, the way we sometimes felt while playing the game. The caliber of his work is better than some first-run movies we've seen lately - hopefully this is an indication of higher standards for the adventure-game genre (certainly higher budgets, anyway). By our estimation, Eliker should have definitely received top billing in the game's credits, since the appearances by the "name" actors Dennis Hopper and Teri Garr are not much more than cameos. A large cast of supporting characters serves to fill out the live-action sequences and gives the whole game a greater degree of verisimilitude. Your interaction with characters is based on multiple-choice dialog selections. Some of these dialog prompts should have been written in the first-person, rather than third-person, to make it easier to identify with the Jim Pearson character. The questions and answers cannot be repeated without restoring a saved game, so you'll have to pay close attention. Often, the game's plot will not advance until each of the dialog choices (or perhaps a key one) has been exercised. Some of the dialog paths may be inaccessible if they are not chosen in a particular order.
Black Dahlia's music tries to be "period", but the segments are so short that it usually feels very repetitive and ultimately annoying. One segment, present for a long time, sounds like a piano being tuned up. Another segment consists of a tinny radio announcer talking, making it a bit difficult to simultaneously carry on a conversation with a character. Sound effects are satisfactory, but don't include footsteps or other evidence of movement. As a result, you seem to silently "float" from one node to another as you move around a location.
We had a few problems with game crashes after periods of inactivity, but most of them were cleared up by installing Take 2's patch (875 KB). Some users have reported solving problems by setting the game's volume control in the middle, but we had better luck by accepting DirectX 5's update of our video and sound card drivers during the game's installation. Even with these changes, however, we still had occasional skipping of the music and dialog, or sometimes out-of-sync video or voices. Once a session is started, the game cannot be minimized and restored under Windows 95.
The story of Black Dahlia is interesting and absorbing, but one that is so long that you may lose track of certain subplots, especially since the loose ends in some of them are not always tidily (or logically) wrapped up. In that sense, Black Dahlia is perhaps more like real life, but not what we've come to expect from an adventure-game story. Sometimes, the game feels as if individual segments were developed independently and then band-aided together. On occasion, the plot seems rather disjointed, jumping around a lot in time and space for no apparent reason. Overall, you'll have a pretty good idea of what your current tasks are, but by the gory end of the game it may not be absolutely sure what the story was really about. At least for us, it wasn't clear at the end who the bad guys really were (except for one, of course).
The cigarette smoking is way overdone - taking 1940's realism too far.
Game control and customization is complete and well thought-out. Sound levels may be adjusted and games saved or restored at any time through a control menu accessible with a single keystroke. We especially liked the "Continue Game" feature, which avoided having to frequently find and restore the last saved game. Slots for saved games are unlimited, and presented with screenshot thumbnails in a very well done manner. There are no credits that you must wait through at the end of the game - they're all listed in the game manual instead.
A generous number of puzzles are interspersed throughout the game. Some of these involve inventory manipulation, but most are standalone tasks - deciphering a mechanical door lock or assembling a jigsaw. While none of the puzzles are new, many of them offer reasonably hard challenges and aren't totally removed from the context of the gameplay. Usually, solution of a puzzle is required in order to advance in the game. The inclusion of FMV sequences lends a personal feeling to the puzzle-solving, absent in the puzzle implementations of other games such as Riven.
Our biggest complaints about Black Dahlia are the difficulties we've had with inventory consistency and the associated problems with advancing the plot. To say the gameplay is linear would be a vast understatement. On at least one occasion, we found that a certain key in our inventory had changed all by itself, which in turn prevented us from continuing through the game. The only way we could get around the problem was to restore a saved game from a completely separate game that we'd started earlier. At another time, we found ourselves in a situation where the cursor would disappear over a world map location, even though the photograph for the location was present. These experiences indicate that Black Dahlia has some technical problems with the triggers used to advance gameplay. Generally, you may find it necessary to complete certain precursor tasks before the game will continue, even though you may already "know" the information you need from an earlier play of the game or from a walkthrough. Many hotspots are available only at certain times or after certain often-unrelated trigger events have transpired. Sometimes the connection between one of the game's triggers and the resulting consequence is less than logical; for example, at one point in the game you'll have to talk to someone before an object will suddenly appear at another location. While it's clear that a game such as Black Dahlia must have some sort of event sequencing affected by the player's actions, more playtesting (or responsiveness to it) and a rethinking of the game's plot from the point of view of a logical player could have avoided many of these problems. These advancing-the-plot issues have been handled better in other games. On the plus side, however, there is very little CD swapping as you progress in the game, so the plot linearity and event triggers are simplified periodically.
An 18-megabyte demo of this game has been made available, but it includes no gameplay interface - merely a portion of the introductory FMV segment and a few screen shots.
Other comments are sprinkled through the walkthrough.
To navigate to another room, press Esc for the game menu and use the World Map. Some sequences may be played in an order different from that shown in this walkthrough. Many details of the game are omitted and left to be discovered by the player.
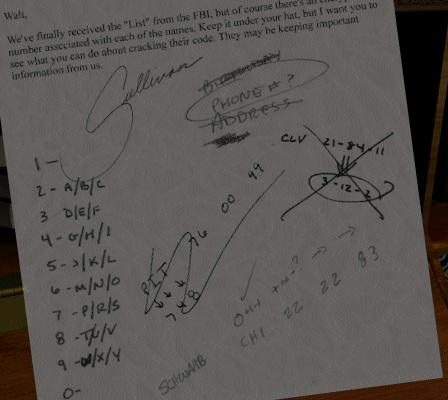
As Special Agent Jim Pearson, you're new on the job at COI. After you meet your boss, William Sullivan, you'll find that you've inherited the office of your predecessor at COI, Walter Pensky. In your office, move toward the windows and open the right desk drawer. On Pensky's checklist inside, note the reference to Professor Strauss. Return the checklist to the drawer, then drag it upwards to disclose a revolver underneath. Pick up the gun and use the inventory window to examine it. Drag the cursor on the gun's handle to extract a key inside. Move toward the bookcase and use the key to open the locked cabinet at the left end of one of the bookshelves. Inside the cabinet, pay particular attention to a note from Sullivan to Pensky:
Turn on the light switch near the door and you'll be able to pick up a bag of runes and some coded parchment sheets inside the ceiling light fixture. Other things you can discover in your office include various books and paraphernalia on the bookcase shelves, notes and a clipping in the desk drawers, and a pamphlet on top of the file cabinet (but try as you might, you won't be able to investigate the ajar door leading off your office). Note the telephone on your desk; you'll need to use it later.
Exit the room and head for Sullivan's office. Ask him about your predecessor and about the case file. Click on the crime report behind the colorful invitation and ask about Finster by moving the cursor around the report until that option is shown. Respond to Sullivan about the invitation, then ask him about the detective who signed the crime report, Peter Merylo. You'll learn that Detective Merylo is handling the torso murders investigation.
Use the world map to travel to Hank Finster's office and note the "Finsterlau" coat of arms behind his desk - obviously Mr. Finster has shortened his name from its original spelling. Ask Finster about the man who gave him the invitation and learn of the involvement of Finster's foreman, George Hansen. Ask for the messenger's description and where you (he) can find him. You'll learn that Hansen was fired by Finster and that the messenger who brought the invitation to Finster had red hair and a bushy red beard.
Travel to Detective Merylo's office and exhaust the dialog options with him. Look in the mug shot book on Merylo's desk and pick up the piece of Finster's company stationery inside. Leafing through the book, you'll see several suspects with bushy beards and even one whose picture has been torn out, but you'll need more information before you can be sure which was the messenger identified by Finster.
Next, travel to McGinty's bar (if you can stand the tinny-sounding radio announcer). Is that Kevin Spacey sitting near the front of the bar? No, it's FBI agent Dick Winslow! After Winslow tells you about the FBI's blacklist, return to Sullivan's office and ask him about the blacklist. After Sullivan gives you the list, return to your own office and open your inventory window. On Finster's stationery, note the six-digit telephone number CMR-140, or 267140 if the letters are converted to numbers using the telephone-dial code seen earlier. Finster's name also appears on page two of the blacklist, with the corresponding case number CLV-21-84-11. For reasons known only to the FBI, their case number assignments are based on subjects' telephone numbers, suitably altered. Again referring to Sullivan's code seen earlier, we find the notation "0 +1 -1", which indicates that the numbers associated with the initial three letters of the case number are modified in the following way:
Do not change the number associated with the first letterIn Finster's case, we would have
Add 1 to the number associated with the second letter
Subtract 1 from the number associated with the third letter
C corresponds to 2, unchangedThe final three digits of Cleveland's 1940's-era telephone number are found by treating each pair of numbers in the case identification as a subtraction problem; in Finster's example,
L corresponds to 5, changed to 6
V corresponds to 8, changed to 7
21 84 11would correspond to the telephone digits 1, 4 and 0:
2 - 1 = 1Combining these results together, we obtain 267140 for Finster's telephone number, which matches what's on his stationery.
8 - 4 = 4
1 - 1 = 0
Referring now to the bottom of page one of the blacklist, we can convert the case number for Dr. Karl Strauss (CLV-51-22-40) to the six-digit telephone number 267404. Use the telephone on your desk to dial this number, and you can leave a message for the professor at the Cleveland Museum of Natural History.
Go to Sullivan's office (or other location), then immediately return to your own office, where you'll receive a message from Helen Strauss. After a switch to CD #2, you'll meet her at the museum. Give Helen your bag of runes. After she's done caressing your hand, she'll offer to translate the coded parchment sheets you're carrying. Return to McGinty's bar and find Finster's foreman Hansen in the back. Talk to him (if you can hear him over the radio announcer) and learn that the messenger's name was Louie. Go back to Merylo's office and check the mug shot book again. There's only one person using the first name Lou, and he does have a beard: Louis Fischer, aka Louis Fielder or Louis Fielding.
Return to the museum and show Helen the invitation in your case file. She'll recognize the crests on its cover as those of an ancient sect of Germanic knights, and will show you a reference book of them, including the one you saw earlier in Finster's office: Sergeant at Arms for the Knights of the Trinity. Apparently the Brotherhood of Thule is patterning itself after an ancient sect of pagan knights, and perhaps Finster is more involved than he's let on.
Ask Helen about the stained glass window, and you'll be introduced to the next puzzle in the game. Arrange the stained-glass window pieces into four diamond-shaped crests:
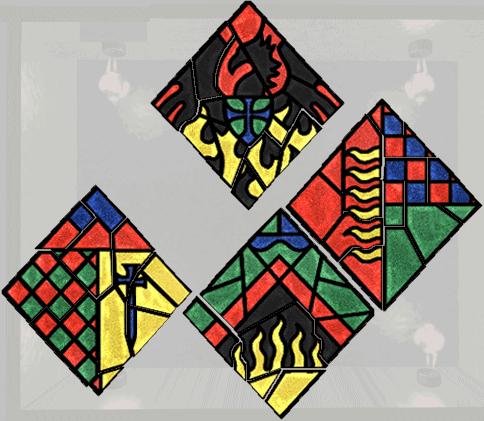
If you drag a piece around while holding down the mouse button, you may end up knocking it into other pieces. To "float" a piece over other pieces, first click on it to grab it, then move it without pressing a mouse button, then click on it again to fix its position. This method comes in particularly handy when some of the diamonds have already been assembled. When you've finished assembling the pieces, click on the swing-arm lamp at left to disclose four names hidden in the stained-glass window:
			LANDULPH

	FINSTERLAU			FISCHTERWALD

			MUHLHAVEN
The associated Order of the Trinity titles are:
	Landulph	Notorious Tyrant and Sorcerer
	Finsterlau	Sergeant at Arms
	Fischterwald	Herald
	Muhlhaven	Scribe
Just as Finster's real name is Finsterlau, Fischer may be an alias for Fischterwald. Return to McGinty's bar and zoom in on the telephone in the back. On the wall in the upper-right corner, you'll find a number (CMR-259) for "Lou Fielding". Call this number on the telephone and ask for Lou Fischterwald when someone answers. You're told he's at the Raven Room; travel there using the world map.
Lou isn't there, but look around and you'll discover a scrap of paper underneath the table in the Raven Room lobby. Turn it over in your inventory window and you'll see a reference to St. Bartholomew's Mission, where Lou has apparently been playing a game with someone called Ernie. Travel to the mission and exhaust all the dialog options with the simple-minded man in charge, Ernie Wiggins. Eventually you'll be able to trick him into leaving. Once you're behind the counter, look down and open the suitcase underneath. Drag all of the left-side papers to the right until you uncover the bottom one marked "DO NOT BEND"; move this one to the left so it's no longer overlapping the right-side pile of papers. Now move all of the right-side items to the left until you can pick up the photograph that Ernie mentioned earlier.
Return to Merylo's office and show him Ernie's photograph (via a dialog choice rather than inventory). After you've learned about Louie the Fish and his association with mobsters, go back to the museum and ask Helen if she's figured out the assembly of the runes. She hasn't, but she did manage to decode the parchments and gives you her notes. Once she's done this, you can return to the Raven Room and finally confront Lou. Show him Ernie's photo, and he'll agree to meet you at his place.
Arriving at the address Lou gave you, you're ambushed by an unknown gunman and lose a dime out of your pocket. Immediately save your game, in case the gunman doesn't miss the next time he shoots at you. In this timed sequence, turn to the left and move toward a rotating fan in the distance. Quickly use the crosshairs to fire your gun at a jet of steam escaping from a pipe on the upper level, then quickly fire again to take out the temporarily-blinded Nazi gunman. Alternatively, you can move to the right, quickly throw a bottle to distract the gunman, then quickly shoot him. Either way, the revolver you've been carrying around mysteriously turns into an automatic.
After a grisly delivery of Lou Fischterwald's head, and a change to CD #3, you'll return to your office and have a bad dream in which an old man brands you on the forehead with his cane. After Detective Merylo wakes you up, talk to him using any of the dialog choices, then travel to Louie's loft. What, this G-man can't afford a holster for his gun?
Walk forward and you'll hear a telltale creak. Turn around and check out the loose floorboard near the end of the cord from the fallen lamp. Pull out the little wooden house (lockbox) that you'll find under the floor and examine it in your inventory window. To open this Chinese puzzle box, perform the following steps by dragging the mouse:
			Dark face

		Light face	Left crescent

	Left crescent			Light face

		Dark face	Right crescent

			Right crescent
Insert the key from the lockbox into the lock in the chest of drawers beneath the wall pattern. Instead of simply opening the lock, the key can be turned to the left or right, as well as pushed in and pulled out. Starting with the 12 o'clock position, use a combination derived from the wall pattern: in, left, out, right twice, in, left and out. Pick up the wolf's fang from inside the small drawer. Turn around and zoom in on the stove on the other side of the room. Use the small brush to sweep away ashes covering up some runes carved on the floor, and you'll experience another dream sequence of the torso killer. When it's over, zoom out from the stove and you can check out your notebook to see that the runes have been recorded. Open your inventory window and look at the matchbook you picked up from the dead gunman - you'll see it's from the Hotel Cleveland. Open it up and you'll find a reference to one of the names you saw earlier in the stained-glass window: Muhlhaven. Turn it over and you'll see the telephone number for the hotel: GB5-637.
Travel to the Hotel Cleveland and ask the desk clerk if Muhlhaven is in. Ask him for Muhlhaven's room number, then threaten or bribe him when he refuses to give it out. Turn right and use the house phone to dial the hotel itself. After a clever ruse about delivering Muhlhaven's newspaper, you'll find yourself on Floor 23 of the hotel. Turn around and grab the maid's cart, then zoom in on it to obtain a table knife from the tray. Look up and click on the transom of Room 23G.
Once inside Muhlhaven's room, zoom in on the armoire at left and use the signet ring to unlock it. After another strange daydream, rummage through Muhlhaven's things until you find an unsigned party invitation from the Raven Room. Look inside an urn on the nightstand to pick up a room key. Try to pick up another invitation inside the urn, triggering another video sequence. When the maid is done waving her hand in front of the light switch, go back to the urn and retrieve a photo of Muhlhaven left by the blackmailer. Return to Sullivan's office to overhear a conversation between him and FBI agent Winslow.
Exhaust all the dialog choices with Sullivan, learning that the FBI has Pensky's files and that the photo of Muhlhaven was taken at Flanagan's. Head for the FBI office and you'll discover that Winslow smokes black Turkish cigarettes, but Pearson doesn't like to smoke (that'll change later for some reason).
Exhaust all the dialog choices with Winslow and find out that Pensky's files are in Winslow's safe in his office. Go back to your own office, then return to the FBI office and Winslow will be preoccupied elsewhere. Look around the now-deserted office, paying particular attention to a framed photograph of Winslow as a football star, standing on a low bookcase next to a globe. Scrawled on this picture is the game score, Harvard 19, Yale 6, and the year, 1933. To the right of the unmarked door behind which Winslow is monotonously playing hide-the-sausage with his secretary, zoom in on the still-life painting and click on its upper-left corner to disclose the safe. Dial in the combination you derived from the football picture:
Show the nurse your FBI card, then exhaust all of the dialog choices with Pensky. You'll have another dream sequence and will learn that you need three talismans to combat the evil forces in this game: a wolf's fang, a raven's feather and the "wisdom of the dragon." Return to your office and extract a feather from the Crusades book on the middle shelf, then head for Flanagan's.
Exhaust the dialog choices with Muhlhaven, then give him the Raven Room invitation to sign. Return to the rest home and ask Pensky about the party. He'll suggest a visit to the museum. After traveling there, look at the display case on Helen's left and you'll experience another dream sequence. The document in the case has five colored seals at the bottom, using two seal patterns.
Zoom in on the tubular seal in the case and remove its cover. Your mission, Jim, is to rotate the knobby rings of the cylinder to change the seal on the bottom, one quadrant (quarter-circle) at a time. Every time you zoom out to reset the puzzle, Helen will whine at you. Numbering the rings 1 through 5 from front to back, rings 1-4 control the in/out motion of each quadrant, and ring 5 rotates the inner rings while leaving the outer portion of the seal unchanged. Some rotations of the rings may require repeated attempts with the mouse before the seal quadrant actually moves. To solve the seal puzzle, use this sequence:
Move toward the doorway to the left of Winslow; the guard won't let you in to the private room, so you'll have to find another way. Pick up an overturned bowl on the table to the left of the door, then head for the busboy's station behind the dividers in the background. While out of sight of the party, put the dish on the rotating dumbwaiter, then balance the tray of wineglasses on top of it. After von Hess is apprehended, you'll be free to explore the private room.
There's all sorts of interesting paraphernalia in this room that you can explore with the big flashlight Jim's managed to carry around in his tight-fitting tuxedo, but your chief objective is to find the cord dangling from a lamp in the center of the room, over a large circular table. Turn on the light to illuminate the table. It has twelve places that each contain a small wooden hatch marked with two superimposed rune symbols. Zoom in on the center of the table to disclose the cult's slogan: Each Gift To Him Is Now Devoted. Where have you seen this before? Open your inventory window and check the 29-item page of Helen's notes - item 22 is the slogan you just saw. Bring up the corresponding parchment sheet (entitled "Nine Gifts to Odin") and note the sequence of 24 runes (excluding the word-separator colons) on line 22. Comparing these runes to those marked on the table hatches suggests a sequence in which the hatches should be opened:
	            8
	       1         2

	   7                 5

	 6                    11

	  10                 3

	       9         4
	           12
	          Eagle
Open the hatches in this order (with the signet ring) and you'll obtain the third talisman, a lizard-skin book with runes on its cover, but apparently no accessible pages. After a couple more dream sequences, you'll discover Pensky has mysteriously disappeared from Sunnyvale (although somehow you'll be able to see him later in one of the endgame sequences).
Now you're having restless nights, and you've obviously lost your razor along the way somewhere. Amid sounds of a piano being tuned, you can read a letter from Madame Cassandra. If you were a handwriting expert, you might wonder if Mme. Cassandra is none other than the Mrs. Flanagan whose letter to Muhlhaven was in his hotel room armoire (and later, Elizabeth Short as well). Exhaust the dialog choices with the plump Teri Garr, if you can stand her always looking at the teleprompter. After several minutes of her mumbo-jimbo, agree to let her put you into a trance. You'll arrive in a really strange world (remember the Bureau in Obsidian ?) and will be barraged with many different voices. While in this trance state, avoid using the Esc key to save your game through the control menu as this will take you out of the trance. Instead, use the Alt-S keystroke.
Move around the dream domain, composed of strangely-distorted views of places you've visited earlier and arranged something like this:
	Door -------- Merylo's
	               Office
	                 |
	                 |
	 Your  ----- Finster's ----- Sullivan's
	Office        Office           Office
As you zoom in on various hotspots, you'll be able to hear each phrase more clearly. There are also a number of extraneous phrases, such as "you can handle things on your own". What, they don't want you to use a walkthrough? When you've collected all the phrases, you should have the following list:
Merylo's Office:
	CROWN		BIRD
	KEY		MOON
	SERPENT		SHIELD
	STAR		FISH
	KEY		SERPENT
	SHIELD		COMET
	SUN		CROWN
	BIRD		FISH
After you're drawn through the doorway, you'll find yourself in a maze of interconnected planets:

You've got to visit each planet in a prescribed order, ending up at the Earth. One possible path through the maze is Saturn, Mars, Mercury, Venus, Sun, Moon, Jupiter and Earth, followed by the unmarked white sphere:

After a cosmic explosion, you're teleported to a throne hall. Approach the raised pool and you'll find seven stones, each of which shows a sequence from the past when dropped into the pool. One in particular shows a young man hiding something in the baseboard of his room. When you've finished looking at these sequences, press Esc to end the trance and return to Cassie. Exhaust the dialog choices with her and learn about using a personal item or totem to see someone (or yourself) in the pool - something you care about deeply, like a lock of your hair.
Ignore the Lucky Strike that's always burning in the ashtray of the world map, and return to Sullivan's office. Exhaust the dialog options with him. He wants proof of your theories. Yeah, and get a shave, too! Head back to Merylo's office and talk to him about von Hess and his medallion, learning that Winslow probably has it. Merylo will give you an invitation he found on von Hess, but it looks different from the one you used to get into the Raven Room party. Ask Merylo if you can see the torso killer evidence. Click on Item 1 to find out from Merylo that Angelo Santini was the torso killer's first victim. Click on the top of the last page in the Item 1 report to find out Santini's address. Click on Item 4 to find out about the Kingsbury Run crime scene. Head for the Santini home.
Talk to Mrs. Santini until she leaves. For a little comic relief, hold down the shift key and click on the open doorway. Turn off the room lights using the switch by the door, then zoom in on the window facing a streetlight and drag its shade all the way down until you find a hidden photograph. Turn the room lights back on, then investigate the baseboard to the right of the bed and pick up some notes and four more runes written on an envelope containing money and a letter from Pensky. After you've turned the money over to Mrs. Santini, travel to Kingsbury Run and change to CD #5.
Using the sewers map

move N E4 N5 and zoom in on the control wheels and gauges. Four control wheels affect the pressure in various combinations of four of the gauges, but the lowest gauge remains fixed at 30 psi. Denote the gauges by the letters A-E and the control wheels by the numbers 1-4 as follows:
	            C
	      B       D
	A
	     2      4
	1    E   3
The puzzle can be reset by zooming back out from it. Use the following procedure to set all the gauges to 30 psi:
	    C D
            1 2
	B 8     3 E
	A 7     4 F
	    6 5
All cylinders are initially expanded; all must be retracted to open the door.
Press switches 1, 5, 7 and 2, in that order, to enter a nicely-lit inner
chamber, containing a door that this time appears to be impassable. Turn left
and zoom in on the ventilation duct that is barely visible at the top of the
screen, giving you a surprise view into the back room at the Raven club.
You'll see the old fart with the cane lock his pendant inside a cabinet. A
candlestick must be the trick to getting into that cabinet, or... you could
just smash it open with your gun.
Return to the Raven Room and turn around so you're facing the door to the back room. You can't get into the back room, so you'd better take a closer look at von Hess' invitation in your inventory. It can be folded up to provide you with the information you need. Starting with its black side showing in a normal orientation, follow these steps:

Click on the back room door, then press the corresponding panels in the following order:

Pick up the left-hand candlestick next to the glass-fronted wardrobe. It has four rotating sections that control which parts in the base protrude, and by how much. Number these sections 1 through 4 from front to back; note that section 1 is actually a narrow ring just above the candlestick base. Four different movement sequences can be used to form a key to the wardrobe lock; the simplest is
Several years have passed, and you've been called on to investigate a Nazi vault, shown to you by Pfc Schwartz. There are some very strange background sounds, as if the mine shaft is constantly caving in. Zoom in on the door to view another puzzle, this one involving planets that you want to orient so that they are all sunny side up (not sunny side toward the sun). Numbering the planets 1 through 7 from inside to outside, make these moves:
Use this move sequence to open the safe:
A B C D
Next, zoom in on the center safe, consisting of eight keys and eight locks. Number the keys and locks as follows:
	Keys:  1  2  3  4  5  6  7  8

	             A    B   C

	Locks:       D    E   F

	               G    H
The appropriate key is inserted into the lock and turned clockwise to open it. This is the only sequence that will open the safe:
Finally, zoom in on the right-hand safe puzzle, consisting of seven levers (numbered 1-7 from left to right) and a red button. Each lever affects the length of a mechanical leg that is activated by the red button. To obtain the maximum length, pull down only levers 1, 4, 6 and 7, then repeatedly press the red button to rotate the gears and open the safe. Click on the Black Dahlia inside.
Too bad you don't get to keep it...
Playing an Indiana Jones-style bounty hunter, you're next in an Austrian monastery on the trail of war criminals. You've now progressed far enough into the game to be killed without much warning, so be careful and save often. Turn left and go up the steps to the wooden door. You can peer through a peephole, but you won't find a way out there. Instead, turn around and move your cursor toward the far corner of the cellar until you hear those immortal words, "hmmm, what's that over there?" Go back down the steps and move toward that corner, past some wooden crates with unconvincing Nazi logos painted on them. Click on the windlass and move both red knobs - the left one down and the right one up - to release the rope wound on the windlass. After it's unwound, set both red knobs down and go to the opposite corner of the cellar. Use the rope to slowly descend into the well, then change back to CD #5.
You've lost your flashlight, so make use of a medieval-times torch. The compass may be a little hard to read, so watch it carefully and use the following map

to navigate the hexagonal maze beneath the monastery. From your initial position at the bottom of the well, move N NW2 SW3 S2 SW into the Scribe's chamber. Look inside the sarcophagus and pick up some loose stones amongst the bones. Turn around and wash the dozen stones in the spooky-looking fountain on the opposite wall of the chamber. Arrange them to form a pattern of four runes:

Unlike the stained-glass window puzzle you saw earlier, there's no way to move one piece over another. Also, be careful not to press the Esc key or you'll have to start the whole puzzle over!
Leave the chamber, move N2 NE3 SE2 NE N2 NE N NW, then turn right and enter an alcove. Zoom in on the altar and click on the box just visible at the far right. Pick up the golden artifact you'll find inside. Go back to the main passageway, turn around and continue NW3 W into the Herald's chamber. Open the lock of the tomb with the artifact in your inventory, then click on the mirror-image runes reflected in the lid of the sarcophagus.
Leave the chamber and move SE2 SW W2 into a large altar room having six exits. As your cursor indicates, you entered through the doorway closest to the right side of the altar. Leave the room through the doorway closest to the left side of the altar and move W NW2 W NW W NW2 W into a large cavern. Move forward to the steps ahead, then attempt to climb them (really great acting at this point). Jim not only looks like Indiana Jones, but he's got to get past the same type of booby trap as well! At each step, you've three flagstones to choose from - always pick the one above the "R" rune and you can't go wrong (the third step gives you a choice).
Zoom in on the sarcophagus and click on the runes on its lid. Also note that the skull is missing from the skeleton inside. Turn around and make your way back down the stairs, using the map:

Exit the cavern and move SE2 SW SE2 SW2 W SW into the chamber of the Sergeant at Arms. Zoom in on the lid of the sarcophagus and a slider-type puzzle will be disclosed:

Make the following moves:
B2to produce the intermediate result:
B3
B5
C6
D6
E7 left
D7
C7
A7
B7 right
B6
B7 up
C6
B6 right
B5
C5
C3
C4 up
C2
D1 up

Make the moves
D5to produce the final configuration:
D3 right
E2
D2 left
D3
E3
F3
E5
E4 up
D4 up
E6
E5 left
F3
F6
D5
C5
B5
A5
A7
A4
A3

Slide the four corner pieces to open the tomb, then click on the runes written on the sword.
Exit the chamber and move E SE E2 NE SE NE E back into the altar room. Referring to your notebook, enter the 4-rune sequences for each tomb on the columns flanking the altar:
	Scribe               Landulph
	           ALTAR
	Herald               Sergeant
	                     at Arms
Enter the rune sequences from top to bottom, but don't forget to reverse both the order and the appearance of the Herald's runes from what is shown in the notebook:

When all four rune sequences have been correctly entered, a secret passage opens up behind the altar and you change to CD #7.
Zoom in on the lid of the sarcophagus and you'll see a pair of hands awaiting the placement of a jewel. In your inventory window, open the bag of runes and arrange them according to the rune patterns in your notebook. Patterns of contiguous jewel facets must correspond to each sequence of runes in your notes. These patterns could be in a row, a column, or a combination of both such as an L-shaped arrangement. One possibility (shown before the runes are attached to the jewel) is:

Place the assembled jewel into the hands of the sarcophagus. After some long and obscure sentences spoken by a ghost, turn right and descend into the sunken walkway surrounding the tomb. You'll need to arrange three mirrors in both ends of the tomb to provide an unbroken light path through a lens built into the side of the tomb. From an overhead perspective, the light path needs to be as follows:

Each of the mirrors forms one face of a rotating triangular solid built into the tomb wall, and appears as a featureless dark gray square. At your current (foot) end of the tomb, click on the two panels until their mirrors are in the appropriate positions facing each other inside the structure, then move to the head end of the tomb and set up the third mirror. Look through the eyepiece to see a magnification of the wall border pattern opposite the lens. Zoom in on that area, extract a dagger and complete your escape from the monastery.
In the old church of the monastery, confront von Hess and exhaust the dialog choices with him, then talk to him one more time. You'll end up threatening him with the gas chamber (but the Nuremburg tribunal used gallows). After Winslow appears and empties a clip into von Hess, you'll find out he's in with the SS and was responsible for Eisenstadt's death. He can't shoot you because his gun's empty, so he inexplicably exits, leaving you alone with a single gunman.
The Black Dahlia has been sold by the quartermaster to pilot Matt Collins, whose whereabouts you've tracked down to an American airbase in Europe. After some more superfluous cigarette smoking, you can ask the soldier where Collins' things are (even though his trunk is plainly visible to your left). He'll tell you that Collins is dead, and that he had sent the Black Dahlia to his girlfriend back in the States. Open the trunk, slide the top tray to the right and pick up a packet of letters that will give you the girl's address. You'll learn from the soldier that Winslow is following the same trail you are.
You're traveling from New York to Los Angeles on a train, hoping to find Collins' girlfriend Elizabeth Short before Winslow does. Money must be tight, because you could have flown to the coast, even in 1947. Or just called her on the telephone, but that would have been too easy... Check out the ashtray on your table in the dining car; by an amazing coincidence Winslow must have been sitting at your table earlier. You'll bribe the attendant into finding out about Winslow. After you check a piece of toast for additional clues, the attendant will return to tell you there's no Winslow registered. Move forward to the end of the dining car, then turn right and zoom in on the seating chart. A quick look will tell you that Winslow is using the alias Matt Collins.
Walk back through six sleepers and the baggage car until you reach the office in the caboose. Talk to the busy conductor about room assignments, giving the alias Matt Collins. He won't give you a room number, but your talking to him has caused a roll of string to mysteriously appear back in the baggage car (go figure). Return to the far end of the baggage car, but instead of re-entering the sleeping cars, zoom in on a metal receptacle on the baggage car door and pull out a blueprint of the train's consist. You can use this map in your inventory to quickly move to any location on the train. For now, turn to your right and pick up the roll of twine on the upper baggage shelf.
Turn right and move forward to the middle of the baggage car. Pick up an orange-colored suitcase lying on the floor; a few seconds later it will fall down due to the train's vibration. Repeat the maneuver, only this time quickly tie the string to the suitcase and the emergency brake line at upper right, then quickly move forward to the caboose so your subterfuge won't be discovered.
With the conductor out of the way, you'll be free to explore the caboose office. The March 1946 calendar seems a bit out of date - the conducter must really like the picture! The clock on the desk reads 12:47. Open the left desk drawer to find out that "Matt Collins" is staying in Car 283 and has porter Nick Adams. A check of the porter room assignments at the top of the page shows that Winslow must be in Room 2 or 7 in that car. Now all you have to do is figure out which car is 283, since the sleeper car numbers are not shown on your blueprint. If you walk into too many wrong compartments, you'll be thrown off the train. While looking at the pages of room assignments, note that someone in Car 238 needs a wheelchair and that a couple in Car 823 is traveling with an infant. Your own name is also on the list (as well as on the dining room chart), so ostensibly Winslow knows you're aboard if he's seen the same information you have. Zoom in on the clipboard on top of the desk to view the repair requisition for this trip:

Some damaged items have already been repaired or replaced (checked off as "Done"), but there's enough of them left unfinished to uniquely identify Car 283: it's the only sleeper with a broken light fixture and a spotted chair railing, as well as no wallpaper damage (ignoring carpet stains that are difficult to distinguish from light reflections). As you move through the train toward the dining car, sleeping compartment doors will always be on your left.
Move through the baggage car and into the first sleeper; the train starts moving again. Turn around and note the damaged wallpaper on the edge of the door leading into the baggage car - this cannot be Car 283. Turn around and continue on into the next car. As you move forward through the second sleeper, carefully check the chair rail between the sleeping compartment doors. None of it seems to be damaged, so this probably isn't Car 283 either. Continue on into the third sleeper car. This one has a damaged railing outside Room 2 and a cracked light fixture outside Room 6, so it could be Car 283. But to make sure, continue on into the next car.
As you approach the far end of the fourth sleeper car, you'll overhear a conductor mentioning a wheelchair - this must be Car 238. Continue into the next car; as soon as you enter it you'll see some obvious wallpaper damage on the opposite wall, so this cannot be Car 283. Continue on into the last sleeper car. As you pass Room 1, you'll see a couple emerge with a baby, so this must be Car 823. You've now identified all the cars on the train:

Use the blueprint in your inventory (or the world map) to return to the center car in the train. Open the door to Room 7 and notice the telltale black cigarettes on the nightstand. Winslow must have been entertaining a visitor, because there are also white cigarette butts in the ashtray. There are also some ashes in the wastebasket, but they're unreadable. The clock on the top of the dresser reads 4:00 - it must be broken. Open the top dresser drawer and read the "poison-pen" letter. After some more mumbo-jumbo, you'll meet the lovely Alice Casey, sporting a nice 40's 'do. Even though you've been out for hours, the clock still says 4:00, so it's definitely broken. You didn't have anywhere else to sleep, anyway. On your way out of the room, you must have touched a nerve, because you barely miss getting hit with Alice's shoe.
Jump back to the caboose and ask the conductor about Collins. You'll learn he's transferred to an express train that will reach Los Angeles before you, but he's left his baggage behind. Return to the baggage car and pick up a clipboard on the upper shelf at the far end. Here you'll discover that the baggage belonging to Winslow (Matt Collins) has tag number 0100AA. Search the baggage car until you find his item, an oversized tan-and-black steamer trunk near the caboose end of the car. Zoom on on the sticker on its top to confirm it's 0100AA, bound for Los Angeles. Click on the front face of the trunk to view it from the left. The trunk operates like another Chinese puzzle-box - zooming out resets the puzzle completely. Remove the small nail on the top of the trunk and put it into one of the holes. Flip down the short hasp and open the trunk using the handle on top. Inside you'll find a couple of cases of champagne. Flip up the short hasp, then remove the large nail on the front of the trunk and put it into one of the holes. Lift up the long hasp and move the large nail to the central hole that was under the hasp. Slide up the square metal piece with the loop. Move the small nail to the bottom of the vertical groove. Extract the handle from the left side of the trunk and insert it into the pair of holes straddling the hasps on top. Remove the black decorative plate from the left side of the trunk and put it in the holes on the front of the trunk. Finally, move the handle from the top of the trunk to the black plate. You'll swap freight labels to prevent the trunk from reaching Winslow (even though zooming in on the top of his trunk doesn't show that anything's changed).
Return to the dining car and talk to Alice. After yet more smoking, you'll eventually exhaust the dialog choices with her. Click on her one last time for a final sequence and a change back to CD #6.
On your arrival in your hotel room in Los Angeles, use the telephone on the nightstand to call the police (for a bit of fun, click on Pearson instead of on the dialog choice). Agree to meet Detective Maxwell at a diner nearby. Use your world map, complete with animated cockroach, to travel to Gabe's diner. Talk to Maxwell until he leaves. By a truly amazing coincidence, you'll run into Alice again. Is she following you? And she's also staying at the Sunset Arms Hotel!
Next, travel to the train station shipping office. Ring the bell on the Incoming Parcels desk and exhaust the dialog choices with the clerk. Pick up a cardboard box from inside the wastebasket next to the Outgoing Parcels desk. Give the box to the Outgoing Parcels clerk, choosing express delivery. Seventy-five cents later, you'll get a receipt.
Travel to the boarding house. In the bottom drawer of the nightstand in Elizabeth Short's former room, take a look at a napkin from the Biltmore Hotel bar. Travel to the Biltmore and show Elizabeth's photo to bartender Ike. Return to the train station shipping office and ask the Incoming Parcels clerk about the status of your package. After you show him your receipt, you'll find out that Winslow's shipment was sent to the ABC Moving Company today. Return to your hotel room at the Sunset Arms and use the telephone to call Amy at ABC Moving. It's Friday and everyone has left for the weekend. Hang up and travel to the ABC Moving Company anyway.
A note on the wall next to the calendar describes Marge's convoluted filing system. Check out a desk drawer for more details. Zoom in on the file cabinet underneath Marge's note and open the bottom drawer. Select folder SOIAKP52, located a bit above the horizontal brace (if you make the wrong selection 14 times, you'll see an easter egg).
Travel to the movie studio - you won't be able to get in without a pass. Return to the Biltmore Hotel bar and talk to Elizabeth Short. You'll get a telephone call to meet Detective Maxwell in Manhattan Beach.
After a change to CD #8, your leads have evaporated and you're back in your hotel room. Return to the Biltmore Hotel bar and talk to the bartender. You'll have to bribe or insult him to find out Elizabeth's room number. After he tells you she's in Room 201, turn left, then right and go up the stairs. Room 201 is on the right side at the end of the hall, but it's locked. Go out the window and along the fire escape until you see her window. Move the top edge of the upper pane, then push away the vertical stick that's keeping the window closed. Now open the lower pane and enter the room. Pick up a key hidden along the top edge of the door next to the bed. On page two of Short's letter to Collins, she refers to a locker at the train station. There's no number on the key, so you'll have to figure out the locker number another way.
Head for the train station lockers. The lockers are numbered 1-100 in groups of six, so the one you want probably has only two digits. There's a phone there, but you haven't a dime. But looking at the telephone dial, notice that Elizabeth's initials E.S. correspond to 37. Use the key to open locker 037, and pick up an antique store sales receipt for the Black Dahlia.
Return to the Sunset Arms Hotel for some grisly news about Elizabeth Short. Maxwell and another detective want to know where you went "after leaving the station house". Station house? What station house? Exhaust the dialog choices with Maxwell, and you'll be saved by Alice Casey. She always shows up at the right time, doesn't she? Talk to her. Let me help you, Jim! She's got a job as a script girl and can get you a pass into the movie studio. Talk to her again and she'll blow you a kiss. Travel to Wellington's Antiques and talk to the proprietor. Unfortunately, he's sold the Black Dahlia to Winslow, but you will be able to obtain Eisenstadt's cane if you don't mind throwing some money down for it. Examine the cane in your inventory window, rotating it so that the head at the top is directly facing you. Rotate the blue dials on the cane until you can form four vertical sequences of runes corresponding to the four sarcophagi you found under the Austrian monastery. From left to right, the sequences are for the Scribe, the Herald, Landulph and the Sergeant at Arms:
When the cane combination has been properly entered, you'll find a treasure map hidden inside.
Return to the Sunset Arms and pick up a pass that Alice left on your pillow, then head for the movie studio. Turn right and check out the trunk full of champagne from Winslow - someone must have figured out those swapped shipping labels. Talk to Alice until she invites you to Mr. King's house. Go to his house and you'll find out he wants to make Alice his next big star.
Looking around King's house, you'll be able to find clues that he's associated with Winslow. Clicking on the bookshelf behind Alice shows a frat photo with both King and Winslow in it. Look in the wastebasket next to King's desk and you'll be able to retrieve a couple of torn-up telegrams. They have different type fonts on them, so you should be able to distinguish between them. One is from King's ex-wife; the other, when assembled, refers to both Winslow and a hunting lodge that King owns:

Keep looking in the wastebasket and you'll read a newspaper story about the desecration of a German tomb in Ferrin's Hill Cemetery. The rest of the items in the wastebasket implicate King in the crime. To the left of King's desk is a Saturn Telescope; note the company's logo on the telescope's control panel and on the inclination/declination chart next to it.
Go to Ferrin's Hill Cemetery and look at the walls of the mausoleum until you find the telescope logo painted in red. Inside it is a cryptic algebra problem, equivalent to
	4A = 6B
	3B = 2C
	5C = 2A + 1.5B + 18D
	?D = 3A
Solving for the question mark yields an answer of 27 - obviously a setting for the telescope. Look inside the urn in the corner to find another numerical telescope reference, this time to a distance:
165 x 100 = 16500These clues are taunts from Winslow directed at you, as if he wants you to find him.
Return to Al King's house and examine the topographic chart on the wall above the desk. Open your inventory window and place the treasure map so that the compass crosshairs line up. This will show you that the place "here committed" (King's house) is at an elevation of 100, and the end of the treasure hunt (King's hunting lodge) is at an elevation of 250. Check out the inclination/declination charts next to the telescope to determine that the angle setting for a height difference of 150 and a distance of 16500 is 0.5. Zoom in on the telescope control panel. For a preliminary diversion, enter any of the codes from a notebook on King's desk: (-0.8,-45), (-1,-25) or (+0.2,+5). To actually use the telescope, click on its shaft and drag the mouse until the indicator triangles line up with the target ones you set up with the control panel. To repeat the view, click on the viewport. When you're ready to confront Winslow, use the telescope with the code (+0.5,+27).
Inside the lodge basement, it looks as if Winslow might have fiddled with the fusebox. You'll find a nice big sledgehammer lying about, but for some unknown reason it'll turn out to be useless. Nothing much happens to accelerate your heartbeat until you find a photo of Alice on the ladder. Your attempt to climb the ladder sets off a fire trap; you now have a limited amount of time to open all three cabinets (in any order) and take the key hanging from a hook inside the last one. Once you've made good your escape, you'll discover Alice has returned to King's house.
Back in King's house, operate the motion picture camera in the living room to find out what happened to King. Somehow Winslow managed to get the movie film developed in time to set all this up for you. Go back to the bookshelf near the entrance and zoom in on the cuckoo clock at left. Zoom out and a secret passage will be disclosed. Change back to CD #1.
Move forward to find Alice all tied up. Touch the end of the rope that's holding her and she'll morph into Winslow. If your enemy could make himself look so much like Alice, why didn't he fake the ropes too? Again, Winslow could simply shoot you, but instead he prefers to give the gun to a hypnotized Alice. Apparently there is no way to prevent Alice from shooting herself - this part of the endgame really sucks (you're not supposed to notice, but she's still breathing anyway).
Many elements and details of the gory endgame sequence are ripoffs of the movie Raiders of the Lost Ark. Given a chance to shoot, aim at the Black Dahlia. If you wait too long, shoot Winslow instead, or miss altogether, you can watch an alternate ending with some more Raiders imagery, a small reappearance by Dennis Hopper, and you as President. If you do manage to destroy the Black Dahlia, it doesn't look like you have much of a future anyway.
One more easter egg (probably the funniest): If you spin around quickly at any point in the game, you'll make Jim real dizzy.
Cheat codes can be found near the end of the main executable file BD_WIN.EXE. Here's a table that's easier to read (thanks to SNASK at comp.sys.ibm.pc.games.adventure). Enter the code in lower case when zoomed in on the puzzle.
	Puzzle Description                        Code

	Stained Glass Puzzle                      leadhead
	Winslow's Safe Puzzle                     masterlock
	Wooden House/Lockbox Puzzle               loghouse
	Dresser in Louie's Loft Puzzle            turnkey
	Raven Room Circular Table Puzzle          arthur
	Seal Puzzle                               ringding
	Bag Of Runes Puzzle                       gemstone
	Dream - Archway Puzzle                    cancan
	Pressure Gauges Puzzle                    pressure
	Sewer Levers/Bars Puzzle                  barbell
	Raven Room Door Plates Puzzle             triangle
	Candlestick In Raven Room Puzzle          nimble
	Sun/Planets/Door Puzzle                   sunspot
	Gearshift Puzzle - Treasure Door #1       ladybug
	Key Puzzle - Treasure Door #2             keypunch
	Half-A-Gear Puzzle - Treasure Door #3     gearoil
	Main Chamber Column Puzzle                temple
	Slider Puzzle                             blockhead
	Stone Blocks Puzzle                       rock33
	Luggage Crate On Train Puzzle             boxtop
	Cane Lock Puzzle                          candycane
	Telegram Puzzle                           teleport
	Telescope Puzzle                          peeper
	Cuckoo Clock Puzzle                       bongo
Copyright © 1998 Balmoral Software (http://www.balmoralsoftware.com). Portions copyright © 1998 Take 2 Interactive Software, Inc. All rights reserved. Republication, redistribution or conversion is expressly prohibited without the prior written consent of Balmoral Software. Contents subject to change! For the latest information, see http://www.balmoralsoftware.com.