Atlantis Map
Copyright © 1997 Balmoral Software (http://www.balmoralsoftware.com). Portions copyright © 1997 Cryo Interactive Entertainment. All rights reserved. Republication, redistribution or conversion is expressly prohibited without the prior written consent of Balmoral Software. Contents subject to change! For the latest information, see http://www.balmoralsoftware.com.
Atlantis: The Lost Tales is a game of extremes. While its graphics, sound and immersive first-person movement are absolutely gorgeous, they're not enough to elevate the game above its operational shortcomings. Not since Zork Nemesis has a game brought such realism to the adventure experience. However, its unbelievably-bad game control and artificial timed-play sequences prevent Atlantis from being a truly great game. In short, we were left with a mixed impression.
In Atlantis, save-game positions cannot be selected at will by the player, but occur only at widely-separated and predefined points in the game's plot. As a result, when the game is restarted, long segments often have to be replayed in order to reach the previous position in the game. The only game control option available is support for simultaneous games by different players. Since Atlantis's gameplay often incorporates one-way trapdoors and other non-replayable plot contrivances, it's impossible to replay a game segment without starting the game over from the beginning (unless you're willing to maintain copies of the installation directory tree). In at least one instance, an essential clue for solving a puzzle could not be obtained because steps could not be retraced. It's hard to believe that this inflexible game control was necessary in the design of the game.
As if that weren't enough, the 4-CD game requires that the first CD be re-inserted every time the game is restarted. One is left with the impression that the designers expected players to finish the game in one sitting. We thought we'd left this kind of thing behind with Timelapse ...
Atlantis also contains an excessive number of arcade-like sequences that give the player a response window that is frustratingly short. The chore of getting through these sequences is made particularly onerous by the lack of an active cursor in the game - essentially the cursor is invisible unless it happens to be over a hotspot (and some hotspots themselves are invisible!). Thankfully, in the (frequent) event your character is killed during one of these sequences, the game autorestores to a earlier position. However, once again long replays are often necessary to regain your previous position.
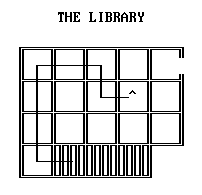
There were a few obvious discrepancies in the game: recycled animations displaying mismatched character clothing, a Library with nothing to read, jellified water, music that occasionally drowns out a character's speech right when he's giving you clues, awkward cyberpuppet motions when arising from a prone position, puzzles that must be re-solved too many times, and several concepts lifted verbatim from movies like Return of the Jedi and Tron.
On the other hand, the graphics and basic user interface of Atlantis are truly exceptional. Sound effects are awesome - listening to the thunder at Carbonek, we kept expecting to feel raindrops. The music of Atlantis is a delight, consisting of original and often-inventive pieces (offered by Cryo on a separate audio CD). Technically, there were no problems playing Atlantis under Windows 95 except an annoying tendency for the music to skip between simultaneous tracks. The game's 360-degree rotation works better than in Zork Nemesis - no separate mode is required to pan up or down, and rotation doesn't continue without stopping.
Atlantis could have been an outstanding game - its storyline is reasonably absorbing without being too confusing and its presentation is state of the art. But it suffers from serious drawbacks that prevent more than a guarded recommendation at best.
A walkthrough for Atlantis: The Lost Tales is available from Cryo Interactive at http://www.cryo.fr/flash/support/int/support_faq.php3?id=6.
Additional notes follow:
Press Esc to skip game introductions, animations, speech and closing credits.
You sometimes need to approach near a character in order to initiate a conversation.
When your inventory is displayed and it appears full, drag the mouse sideways to display additional items.
To pick up an object and immediately use it without first storing and retrieving it from your inventory, left-click then right-click on it. Of course, this shortcut works only if you don't have to move forward after picking up the object.
Your first encounter with Garcelos is in an alcove on the second-floor ocean side of the building facing the palace courtyard.
Your first encounter with Lascoyt is in a corner of the palace courtyard near the women pilots' house. Be sure to show him the earring in your inventory.
Place the flowerpot icon as low as possible and just to the right of the doorway (approximately vertical from its original position on the balcony railing). When assassin Servage's head is just below the icon, click the mouse. If you miss, you'll have to start all over again from the point at which you jumped out of the palace window (don't forget that you can double-click the mouse to accelerate your movements).
As soon as you enter the tavern and Lascoyt asks you to come and sit down, move toward him. Wait for Meljanz to burst into the room. When Lascoyt and Meljanz are done talking to you (or you've skipped their dialog for the umpteenth time using the Esc key), very quickly follow these steps:
To get back into the palace, start by using the ladder on the top of the stone bench in the garden (no hotspot). This ladder must be magical, because it mysteriously returns to its original location every time you use it to re-enter the palace.
The queen's hidden position may change over time. Make a note of her new position every time she reappears. The ogres apparently don't have the benefit of seeing her as you do, or are more interested in catching you than in finding her. Most successful strategies involved getting the ogres clustered together near an edge of the board, then using your greater speed (on non-diagonal moves) to get around them to the same side as the queen. Sometimes the ogres may outwit you, though, and not group together. Of course, never move onto any of the eight squares surrounding an ogre.
Talk to the Rat Catcher after winning the game.
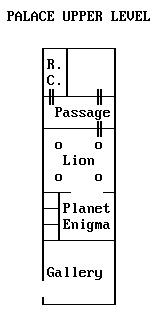
From the top of the stairs, turn toward the library and move forward three times. Then immediately turn right and move forward twice. Turn right and move forward once, then turn left and move forward once. Finally, turn left, push the bookcase onto the guards and quickly jump out the window:
After leaving the flyer clearing, bear left at the fork and follow the perimeter path to the bridge and cave. Once you've entered the cave, you can find the hotspot to jump into the water and swim to the grotto.
Using this positional notation:
press the pieces in the following order:
After swimming away from the snake-puzzle grotto, you and Rhea will end up in a new cave containing a waterfall. Exit through the hole in the ceiling, then turn left and quickly follow the path along the top of the ridge, across the bridge and on to the flyer clearing. Turn right at the fork just before you reach the clearing.
When the guards are chasing you, quickly run away from the flyer clearing following this path:
Solution:
Note that pulling the left drawstring when the puzzle is complete will reset the puzzle!
One solution:
The bow and arrows are found on the ridge above the bridge. One way to reach them is to retrace your steps from the old woman's cave to the fork near the flyer clearing, then proceed to the bridge as before. The boar stone can be reached from the cliff side of the bridge as follows:
Go back and re-cross the bridge. Continue forward past the ridge path on your left, until you're at an intersection from which you can see a low, grass-covered, almost grave-shaped mound with a large tree at its head. From this position, you should be able to hear the occasional sounds of a boar crashing through the underbrush. Turn around and wield the bow from your inventory. When the white boar appears, shoot it by positioning your arrowhead on its head and quickly clicking the mouse. If you miss, wait for the boar to reappear at the same spot (or, you can move forward down the path and try to shoot him from the other side).
It may be difficult to determine that you've collected the blood-soaked earth in the leather pouch. If there seems to be no reaction, you may have to return and kill another boar.
To initiate the "owl dream", keep talking to the old woman. During the dream, it's hard to distinguish between the metal head talking and the off-screen guard talking. After the end of the dream, talk to the old woman and get a bottle of powder from her.
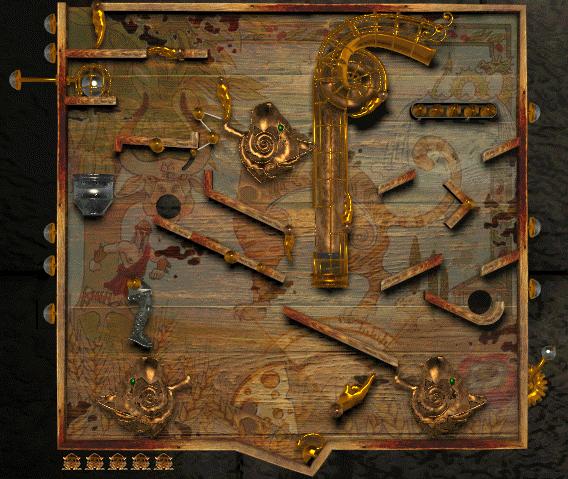
You have five chances (rats) to win.
Load a rat using the crystal-handled lever at lower right. Press the first (top) left button to activate the rat, then immediately press the second left button to deflect the rat onto the teeter-totter.
Press the extended third left button, immediately followed by holding down the fourth left button, to transfer the rat to the central tube.
Press the first (top) right button to set a clockwise rotation of the conveyor belt. As soon as the freely-rotating shelf at center right is oriented like a "V", hold and release the third right button (like a pinball shooter) to send the rat into the hole at lower right.
As soon as the rat disappears (before it reappears at the center-left hole), press the fifth left button to twist the deflector counterclockwise and hold down the sixth (bottom) left button to extend the chrome boot. The rat will be deflected toward the bottom and will ring the golden bell.
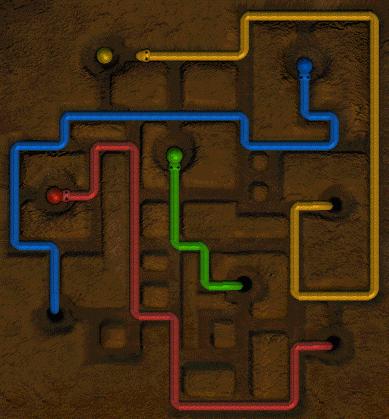
IMPORTANT: As soon as the Rat Catcher sends you into the dark passage, turn around and put the glass marble he gave you into the hole in the wall. This will give you the orientation of symbols needed later in the game:
If you neglect to use the marble before leaving the passage, you will be unable to return to the passage and view these symbols.
When the pieces of the throne puzzle are in their correct orientation, click the switch at the bottom shaped like a Companion badge to access the stairs. These stairs must be approached from the front of the throne in order to descend.
Rotate your POV by right-clicking anywhere on the circular floor tile. Rotate an individual piece by first left-clicking it to select it, then right-clicking it. Note that a "grout space" must be left between adjacent pieces. Here are solutions to the four puzzles:
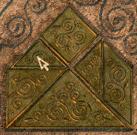
 Solution to First Metamorphosis
Puzzle
Solution to First Metamorphosis
Puzzle
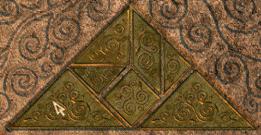
 Solution to Second Metamorphosis
Puzzle
Solution to Second Metamorphosis
Puzzle
 Solution to Third Metamorphosis
Puzzle
Solution to Third Metamorphosis
Puzzle
 Solution to Fourth Metamorphosis
Puzzle
Solution to Fourth Metamorphosis
Puzzle
It may be easier to find the new-piece hotspot on a statue by moving a piece of inventory over it, giving you a temporary cursor. Note that two of the four statues are identical.
All slider puzzles start out in the same jumbled-up condition. Using the positional notation
each puzzle can be solved with the 30-move sequence
A B C D E F G H I
	D A B E D A B C F E
	B A D E F I H E F I
	H G D E H I F E D G
After entering the Scarlet Cockerel tavern, move towards Servage (the wide-eyed guy in back) and engage only him in conversation.
Leaving the lit-up "cult igloo", turn around until you are facing the cult igloo entrance. Angle slightly to the right and head for the igloo farthest away. The igloo puzzle requires correct placement of the three wooden flooring pieces you picked up from the cult igloo. The star pattern you must form should have the points of the star aligned with the hexagon border:
Approach the bear cave by circling around the rocky spur to the left of its entrance. Retrace your steps with the polar bear breathing down your neck.
We found it advisable to turn down the background music so that the character voices could be better understood at this point. After the crab races, pick up the rope in the adjacent stone hut. To talk to Hona Ly when he's accompanying you, right-click to bring up your inventory bar, then left-click on Hona Ly's head.
There are nine logically-consistent possibilities for the statuette puzzle, but only one of them will work.
When you've received the gray ball from the spinning cube, turn around and find the hotspot near the base of the wall. When you click on it, it will turn into a glowing green flagstone.
On the tower, a yellowish star identifies the location for the lantern you picked up in the adjoining room. Check out those awesome smoke effects!
After returning to the palace, you'll have to solve the Planet Enigma puzzle yet again in order to reach the Rat Catcher. You can't exit through the door into the palace courtyard, and you won't be able to jump out the library window. However, if you know what you need to obtain, you can avoid visiting the Rat Catcher again...
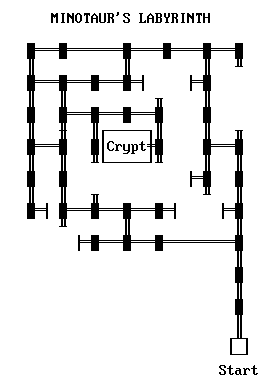
Several different routes lead to the crypt:
Do priestesses of Ammu take vows of celibacy?
Also starring Judge Reinhold as Lascoyt.
Copyright © 1997 Balmoral Software (http://www.balmoralsoftware.com). Portions copyright © 1997 Cryo Interactive Entertainment. All rights reserved. Republication, redistribution or conversion is expressly prohibited without the prior written consent of Balmoral Software. Contents subject to change! For the latest information, see http://www.balmoralsoftware.com.